- ReactJS 教程
- ReactJS - 首页
- ReactJS - 简介
- ReactJS - 路线图
- ReactJS - 安装
- ReactJS - 特性
- ReactJS - 优点与缺点
- ReactJS - 架构
- ReactJS - 创建 React 应用
- ReactJS - JSX
- ReactJS - 组件
- ReactJS - 嵌套组件
- ReactJS - 使用新创建的组件
- ReactJS - 组件集合
- ReactJS - 样式
- ReactJS - 属性 (props)
- ReactJS - 使用属性创建组件
- ReactJS - props 验证
- ReactJS - 构造函数
- ReactJS - 组件生命周期
- ReactJS - 事件管理
- ReactJS - 创建一个事件感知组件
- ReactJS - 在 Expense Manager 应用中引入事件
- ReactJS - 状态管理
- ReactJS - 状态管理 API
- ReactJS - 无状态组件
- ReactJS - 使用 React Hooks 进行状态管理
- ReactJS - 使用 React Hooks 进行组件生命周期管理
- ReactJS - 布局组件
- ReactJS - 分页
- ReactJS - Material UI
- ReactJS - Http 客户端编程
- ReactJS - 表单编程
- ReactJS - 受控组件
- ReactJS - 非受控组件
- ReactJS - Formik
- ReactJS - 条件渲染
- ReactJS - 列表
- ReactJS - Keys
- ReactJS - 路由
- ReactJS - Redux
- ReactJS - 动画
- ReactJS - Bootstrap
- ReactJS - 地图
- ReactJS - 表格
- ReactJS - 使用 Flux 管理状态
- ReactJS - 测试
- ReactJS - CLI 命令
- ReactJS - 构建和部署
- ReactJS - 示例
- Hooks
- ReactJS - Hooks 简介
- ReactJS - 使用 useState
- ReactJS - 使用 useEffect
- ReactJS - 使用 useContext
- ReactJS - 使用 useRef
- ReactJS - 使用 useReducer
- ReactJS - 使用 useCallback
- ReactJS - 使用 useMemo
- ReactJS - 自定义 Hooks
- ReactJS 高级
- ReactJS - 可访问性
- ReactJS - 代码分割
- ReactJS - Context
- ReactJS - 错误边界
- ReactJS - 转发 Refs
- ReactJS - 碎片
- ReactJS - 高阶组件
- ReactJS - 集成其他库
- ReactJS - 优化性能
- ReactJS - Profiler API
- ReactJS - Portals
- ReactJS - 无 ES6 ECMAScript 的 React
- ReactJS - 无 JSX 的 React
- ReactJS - 调和
- ReactJS - Refs 和 DOM
- ReactJS - 渲染 Props
- ReactJS - 静态类型检查
- ReactJS - 严格模式
- ReactJS - Web Components
- 其他概念
- ReactJS - 日期选择器
- ReactJS - Helmet
- ReactJS - 内联样式
- ReactJS - PropTypes
- ReactJS - BrowserRouter
- ReactJS - DOM
- ReactJS - 走马灯
- ReactJS - 图标
- ReactJS - 表单组件
- ReactJS - 参考 API
- ReactJS 有用资源
- ReactJS - 快速指南
- ReactJS - 有用资源
- ReactJS - 讨论
ReactJS - getChildContext() 方法
getChildContext() 函数是 React 中的组件生命周期函数。此函数允许父组件与其子组件交换指定的信息。它类似于创建一个特定的盒子(上下文),父组件可以在其中存储重要数据。父组件决定放入盒子中的内容,并允许子组件访问它,而无需通过使用 getChildContext() 直接传递。这种通信方式使事情井然有序,并简化了应用程序不同部分之间如何相互通信,类似于一个家庭有一种特定的方式来讨论关键信息,而无需单独与每个成员沟通。
语法
getChildContext()
为了使用 getChildContext(),组件必须定义一个名为 childContextTypes 的静态属性,该属性指定上下文数据的预期类型。
示例
示例 1
让我们使用 getChildContext() 函数创建一个示例。在这个例子中,我们将创建一个简单的应用程序,通过上下文传递用户数据来显示用户信息。
import PropTypes from 'prop-types';
import React, { Component } from 'react';

// Create a context
const UserContext = React.createContext({
   username: 'Guest',
   age: 0,
});

// Create a component
class UserProvider extends Component {
   // Define child context types
   static childContextTypes = {
      user: PropTypes.shape({
      username: PropTypes.string,
      age: PropTypes.number,
   }),
   };
   getChildContext() {
      return {
         user: {
            username: this.props.username,
            age: this.props.age,
         },
      };
   }

   render() {
      // Render the child components
      return this.props.children;
   }
}

// Create a component that consumes user data from context
class UserInfo extends Component {
   static contextTypes = {
      user: PropTypes.shape({
         username: PropTypes.string,
         age: PropTypes.number,
      }),
   };
   render() {
      return (
         <div>
            <p>Welcome, {this.context.user.username}!</p>
            <p>Your age: {this.context.user.age}</p>
         </div>
      );
   }
}

// Create the main App component
class App extends Component {
   render() {
      return (
         // Wrap the UserInfo component with the UserProvider
         <UserProvider username="Amit" age={25}>
            <UserInfo />
         </UserProvider>
      );
   }
}

export default App;
输出

在上面的代码中,App 组件使用 UserProvider 包装 UserInfo 组件,以通过上下文传递用户数据。
示例 2
这是一个使用 getChildContext() 在 React 应用中创建简单主题上下文的另一个示例 -
import React, { Component } from 'react';
import PropTypes from 'prop-types';

// Create a context for the theme
const ThemeContext = React.createContext({
   theme: 'light',
   toggleTheme: () => {},
});

// Create a component for providing the theme
class ThemeProvider extends Component {

   // Define child context types
   static childContextTypes = {
      themeContext: PropTypes.shape({
         theme: PropTypes.string,
         toggleTheme: PropTypes.func,
      }),
   };

   // Set initial state
   state = {
      theme: 'light',
   };

   // Define a function to toggle the theme
   toggleTheme = () => {
      this.setState((prevState) => ({
         theme: prevState.theme === 'light' ? 'dark' : 'light',
      }));
   };

   // Provide the theme context through getChildContext()
   getChildContext() {
      return {
         themeContext: {
            theme: this.state.theme,
            toggleTheme: this.toggleTheme,
         },
      };
   }

   render() {
      // Render the child components
      return this.props.children;
   }
}

// Create a component
class ThemedComponent extends Component {
   // Define context types
   static contextTypes = {
      themeContext: PropTypes.shape({
         theme: PropTypes.string,
         toggleTheme: PropTypes.func,
      }),
   };

   render() {
      return (
         <div style={{ background: this.context.themeContext.theme === 'light' ? '#fff' : '#333', color: this.context.themeContext.theme === 'light' ? '#333' : '#fff' }}>
            <p>Current Theme: {this.context.themeContext.theme}</p>
            <button onClick={this.context.themeContext.toggleTheme}>Toggle Theme</button>
         </div>
      );
   }
}

// Create the main App component
class ThemeApp extends Component {
   render() {
      return (
         <ThemeProvider>
            <ThemedComponent />
         </ThemeProvider>
      );
   }
}

export default ThemeApp;
输出
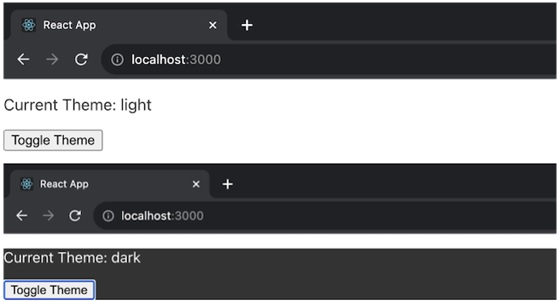
在上面的示例中,ThemeProvider 组件使用 getChildContext() 提供一个主题上下文,默认主题为“light”,并提供一个切换主题的函数。ThemedComponent 然后使用此上下文显示有关当前主题的信息和一个切换按钮。ThemeApp 组件在 ThemeProvider 的上下文中渲染 ThemedComponent。
示例 3
让我们再创建一个使用 getChildContext() 在 React 应用中管理用户身份验证的示例 -
import React, { Component } from 'react';
import PropTypes from 'prop-types';

// Create a context for user authentication
const AuthContext = React.createContext({
   isAuthenticated: false,
   login: () => {},
   logout: () => {},
});

// Create a component for providing authentication context
class AuthProvider extends Component {
   static childContextTypes = {
      authContext: PropTypes.shape({
         isAuthenticated: PropTypes.bool,
         login: PropTypes.func,
         logout: PropTypes.func,
      }),
   };

   // Set initial state
   state = {
      isAuthenticated: false,
   };

   // Define a function to handle user login
   login = () => {
      this.setState({
         isAuthenticated: true,
      });
   };

   // Define a function to handle user logout
   logout = () => {
      this.setState({
         isAuthenticated: false,
      });
   };

   // Provide the authentication context through getChildContext()
   getChildContext() {
      return {
         authContext: {
            isAuthenticated: this.state.isAuthenticated,
            login: this.login,
            logout: this.logout,
         },
      };
   }

   render() {
      // Render the child components
      return this.props.children;
   }
}

// Create a component that consumes the authentication context
class AuthComponent extends Component {
   // Define context types
   static contextTypes = {
      authContext: PropTypes.shape({
         isAuthenticated: PropTypes.bool,
         login: PropTypes.func,
         logout: PropTypes.func,
      }),
   };

   render() {
      return (
         <div>
            <p>User is {this.context.authContext.isAuthenticated ? 'authenticated' : 'not authenticated'}</p>
            {this.context.authContext.isAuthenticated ? (
               <button onClick={this.context.authContext.logout}>Logout</button>
            ) : (
               <button onClick={this.context.authContext.login}>Login</button>
            )}
         </div>
      );
   }
}

// Create the main App component
class App extends Component {
   render() {
      return (
         <AuthProvider>
            <AuthComponent />
         </AuthProvider>
      );
   }
}

export default App;
输出
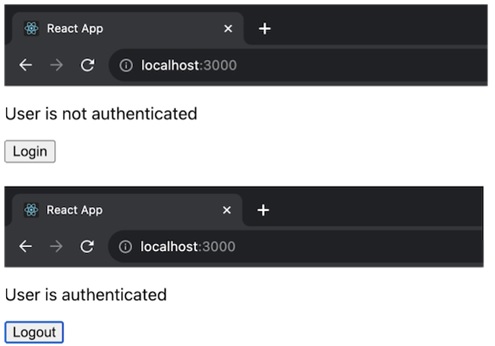
在上面的应用程序中,AuthProvider 组件使用 getChildContext() 提供一个身份验证上下文,其默认值为 isAuthenticated 设置为 false。它还具有管理登录和注销操作的功能。AuthComponent 使用此上下文来确定用户是否已认证,并提供登录和注销按钮。
局限性
从 React 16.3 开始,getChildContext() 函数已弃用,建议使用新的 Context API 来代替。
总结
getChildContext() 函数可用于在 React 组件中提供上下文,建议开发人员采用新的 Context API 以提高可读性和未来的兼容性。