- ReactJS 教程
- ReactJS - 首页
- ReactJS - 简介
- ReactJS - 路线图
- ReactJS - 安装
- ReactJS - 功能
- ReactJS - 优点与缺点
- ReactJS - 架构
- ReactJS - 创建 React 应用
- ReactJS - JSX
- ReactJS - 组件
- ReactJS - 嵌套组件
- ReactJS - 使用新创建的组件
- ReactJS - 组件集合
- ReactJS - 样式
- ReactJS - 属性 (props)
- ReactJS - 使用属性创建组件
- ReactJS - props 验证
- ReactJS - 构造函数
- ReactJS - 组件生命周期
- ReactJS - 事件管理
- ReactJS - 创建一个事件感知组件
- ReactJS - 在 Expense Manager 应用中引入事件
- ReactJS - 状态管理
- ReactJS - 状态管理 API
- ReactJS - 无状态组件
- ReactJS - 使用 React Hooks 进行状态管理
- ReactJS - 使用 React Hooks 进行组件生命周期管理
- ReactJS - 布局组件
- ReactJS - 分页
- ReactJS - Material UI
- ReactJS - Http 客户端编程
- ReactJS - 表单编程
- ReactJS - 受控组件
- ReactJS - 非受控组件
- ReactJS - Formik
- ReactJS - 条件渲染
- ReactJS - 列表
- ReactJS - Keys
- ReactJS - 路由
- ReactJS - Redux
- ReactJS - 动画
- ReactJS - Bootstrap
- ReactJS - Map
- ReactJS - 表格
- ReactJS - 使用 Flux 管理状态
- ReactJS - 测试
- ReactJS - CLI 命令
- ReactJS - 构建和部署
- ReactJS - 示例
- Hooks
- ReactJS - Hooks 简介
- ReactJS - 使用 useState
- ReactJS - 使用 useEffect
- ReactJS - 使用 useContext
- ReactJS - 使用 useRef
- ReactJS - 使用 useReducer
- ReactJS - 使用 useCallback
- ReactJS - 使用 useMemo
- ReactJS - 自定义 Hooks
- ReactJS 高级
- ReactJS - 可访问性
- ReactJS - 代码分割
- ReactJS - Context
- ReactJS - 错误边界
- ReactJS - 转发 Refs
- ReactJS - Fragments
- ReactJS - 高阶组件
- ReactJS - 与其他库集成
- ReactJS - 性能优化
- ReactJS - Profiler API
- ReactJS - Portals
- ReactJS - 无 ES6 ECMAScript 的 React
- ReactJS - 无 JSX 的 React
- ReactJS - 协调
- ReactJS - Refs 和 DOM
- ReactJS - Render Props
- ReactJS - 静态类型检查
- ReactJS - Strict Mode
- ReactJS - Web Components
- 其他概念
- ReactJS - 日期选择器
- ReactJS - Helmet
- ReactJS - 内联样式
- ReactJS - PropTypes
- ReactJS - BrowserRouter
- ReactJS - DOM
- ReactJS - 走马灯
- ReactJS - 图标
- ReactJS - 表单组件
- ReactJS - 参考 API
- ReactJS 有用资源
- ReactJS - 快速指南
- ReactJS - 有用资源
- ReactJS - 讨论
ReactJS - testInstance.type 属性
React JS 库的核心思想是将程序划分成许多组件。每个组件都有其独特生命周期。React 提供了一些内置方法,我们可以在组件生命周期的不同阶段重写这些方法。
因此,在本教程中,我们将学习如何使用 testInstance.type 属性。此属性用于获取与测试实例相关的组件类型。
语法
testInstance.type
让我们通过一个示例来了解此属性。当开发者在代码中使用 testInstance.type 时,他们是在请求计算机告诉他们正在处理哪种类型的组件。这对于确保软件易于使用并按预期执行非常重要。
例如,类似于 button.type 的代码片段表明开发者想要了解程序中按钮的类型。然后,计算机将返回类似“Button”的内容,帮助开发者更好地理解和管理他们的代码。
返回值
testInstance.type 返回计算机程序组件的类型或种类。简单来说,它为开发者提供了关于应用程序元素的信息。
示例
示例 - DivTypeApp
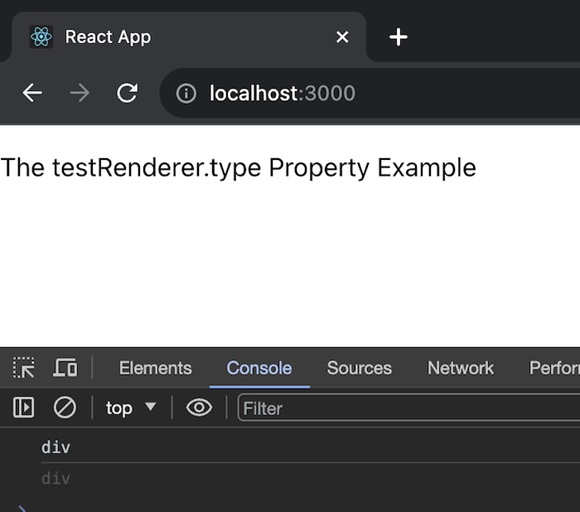
在这个应用中,我们将使用 TestRenderer 创建一个简单的 React 组件(一个 <div> 元素),并将它的类型记录到控制台。JSX 返回值是一个基本的段落元素,显示了 testRenderer.type 属性的示例。请参见下面的应用代码:
import React from 'react';
import TestRenderer from 'react-test-renderer';

// Defining our DivTypeApp Component
const DivTypeApp = () => {

   // Function to demonstrate TestRenderer.type Property
   function testFunction() {
      const renderer = TestRenderer.create(
         <div>The testRenderer.type Property</div>
      );
      const mytype = renderer.root;
      console.log(mytype.type);
   }

   testFunction();

   // Returning our JSX code
   return <>
      <p>
         The testRenderer.type Property Example
      </p>
   </>;
}

export default DivTypeApp;
输出
示例 - ButtonTypeApp
在这个应用中,我们将使用 TestRenderer 创建一个 React 组件(一个按钮元素),然后将它的类型记录到控制台。JSX 返回值是一个简单的段落元素,显示了 testRenderer.type 属性的示例。因此,相应的代码如下:
import React from 'react';
import TestRenderer from 'react-test-renderer';

const ButtonTypeApp = () => {
   function testButtonType() {
      const renderer = TestRenderer.create(
         <button>Click me</button>
      );
      const buttonType = renderer.root;
      console.log(buttonType.type);
   }

   testButtonType();

   return (
      <>
         <p>ButtonTypeApp: Testing testInstance.type with a button.</p>
      </>
   );
};

export default ButtonTypeApp;
输出

示例 - HeadingTypeApp
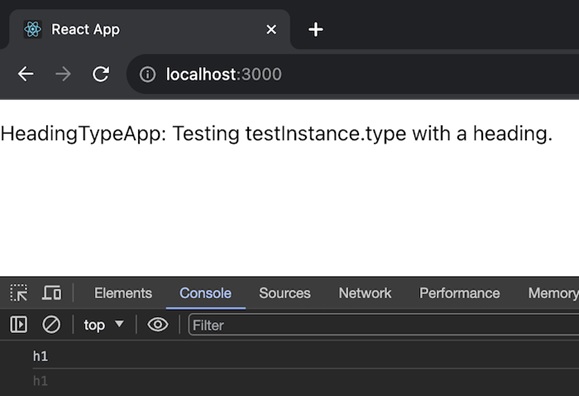
在这个应用中,我们将使用 TestRenderer 创建一个 React 组件(一个 <h1> 标题),将它的类型记录到控制台(在这种情况下为“h1”),并返回具有解释性段落的 JSX 结构。这是一个使用标题元素测试 testInstance.type 属性的基本示例。以下是此应用的代码:
import React from 'react';
import TestRenderer from 'react-test-renderer';

const HeadingTypeApp = () => {
   function testHeadingType() {
      const renderer = TestRenderer.create(
         <h1>Hello, TestInstance!</h1>
      );
      const headingType = renderer.root;
      console.log(headingType.type); // Output: "h1"
   }

   testHeadingType();

   return (
      <>
         <p>HeadingTypeApp: Testing testInstance.type with a heading.</p>
      </>
   );
};

export default HeadingTypeApp;
输出
总结
testInstance.type 类似于在计算机程序的不同拼图块上放置名称标签。它帮助开发者了解和组织他们的代码,使计算机更容易理解每个组件应该执行的操作。我们已经使用 testInstance.type 属性创建了三个不同的示例。通过练习这些示例,我们可以理解它的实际应用。