- GWT 教程
- GWT - 首页
- GWT - 概述
- GWT - 环境设置
- GWT - 应用程序
- GWT - 创建应用程序
- GWT - 部署应用程序
- GWT - 使用 CSS 样式
- GWT - 基本部件
- GWT - 表单部件
- GWT - 复杂部件
- GWT - 布局面板
- GWT - 事件处理
- GWT - 自定义部件
- GWT - UIBinder
- GWT - RPC 通信
- GWT - JUnit 集成
- GWT - 调试应用程序
- GWT - 国际化
- GWT - 历史类
- GWT - 书签支持
- GWT - 日志框架
- GWT 有用资源
- GWT - 问题和解答
- GWT - 快速指南
- GWT - 有用资源
- GWT - 讨论
GWT - 使用 CSS 样式
GWT 部件依靠层叠样式表 (CSS) 进行视觉样式设置。默认情况下,每个组件的类名是 gwt-<classname>。
例如,Button 部件的默认样式为 gwt-Button,类似地,TextBox 部件的默认样式为 gwt-TextBox。
为了使所有按钮和文本框都使用更大的字体,您可以将以下规则放入应用程序的 CSS 文件中
.gwt-Button  { font-size: 150%; }

.gwt-TextBox { font-size: 150%; }
默认情况下,浏览器和 GWT 都不会为部件创建默认的 id 属性。您必须显式地为可以在 CSS 中使用的元素创建唯一的 id。为了使具有 id my-button-id 的特定按钮使用更大的字体,您可以将以下规则放入应用程序的 CSS 文件中:
#my-button-id { font-size: 150%; }
要设置 GWT 部件的 id,请检索其 DOM 元素,然后按如下方式设置 id 属性:
Button b = new Button();
DOM.setElementAttribute(b.getElement(), "id", "my-button-id")
CSS 样式 API
有很多 API 可用于处理任何 GWT 部件的 CSS 设置。以下是一些重要的 API,它们将帮助您在使用 GWT 进行日常 Web 编程时:
| 序号 | API 及描述 |
|---|---|
| 1 |
public void setStyleName(java.lang.String style) 此方法将清除任何现有的样式,并将部件样式设置为使用 style 提供的新 CSS 类。 |
| 2 |
public void addStyleName(java.lang.String style) 此方法将向部件添加辅助或依赖样式名称。辅助样式名称是附加的样式名称,因此,如果应用了任何先前的样式名称,则会保留它们。 |
| 3 |
public void removeStyleName(java.lang.String style) 此方法将从部件中删除给定的样式,并保留与部件关联的任何其他样式。 |
| 4 |
public java.lang.String getStyleName() 此方法获取所有对象的样式名称,以空格分隔的列表形式。 |
| 5 |
public void setStylePrimaryName(java.lang.String style) 此方法设置对象的 primary 样式名称并更新所有依赖样式名称。 |
例如,让我们定义两个我们将应用于文本的新样式:
.gwt-Big-Text {
   font-size:150%;
}

.gwt-Small-Text {
   font-size:75%;
}

.gwt-Red-Text {
   color:red;
}
现在,您可以使用 setStyleName(Style) 将默认设置更改为新设置。应用以下规则后,文本的字体将变大
txtWidget.setStyleName("gwt-Big-Text");
我们可以对同一部件应用辅助 CSS 规则以更改其颜色,如下所示:
txtWidget.addStyleName("gwt-Red-Text");
使用上述方法,您可以添加任意数量的样式以应用于部件。如果您从按钮部件中删除第一个样式,则第二个样式将仍然保留在文本中。
txtWidget.removeStyleName("gwt-Big-Text");
Primary 和 Secondary 样式
默认情况下,部件的 primary 样式名称将是其部件类的默认样式名称,例如 Button 部件的 gwt-Button。当我们使用 AddStyleName() 方法添加和删除样式名称时,这些样式称为 secondary 样式。
部件的最终外观由添加到它的所有 secondary 样式以及其 primary 样式的总和决定。您可以使用 setStylePrimaryName(String) 方法设置部件的 primary 样式。为了说明这一点,假设我们有一个 Label 部件。在我们的 CSS 文件中,我们定义了以下规则:
.MyText {
   color: blue;
}

.BigText {
   font-size: large;
}

.LoudText {
   font-weight:  bold;
}
假设我们希望特定的 label 部件始终显示蓝色文本,并且在某些情况下,使用更大、更粗的字体以增强强调。
我们可以这样做:
// set up our primary style
Label someText = new Label();
someText.setStylePrimaryName("MyText");
...

// later on, to really grab the user's attention
someText.addStyleName("BigText");
someText.addStyleName("LoudText");
...

// after the crisis is over
someText.removeStyleName("BigText");
someText.removeStyleName("LoudText");
关联 CSS 文件
有多种方法可以将 CSS 文件与您的模块关联。现代 GWT 应用程序通常使用 CssResource 和 UiBinder 的组合。在我们的示例中,我们只使用第一种方法。
在主机 HTML 页面中使用 <link> 标签。
在模块 XML 文件中使用 <stylesheet> 元素。
使用包含在 ClientBundle 中的 CssResource。
在 UiBinder 模板中使用内联 <ui:style> 元素。
GWT CSS 示例
此示例将引导您完成在 GWT 部件上应用不同 CSS 规则的简单步骤。让我们使用 Eclipse IDE 以及已安装的 GWT 插件,并按照以下步骤创建一个 GWT 应用程序:
| 步骤 | 描述 |
|---|---|
| 1 | 在 com.tutorialspoint 包下创建一个名为 HelloWorld 的项目,如 GWT - 创建应用程序章节中所述。 |
| 2 | 修改 HelloWorld.gwt.xml、HelloWorld.css、HelloWorld.html 和 HelloWorld.java,如以下所述。保持其余文件不变。 |
| 3 | 编译并运行应用程序以验证已实现逻辑的结果。 |
以下是修改后的模块描述符 src/com.tutorialspoint/HelloWorld.gwt.xml 的内容。
<?xml version = "1.0" encoding = "UTF-8"?>
<module rename-to = 'helloworld'>
   <!-- Inherit the core Web Toolkit stuff.                        -->
   <inherits name = 'com.google.gwt.user.User'/>

   <!-- Inherit the default GWT style sheet.                       -->
   <inherits name = 'com.google.gwt.user.theme.clean.Clean'/>

   <!-- Specify the app entry point class.                         -->
   <entry-point class = 'com.tutorialspoint.client.HelloWorld'/>

   <!-- Specify the paths for translatable code                    -->
   <source path = 'client'/>
   <source path = 'shared'/>

</module>
以下是修改后的样式表文件 war/HelloWorld.css 的内容。
body {
   text-align: center;
   font-family: verdana, sans-serif;
}

h1 {
   font-size: 2em;
   font-weight: bold;
   color: #777777;
   margin: 40px 0px 70px;
   text-align: center;
}

.gwt-Button {
   font-size: 150%;
   font-weight: bold;
   width:100px;
   height:100px;
}

.gwt-Big-Text {
   font-size:150%;
}

.gwt-Small-Text {
   font-size:75%;
}
以下是修改后的 HTML 主机文件 war/HelloWorld.html 的内容,以容纳两个按钮。
<html>
   <head>
      <title>Hello World</title>
      <link rel = "stylesheet" href = "HelloWorld.css"/>
      <script language = "javascript" src = "helloworld/helloworld.nocache.js">
      </script>
   </head>

   <body>
      <div id = "mytext"><h1>Hello, World!</h1></div>
      <div id = "gwtGreenButton"></div>
      <div id = "gwtRedButton"></div>
   </body>
</html>
让我们将 Java 文件 src/com.tutorialspoint/HelloWorld.java 的内容如下,它将负责在 HTML 中添加两个按钮,并应用自定义 CSS 样式。
package com.tutorialspoint.client;

import com.google.gwt.core.client.EntryPoint;
import com.google.gwt.event.dom.client.ClickEvent;
import com.google.gwt.event.dom.client.ClickHandler;
import com.google.gwt.user.client.ui.Button;
import com.google.gwt.user.client.ui.HTML;
import com.google.gwt.user.client.ui.RootPanel;

public class HelloWorld implements EntryPoint {
   public void onModuleLoad() {

   // add button to change font to big when clicked.
   Button Btn1 = new Button("Big Text");
   Btn1.addClickHandler(new ClickHandler() {
      public void onClick(ClickEvent event) {
         RootPanel.get("mytext").setStyleName("gwt-Big-Text");
      }
   });

   // add button to change font to small when clicked.
   Button Btn2 = new Button("Small Text");
   Btn2.addClickHandler(new ClickHandler() {
      public void onClick(ClickEvent event) {
         RootPanel.get("mytext").setStyleName("gwt-Small-Text");
      }
   });

   RootPanel.get("gwtGreenButton").add(Btn1);
   RootPanel.get("gwtRedButton").add(Btn2);
   }
}
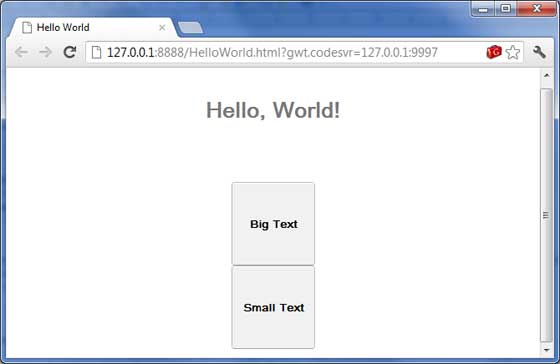
准备好所有更改后,让我们像在 GWT - 创建应用程序 章节中那样以开发模式编译并运行应用程序。如果您的应用程序一切正常,这将产生以下结果:

现在,尝试点击显示的两个按钮,并观察“Hello, World!”文本,该文本在点击两个按钮时会不断更改其字体。