- GWT 教程
- GWT - 首页
- GWT - 概述
- GWT - 环境搭建
- GWT - 应用
- GWT - 创建应用
- GWT - 部署应用
- GWT - 使用 CSS 样式
- GWT - 基本组件
- GWT - 表单组件
- GWT - 复杂组件
- GWT - 布局面板
- GWT - 事件处理
- GWT - 自定义组件
- GWT - UiBinder
- GWT - RPC 通信
- GWT - JUnit 集成
- GWT - 调试应用
- GWT - 国际化
- GWT - History 类
- GWT - 书签支持
- GWT - 日志框架
- GWT 有用资源
- GWT - 问答
- GWT - 快速指南
- GWT - 有用资源
- GWT - 讨论
GWT - UiBinder
介绍
UiBinder 是一个旨在分离用户界面功能和视图的框架。
UiBinder 框架允许开发者构建 GWT 应用,如同构建带有 GWT 组件配置的 HTML 页面一样。
UiBinder 框架使与 UI 设计师的协作更加容易,因为他们更熟悉 XML、HTML 和 CSS,而不是 Java 源代码。
UiBinder 提供了一种声明式定义用户界面的方式。
UiBinder 将程序逻辑与 UI 分离。
UiBinder 类似于 JSP 与 Servlet 的关系。
UiBinder 工作流程
步骤 1 - 创建 UI 声明 XML 文件
创建一个基于 XML/HTML 的用户界面声明文件。在我们的示例中,我们创建了一个 **Login.ui.xml** 文件。
<ui:UiBinder xmlns:ui = 'urn:ui:com.google.gwt.uibinder'
   xmlns:gwt = 'urn:import:com.google.gwt.user.client.ui'
   xmlns:res = 'urn:with:com.tutorialspoint.client.LoginResources'>
   <ui:with type = "com.tutorialspoint.client.LoginResources" field = "res">
   </ui:with>
   <gwt:HTMLPanel>
   ...
   </gwt:HTMLPanel>
</ui:UiBinder>
步骤 2 - 使用 ui:field 用于后期绑定
在 XML/HTML 元素中使用 ui:field 属性,将 XML 中的 UI 字段与 JAVA 文件中的 UI 字段关联起来,以便后期绑定。
<gwt:Label ui:field = "completionLabel1" />
<gwt:Label ui:field = "completionLabel2" />
步骤 3 - 创建 UI XML 的 Java 对等文件
通过扩展 Composite 组件,创建基于 Java 的 XML 布局的对应文件。在我们的示例中,我们创建了一个 **Login.java** 文件。
package com.tutorialspoint.client;
   ...
public class Login extends Composite {
   ...
}
步骤 4 - 使用 UiField 注解绑定 Java UI 字段
在 **Login.java** 中使用 @UiField 注解,指定要绑定到 **Login.ui.xml** 中基于 XML 的字段的对应类成员。
public class Login extends Composite {
   ...
   @UiField
   Label completionLabel1;

   @UiField
   Label completionLabel2;
   ...
}
步骤 5 - 使用 UiTemplate 注解绑定 Java UI 与 UI XML
使用 @UiTemplate 注解指示 GWT 绑定基于 Java 的组件 **Login.java** 和基于 XML 的布局 **Login.ui.xml**。
public class Login extends Composite {

   private static LoginUiBinder uiBinder = GWT.create(LoginUiBinder.class);

   /*
    * @UiTemplate is not mandatory but allows multiple XML templates
    * to be used for the same widget.
    * Default file loaded will be <class-name>.ui.xml
    */

   @UiTemplate("Login.ui.xml")
   interface LoginUiBinder extends UiBinder<Widget, Login> {
   }
   ...
}
步骤 6 - 创建 CSS 文件
创建一个外部 CSS 文件 **Login.css** 和一个与 CSS 样式等效的基于 Java 的资源文件 **LoginResources.java**。
.blackText {
   font-family: Arial, Sans-serif;
   color: #000000;
   font-size: 11px;
   text-align: left;
}
...
步骤 7 - 为 CSS 文件创建基于 Java 的资源文件
package com.tutorialspoint.client;
...
public interface LoginResources extends ClientBundle {
   public interface MyCss extends CssResource {
      String blackText();

      ...
   }

   @Source("Login.css")
   MyCss style();
}
步骤 8 - 在 Java UI 代码文件中附加 CSS 资源。
使用 Java 组件类 **Login.java** 的构造函数附加外部 CSS 文件 **Login.css**。
public Login() {
   this.res = GWT.create(LoginResources.class);
   res.style().ensureInjected();
   initWidget(uiBinder.createAndBindUi(this));
}
UiBinder完整示例
此示例将引导您完成简单的步骤,以演示在 GWT 中使用 UiBinder。按照以下步骤更新我们在 *GWT - 创建应用* 章节中创建的 GWT 应用程序:
| 步骤 | 描述 |
|---|---|
| 1 | 创建一个名为 *HelloWorld* 的项目,放在 *com.tutorialspoint* 包下,如 *GWT - 创建应用* 章节中所述。 |
| 2 | 修改 *HelloWorld.gwt.xml*、*HelloWorld.css*、*HelloWorld.html* 和 *HelloWorld.java*,如下所述。保持其余文件不变。 |
| 3 | 编译并运行应用程序以验证已实现逻辑的结果。 |
以下是修改后的模块描述符 **src/com.tutorialspoint/HelloWorld.gwt.xml** 的内容。
<?xml version = "1.0" encoding = "UTF-8"?>
<module rename-to = 'helloworld'>
   <!-- Inherit the core Web Toolkit stuff.                        -->
   <inherits name = 'com.google.gwt.user.User'/>

   <!-- Inherit the default GWT style sheet.                       -->
   <inherits name = 'com.google.gwt.user.theme.clean.Clean'/>
   <!-- Inherit the UiBinder module.                               -->
   <inherits name = "com.google.gwt.uibinder.UiBinder"/>
   <!-- Specify the app entry point class.                         -->
   <entry-point class = 'com.tutorialspoint.client.HelloWorld'/>

   <!-- Specify the paths for translatable code                    -->
   <source path ='client'/>
   <source path = 'shared'/>

</module>
以下是修改后的样式表文件 **war/HelloWorld.css** 的内容。
body {
   text-align: center;
   font-family: verdana, sans-serif;
}

h1 {
   font-size: 2em;
   font-weight: bold;
   color: #777777;
   margin: 40px 0px 70px;
   text-align: center;
}
以下是修改后的 HTML 宿主文件 **war/HelloWorld.html** 的内容。
<html>
   <head>
      <title>Hello World</title>
      <link rel = "stylesheet" href = "HelloWorld.css"/>
      <script language = "javascript" src = "helloworld/helloworld.nocache.js">
      </script>
   </head>

   <body>
      <h1>UiBinder Demonstration</h1>
      <div id = "gwtContainer"></div>
   </body>
</html>
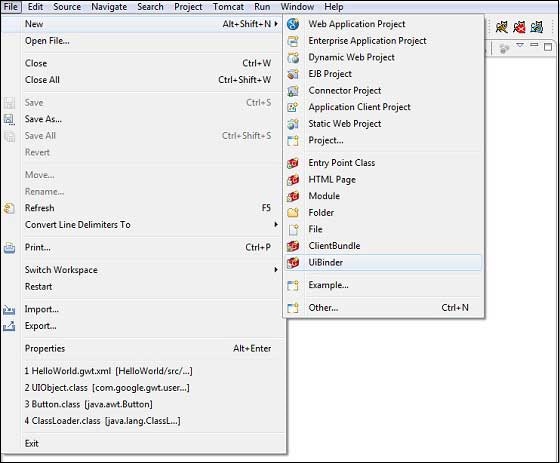
现在创建一个新的 UiBinder 模板和所有者类(文件 → 新建 → UiBinder)。
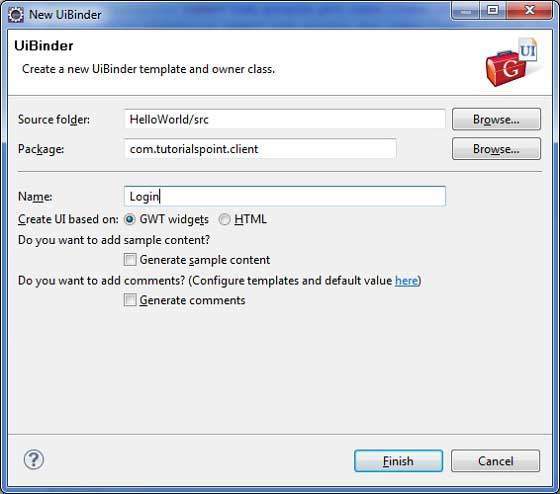
为项目选择客户端包,然后将其命名为 Login。保留所有其他默认值。单击“完成”按钮,插件将创建一个新的 UiBinder 模板和所有者类。
现在在 **src/com.tutorialspoint/client** 包中创建 Login.css 文件,并将以下内容放在其中
.blackText {
   font-family: Arial, Sans-serif;
   color: #000000;
   font-size: 11px;
   text-align: left;
}

.redText {
   font-family: Arial, Sans-serif;
   color: #ff0000;
   font-size: 11px;
   text-align: left;
}

.loginButton {
   border: 1px solid #3399DD;
   color: #FFFFFF;
   background: #555555;
   font-size: 11px;
   font-weight: bold;
   margin: 0 5px 0 0;
   padding: 4px 10px 5px;
   text-shadow: 0 -1px 0 #3399DD;
}

.box {
   border: 1px solid #AACCEE;
   display: block;
   font-size: 12px;
   margin: 0 0 5px;
   padding: 3px;
   width: 203px;
}

.background {
   background-color: #999999;
   border: 1px none transparent;
   color: #000000;
   font-size: 11px;
   margin-left: -8px;
   margin-top: 5px;
   padding: 6px;
}
现在在 **src/com.tutorialspoint/client** 包中创建 LoginResources.java 文件,并将以下内容放在其中
package com.tutorialspoint.client;

import com.google.gwt.resources.client.ClientBundle;
import com.google.gwt.resources.client.CssResource;

public interface LoginResources extends ClientBundle {
   /**
    * Sample CssResource.
    */
   public interface MyCss extends CssResource {
      String blackText();

      String redText();

      String loginButton();

      String box();

      String background();
   }

   @Source("Login.css")
   MyCss style();
}
将 **src/com.tutorialspoint/client** 包中 Login.ui.xml 的内容替换为以下内容
<ui:UiBinder xmlns:ui = 'urn:ui:com.google.gwt.uibinder'
   xmlns:gwt = 'urn:import:com.google.gwt.user.client.ui'
   xmlns:res = 'urn:with:com.tutorialspoint.client.LoginResources'>

   <ui:with type = "com.tutorialspoint.client.LoginResources" field = "res">
   </ui:with>

   <gwt:HTMLPanel>
      <div align = "center">

         <gwt:VerticalPanel res:styleName = "style.background">
            <gwt:Label text = "Login" res:styleName = "style.blackText" />
            <gwt:TextBox ui:field="loginBox" res:styleName = "style.box" />
            <gwt:Label text = "Password" res:styleName = "style.blackText" />
            <gwt:PasswordTextBox ui:field = "passwordBox" res:styleName = "style.box" />

            <gwt:HorizontalPanel verticalAlignment = "middle">
               <gwt:Button ui:field = "buttonSubmit" text="Submit"
                  res:styleName = "style.loginButton" />
               <gwt:CheckBox ui:field = "myCheckBox" />
               <gwt:Label ui:field = "myLabel" text = "Remember me"
                  res:styleName = "style.blackText" />
            </gwt:HorizontalPanel>

            <gwt:Label ui:field = "completionLabel1" res:styleName = "style.blackText" />
            <gwt:Label ui:field = "completionLabel2" res:styleName = "style.blackText" />
         </gwt:VerticalPanel>

      </div>
   </gwt:HTMLPanel>

</ui:UiBinder>
将 **src/com.tutorialspoint/client** 包中 Login.java 的内容替换为以下内容
package com.tutorialspoint.client;

import com.google.gwt.core.client.GWT;
import com.google.gwt.event.dom.client.ClickEvent;
import com.google.gwt.event.logical.shared.ValueChangeEvent;
import com.google.gwt.uibinder.client.UiBinder;
import com.google.gwt.uibinder.client.UiField;
import com.google.gwt.uibinder.client.UiHandler;
import com.google.gwt.uibinder.client.UiTemplate;
import com.google.gwt.user.client.Window;
import com.google.gwt.user.client.ui.Composite;
import com.google.gwt.user.client.ui.Label;
import com.google.gwt.user.client.ui.TextBox;
import com.google.gwt.user.client.ui.Widget;

public class Login extends Composite {

   private static LoginUiBinder uiBinder = GWT.create(LoginUiBinder.class);

   /*
    * @UiTemplate is not mandatory but allows multiple XML templates
    * to be used for the same widget.
    * Default file loaded will be <class-name>.ui.xml
    */
   @UiTemplate("Login.ui.xml")
   interface LoginUiBinder extends UiBinder<Widget, Login> {
   }

   @UiField(provided = true)
   final LoginResources res;

   public Login() {
      this.res = GWT.create(LoginResources.class);
      res.style().ensureInjected();
      initWidget(uiBinder.createAndBindUi(this));
   }

   @UiField
   TextBox loginBox;

   @UiField
   TextBox passwordBox;

   @UiField
   Label completionLabel1;

   @UiField
   Label completionLabel2;

   private Boolean tooShort = false;

   /*
    * Method name is not relevant, the binding is done according to the class
    * of the parameter.
    */
   @UiHandler("buttonSubmit")
   void doClickSubmit(ClickEvent event) {
      if (!tooShort) {
         Window.alert("Login Successful!");
      } else {
         Window.alert("Login or Password is too short!");
      }
   }

   @UiHandler("loginBox")
   void handleLoginChange(ValueChangeEvent<String> event) {
      if (event.getValue().length() < 6) {
         completionLabel1.setText("Login too short (Size must be > 6)");
         tooShort = true;
      } else {
         tooShort = false;
         completionLabel1.setText("");
      }
   }

   @UiHandler("passwordBox")
   void handlePasswordChange(ValueChangeEvent<String> event) {
      if (event.getValue().length() < 6) {
         tooShort = true;
         completionLabel2.setText("Password too short (Size must be > 6)");
      } else {
         tooShort = false;
         completionLabel2.setText("");
      }
   }
}
让我们将 Java 文件 **src/com.tutorialspoint/HelloWorld.java** 的内容如下,它将演示 UiBinder 的用法。
package com.tutorialspoint.client;

import com.google.gwt.core.client.EntryPoint;
import com.google.gwt.user.client.ui.RootPanel;

public class HelloWorld implements EntryPoint {
   public void onModuleLoad() {
      RootPanel.get().add(new Login());
   }
}
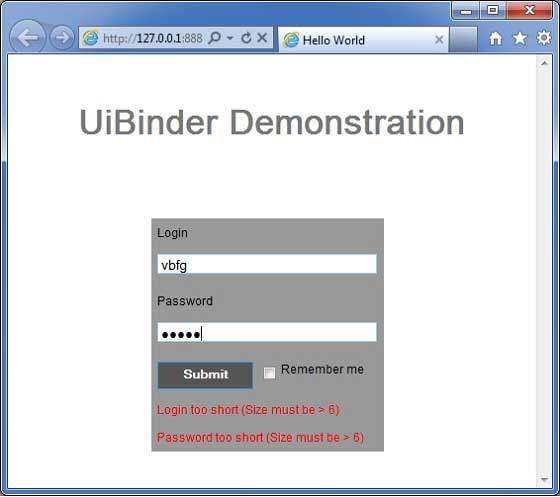
完成所有更改后,让我们像在 GWT - 创建应用 章节中一样,在开发模式下编译并运行应用程序。如果您的应用程序一切正常,这将产生以下结果: