- GWT 教程
- GWT - 首页
- GWT - 概述
- GWT - 环境设置
- GWT - 应用
- GWT - 创建应用
- GWT - 部署应用
- GWT - 使用 CSS 样式
- GWT - 基本部件
- GWT - 表单部件
- GWT - 复杂部件
- GWT - 布局面板
- GWT - 事件处理
- GWT - 自定义部件
- GWT - UIBinder
- GWT - RPC 通信
- GWT - JUnit 集成
- GWT - 调试应用
- GWT - 国际化
- GWT - History 类
- GWT - 书签支持
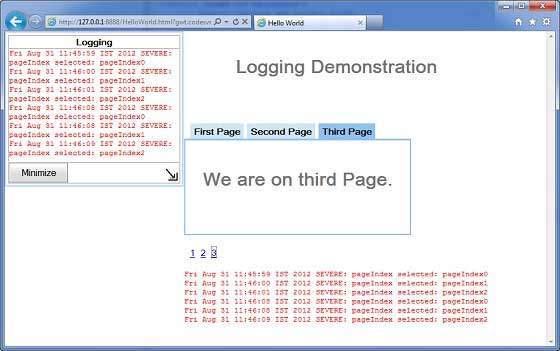
- GWT - 日志框架
- GWT 有用资源
- GWT - 问答
- GWT 快速指南
- GWT - 有用资源
- GWT - 讨论
GWT 快速指南
GWT - 概述
什么是 GWT?
Google Web Toolkit (GWT) 是一款用于创建富互联网应用 (RIA)的开发工具包。以下是一些值得注意的功能:-
GWT 为开发人员提供了使用 JAVA 编写客户端应用程序的选项。
GWT 将用 JAVA 编写的代码编译成 JavaScript 代码。
用 GWT 编写的应用程序与跨浏览器兼容。GWT 自动生成适合每个浏览器的 javascript 代码。
GWT 是开源的,完全免费的,并且被全球数千名开发人员使用。它根据 Apache 许可证 2.0 版获得许可。
总的来说,GWT 是一个框架,用于构建大规模、高性能的 Web 应用程序,同时保持易于维护。
为什么要使用 GWT?
基于 Java,您可以使用 Eclipse 等 Java IDE 开发 GWT 应用程序。
开发人员可以使用代码自动完成/重构/导航/项目管理以及 IDE 的所有功能。GWT 提供了完整的调试功能。开发人员可以像调试 Java 应用程序一样调试客户端应用程序。
GWT 提供了与 Junit 和 Maven 的轻松集成。
同样基于 Java,GWT 对 Java 开发人员来说学习曲线较低。
GWT 生成优化的 javascript 代码,自行生成浏览器特定的 javascript 代码。
GWT 提供的部件库提供了应用程序中所需的大多数任务。
GWT 是可扩展的,可以创建自定义部件来满足应用程序的需求。
最重要的是,GWT 应用程序可以在所有主要的浏览器和智能手机上运行,包括基于 Android 和 iOS 的手机/平板电脑。
GWT 的缺点
尽管 GWT 提供了许多优点,但它也存在以下缺点:-
不可索引 - 由 GWT 生成的网页不会被搜索引擎索引,因为这些应用程序是动态生成的。
不可降级 - 如果您的应用程序用户禁用了 Javascript,则用户只会看到基本页面,而不会看到更多内容。
对设计人员不友好 - GWT 不适合喜欢使用纯 HTML 并为以后插入动态内容预留占位符的网页设计师。
GWT 组件
GWT 框架可以分为以下三个主要部分:-
GWT Java 到 JavaScript 编译器 - 这是 GWT 最重要的部分,它使 GWT 成为构建 RIA 的强大工具。GWT 编译器用于将用 Java 编写的所有应用程序代码转换为 JavaScript。
JRE 模拟库 - Google Web Toolkit 包含一个模拟 Java 运行时库子集的库。该列表包括 java.lang、java.lang.annotation、java.math、java.io、java.sql、java.util 和 java.util.logging
GWT UI 构建库 - GWT 的这部分包含许多子部分,包括实际的 UI 组件、RPC 支持、历史管理等等。
GWT 还提供了一个 GWT 托管 Web 浏览器,它允许您在托管模式下运行和执行 GWT 应用程序,其中您的代码在 Java 虚拟机中作为 Java 运行,而无需编译为 JavaScript。
GWT - 环境设置
本教程将指导您如何准备开发环境以开始使用 GWT 框架的工作。本教程还将教您如何在设置 GWT 框架之前在您的机器上设置 JDK、Tomcat 和 Eclipse:-
系统需求
GWT 需要 JDK 1.6 或更高版本,因此首要要求是在您的机器上安装 JDK。
| JDK | 1.6 或更高版本。 |
|---|---|
| 内存 | 没有最低要求。 |
| 磁盘空间 | 没有最低要求。 |
| 操作系统 | 没有最低要求。 |
按照以下步骤设置您的环境以开始 GWT 应用程序开发。
步骤 1 - 验证您的机器上是否安装了 Java
现在打开控制台并执行以下 java 命令。
| 操作系统 | 任务 | 命令 |
|---|---|---|
| Windows | 打开命令控制台 | c:\> java -version |
| Linux | 打开命令终端 | $ java -version |
| Mac | 打开终端 | machine:~ joseph$ java -version |
让我们验证所有操作系统的输出
| 序号 | 操作系统和生成的输出 |
|---|---|
| 1 |
Windows java version "1.6.0_21" Java(TM) SE Runtime Environment (build 1.6.0_21-b07) Java HotSpot(TM) Client VM (build 17.0-b17, mixed mode, sharing) |
| 2 |
Linux java version "1.6.0_21" Java(TM) SE Runtime Environment (build 1.6.0_21-b07) ava HotSpot(TM) Client VM (build 17.0-b17, mixed mode, sharing) |
| 3 |
Mac java version "1.6.0_21" Java(TM) SE Runtime Environment (build 1.6.0_21-b07) Java HotSpot(TM)64-Bit Server VM (build 17.0-b17, mixed mode, sharing) |
步骤 2 - 设置 Java 开发工具包 (JDK)
如果您没有安装 Java,则可以从 Oracle 的 Java 网站安装 Java 软件开发工具包 (SDK):Java SE 下载。您将在下载的文件中找到安装 JDK 的说明,请按照给定的说明安装和配置设置。最后设置 PATH 和 JAVA_HOME 环境变量以引用包含 java 和 javac 的目录,通常分别为 java_install_dir/bin 和 java_install_dir。
设置JAVA_HOME环境变量以指向 Java 安装在您机器上的基本目录位置。例如
| 序号 | 操作系统和输出 |
|---|---|
| 1 |
Windows 将 JAVA_HOME 环境变量设置为 C:\Program Files\Java\jdk1.6.0_21 |
| 2 |
Linux export JAVA_HOME = /usr/local/java-current |
| 3 |
Mac export JAVA_HOME = /Library/Java/Home |
将 Java 编译器位置添加到系统路径。
| 序号 | 操作系统和输出 |
|---|---|
| 1 |
Windows 将字符串 ;%JAVA_HOME%\bin 附加到系统变量 Path 的末尾。 |
| 2 |
Linux export PATH=$PATH:$JAVA_HOME/bin/ |
| 3 |
Mac 不需要 |
或者,如果您使用集成开发环境 (IDE),如 Borland JBuilder、Eclipse、IntelliJ IDEA 或 Sun ONE Studio,请编译并运行一个简单的程序以确认 IDE 知道您安装 Java 的位置,否则请按照 IDE 给定的文档进行正确的设置。
步骤 3 - 设置 Eclipse IDE
本教程中的所有示例都是使用 Eclipse IDE 编写的。因此,我建议您应该在您的机器上安装最新版本的 Eclipse,具体取决于您的操作系统。
要安装 Eclipse IDE,请从https://www.eclipse.org下载最新的 Eclipse 二进制文件。下载安装后,将二进制分发版解压缩到方便的位置。例如在 Windows 上的 C:\eclipse,或在 Linux/Unix 上的 /usr/local/eclipse,最后适当地设置 PATH 变量。
可以通过在 Windows 机器上执行以下命令启动 Eclipse,或者您可以简单地双击 eclipse.exe
%C:\eclipse\eclipse.exe
可以通过在 Unix(Solaris、Linux 等)机器上执行以下命令启动 Eclipse:-
$/usr/local/eclipse/eclipse
启动成功后,如果一切正常,则应显示以下结果:-
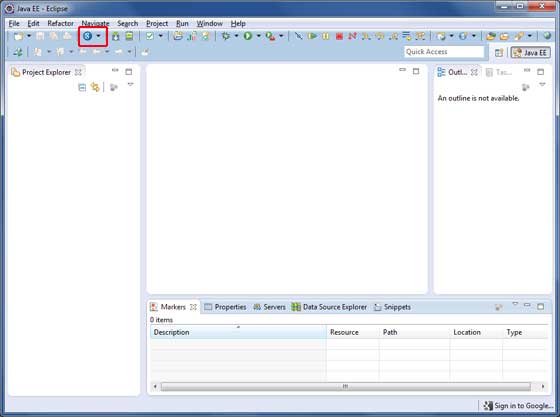
步骤 4 - 为 Eclipse 安装 GWT SDK 和插件
按照链接Eclipse 插件(包括 SDK)中提供的说明,为安装在您的机器上的 Eclipse 版本安装 GWT SDK 和插件。
GWT 插件设置成功后,如果一切正常,则应显示以下屏幕,其中Google 图标用红色矩形标记,如下所示:-
步骤 5:设置 Apache Tomcat
您可以从https://tomcat.net.cn/下载最新版本的 Tomcat。下载安装后,将二进制分发版解压缩到方便的位置。例如在 Windows 上的 C:\apache-tomcat-6.0.33,或在 Linux/Unix 上的 /usr/local/apache-tomcat-6.0.33,并设置指向安装位置的 CATALINA_HOME 环境变量。
可以通过在 Windows 机器上执行以下命令启动 Tomcat,或者您可以简单地双击 startup.bat
%CATALINA_HOME%\bin\startup.bat
or
/usr/local/apache-tomcat-6.0.33/bin/startup.sh
启动成功后,可以通过访问https://:8080/访问 Tomcat 附带的默认 Web 应用程序。如果一切正常,则应显示以下结果:-
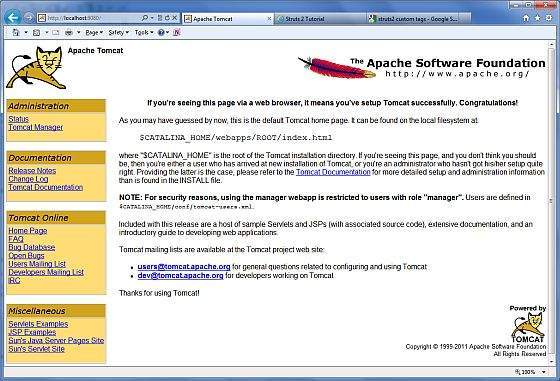
有关配置和运行 Tomcat 的更多信息,可以在此处包含的文档以及 Tomcat 网站上找到:-https://tomcat.net.cn/
可以通过在 Windows 机器上执行以下命令停止 Tomcat:-
%CATALINA_HOME%\bin\shutdown
or
C:\apache-tomcat-5.5.29\bin\shutdown
可以通过在 Unix(Solaris、Linux 等)机器上执行以下命令停止 Tomcat:-
$CATALINA_HOME/bin/shutdown.sh
or
/usr/local/apache-tomcat-5.5.29/bin/shutdown.sh
GWT - 应用
在开始使用 GWT 创建实际的“HelloWorld”应用程序之前,让我们看看 GWT 应用程序的实际组成部分是什么:-
GWT 应用程序包含以下四个重要部分,其中最后一个部分是可选的,但前三个部分是必须的。
- 模块描述符
- 公共资源
- 客户端代码
- 服务器端代码
典型 gwt 应用程序HelloWord的不同部分的示例位置将如下所示:-
| 名称 | 位置 |
|---|---|
| 项目根目录 | HelloWorld/ |
| 模块描述符 | src/com/tutorialspoint/HelloWorld.gwt.xml |
| 公共资源 | src/com/tutorialspoint/war/ |
| 客户端代码 | src/com/tutorialspoint/client/ |
| 服务器端代码 | src/com/tutorialspoint/server/ |
模块描述符
模块描述符是以 XML 形式存在的配置文件,用于配置 GWT 应用程序。
模块描述符文件扩展名为 *.gwt.xml,其中 * 是应用程序的名称,此文件应位于项目的根目录中。
以下是 HelloWorld 应用程序的默认模块描述符 HelloWorld.gwt.xml:-
<?xml version = "1.0" encoding = "utf-8"?>
<module rename-to = 'helloworld'>
   <!-- inherit the core web toolkit stuff.                        -->
   <inherits name = 'com.google.gwt.user.user'/>

   <!-- inherit the default gwt style sheet.                       -->
   <inherits name = 'com.google.gwt.user.theme.clean.Clean'/>

   <!-- specify the app entry point class.                         -->
   <entry-point class = 'com.tutorialspoint.client.HelloWorld'/>

   <!-- specify the paths for translatable code                    -->
   <source path = '...'/>
   <source path = '...'/>

   <!-- specify the paths for static files like html, css etc.     -->
   <public path = '...'/>
   <public path = '...'/>

   <!-- specify the paths for external javascript files            -->
   <script src = "js-url" />
   <script src = "js-url" />

   <!-- specify the paths for external style sheet files            -->
   <stylesheet  src = "css-url" />
   <stylesheet  src = "css-url" />
</module>
以下是关于模块描述符中使用的不同部分的简要说明。
| 序号 | 节点和说明 |
|---|---|
| 1 |
<module rename-to = "helloworld"> 这提供了应用程序的名称。 |
| 2 |
<inherits name = "logical-module-name" /> 这将其他 gwt 模块添加到应用程序中,就像 java 应用程序中的 import 一样。可以以这种方式继承任意数量的模块。 |
| 3 |
<entry-point class = "classname" /> 此项指定了将开始加载 GWT 应用程序的类的名称。可以添加任意数量的入口点类,并且它们会按照在模块文件中出现的顺序依次调用。因此,当第一个入口点的 onModuleLoad() 完成时,下一个入口点将立即被调用。 |
| 4 |
<source path = "path" /> 此项指定了 GWT 编译器将搜索源代码进行编译的源文件夹名称。 |
| 5 |
<public path = "path" /> 公共路径是项目中存储 GWT 模块引用的静态资源(如 CSS 或图像)的位置。默认公共路径是模块 XML 文件存储位置下的 public 子目录。 |
| 6 |
<script src="js-url" /> 自动注入位于 src 指定位置的外部 JavaScript 文件。 |
| 7 |
<stylesheet src="css-url" /> 自动注入位于 src 指定位置的外部 CSS 文件。 |
公共资源
这些都是 GWT 模块引用的所有文件,例如主机 HTML 页面、CSS 或图像。
这些资源的位置可以使用模块配置文件中的 <public path = "path" /> 元素进行配置。默认情况下,它是模块 XML 文件存储位置下的 public 子目录。
当您将应用程序编译成 JavaScript 时,可以在公共路径上找到的所有文件都将复制到模块的输出目录。
最重要的公共资源是主机页面,它用于调用实际的 GWT 应用程序。应用程序的典型 HTML 主机页面可能根本不包含任何可见的 HTML body 内容,但始终预期通过如下所示的 <script.../> 标签包含 GWT 应用程序
<html>
   <head>
      <title>Hello World</title>
      <link rel = "stylesheet" href = "HelloWorld.css"/>
      <script language = "javascript" src = "helloworld/helloworld.nocache.js">
      </script>
   </head>

   <body>
      <h1>Hello World</h1>
      <p>Welcome to first GWT application</p>
   </body>
</html>
以下是我们包含在主机页面中的示例样式表 -
body {
   text-align: center;
   font-family: verdana, sans-serif;
}

h1 {
   font-size: 2em;
   font-weight: bold;
   color: #777777;
   margin: 40px 0px 70px;
   text-align: center;
}
客户端代码
这是实现应用程序业务逻辑的实际 Java 代码,GWT 编译器会将其转换为 JavaScript,最终在浏览器中运行。这些资源的位置可以使用模块配置文件中的 <source path = "path" /> 元素进行配置。
例如,**入口点**代码将用作客户端代码,其位置将使用 <source path = "path" /> 指定。
模块**入口点**是任何可分配给**EntryPoint**且无需参数即可构造的类。加载模块时,将实例化每个入口点类,并调用其**EntryPoint.onModuleLoad()**方法。一个 HelloWorld 入口点类的示例如下 -
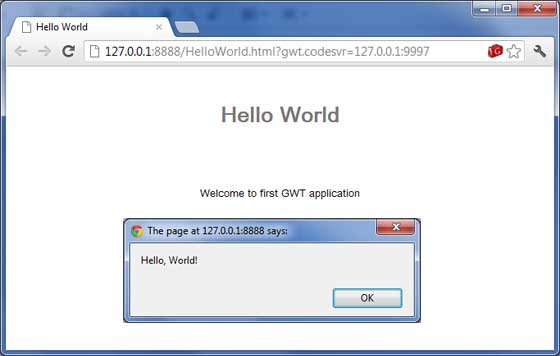
public class HelloWorld implements EntryPoint {
   public void onModuleLoad() {
      Window.alert("Hello, World!");
   }
}
服务器端代码
这是应用程序的服务器端部分,它是完全可选的。如果您没有在应用程序中进行任何后端处理,则不需要此部分,但如果后端需要一些处理并且您的客户端应用程序与服务器交互,则您需要开发这些组件。
下一章将利用上述所有概念,使用 Eclipse IDE 创建 HelloWorld 应用程序。
GWT - 创建应用
由于 GWT 的强大功能在于**用 Java 编写,在 JavaScript 中运行**,我们将使用 Java IDE Eclipse 来演示我们的示例。
让我们从一个简单的 _HelloWorld_ 应用程序开始 -
步骤 1 - 创建项目
第一步是使用 Eclipse IDE 创建一个简单的 Web 应用程序项目。使用选项**Google 图标 ![]() > 新建 Web 应用程序项目...** 启动项目向导。现在使用向导窗口将您的项目命名为 _HelloWorld_,如下所示 -
> 新建 Web 应用程序项目...** 启动项目向导。现在使用向导窗口将您的项目命名为 _HelloWorld_,如下所示 -
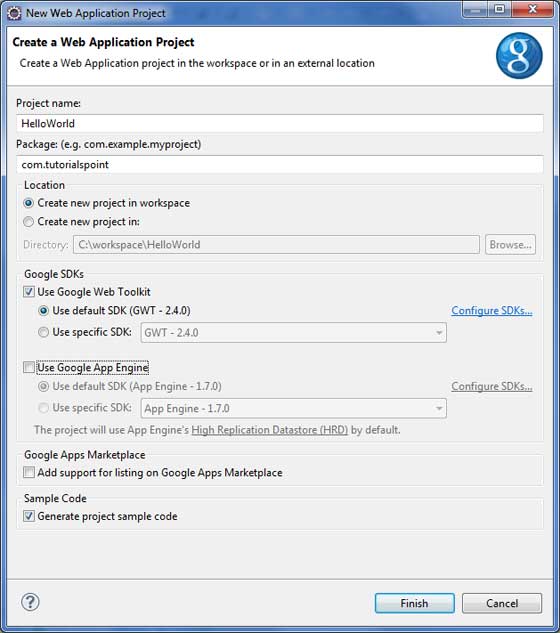
取消选中**使用 Google App Engine**,因为我们在此项目中不使用它,并保留其他默认值(保持**生成示例项目代码**选项选中),然后单击完成按钮。
项目成功创建后,您的项目资源管理器中将包含以下内容 -
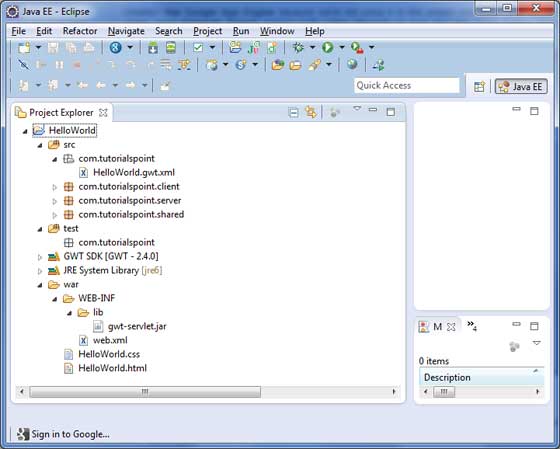
以下是所有重要文件夹的简要说明
| 序号 | 文件夹 & 位置 |
|---|---|
| 1 |
src 源代码(Java 类)文件。 包含负责客户端 UI 显示的客户端特定 Java 类的 Client 文件夹。 包含负责服务器端处理的服务器端 Java 类的 Server 文件夹。 包含用于在服务器和客户端之间传输数据的 Java 模型类的 Shared 文件夹。 HelloWorld.gwt.xml,GWT 编译器编译 HelloWorld 项目所需的模块描述符文件。 |
| 2 |
test 测试代码(Java 类)源文件。 包含负责测试 gwt 客户端代码的 Java 类的 Client 文件夹。 |
| 3 |
war 这是最重要的部分,它代表了实际的可部署 Web 应用程序。 包含已编译的类、gwt 库、servlet 库的 WEB-INF。 HelloWorld.css,项目样式表。 HelloWorld.html,将调用 GWT UI 应用程序的主机 HTML。 |
步骤 2 - 修改模块描述符:HelloWorld.gwt.xml
GWT 插件将创建一个默认的模块描述符文件 _src/com.tutorialspoint/HelloWorld.gwt.xml_,如下所示。对于此示例,我们不会修改它,但您可以根据需要修改它。
<?xml version = "1.0" encoding = "UTF-8"?>
<module rename-to = 'helloworld'>
   <!-- Inherit the core Web Toolkit stuff.                        -->
   <inherits name = 'com.google.gwt.user.User'/>

   <!-- Inherit the default GWT style sheet.  You can change       -->
   <!-- the theme of your GWT application by uncommenting          -->
   <!-- any one of the following lines.                            -->
   <inherits name = 'com.google.gwt.user.theme.clean.Clean'/>
   <!-- <inherits name = 'com.google.gwt.user.theme.chrome.Chrome'/> -->
   <!-- <inherits name = 'com.google.gwt.user.theme.dark.Dark'/>     -->

   <!-- Other module inherits                                      -->

   <!-- Specify the app entry point class.                         -->
   <entry-point class = 'com.tutorialspoint.client.HelloWorld'/>

   <!-- Specify the paths for translatable code                    -->
   <source path = 'client'/>
   <source path = 'shared'/>

</module>
步骤 3 - 修改样式表:HelloWorld.css
GWT 插件将创建一个默认的样式表文件 _war/HelloWorld.css_。让我们修改此文件,以使我们的示例保持最简单的理解级别 -
body {
   text-align: center;
   font-family: verdana, sans-serif;
}

h1 {
   font-size: 2em;
   font-weight: bold;
   color: #777777;
   margin: 40px 0px 70px;
   text-align: center;
}
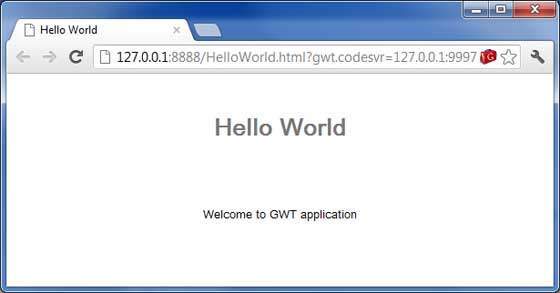
步骤 4 - 修改主机文件:HelloWorld.html
GWT 插件将创建一个默认的 HTML 主机文件 _war/HelloWorld.html_。让我们修改此文件,以使我们的示例保持最简单的理解级别 -
<html>
   <head>
      <title>Hello World</title>
      <link rel = "stylesheet" href = "HelloWorld.css"/>
      <script language = "javascript" src = "helloworld/helloworld.nocache.js">
      </script>
   </head>

   <body>
      <h1>Hello World</h1>
      <p>Welcome to first GWT application</p>
   </body>
</html>
您可以在同一个源目录中创建更多静态文件(如 HTML、CSS 或图像),或者可以创建更多子目录并将文件移动到这些子目录中,并在应用程序的模块描述符中配置这些子目录。
步骤 5 - 修改入口点:HelloWorld.java
GWT 插件将创建一个默认的 Java 文件 _src/com.tutorialspoint/HelloWorld.java_,它为应用程序提供了一个入口点。
让我们修改此文件以显示“Hello,World!”
package com.tutorialspoint.client;

import com.google.gwt.core.client.EntryPoint;
import com.google.gwt.user.client.Window;

public class HelloWorld implements EntryPoint {
   public void onModuleLoad() {
      Window.alert("Hello, World!");
   }
}
您可以在同一个源目录中创建更多 Java 文件以定义入口点或定义辅助例程。
步骤 6 - 编译应用程序
完成所有更改后,就可以编译项目了。使用选项**Google 图标 ![]() > GWT 编译项目...** 启动 GWT 编译对话框,如下所示 -
> GWT 编译项目...** 启动 GWT 编译对话框,如下所示 -

保持默认值不变,然后单击编译按钮。如果一切顺利,您将在 Eclipse 控制台中看到以下输出
Compiling module com.tutorialspoint.HelloWorld
   Compiling 6 permutations
      Compiling permutation 0...
      Compiling permutation 1...
      Compiling permutation 2...
      Compiling permutation 3...
      Compiling permutation 4...
      Compiling permutation 5...
   Compile of permutations succeeded
Linking into C:\workspace\HelloWorld\war\helloworld
   Link succeeded
   Compilation succeeded -- 33.029s
步骤 7 - 运行应用程序
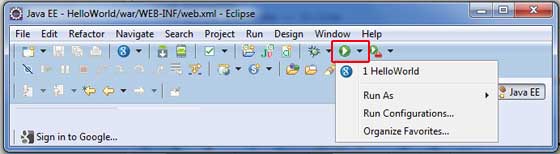
现在单击 ![]() 运行应用程序菜单,然后选择**HelloWorld**应用程序以运行该应用程序。
运行应用程序菜单,然后选择**HelloWorld**应用程序以运行该应用程序。
如果一切正常,您应该会看到 Eclipse 中激活的 GWT 开发模式,其中包含一个 URL,如下所示。双击 URL 以打开 GWT 应用程序。
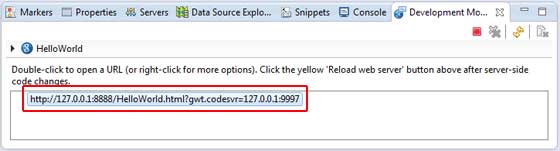
因为您是在开发模式下运行应用程序,所以需要为浏览器安装 GWT 插件。只需按照屏幕上的说明安装插件即可。
如果您已经为浏览器设置了 GWT 插件,则应该能够看到以下输出
恭喜!您已经使用 Google Web Toolkit (GWT) 实现了自己的第一个应用程序。
GWT - 部署应用
本教程将向您解释如何创建应用程序**“war”**文件以及如何在 Apache Tomcat Web 服务器根目录中部署它。
如果您理解了这个简单的示例,那么您也可以按照相同的步骤部署复杂的 GWT 应用程序。
让我们使用已安装 GWT 插件的 Eclipse IDE,并按照以下步骤创建一个 GWT 应用程序 -
| 步骤 | 描述 |
|---|---|
| 1 | 在 _GWT - 创建应用程序_ 章节中说明的 _com.tutorialspoint_ 包下创建一个名为 _HelloWorld_ 的项目。 |
| 2 | 修改 _HelloWorld.gwt.xml_、_HelloWorld.css_、_HelloWorld.html_ 和 _HelloWorld.java_,如下所述。保持其余文件不变。 |
| 3 | 编译并运行应用程序,以确保业务逻辑按要求工作。 |
| 4 | 最后,将应用程序 war 文件夹的内容压缩成 war 文件,并将其部署到 Apache Tomcat Web 服务器中。 |
| 5 | 使用最后一步中说明的适当 URL 启动您的 Web 应用程序。 |
以下是修改后的模块描述符 **src/com.tutorialspoint/HelloWorld.gwt.xml** 的内容。
<?xml version = "1.0" encoding = "UTF-8"?>
<module rename-to = 'helloworld'>
   <!-- Inherit the core Web Toolkit stuff.                        -->
   <inherits name = 'com.google.gwt.user.User'/>

   <!-- Inherit the default GWT style sheet.                       -->
   <inherits name = 'com.google.gwt.user.theme.clean.Clean'/>

   <!-- Specify the app entry point class.                         -->
   <entry-point class = 'com.tutorialspoint.client.HelloWorld'/>

   <!-- Specify the paths for translatable code                    -->
   <source path = 'client'/>
   <source path = 'shared'/>

</module>
以下是修改后的样式表文件 **war/HelloWorld.css** 的内容。
body {
   text-align: center;
   font-family: verdana, sans-serif;
}

h1 {
   font-size: 2em;
   font-weight: bold;
   color: #777777;
   margin: 40px 0px 70px;
   text-align: center;
}
以下是修改后的 HTML 主机文件 **war/HelloWorld.html** 的内容。
<html>
   <head>
      <title>Hello World</title>
      <link rel = "stylesheet" href = "HelloWorld.css"/>
      <script language = "javascript" src = "helloworld/helloworld.nocache.js">
      </script>
   </head>

   <body>
      <h1>Hello World</h1>
      <div id = "gwtContainer"></div>
   </body>
</html>
我稍微修改了一下上一个示例中的 HTML。在这里,我创建了一个占位符 <div>...</div>,我们将使用入口点 Java 类在此处插入一些内容。因此,让我们看看 Java 文件 **src/com.tutorialspoint/HelloWorld.java** 的以下内容。
package com.tutorialspoint.client;

import com.google.gwt.core.client.EntryPoint;
import com.google.gwt.user.client.ui.HTML;
import com.google.gwt.user.client.ui.RootPanel;

public class HelloWorld implements EntryPoint {
   public void onModuleLoad() {
      HTML html = new HTML("<p>Welcome to GWT application</p>");

      RootPanel.get("gwtContainer").add(html);
   }
}
在这里,我们创建了一个基本的 widgest HTML 并将其添加到 id 为“gwtContainer”的 div 标签中。我们将在接下来的章节中学习不同的 GWT 小部件。
完成所有更改后,让我们像在 GWT - 创建应用程序 章节中所做的那样,在开发模式下编译并运行应用程序。如果您的应用程序一切正常,这将产生以下结果 -
创建 WAR 文件
现在我们的应用程序运行良好,我们可以将其导出为 war 文件了。
请按照以下步骤操作 -
进入项目的 **war** 目录 **C:\workspace\HelloWorld\war**
选择 war 目录中所有可用的文件和文件夹。
将所有选定的文件和文件夹压缩到一个名为 _HelloWorld.zip_ 的文件中。
将 _HelloWorld.zip_ 重命名为 _HelloWorld.war_。
部署 WAR 文件
停止 tomcat 服务器。
将 _HelloWorld.war_ 文件复制到 **tomcat 安装目录 > webapps 文件夹。**
启动 tomcat 服务器。
查看 webapps 目录,应该创建了一个名为 **helloworld** 的文件夹。
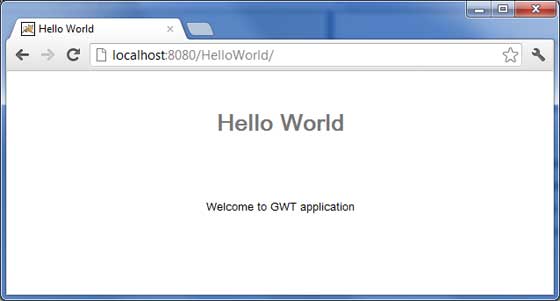
现在 HelloWorld.war 已成功部署到 Tomcat Web 服务器根目录。
运行应用程序
在 Web 浏览器中输入 URL:**https://:8080/HelloWorld** 以启动应用程序
服务器名称 (localhost) 和端口 (8080) 可能因您的 tomcat 配置而异。
GWT - 使用 CSS 样式
GWT 小部件依赖于层叠样式表 (CSS) 进行视觉样式设置。默认情况下,每个组件的类名为 **gwt-<classname>**。
例如,Button 小部件的默认样式为 _gwt-Button_,类似地,TextBox 小部件的默认样式为 _gwt-TextBox_。
为了使所有按钮和文本框都具有更大的字体,您可以在应用程序的 CSS 文件中添加以下规则
.gwt-Button  { font-size: 150%; }

.gwt-TextBox { font-size: 150%; }
默认情况下,浏览器和 GWT 都不会为小部件创建默认的 **id** 属性。您必须为可以在 CSS 中使用的元素显式创建唯一的 id。为了使 id 为 **my-button-id** 的特定按钮具有更大的字体,您可以在应用程序的 CSS 文件中添加以下规则 -
#my-button-id { font-size: 150%; }
要设置 GWT 小部件的 id,请检索其 DOM 元素,然后设置 id 属性,如下所示 -
Button b = new Button();
DOM.setElementAttribute(b.getElement(), "id", "my-button-id")
CSS 样式 API
有许多 API 可用于处理任何 GWT 小部件的 CSS 设置。以下是一些重要的 API,将帮助您使用 GWT 进行日常 Web 编程 -
| 序号 | API & 描述 |
|---|---|
| 1 |
public void setStyleName(java.lang.String style) 此方法将清除任何现有样式,并将小部件样式设置为使用 _style_ 提供的新 CSS 类。 |
| 2 |
public void addStyleName(java.lang.String style) 此方法将向小部件添加辅助或依赖样式名称。辅助样式名称是一个附加样式名称,因此,如果应用了任何先前的样式名称,则会保留它们。 |
| 3 |
public void removeStyleName(java.lang.String style) 此方法将从部件中移除给定的样式,并保留与部件关联的任何其他样式。 |
| 4 |
public java.lang.String getStyleName() 此方法获取对象的所有样式名称,以空格分隔的列表形式表示。 |
| 5 |
public void setStylePrimaryName(java.lang.String style) 此方法设置对象的样式主名称,并更新所有相关的样式名称。 |
例如,让我们定义两个我们将应用于文本的新样式 -
.gwt-Big-Text {
   font-size:150%;
}

.gwt-Small-Text {
   font-size:75%;
}

.gwt-Red-Text {
   color:red;
}
现在您可以使用setStyleName(Style)将默认设置更改为新设置。应用以下规则后,文本的字体将变大
txtWidget.setStyleName("gwt-Big-Text");
我们可以在同一个部件上应用一个辅助 CSS 规则来更改其颜色,如下所示 -
txtWidget.addStyleName("gwt-Red-Text");
使用上述方法,您可以添加任意数量的样式以应用于部件。如果您从按钮部件中删除第一个样式,则第二个样式将仍然保留在文本中。
txtWidget.removeStyleName("gwt-Big-Text");
主样式和辅助样式
默认情况下,部件的主样式名称将是其部件类(例如,按钮部件的gwt-Button)的默认样式名称。当我们使用 AddStyleName() 方法添加和删除样式名称时,这些样式称为辅助样式。
部件的最终外观由添加到它的所有辅助样式以及其主样式的总和决定。您可以使用setStylePrimaryName(String)方法设置部件的主样式。为了说明,假设我们有一个 Label 部件。在我们的 CSS 文件中,我们定义了以下规则 -
.MyText {
   color: blue;
}

.BigText {
   font-size: large;
}

.LoudText {
   font-weight:  bold;
}
假设我们希望特定的标签部件始终显示蓝色文本,并且在某些情况下,使用更大、更粗的字体来增强强调。
我们可以这样做 -
// set up our primary style
Label someText = new Label();
someText.setStylePrimaryName("MyText");
...

// later on, to really grab the user's attention
someText.addStyleName("BigText");
someText.addStyleName("LoudText");
...

// after the crisis is over
someText.removeStyleName("BigText");
someText.removeStyleName("LoudText");
关联 CSS 文件
有多种方法可以将 CSS 文件与您的模块关联。现代 GWT 应用程序通常结合使用 CssResource 和 UiBinder。在我们的示例中,我们只使用第一种方法。
在主机 HTML 页面中使用<link>标签。
在模块 XML 文件中使用<stylesheet>元素。
使用包含在ClientBundle中的CssResource。
在UiBinder模板中使用内联<ui:style>元素。
GWT CSS 示例
此示例将指导您完成在 GWT 部件上应用不同 CSS 规则的简单步骤。让我们准备好包含 GWT 插件的 Eclipse IDE,并按照以下步骤创建一个 GWT 应用程序 -
| 步骤 | 描述 |
|---|---|
| 1 | 在 _GWT - 创建应用程序_ 章节中说明的 _com.tutorialspoint_ 包下创建一个名为 _HelloWorld_ 的项目。 |
| 2 | 修改 _HelloWorld.gwt.xml_、_HelloWorld.css_、_HelloWorld.html_ 和 _HelloWorld.java_,如下所述。保持其余文件不变。 |
| 3 | 编译并运行应用程序以验证实现逻辑的结果。 |
以下是修改后的模块描述符 **src/com.tutorialspoint/HelloWorld.gwt.xml** 的内容。
<?xml version = "1.0" encoding = "UTF-8"?>
<module rename-to = 'helloworld'>
   <!-- Inherit the core Web Toolkit stuff.                        -->
   <inherits name = 'com.google.gwt.user.User'/>

   <!-- Inherit the default GWT style sheet.                       -->
   <inherits name = 'com.google.gwt.user.theme.clean.Clean'/>

   <!-- Specify the app entry point class.                         -->
   <entry-point class = 'com.tutorialspoint.client.HelloWorld'/>

   <!-- Specify the paths for translatable code                    -->
   <source path = 'client'/>
   <source path = 'shared'/>

</module>
以下是修改后的样式表文件 **war/HelloWorld.css** 的内容。
body {
   text-align: center;
   font-family: verdana, sans-serif;
}

h1 {
   font-size: 2em;
   font-weight: bold;
   color: #777777;
   margin: 40px 0px 70px;
   text-align: center;
}

.gwt-Button {
   font-size: 150%;
   font-weight: bold;
   width:100px;
   height:100px;
}

.gwt-Big-Text {
   font-size:150%;
}

.gwt-Small-Text {
   font-size:75%;
}
以下是修改后的 HTML 主机文件war/HelloWorld.html的内容,以容纳两个按钮。
<html>
   <head>
      <title>Hello World</title>
      <link rel = "stylesheet" href = "HelloWorld.css"/>
      <script language = "javascript" src = "helloworld/helloworld.nocache.js">
      </script>
   </head>

   <body>
      <div id = "mytext"><h1>Hello, World!</h1></div>
      <div id = "gwtGreenButton"></div>
      <div id = "gwtRedButton"></div>
   </body>
</html>
让我们看看 Java 文件src/com.tutorialspoint/HelloWorld.java的内容,它将负责在 HTML 中添加两个按钮并应用自定义 CSS 样式。
package com.tutorialspoint.client;

import com.google.gwt.core.client.EntryPoint;
import com.google.gwt.event.dom.client.ClickEvent;
import com.google.gwt.event.dom.client.ClickHandler;
import com.google.gwt.user.client.ui.Button;
import com.google.gwt.user.client.ui.HTML;
import com.google.gwt.user.client.ui.RootPanel;

public class HelloWorld implements EntryPoint {
   public void onModuleLoad() {

   // add button to change font to big when clicked.
   Button Btn1 = new Button("Big Text");
   Btn1.addClickHandler(new ClickHandler() {
      public void onClick(ClickEvent event) {
         RootPanel.get("mytext").setStyleName("gwt-Big-Text");
      }
   });

   // add button to change font to small when clicked.
   Button Btn2 = new Button("Small Text");
   Btn2.addClickHandler(new ClickHandler() {
      public void onClick(ClickEvent event) {
         RootPanel.get("mytext").setStyleName("gwt-Small-Text");
      }
   });

   RootPanel.get("gwtGreenButton").add(Btn1);
   RootPanel.get("gwtRedButton").add(Btn2);
   }
}
完成所有更改后,让我们像在 GWT - 创建应用程序 章节中所做的那样,在开发模式下编译并运行应用程序。如果您的应用程序一切正常,这将产生以下结果 -
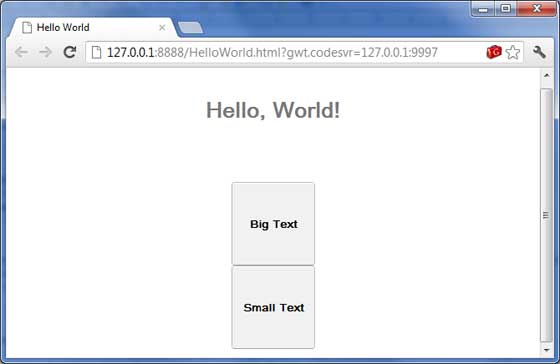
现在尝试点击显示的两个按钮,并观察“Hello, World!”文本,该文本在点击两个按钮时会不断更改其字体。
GWT - 基本部件
每个用户界面都考虑以下三个主要方面 -
UI 元素 - 这些是用户最终看到并与其交互的核心视觉元素。GWT 提供了大量广泛使用和常见的元素,从基本到复杂,我们将在本教程中介绍。
布局 - 它们定义了 UI 元素如何在屏幕上组织,并为 GUI(图形用户界面)提供最终的外观和感觉。这部分将在布局章节中介绍。
行为 - 这些是用户与 UI 元素交互时发生的事件。这部分将在事件处理章节中介绍。
GWT UI 元素
GWT 库在定义良好的类层次结构中提供类,以创建复杂的基于 Web 的用户界面。此组件层次结构中的所有类都从UIObject基类派生,如下所示 -
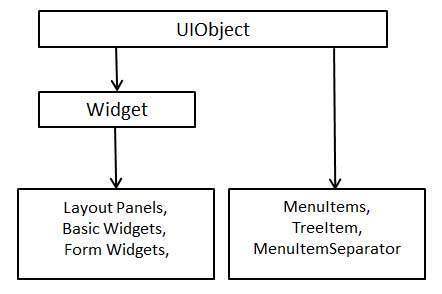
每个基本 UI 部件都继承 Widget 类的属性,而 Widget 类又继承 UIObject 的属性。树和菜单将在复杂部件教程中介绍。
| 序号 | 部件和描述 |
|---|---|
| 1 |
GWT UIObject 类
此部件包含文本,不解释为使用<div>元素的 HTML,导致它以块布局显示。 |
| 2 |
GWT Widget 类
此部件可以包含 HTML 文本,并使用<div>元素显示 html 内容,导致它以块布局显示。 |
基本部件
以下是一些重要的基本部件 -
| 序号 | 部件和描述 |
|---|---|
| 1 |
标签
此部件包含文本,不解释为使用<div>元素的 HTML,导致它以块布局显示。 |
| 2 |
HTML
此部件可以包含 HTML 文本,并使用<div>元素显示 html 内容,导致它以块布局显示。 |
| 3 |
图像
此部件在给定 URL 上显示图像。 |
| 4 |
锚点
此部件表示一个简单的<a>元素。 |
GWT - 表单部件
表单部件允许用户输入数据,并为他们提供与应用程序交互的功能。每个表单部件都继承 Widget 类的属性,而 Widget 类又继承 UIObject 和 Wigdet 类。
| 序号 | 部件和描述 |
|---|---|
| 1 |
GWT UIObject 类
此部件包含文本,不解释为使用<div>元素的 HTML,导致它以块布局显示。 |
| 2 |
GWT Widget 类
此部件可以包含 HTML 文本,并使用<div>元素显示 html 内容,导致它以块布局显示。 |
表单部件
以下是一些重要的表单部件 -
| 序号 | 部件和描述 |
|---|---|
| 1 |
按钮
此部件表示标准的按钮。 |
| 2 |
PushButton
此部件表示具有自定义样式的普通按钮。 |
| 3 |
ToggleButton
此部件表示一个时尚的有状态按钮,允许用户在向上和向下状态之间切换。 |
| 4 |
复选框
此部件表示标准的复选框部件。此类也用作 RadioButton 的基类。 |
| 5 |
RadioButton
此部件表示互斥选择的单选按钮部件。 |
| 6 |
ListBox
此部件向用户显示一系列选择,可以是列表框或下拉列表。 |
| 7 |
SuggestBox
此部件表示文本框或文本区域,显示与用户输入匹配的预配置选择集。每个 SuggestBox 都与单个 SuggestOracle 相关联。SuggestOracle 用于根据特定查询字符串提供选择集。 |
| 8 |
TextBox
此部件表示单行文本框。 |
| 9 |
PasswordTextBox
此部件表示一个文本框,它会视觉上屏蔽其输入以防止窃听。 |
| 10 |
TextArea
此部件表示允许输入多行文本的文本框。 |
| 11 |
RichTextArea
此部件表示一个富文本编辑器,允许进行复杂的样式设置和格式化。 |
| 12 |
FileUpload
此部件包装 HTML <input type='file'>元素。 |
| 13 |
Hidden
此部件表示 HTML 表单中的隐藏字段。 |
GWT - 复杂部件
“复杂部件”允许用户与应用程序进行高级交互功能。每个复杂部件都继承 Widget 类的属性,而 Widget 类又继承 UIObject 的属性。
| 序号 | 部件和描述 |
|---|---|
| 1 |
GWT UIObject 类
此部件包含文本,不解释为使用<div>元素的 HTML,导致它以块布局显示。 |
| 2 |
GWT Widget 类
此部件可以包含 HTML 文本,并使用<div>元素显示 html 内容,导致它以块布局显示。 |
复杂部件
以下是一些重要的复杂部件 -
| 序号 | 部件和描述 |
|---|---|
| 1 |
树
此部件表示标准的分层树部件。树包含用户可以打开、关闭和选择的 TreeItems 层次结构。 |
| 2 |
MenuBar
此部件表示标准的菜单栏部件。菜单栏可以包含任意数量的菜单项,每个菜单项可以触发命令或打开级联菜单栏。 |
| 3 |
DatePicker
此部件表示标准的 GWT 日期选择器。 |
| 4 |
CellTree
此部件表示树的视图。此部件仅在标准模式下工作,这要求运行它的 HTML 页面具有明确的<!DOCTYPE>声明。 |
| 5 |
CellList
此部件表示单元格的单列列表。 |
| 6 |
CellTable
此部件表示支持分页和列的表格视图。 |
| 7 |
CellBrowser
此部件表示树的可浏览视图,其中在任何时间只能打开每个级别的单个节点。此部件仅在标准模式下工作,这要求运行它的 HTML 页面具有明确的<!DOCTYPE>声明。 |
GWT - 布局面板
布局面板可以包含其他部件。这些面板控制部件在用户界面上的显示方式。每个 Panel 部件都继承 Panel 类的属性,而 Panel 类又继承 Widget 类,Widget 类又继承 UIObject 类。
| 序号 | 部件和描述 |
|---|---|
| 1 |
GWT UIObject 类
此部件包含文本,不解释为使用<div>元素的 HTML,导致它以块布局显示。 |
| 2 |
GWT Widget 类
此部件可以包含 HTML 文本,并使用<div>元素显示 html 内容,导致它以块布局显示。 |
| 3 |
GWT Panel 类
这是所有面板的抽象基类,面板是可以包含其他部件的部件。 |
布局面板
以下是一些重要的布局面板 -
| 序号 | 部件和描述 |
|---|---|
| 1 |
FlowPanel
此部件表示一个面板,该面板使用默认的 HTML 布局行为格式化其子部件。 |
| 2 |
HorizontalPanel
此部件表示一个面板,该面板将其所有部件都布置在单个水平列中。 |
| 3 |
VerticalPanel
此部件表示一个面板,该面板将其所有部件都布置在单个垂直列中。 |
| 4 |
HorizontalSplitPanel
此部件表示一个面板,该面板将两个部件排列在单个水平行中,并允许用户交互地更改分配给这两个部件的宽度的比例。包含在 HorizontalSplitPanel 中的部件将在必要时自动装饰有滚动条。 |
| 5 |
VerticalSplitPanel
此部件表示一个面板,该面板将两个部件排列在单个垂直列中,并允许用户交互地更改分配给这两个部件的高度比例。包含在 VertialSplitPanel 中的部件将在必要时自动装饰有滚动条。 |
| 6 |
FlexTable
此部件表示一个灵活的表格,该表格根据需要创建单元格。它可以是不规则的(即,每一行可以包含不同数量的单元格),并且可以将各个单元格设置为跨越多个行或列。 |
| 7 |
Grid
此部件表示一个矩形网格,可以在其单元格中包含文本、html 或子部件。必须将其显式调整为所需的行列数。 |
| 8 |
DeckPanel
面板,它以“叠放”的方式显示其所有子部件,其中一次只能显示一个。它由 TabPanel 使用。 |
| 9 |
DockPanel
此部件表示一个面板,该面板将其子部件布置在其外边缘“停靠”,并允许其最后一个部件占据其中心剩余的空间。 |
| 10 |
HTMLPanel
此部件表示一个包含 HTML 的面板,并且可以将子部件附加到该 HTML 中的已识别元素。 |
| 11 |
TabPanel
此部件表示一个面板,该面板表示一组选项卡式页面,每个页面都包含另一个部件。当用户选择与其关联的各种选项卡时,将显示其子部件。选项卡可以包含任意 HTML。 |
| 12 |
Composite
此部件表示一种可以包装另一个部件的部件类型,隐藏被包装部件的方法。当添加到面板时,复合部件的行为就像已添加了它所包装的部件一样。 |
| 13 |
简单面板
此部件表示仅包含一个部件的面板的基本类。 |
| 14 |
滚动面板
此部件表示一个简单的面板,它将其内容包装在可滚动区域中。 |
| 15 |
焦点面板
此部件表示一个简单的面板,它使它的内容可聚焦,并增加了捕获鼠标和键盘事件的能力。 |
| 16 |
表单面板
此部件表示一个面板,它将其内容包装在 HTML <FORM> 元素中。 |
| 17 |
弹出面板
此部件表示一个可以**弹出**到其他部件上方的面板。它覆盖浏览器的客户端区域(以及任何先前创建的弹出窗口)。 |
| 18 |
对话框
此部件表示一种弹出窗口的形式,顶部有一个标题区域,用户可以拖动它。与 PopupPanel 不同,对 PopupPanel.setWidth(String) 和 PopupPanel.setHeight(String) 的调用将设置对话框本身的宽度和高度,即使尚未添加部件也是如此。 |
GWT - 事件处理
GWT 提供了一个类似于 Java AWT 或 SWING 用户界面框架的事件处理程序模型。
监听器接口定义了一个或多个方法,部件调用这些方法来宣布事件。GWT 提供了一个与各种可能事件相对应的接口列表。
希望接收特定类型事件的类实现关联的处理程序接口,然后将对自身的引用传递给部件以订阅一组事件。
例如,**按钮**类发布**点击事件**,因此您必须编写一个类来实现ClickHandler以处理**点击**事件。
事件处理程序接口
所有 GWT 事件处理程序都扩展自EventHandler接口,并且每个处理程序只有一个具有单个参数的方法。此参数始终是关联事件类型的对象。每个**事件**对象都有一些方法来操作传递的事件对象。例如,对于点击事件,您必须按如下方式编写处理程序:
/**
 * create a custom click handler which will call
 * onClick method when button is clicked.
 */
public class MyClickHandler implements ClickHandler {
   @Override
   public void onClick(ClickEvent event) {
      Window.alert("Hello World!");
   }
}
现在,任何希望接收点击事件的类都将调用addClickHandler()来注册事件处理程序,如下所示:
/**
 * create button and attach click handler
 */
Button button = new Button("Click Me!");
button.addClickHandler(new MyClickHandler());
每个支持事件类型的部件都将具有 HandlerRegistration addFooHandler(FooEvent) 形式的方法,其中Foo是实际事件,如 Click、Error、KeyPress 等。
以下是重要的 GWT 事件处理程序及其关联事件和处理程序注册方法的列表:
| 序号 | 事件接口 | 事件方法和描述 |
|---|---|---|
| 1 | 选择前处理程序<I> |
void on Before Selection (Before Selection Event<I> event); 当触发 BeforeSelectionEvent 时调用。 |
| 2 | 失焦处理程序 |
void on Blur(Blur Event event); 当触发 Blur 事件时调用。 |
| 3 | 更改处理程序 |
void on Change(ChangeEvent event); 当触发更改事件时调用。 |
| 4 | 点击处理程序 |
void on Click(ClickEvent event); 当触发原生点击事件时调用。 |
| 5 | 关闭处理程序<T> |
void on Close(CloseEvent<T> event); 当触发 CloseEvent 时调用。 |
| 6 | 上下文菜单处理程序 |
void on Context Menu(Context Menu Event event); 当触发原生上下文菜单事件时调用。 |
| 7 | 双击处理程序 |
void on Double Click(Double Click Event event); 当触发双击事件时调用。 |
| 8 | 错误处理程序 |
void on Error(Error Event event); 当触发 Error 事件时调用。 |
| 9 | 聚焦处理程序 |
void on Focus(Focus Event event); 当触发 Focus 事件时调用。 |
| 10 | 表单面板.提交完成处理程序 |
void on Submit Complete(Form Panel.Submit Complete Event event); 表单成功提交后触发。 |
| 11 | FormPanel.SubmitHandler |
void on Submit(Form Panel.Submit Event event); 提交表单时触发。 |
| 12 | 键盘按下处理程序 |
void on Key Down(Key Down Event event); 当触发 KeyDownEvent 时调用。 |
| 13 | KeyPressHandler |
void on KeyPress(KeyPressEvent event); 当触发 KeyPressEvent 时调用。 |
| 14 | KeyUpHandler |
void on KeyUp(KeyUpEvent event); 当触发 KeyUpEvent 时调用。 |
| 15 | 加载处理程序 |
void on Load(LoadEvent event); 当触发 LoadEvent 时调用。 |
| 16 | 鼠标按下处理程序 |
void on MouseDown(MouseDownEvent event); 当触发 MouseDown 时调用。 |
| 17 | 鼠标移动处理程序 |
void on MouseMove(MouseMoveEvent event); 当触发 MouseMoveEvent 时调用。 |
| 18 | 鼠标移出处理程序 |
void on MouseOut(MouseOutEvent event); 当触发 MouseOutEvent 时调用。 |
| 19 | 鼠标悬停处理程序 |
void on MouseOver(MouseOverEvent event); 当触发 MouseOverEvent 时调用。 |
| 20 | 鼠标抬起处理程序 |
void on MouseUp(MouseUpEvent event); 当触发 MouseUpEvent 时调用。 |
| 21 | 鼠标滚轮处理程序 |
void on MouseWheel(MouseWheelEvent event); 当触发 MouseWheelEvent 时调用。 |
| 22 | 调整大小处理程序 |
void on Resize(ResizeEvent event); 部件大小调整时触发。 |
| 23 | 滚动处理程序 |
void on Scroll(ScrollEvent event); 当触发 ScrollEvent 时调用。 |
| 24 | 选择处理程序<I> |
void on Selection(SelectionEvent<I> event); 当触发 SelectionEvent 时调用。 |
| 25 | 值更改处理程序<I> |
void on ValueChange(ValueChangeEvent<I> event); 当触发 ValueChangeEvent 时调用。 |
| 26 | Window.ClosingHandler |
void on WindowClosing(Window.ClosingEvent event); 浏览器窗口关闭或导航到其他站点之前触发。 |
| 27 | Window.ScrollHandler |
void on WindowScroll(Window.ScrollEvent event); 浏览器窗口滚动时触发。 |
事件方法
如前所述,每个处理程序都只有一个具有单个参数的方法,该参数保存事件对象,例如void onClick(ClickEvent event)或void onKeyDown(KeyDownEvent event)。事件对象如ClickEvent和KeyDownEvent有一些常见的方法,如下所示:
| 序号 | 方法和描述 |
|---|---|
| 1 |
protected void dispatch(ClickHandler handler) 此方法应仅由 HandlerManager 调用。 |
| 2 |
DomEvent.Type <FooHandler> getAssociatedType() 此方法返回用于注册Foo事件的类型。 |
| 3 |
static DomEvent.Type<FooHandler> getType() 此方法获取与Foo事件关联的事件类型。 |
| 4 |
public java.lang.Object getSource() 此方法返回最后触发此事件的源。 |
| 5 |
protected final boolean isLive() 此方法返回事件是否处于活动状态。 |
| 6 |
protected void kill() 此方法终止事件。 |
示例
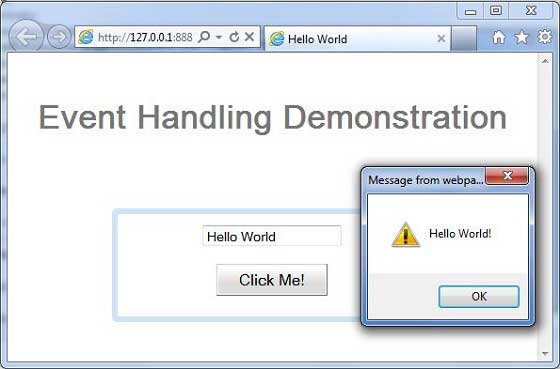
此示例将引导您完成简单的步骤,以展示如何在 GWT 中使用**点击**事件和**键盘按下**事件处理。按照以下步骤更新我们在GWT - 创建应用程序章节中创建的 GWT 应用程序:
| 步骤 | 描述 |
|---|---|
| 1 | 在 _GWT - 创建应用程序_ 章节中说明的 _com.tutorialspoint_ 包下创建一个名为 _HelloWorld_ 的项目。 |
| 2 | 修改 _HelloWorld.gwt.xml_、_HelloWorld.css_、_HelloWorld.html_ 和 _HelloWorld.java_,如下所述。保持其余文件不变。 |
| 3 | 编译并运行应用程序以验证实现逻辑的结果。 |
以下是修改后的模块描述符 **src/com.tutorialspoint/HelloWorld.gwt.xml** 的内容。
<?xml version = "1.0" encoding = "UTF-8"?>
<module rename-to = 'helloworld'>
   <!-- Inherit the core Web Toolkit stuff.                        -->
   <inherits name = 'com.google.gwt.user.User'/>

   <!-- Inherit the default GWT style sheet.                       -->
   <inherits name = 'com.google.gwt.user.theme.clean.Clean'/>

   <!-- Specify the app entry point class.                         -->
   <entry-point class = 'com.tutorialspoint.client.HelloWorld'/>

   <!-- Specify the paths for translatable code                    -->
   <source path = 'client'/>
   <source path = 'shared'/>

</module>
以下是修改后的样式表文件 **war/HelloWorld.css** 的内容。
body {
   text-align: center;
   font-family: verdana, sans-serif;
}

h1 {
   font-size: 2em;
   font-weight: bold;
   color: #777777;
   margin: 40px 0px 70px;
   text-align: center;
}
以下是修改后的 HTML 主机文件 **war/HelloWorld.html** 的内容。
<html>
   <head>
      <title>Hello World</title>
      <link rel = "stylesheet" href = "HelloWorld.css"/>
      <script language = "javascript" src = "helloworld/helloworld.nocache.js">
      </script>
   </head>

   <body>
      <h1>Event Handling Demonstration</h1>
      <div id = "gwtContainer"></div>
   </body>
</html>
让我们在 Java 文件src/com.tutorialspoint/HelloWorld.java中包含以下内容,它将演示在 GWT 中使用事件处理。
package com.tutorialspoint.client;

import com.google.gwt.core.client.EntryPoint;
import com.google.gwt.event.dom.client.ClickEvent;
import com.google.gwt.event.dom.client.ClickHandler;
import com.google.gwt.event.dom.client.KeyCodes;
import com.google.gwt.event.dom.client.KeyDownEvent;
import com.google.gwt.event.dom.client.KeyDownHandler;
import com.google.gwt.user.client.Window;
import com.google.gwt.user.client.ui.Button;
import com.google.gwt.user.client.ui.DecoratorPanel;
import com.google.gwt.user.client.ui.HasHorizontalAlignment;
import com.google.gwt.user.client.ui.RootPanel;
import com.google.gwt.user.client.ui.TextBox;
import com.google.gwt.user.client.ui.VerticalPanel;

public class HelloWorld implements EntryPoint {
   public void onModuleLoad() {
      /**
       * create textbox and attach key down handler
       */
      TextBox textBox = new TextBox();
      textBox.addKeyDownHandler(new MyKeyDownHandler());

      /*
       * create button and attach click handler
       */
      Button button = new Button("Click Me!");
      button.addClickHandler(new MyClickHandler());

      VerticalPanel panel = new VerticalPanel();
      panel.setSpacing(10);
      panel.setHorizontalAlignment(HasHorizontalAlignment.ALIGN_CENTER);
      panel.setSize("300", "100");
      panel.add(textBox);
      panel.add(button);

      DecoratorPanel decoratorPanel = new DecoratorPanel();
      decoratorPanel.add(panel);
      RootPanel.get("gwtContainer").add(decoratorPanel);
   }

   /**
    * create a custom click handler which will call
    * onClick method when button is clicked.
    */
   private class MyClickHandler implements ClickHandler {
      @Override
      public void onClick(ClickEvent event) {
         Window.alert("Hello World!");
      }
   }

   /**
    * create a custom key down handler which will call
    * onKeyDown method when a key is down in textbox.
    */
   private class MyKeyDownHandler implements KeyDownHandler {
      @Override
      public void onKeyDown(KeyDownEvent event) {
         if(event.getNativeKeyCode() == KeyCodes.KEY_ENTER){
            Window.alert(((TextBox)event.getSource()).getValue());
         }
      }
   }
}
完成所有更改后,让我们像在 GWT - 创建应用程序 章节中所做的那样,在开发模式下编译并运行应用程序。如果您的应用程序一切正常,这将产生以下结果 -
GWT - 自定义部件
GWT 提供三种创建自定义用户界面元素的方式。有三种通用的策略可以遵循:
**通过扩展 Composite 类创建部件** - 这是创建自定义部件最常见和最简单的方法。在这里,您可以使用现有的部件来创建具有自定义属性的复合视图。
**使用 JAVA 中的 GWT DOM API 创建部件** - GWT 基本部件就是以这种方式创建的。但这仍然是创建自定义部件的一种非常复杂的方式,应谨慎使用。
**使用 JavaScript 并使用 JSNI 将其包装在部件中** - 通常应仅在最后不得已时才这样做。考虑到原生方法的跨浏览器影响,它变得非常复杂,并且也更难以调试。
使用 Composite 类创建自定义部件
此示例将引导您完成简单的步骤,以展示如何在 GWT 中创建自定义部件。按照以下步骤更新我们在GWT - 基本部件章节中创建的 GWT 应用程序:
在这里,我们将通过扩展 Composite 类来创建一个自定义部件,这是构建自定义部件最简单的方法。
| 步骤 | 描述 |
|---|---|
| 1 | 在 _GWT - 创建应用程序_ 章节中说明的 _com.tutorialspoint_ 包下创建一个名为 _HelloWorld_ 的项目。 |
| 2 | 修改 _HelloWorld.gwt.xml_、_HelloWorld.css_、_HelloWorld.html_ 和 _HelloWorld.java_,如下所述。保持其余文件不变。 |
| 3 | 编译并运行应用程序以验证实现逻辑的结果。 |
以下是修改后的模块描述符 **src/com.tutorialspoint/HelloWorld.gwt.xml** 的内容。
<?xml version = "1.0" encoding = "UTF-8"?>
<module rename-to = 'helloworld'>
   <!-- Inherit the core Web Toolkit stuff.                        -->
   <inherits name = 'com.google.gwt.user.User'/>

   <!-- Inherit the default GWT style sheet.                       -->
   <inherits name = 'com.google.gwt.user.theme.clean.Clean'/>

   <!-- Specify the app entry point class.                         -->
   <entry-point class = 'com.tutorialspoint.client.HelloWorld'/>

   <!-- Specify the paths for translatable code                    -->
   <source path = 'client'/>
   <source path = 'shared'/>

</module>
以下是修改后的样式表文件 **war/HelloWorld.css** 的内容。
body {
   text-align: center;
   font-family: verdana, sans-serif;
}

h1 {
   font-size: 2em;
   font-weight: bold;
   color: #777777;
   margin: 40px 0px 70px;
   text-align: center;
}
以下是修改后的 HTML 主机文件 **war/HelloWorld.html** 的内容。
<html>
   <head>
      <title>Hello World</title>
      <link rel = "stylesheet" href = "HelloWorld.css"/>
      <script language = "javascript" src = "helloworld/helloworld.nocache.js">
      </script>
   </head>

   <body>
      <h1>Custom Widget Demonstration</h1>
      <div id = "gwtContainer"></div>
   </body>
</html>
让我们在 Java 文件src/com.tutorialspoint/HelloWorld.java中包含以下内容,它将演示创建自定义部件。
package com.tutorialspoint.client;

import com.google.gwt.core.client.EntryPoint;
import com.google.gwt.event.dom.client.ClickEvent;
import com.google.gwt.event.dom.client.ClickHandler;
import com.google.gwt.user.client.ui.CheckBox;
import com.google.gwt.user.client.ui.Composite;
import com.google.gwt.user.client.ui.HorizontalPanel;
import com.google.gwt.user.client.ui.RootPanel;
import com.google.gwt.user.client.ui.TextBox;

public class HelloWorld implements EntryPoint {

   /**
    * A composite of a TextBox and a CheckBox that optionally enables it.
    */
   private static class OptionalTextBox extends Composite implements
   ClickHandler {

      private TextBox textBox = new TextBox();
      private CheckBox checkBox = new CheckBox();
      private boolean enabled = true;

      public boolean isEnabled() {
         return enabled;
      }

      public void setEnabled(boolean enabled) {
         this.enabled = enabled;
      }

      /**
       * Style this widget using .optionalTextWidget CSS class.<br/>
       * Style textbox using .optionalTextBox CSS class.<br/>
       * Style checkbox using .optionalCheckBox CSS class.<br/>
       * Constructs an OptionalTextBox with the given caption
       * on the check.
       * @param caption the caption to be displayed with the check box
       */
      public OptionalTextBox(String caption) {
         // place the check above the text box using a vertical panel.
         HorizontalPanel panel = new HorizontalPanel();
         // panel.setBorderWidth(1);
         panel.setSpacing(10);
         panel.add(checkBox);
         panel.add(textBox);

         // all composites must call initWidget() in their constructors.
         initWidget(panel);

         //set style name for entire widget
         setStyleName("optionalTextWidget");

         //set style name for text box
         textBox.setStyleName("optionalTextBox");

         //set style name for check box
         checkBox.setStyleName("optionalCheckBox");
         textBox.setWidth("200");

         // Set the check box's caption, and check it by default.
         checkBox.setText(caption);
         checkBox.setValue(enabled);
         checkBox.addClickHandler(this);
         enableTextBox(enabled,checkBox.getValue());
      }

      public void onClick(ClickEvent event) {
         if (event.getSource() == checkBox) {
            // When the check box is clicked,
            //update the text box's enabled state.
            enableTextBox(enabled,checkBox.getValue());
         }
      }

      private void enableTextBox(boolean enable,boolean isChecked){
         enable = (enable && isChecked) || (!enable && !isChecked);
         textBox.setStyleDependentName("disabled", !enable);
         textBox.setEnabled(enable);
      }
   }

   public void onModuleLoad() {
      // Create an optional text box and add it to the root panel.
      OptionalTextBox otb = new OptionalTextBox(
         "Want to explain the solution?");
      otb.setEnabled(true);
      RootPanel.get().add(otb);
   }
}
完成所有更改后,让我们像在 GWT - 创建应用程序 章节中所做的那样,在开发模式下编译并运行应用程序。如果您的应用程序一切正常,这将产生以下结果 -
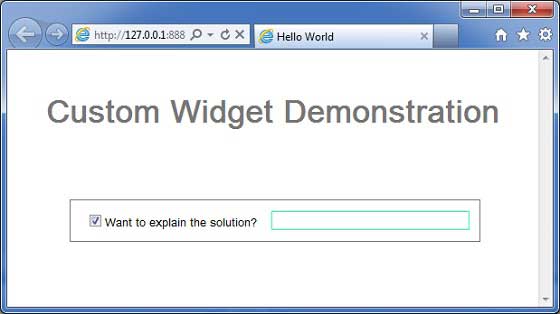
您可以注意到以下几点
通过扩展 Composite 部件创建自定义部件非常简单。
我们使用 GWT 内置部件 TextBox 和 CheckBox 创建了一个部件,从而使用了可重用性的概念。
TextBox 根据复选框的状态禁用/启用。我们提供了一个 API 来启用/禁用控件。
我们通过记录的 CSS 样式公开了内部部件样式。
GWT - UiBinder
简介
UiBinder 是一个旨在分离用户界面功能和视图的框架。
UiBinder 框架允许开发人员将 gwt 应用程序构建为 HTML 页面,并在其中配置 GWT 部件。
UiBinder 框架使与 UI 设计师的协作更加容易,因为 UI 设计师更熟悉 XML、HTML 和 CSS 而不是 Java 源代码。
UIBinder 提供了一种声明式的方式来定义用户界面。
UIBinder 将程序逻辑与 UI 分离。
UIBinder 类似于 JSP 与 Servlet 的关系。
UiBinder 工作流程
步骤 1 - 创建 UI 声明 XML 文件
创建一个基于 XML/HTML 的用户界面声明文件。在我们的示例中,我们创建了一个Login.ui.xml文件。
<ui:UiBinder xmlns:ui = 'urn:ui:com.google.gwt.uibinder'
   xmlns:gwt = 'urn:import:com.google.gwt.user.client.ui'
   xmlns:res = 'urn:with:com.tutorialspoint.client.LoginResources'>
   <ui:with type = "com.tutorialspoint.client.LoginResources" field = "res">
   </ui:with>
   <gwt:HTMLPanel>
   ...
   </gwt:HTMLPanel>
</ui:UiBinder>
步骤 2 - 使用 ui:field 进行后期绑定
在 XML/HTML 元素中使用 ui:field 属性将 XML 中的 UI 字段与 JAVA 文件中的 UI 字段相关联,以便进行后期绑定。
<gwt:Label ui:field = "completionLabel1" />
<gwt:Label ui:field = "completionLabel2" />
步骤 3 - 创建 UI XML 的 JAVA 对应部分
通过扩展 Composite 部件来创建基于 XML 布局的 JAVA 对应部分。在我们的示例中,我们创建了一个Login.java文件。
package com.tutorialspoint.client;
   ...
public class Login extends Composite {
   ...
}
步骤 4 - 使用 UiField 注解将 JAVA UI 字段与之绑定
在Login.java中使用 @UiField 注解来指定对应类成员,以绑定到Login.ui.xml中基于 XML 的字段。
public class Login extends Composite {
   ...
   @UiField
   Label completionLabel1;

   @UiField
   Label completionLabel2;
   ...
}
步骤 5 - 使用 UiTemplate 注解将 JAVA UI 与 UI XML 绑定
指示 GWT 使用 @UiTemplate 注解绑定基于 JAVA 的组件Login.java和基于 XML 的布局Login.ui.xml。
public class Login extends Composite {

   private static LoginUiBinder uiBinder = GWT.create(LoginUiBinder.class);

   /*
    * @UiTemplate is not mandatory but allows multiple XML templates
    * to be used for the same widget.
    * Default file loaded will be <class-name>.ui.xml
    */

   @UiTemplate("Login.ui.xml")
   interface LoginUiBinder extends UiBinder<Widget, Login> {
   }
   ...
}
步骤 6 - 创建 CSS 文件
创建一个外部 CSS 文件Login.css和基于 JAVA 的资源LoginResources.java文件,相当于 css 样式。
.blackText {
   font-family: Arial, Sans-serif;
   color: #000000;
   font-size: 11px;
   text-align: left;
}
...
步骤 7 - 为 CSS 文件创建基于 JAVA 的资源文件
package com.tutorialspoint.client;
...
public interface LoginResources extends ClientBundle {
   public interface MyCss extends CssResource {
      String blackText();

      ...
   }

   @Source("Login.css")
   MyCss style();
}
步骤 8 - 在基于 JAVA 的 UI 代码文件中附加 CSS 资源。
使用基于 JAVA 的部件类Login.java的构造函数附加外部 CSS 文件Login.css。
public Login() {
   this.res = GWT.create(LoginResources.class);
   res.style().ensureInjected();
   initWidget(uiBinder.createAndBindUi(this));
}
UIBinder完整示例
此示例将引导您完成简单的步骤,以展示如何在 GWT 中使用 UIBinder。按照以下步骤更新我们在GWT - 创建应用程序章节中创建的 GWT 应用程序:
| 步骤 | 描述 |
|---|---|
| 1 | 在 _GWT - 创建应用程序_ 章节中说明的 _com.tutorialspoint_ 包下创建一个名为 _HelloWorld_ 的项目。 |
| 2 | 修改 _HelloWorld.gwt.xml_、_HelloWorld.css_、_HelloWorld.html_ 和 _HelloWorld.java_,如下所述。保持其余文件不变。 |
| 3 | 编译并运行应用程序以验证实现逻辑的结果。 |
以下是修改后的模块描述符 **src/com.tutorialspoint/HelloWorld.gwt.xml** 的内容。
<?xml version = "1.0" encoding = "UTF-8"?>
<module rename-to = 'helloworld'>
   <!-- Inherit the core Web Toolkit stuff.                        -->
   <inherits name = 'com.google.gwt.user.User'/>

   <!-- Inherit the default GWT style sheet.                       -->
   <inherits name = 'com.google.gwt.user.theme.clean.Clean'/>
   <!-- Inherit the UiBinder module.                               -->
   <inherits name = "com.google.gwt.uibinder.UiBinder"/>
   <!-- Specify the app entry point class.                         -->
   <entry-point class = 'com.tutorialspoint.client.HelloWorld'/>

   <!-- Specify the paths for translatable code                    -->
   <source path ='client'/>
   <source path = 'shared'/>

</module>
以下是修改后的样式表文件 **war/HelloWorld.css** 的内容。
body {
   text-align: center;
   font-family: verdana, sans-serif;
}

h1 {
   font-size: 2em;
   font-weight: bold;
   color: #777777;
   margin: 40px 0px 70px;
   text-align: center;
}
以下是修改后的 HTML 主机文件 **war/HelloWorld.html** 的内容。
<html>
   <head>
      <title>Hello World</title>
      <link rel = "stylesheet" href = "HelloWorld.css"/>
      <script language = "javascript" src = "helloworld/helloworld.nocache.js">
      </script>
   </head>

   <body>
      <h1>UiBinder Demonstration</h1>
      <div id = "gwtContainer"></div>
   </body>
</html>
现在创建一个新的 UiBinder 模板和所有者类(文件→新建→UiBinder)。
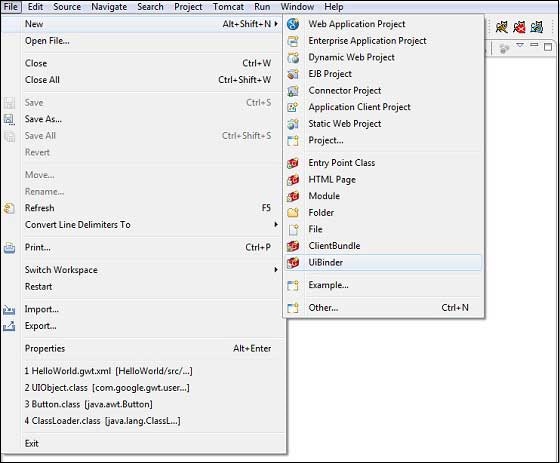
为项目选择客户端包,然后将其命名为 Login。保留所有其他默认值。单击“完成”按钮,插件将创建一个新的 UiBinder 模板和所有者类。
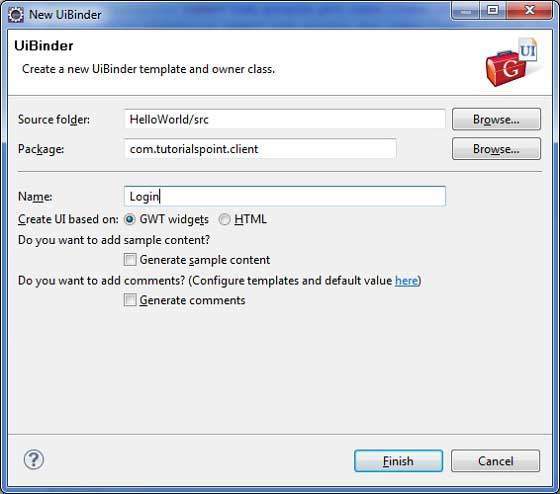
现在在src/com.tutorialspoint/client包中创建 Login.css 文件,并在其中放置以下内容
.blackText {
   font-family: Arial, Sans-serif;
   color: #000000;
   font-size: 11px;
   text-align: left;
}

.redText {
   font-family: Arial, Sans-serif;
   color: #ff0000;
   font-size: 11px;
   text-align: left;
}

.loginButton {
   border: 1px solid #3399DD;
   color: #FFFFFF;
   background: #555555;
   font-size: 11px;
   font-weight: bold;
   margin: 0 5px 0 0;
   padding: 4px 10px 5px;
   text-shadow: 0 -1px 0 #3399DD;
}

.box {
   border: 1px solid #AACCEE;
   display: block;
   font-size: 12px;
   margin: 0 0 5px;
   padding: 3px;
   width: 203px;
}

.background {
   background-color: #999999;
   border: 1px none transparent;
   color: #000000;
   font-size: 11px;
   margin-left: -8px;
   margin-top: 5px;
   padding: 6px;
}
现在在src/com.tutorialspoint/client包中创建 LoginResources.java 文件,并在其中放置以下内容
package com.tutorialspoint.client;

import com.google.gwt.resources.client.ClientBundle;
import com.google.gwt.resources.client.CssResource;

public interface LoginResources extends ClientBundle {
   /**
    * Sample CssResource.
    */
   public interface MyCss extends CssResource {
      String blackText();

      String redText();

      String loginButton();

      String box();

      String background();
   }

   @Source("Login.css")
   MyCss style();
}
将src/com.tutorialspoint/client包中 Login.ui.xml 的内容替换为以下内容
<ui:UiBinder xmlns:ui = 'urn:ui:com.google.gwt.uibinder'
   xmlns:gwt = 'urn:import:com.google.gwt.user.client.ui'
   xmlns:res = 'urn:with:com.tutorialspoint.client.LoginResources'>

   <ui:with type = "com.tutorialspoint.client.LoginResources" field = "res">
   </ui:with>

   <gwt:HTMLPanel>
      <div align = "center">

         <gwt:VerticalPanel res:styleName = "style.background">
            <gwt:Label text = "Login" res:styleName = "style.blackText" />
            <gwt:TextBox ui:field="loginBox" res:styleName = "style.box" />
            <gwt:Label text = "Password" res:styleName = "style.blackText" />
            <gwt:PasswordTextBox ui:field = "passwordBox" res:styleName = "style.box" />

            <gwt:HorizontalPanel verticalAlignment = "middle">
               <gwt:Button ui:field = "buttonSubmit" text="Submit"
                  res:styleName = "style.loginButton" />
               <gwt:CheckBox ui:field = "myCheckBox" />
               <gwt:Label ui:field = "myLabel" text = "Remember me"
                  res:styleName = "style.blackText" />
            </gwt:HorizontalPanel>

            <gwt:Label ui:field = "completionLabel1" res:styleName = "style.blackText" />
            <gwt:Label ui:field = "completionLabel2" res:styleName = "style.blackText" />
         </gwt:VerticalPanel>

      </div>
   </gwt:HTMLPanel>

</ui:UiBinder>
将src/com.tutorialspoint/client包中 Login.java 的内容替换为以下内容
package com.tutorialspoint.client;
import com.google.gwt.core.client.GWT;
import com.google.gwt.event.dom.client.ClickEvent;
import com.google.gwt.event.logical.shared.ValueChangeEvent;
import com.google.gwt.uibinder.client.UiBinder;
import com.google.gwt.uibinder.client.UiField;
import com.google.gwt.uibinder.client.UiHandler;
import com.google.gwt.uibinder.client.UiTemplate;
import com.google.gwt.user.client.Window;
import com.google.gwt.user.client.ui.Composite;
import com.google.gwt.user.client.ui.Label;
import com.google.gwt.user.client.ui.TextBox;
import com.google.gwt.user.client.ui.Widget;
public class Login extends Composite {
private static LoginUiBinder uiBinder = GWT.create(LoginUiBinder.class);
/*
* @UiTemplate is not mandatory but allows multiple XML templates
* to be used for the same widget.
* Default file loaded will be <class-name>.ui.xml
*/
@UiTemplate("Login.ui.xml")
interface LoginUiBinder extends UiBinder<Widget, Login> {
}
@UiField(provided = true)
final LoginResources res;
public Login() {
this.res = GWT.create(LoginResources.class);
res.style().ensureInjected();
initWidget(uiBinder.createAndBindUi(this));
}
@UiField
TextBox loginBox;
@UiField
TextBox passwordBox;
@UiField
Label completionLabel1;
@UiField
Label completionLabel2;
private Boolean tooShort = false;
/*
* Method name is not relevant, the binding is done according to the class
* of the parameter.
*/
@UiHandler("buttonSubmit")
void doClickSubmit(ClickEvent event) {
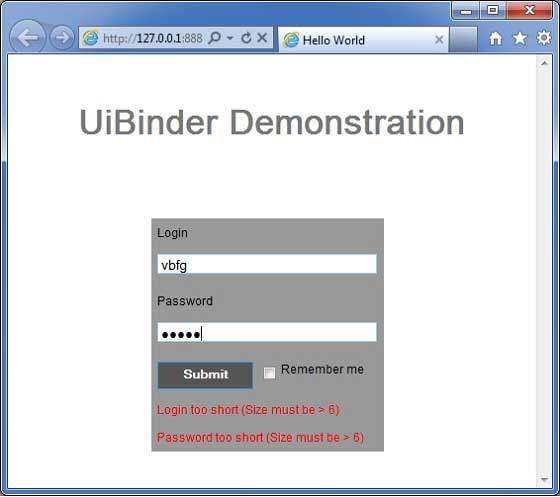
if (!tooShort) {
Window.alert("Login Successful!");
} else {
Window.alert("Login or Password is too short!");
}
}
@UiHandler("loginBox")
void handleLoginChange(ValueChangeEvent<String> event) {
if (event.getValue().length() < 6) {
completionLabel1.setText("Login too short (Size must be > 6)");
tooShort = true;
} else {
tooShort = false;
completionLabel1.setText("");
}
}
@UiHandler("passwordBox")
void handlePasswordChange(ValueChangeEvent<String> event) {
if (event.getValue().length() < 6) {
tooShort = true;
completionLabel2.setText("Password too short (Size must be > 6)");
} else {
tooShort = false;
completionLabel2.setText("");
}
}
}
让我们在 Java 文件src/com.tutorialspoint/HelloWorld.java中包含以下内容,它将演示 UiBinder 的用法。
package com.tutorialspoint.client;

import com.google.gwt.core.client.EntryPoint;
import com.google.gwt.user.client.ui.RootPanel;

public class HelloWorld implements EntryPoint {
   public void onModuleLoad() {
      RootPanel.get().add(new Login());
   }
}
完成所有更改后,让我们像在 GWT - 创建应用程序 章节中所做的那样,在开发模式下编译并运行应用程序。如果您的应用程序一切正常,这将产生以下结果 -
GWT - RPC 通信
基于 GWT 的应用程序通常由客户端模块和服务器端模块组成。客户端代码在浏览器中运行,服务器端代码在 Web 服务器中运行。客户端代码必须通过网络发出 HTTP 请求才能访问服务器端数据。
RPC,远程过程调用是 GWT 使用的机制,客户端代码可以直接执行服务器端方法。
GWT RPC 基于 servlet。
GWT RPC 是异步的,客户端在通信过程中永远不会被阻塞。
使用 GWT RPC,Java 对象可以直接在客户端和服务器之间发送(由 GWT 框架自动序列化)。
服务器端 servlet 被称为 **服务**。
从客户端代码调用服务器端 servlet 方法的远程过程调用被称为 **调用服务**。
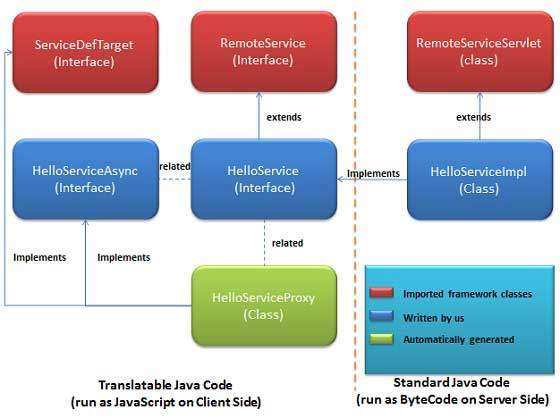
GWT RPC 组件
以下是 GWT RPC 通信机制中使用的三个组件
- 在服务器上运行的远程服务(服务器端 servlet)。
- 用于调用该服务的客户端代码。
- 将在客户端和服务器之间传递的 Java 数据对象。
GWT 客户端和服务器都自动序列化和反序列化数据,因此开发人员无需序列化/反序列化对象,数据对象可以通过 HTTP 传输。
下图显示了 RPC 架构。
要开始使用 RPC,我们需要遵循 GWT 约定。
RPC 通信工作流程
步骤 1 - 创建可序列化的模型类
在客户端定义一个应该可序列化的 Java 模型对象。
public class Message implements Serializable {
   ...
   private String message;
   public Message(){};

   public void setMessage(String message) {
      this.message = message;
   }
   ...
}
步骤 2 - 创建服务接口
在客户端为服务定义一个扩展 RemoteService 的接口,列出所有服务方法。
使用注释 @RemoteServiceRelativePath 将服务映射到相对于模块基本 URL 的远程 servlet 的默认路径。
@RemoteServiceRelativePath("message")
public interface MessageService extends RemoteService {
   Message getMessage(String input);
}
步骤 3 - 创建异步服务接口
在客户端(与上面提到的服务相同的位置)为服务定义一个异步接口,这将在 GWT 客户端代码中使用。
public interface MessageServiceAsync {
   void getMessage(String input, AsyncCallback<Message> callback);
}
步骤 4 - 创建服务实现 Servlet 类
在服务器端实现接口,并且该类应该扩展 RemoteServiceServlet 类。
public class MessageServiceImpl extends RemoteServiceServlet
   implements MessageService{
   ...
   public Message getMessage(String input) {
      String messageString = "Hello " + input + "!";
      Message message = new Message();
      message.setMessage(messageString);
      return message;
   }
}
步骤 5 - 更新 Web.xml 以包含 Servlet 声明
编辑 Web 应用程序部署描述符 (web.xml) 以包含 MessageServiceImpl Servlet 声明。
<web-app>
   ...
   <servlet>
      <servlet-name>messageServiceImpl</servlet-name>
      <servlet-class>com.tutorialspoint.server.MessageServiceImpl
      </servlet-class>
   </servlet>

   <servlet-mapping>
      <servlet-name>messageServiceImpl</servlet-name>
      <url-pattern>/helloworld/message</url-pattern>
   </servlet-mapping>
</web-app>
步骤 6 - 在应用程序代码中进行远程过程调用
创建服务代理类。
MessageServiceAsync messageService = GWT.create(MessageService.class);
创建 AsyncCallback 处理程序来处理 RPC 回调,其中服务器将消息返回给客户端
class MessageCallBack implements AsyncCallback<Message> {

   @Override
   public void onFailure(Throwable caught) {
      Window.alert("Unable to obtain server response: "
      + caught.getMessage());
   }

   @Override
   public void onSuccess(Message result) {
      Window.alert(result.getMessage());
   }
}
当用户与 UI 交互时调用远程服务
public class HelloWorld implements EntryPoint {
   ...
   public void onModuleLoad() {
   ...
      buttonMessage.addClickHandler(new ClickHandler() {
         @Override
         public void onClick(ClickEvent event) {
            messageService.getMessage(txtName.getValue(),
            new MessageCallBack());
         }
      });
   ...
   }
}
RPC 通信完整示例
此示例将引导您完成简单的步骤,以展示 GWT 中 RPC 通信的示例。请按照以下步骤更新我们在“GWT - 创建应用程序”章节中创建的 GWT 应用程序 -
| 步骤 | 描述 |
|---|---|
| 1 | 在 _GWT - 创建应用程序_ 章节中说明的 _com.tutorialspoint_ 包下创建一个名为 _HelloWorld_ 的项目。 |
| 2 | 修改 _HelloWorld.gwt.xml_、_HelloWorld.css_、_HelloWorld.html_ 和 _HelloWorld.java_,如下所述。保持其余文件不变。 |
| 3 | 编译并运行应用程序以验证实现逻辑的结果。 |
以下是修改后的模块描述符 **src/com.tutorialspoint/HelloWorld.gwt.xml** 的内容。
<?xml version = "1.0" encoding = "UTF-8"?>
<module rename-to = 'helloworld'>
   <!-- Inherit the core Web Toolkit stuff.                        -->
   <inherits name = 'com.google.gwt.user.User'/>

   <!-- Inherit the default GWT style sheet.                       -->
   <inherits name = 'com.google.gwt.user.theme.clean.Clean'/>
   <!-- Inherit the UiBinder module.                               -->
   <inherits name = "com.google.gwt.uibinder.UiBinder"/>
   <!-- Specify the app entry point class.                         -->
   <entry-point class = 'com.tutorialspoint.client.HelloWorld'/>

   <!-- Specify the paths for translatable code                    -->
   <source path = 'client'/>
   <source path = 'shared'/>

</module>
以下是修改后的样式表文件 **war/HelloWorld.css** 的内容。
body {
   text-align: center;
   font-family: verdana, sans-serif;
}

h1 {
   font-size: 2em;
   font-weight: bold;
   color: #777777;
   margin: 40px 0px 70px;
   text-align: center;
}
以下是修改后的 HTML 主机文件 **war/HelloWorld.html** 的内容。
<html>
<head>
<title>Hello World</title>
<link rel = "stylesheet" href = "HelloWorld.css"/>
<script language = "javascript" src = "helloworld/helloworld.nocache.js">
</script>
</head>
<body>
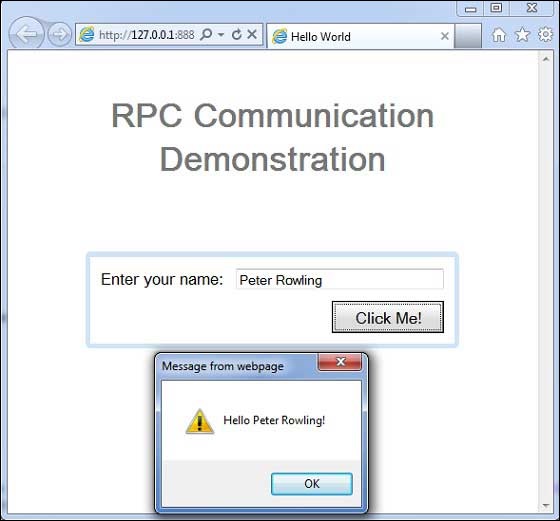
<h1>RPC Communication Demonstration</h1>
<div id = "gwtContainer"></div>
</body>
</html>
现在在 **src/com.tutorialspoint/client** 包中创建 Message.java 文件,并将以下内容放入其中
package com.tutorialspoint.client;

import java.io.Serializable;

public class Message implements Serializable {

   private static final long serialVersionUID = 1L;
   private String message;
   public Message(){};

   public void setMessage(String message) {
      this.message = message;
   }

   public String getMessage() {
      return message;
   }
}
现在在 **src/com.tutorialspoint/client** 包中创建 MessageService.java 文件,并将以下内容放入其中
package com.tutorialspoint.client;

import com.google.gwt.user.client.rpc.RemoteService;
import com.google.gwt.user.client.rpc.RemoteServiceRelativePath;

@RemoteServiceRelativePath("message")
public interface MessageService extends RemoteService {
   Message getMessage(String input);
}
现在在 **src/com.tutorialspoint/client** 包中创建 MessageServiceAsync.java 文件,并将以下内容放入其中
package com.tutorialspoint.client;

import com.google.gwt.user.client.rpc.AsyncCallback;

public interface MessageServiceAsync {
   void getMessage(String input, AsyncCallback<Message> callback);
}
现在在 **src/com.tutorialspoint/server** 包中创建 MessageServiceImpl.java 文件,并将以下内容放入其中
package com.tutorialspoint.server;

import com.google.gwt.user.server.rpc.RemoteServiceServlet;
import com.tutorialspoint.client.Message;
import com.tutorialspoint.client.MessageService;

public class MessageServiceImpl extends RemoteServiceServlet
   implements MessageService{

   private static final long serialVersionUID = 1L;

   public Message getMessage(String input) {
      String messageString = "Hello " + input + "!";
      Message message = new Message();
      message.setMessage(messageString);
      return message;
   }
}
更新修改后的 Web 应用程序部署描述符 **war/WEB-INF/web.xml** 的内容,以包含 MessageServiceImpl Servlet 声明。
<?xml version = "1.0" encoding = "UTF-8"?>
<!DOCTYPE web-app
   PUBLIC "-//Sun Microsystems, Inc.//DTD Web Application 2.3//EN"
   "http://java.sun.com/dtd/web-app_2_3.dtd">

<web-app>
   <!-- Default page to serve -->
   <welcome-file-list>
      <welcome-file>HelloWorld.html</welcome-file>
   </welcome-file-list>

   <servlet>
      <servlet-name>messageServiceImpl</servlet-name>
      <servlet-class>com.tutorialspoint.server.MessageServiceImpl
      </servlet-class>
   </servlet>

   <servlet-mapping>
      <servlet-name>messageServiceImpl</servlet-name>
      <url-pattern>/helloworld/message</url-pattern>
   </servlet-mapping>
</web-app>
将 **src/com.tutorialspoint/client** 包中 HelloWorld.java 的内容替换为以下内容
package com.tutorialspoint.client;

import com.google.gwt.core.client.EntryPoint;
import com.google.gwt.core.client.GWT;
import com.google.gwt.event.dom.client.ClickEvent;
import com.google.gwt.event.dom.client.ClickHandler;
import com.google.gwt.event.dom.client.KeyCodes;
import com.google.gwt.event.dom.client.KeyUpEvent;
import com.google.gwt.event.dom.client.KeyUpHandler;
import com.google.gwt.user.client.Window;
import com.google.gwt.user.client.rpc.AsyncCallback;
import com.google.gwt.user.client.ui.Button;
import com.google.gwt.user.client.ui.DecoratorPanel;
import com.google.gwt.user.client.ui.HasHorizontalAlignment;
import com.google.gwt.user.client.ui.HorizontalPanel;
import com.google.gwt.user.client.ui.Label;
import com.google.gwt.user.client.ui.RootPanel;
import com.google.gwt.user.client.ui.TextBox;
import com.google.gwt.user.client.ui.VerticalPanel;

public class HelloWorld implements EntryPoint {

   private MessageServiceAsync messageService =
   GWT.create(MessageService.class);

   private class MessageCallBack implements AsyncCallback<Message> {
      @Override
      public void onFailure(Throwable caught) {
         /* server side error occured */
         Window.alert("Unable to obtain server response: " + caught.getMessage());
      }
      @Override
      public void onSuccess(Message result) {
          /* server returned result, show user the message */
         Window.alert(result.getMessage());
      }
   }

   public void onModuleLoad() {
      /*create UI */
      final TextBox txtName = new TextBox();
      txtName.setWidth("200");
      txtName.addKeyUpHandler(new KeyUpHandler() {
         @Override
         public void onKeyUp(KeyUpEvent event) {
            if(event.getNativeKeyCode() == KeyCodes.KEY_ENTER){
               /* make remote call to server to get the message */
               messageService.getMessage(txtName.getValue(),
               new MessageCallBack());
            }
         }
      });
      Label lblName = new Label("Enter your name: ");

      Button buttonMessage = new Button("Click Me!");

      buttonMessage.addClickHandler(new ClickHandler() {
         @Override
         public void onClick(ClickEvent event) {
            /* make remote call to server to get the message */
            messageService.getMessage(txtName.getValue(),
            new MessageCallBack());
         }
      });

      HorizontalPanel hPanel = new HorizontalPanel();
      hPanel.add(lblName);
      hPanel.add(txtName);
      hPanel.setCellWidth(lblName, "130");

      VerticalPanel vPanel = new VerticalPanel();
      vPanel.setSpacing(10);
      vPanel.add(hPanel);
      vPanel.add(buttonMessage);
      vPanel.setCellHorizontalAlignment(buttonMessage,
      HasHorizontalAlignment.ALIGN_RIGHT);

      DecoratorPanel panel = new DecoratorPanel();
      panel.add(vPanel);

      // Add widgets to the root panel.
      RootPanel.get("gwtContainer").add(panel);
   }
}
完成所有更改后,让我们像在 GWT - 创建应用程序 章节中所做的那样,在开发模式下编译并运行应用程序。如果您的应用程序一切正常,这将产生以下结果 -
GWT - JUnit 集成
GWT 为使用 JUnit 测试框架自动测试客户端代码提供了出色的支持。在本文中,我们将演示 GWT 和 JUNIT 的集成。
下载 Junit 归档文件
JUnit 官方网站 - https://www.junit.org
下载 **Junit-4.10.jar**
| 操作系统 | 归档文件名 |
|---|---|
| Windows | junit4.10.jar |
| Linux | junit4.10.jar |
| Mac | junit4.10.jar |
将下载的 jar 文件存储到计算机上的某个位置。我们将其存储在 **C:/ > JUNIT**
找到 GWT 安装文件夹
| 操作系统 | GWT 安装文件夹 |
|---|---|
| Windows | C:\GWT\gwt-2.1.0 |
| Linux | /usr/local/GWT/gwt-2.1.0 |
| Mac | /Library/GWT/gwt-2.1.0 |
GWTTestCase 类
GWT 提供了 **GWTTestCase** 基类,该基类提供了 JUnit 集成。运行扩展 GWTTestCase 的已编译类在 JUnit 下会启动 HtmlUnit 浏览器,该浏览器用于模拟测试执行期间的应用程序行为。
GWTTestCase 是从 JUnit 的 TestCase 派生的类,可以使用 JUnit TestRunner 运行它。
使用 webAppCreator
GWT 提供了一个特殊的命令行工具 **webAppCreator**,它可以为我们生成一个入门测试用例,以及用于在开发模式和生产模式下进行测试的 ant 目标和 eclipse 启动配置。
打开命令提示符并转到 **C:\ > GWT_WORKSPACE >**,您希望在其中创建一个具有测试支持的新项目。运行以下命令
C:\GWT_WORKSPACE>C:\GWT\gwt-2.1.0\webAppCreator
   -out HelloWorld
   -junit C:\JUNIT\junit-4.10.jar
   com.tutorialspoint.HelloWorld
值得注意的要点
- 我们正在执行 webAppCreator 命令行实用程序。
- HelloWorld 是要创建的项目的名称
- -junit 选项指示 webAppCreator 向项目添加 junit 支持
- com.tutorialspoint.HelloWorld 是模块的名称
验证输出。
Created directory HelloWorld\src
Created directory HelloWorld\war
Created directory HelloWorld\war\WEB-INF
Created directory HelloWorld\war\WEB-INF\lib
Created directory HelloWorld\src\com\tutorialspoint
Created directory HelloWorld\src\com\tutorialspoint\client
Created directory HelloWorld\src\com\tutorialspoint\server
Created directory HelloWorld\src\com\tutorialspoint\shared
Created directory HelloWorld\test\com\tutorialspoint
Created directory HelloWorld\test\com\tutorialspoint\client
Created file HelloWorld\src\com\tutorialspoint\HelloWorld.gwt.xml
Created file HelloWorld\war\HelloWorld.html
Created file HelloWorld\war\HelloWorld.css
Created file HelloWorld\war\WEB-INF\web.xml
Created file HelloWorld\src\com\tutorialspoint\client\HelloWorld.java
Created file
HelloWorld\src\com\tutorialspoint\client\GreetingService.java
Created file
HelloWorld\src\com\tutorialspoint\client\GreetingServiceAsync.java
Created file
HelloWorld\src\com\tutorialspoint\server\GreetingServiceImpl.java
Created file HelloWorld\src\com\tutorialspoint\shared\FieldVerifier.java
Created file HelloWorld\build.xml
Created file HelloWorld\README.txt
Created file HelloWorld\test\com\tutorialspoint\HelloWorldJUnit.gwt.xml
Created file HelloWorld\test\com\tutorialspoint\client\HelloWorldTest.java
Created file HelloWorld\.project
Created file HelloWorld\.classpath
Created file HelloWorld\HelloWorld.launch
Created file HelloWorld\HelloWorldTest-dev.launch
Created file HelloWorld\HelloWorldTest-prod.launch
理解测试类:HelloWorldTest.java
package com.tutorialspoint.client;

import com.tutorialspoint.shared.FieldVerifier;
import com.google.gwt.core.client.GWT;
import com.google.gwt.junit.client.GWTTestCase;
import com.google.gwt.user.client.rpc.AsyncCallback;
import com.google.gwt.user.client.rpc.ServiceDefTarget;

/**
 * GWT JUnit tests must extend GWTTestCase.
 */
public class HelloWorldTest extends GWTTestCase {

   /**
    * must refer to a valid module that sources this class.
    */
   public String getModuleName() {
      return "com.tutorialspoint.HelloWorldJUnit";
   }

   /**
    * tests the FieldVerifier.
    */
   public void testFieldVerifier() {
      assertFalse(FieldVerifier.isValidName(null));
      assertFalse(FieldVerifier.isValidName(""));
      assertFalse(FieldVerifier.isValidName("a"));
      assertFalse(FieldVerifier.isValidName("ab"));
      assertFalse(FieldVerifier.isValidName("abc"));
      assertTrue(FieldVerifier.isValidName("abcd"));
   }

   /**
    * this test will send a request to the server using the greetServer
    *  method in GreetingService and verify the response.
    */
   public void testGreetingService() {
      /* create the service that we will test. */
      GreetingServiceAsync greetingService =
      GWT.create(GreetingService.class);
      ServiceDefTarget target = (ServiceDefTarget) greetingService;
      target.setServiceEntryPoint(GWT.getModuleBaseURL()
      + "helloworld/greet");

      /* since RPC calls are asynchronous, we will need to wait
       for a response after this test method returns. This line
       tells the test runner to wait up to 10 seconds
       before timing out. */
      delayTestFinish(10000);

      /* send a request to the server. */
      greetingService.greetServer("GWT User",
         new AsyncCallback<String>() {
         public void onFailure(Throwable caught) {
            /* The request resulted in an unexpected error. */
            fail("Request failure: " + caught.getMessage());
         }

         public void onSuccess(String result) {
            /* verify that the response is correct. */
            assertTrue(result.startsWith("Hello, GWT User!"));

            /* now that we have received a response, we need to
             tell the test runner that the test is complete.
             You must call finishTest() after an asynchronous test
             finishes successfully, or the test will time out.*/
            finishTest();
         }
      });
   }
}
值得注意的要点
| 序号 | 注意 |
|---|---|
| 1 | HelloWorldTest 类是在 HelloWorld/test 目录下的 com.tutorialspoint.client 包中生成的。 |
| 2 | HelloWorldTest 类将包含 HelloWorld 的单元测试用例。 |
| 3 | HelloWorldTest 类扩展了 com.google.gwt.junit.client 包中的 GWTTestCase 类。 |
| 4 | HelloWorldTest 类有一个抽象方法 (getModuleName),它必须返回 GWT 模块的名称。对于 HelloWorld,它是 com.tutorialspoint.HelloWorldJUnit。 |
| 5 | HelloWorldTest 类生成了两个示例测试用例 testFieldVerifier、testSimple。我们添加了 testGreetingService。 |
| 6 | 这些方法使用它从 JUnit Assert 类(GWTTestCase 的祖先)继承的众多 assert* 函数之一。 |
| 7 | assertTrue(boolean) 函数断言传入的布尔参数计算结果为 true。如果不是,则在 JUnit 中运行时测试将失败。 |
GWT - JUnit 集成完整示例
此示例将引导您完成简单的步骤,以展示 JUnit 集成在 GWT 中的示例。
请按照以下步骤更新我们上面创建的 GWT 应用程序 -
| 步骤 | 描述 |
|---|---|
| 1 | 使用导入现有项目向导(文件 → 导入 → 常规 → 将现有项目导入工作区)在 eclipse 中导入名为 HelloWorld 的项目。 |
| 2 | 修改 _HelloWorld.gwt.xml_、_HelloWorld.css_、_HelloWorld.html_ 和 _HelloWorld.java_,如下所述。保持其余文件不变。 |
| 3 | 编译并运行应用程序以验证实现逻辑的结果。 |
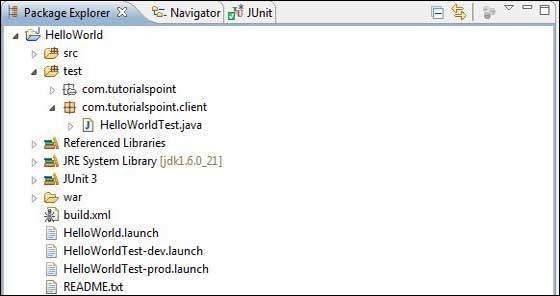
以下是 eclipse 中的项目结构。
以下是修改后的模块描述符 **src/com.tutorialspoint/HelloWorld.gwt.xml** 的内容。
<?xml version = "1.0" encoding = "UTF-8"?>
<module rename-to = 'helloworld'>
   <!-- Inherit the core Web Toolkit stuff.                        -->
   <inherits name = 'com.google.gwt.user.User'/>

   <!-- Inherit the default GWT style sheet.                       -->
   <inherits name = 'com.google.gwt.user.theme.clean.Clean'/>
   <!-- Inherit the UiBinder module.                               -->
   <inherits name = "com.google.gwt.uibinder.UiBinder"/>
   <!-- Specify the app entry point class.                         -->
   <entry-point class = 'com.tutorialspoint.client.HelloWorld'/>

   <!-- Specify the paths for translatable code                    -->
   <source path = 'client'/>
   <source path = 'shared'/>

</module>
以下是修改后的样式表文件 **war/HelloWorld.css** 的内容。
body {
   text-align: center;
   font-family: verdana, sans-serif;
}

h1 {
   font-size: 2em;
   font-weight: bold;
   color: #777777;
   margin: 40px 0px 70px;
   text-align: center;
}
以下是修改后的 HTML 主机文件 **war/HelloWorld.html** 的内容。
<html>
   <head>
      <title>Hello World</title>
      <link rel = "stylesheet" href = "HelloWorld.css"/>
      <script language = "javascript" src = "helloworld/helloworld.nocache.js">
      </script>
   </head>

   <body>
      <h1>JUnit Integration Demonstration</h1>
      <div id = "gwtContainer"></div>
   </body>
</html>
将 **src/com.tutorialspoint/client** 包中 HelloWorld.java 的内容替换为以下内容
package com.tutorialspoint.client;

import com.google.gwt.core.client.EntryPoint;

import com.google.gwt.core.client.GWT;
import com.google.gwt.event.dom.client.ClickEvent;
import com.google.gwt.event.dom.client.ClickHandler;
import com.google.gwt.event.dom.client.KeyCodes;
import com.google.gwt.event.dom.client.KeyUpEvent;
import com.google.gwt.event.dom.client.KeyUpHandler;

import com.google.gwt.user.client.Window;
import com.google.gwt.user.client.rpc.AsyncCallback;
import com.google.gwt.user.client.ui.Button;
import com.google.gwt.user.client.ui.DecoratorPanel;
import com.google.gwt.user.client.ui.HasHorizontalAlignment;
import com.google.gwt.user.client.ui.HorizontalPanel;
import com.google.gwt.user.client.ui.Label;
import com.google.gwt.user.client.ui.RootPanel;
import com.google.gwt.user.client.ui.TextBox;
import com.google.gwt.user.client.ui.VerticalPanel;

public class HelloWorld implements EntryPoint {

   public void onModuleLoad() {
      /*create UI */
      final TextBox txtName = new TextBox();
      txtName.setWidth("200");
      txtName.addKeyUpHandler(new KeyUpHandler() {
         @Override
         public void onKeyUp(KeyUpEvent event) {
            if(event.getNativeKeyCode() == KeyCodes.KEY_ENTER){
               Window.alert(getGreeting(txtName.getValue()));
            }
         }
      });
      Label lblName = new Label("Enter your name: ");

      Button buttonMessage = new Button("Click Me!");

      buttonMessage.addClickHandler(new ClickHandler() {
         @Override
         public void onClick(ClickEvent event) {
            Window.alert(getGreeting(txtName.getValue()));
         }
      });

      HorizontalPanel hPanel = new HorizontalPanel();
      hPanel.add(lblName);
      hPanel.add(txtName);
      hPanel.setCellWidth(lblName, "130");

      VerticalPanel vPanel = new VerticalPanel();
      vPanel.setSpacing(10);
      vPanel.add(hPanel);
      vPanel.add(buttonMessage);
      vPanel.setCellHorizontalAlignment(buttonMessage,
      HasHorizontalAlignment.ALIGN_RIGHT);

      DecoratorPanel panel = new DecoratorPanel();
      panel.add(vPanel);

      // Add widgets to the root panel.
      RootPanel.get("gwtContainer").add(panel);
   }

   public String getGreeting(String name){
      return "Hello "+name+"!";
   }
}
将 **test/com.tutorialspoint/client** 包中 HelloWorldTest.java 的内容替换为以下内容
package com.tutorialspoint.client;

import com.tutorialspoint.shared.FieldVerifier;
import com.google.gwt.core.client.GWT;
import com.google.gwt.junit.client.GWTTestCase;
import com.google.gwt.user.client.rpc.AsyncCallback;
import com.google.gwt.user.client.rpc.ServiceDefTarget;

/**
 * GWT JUnit tests must extend GWTTestCase.
 */
public class HelloWorldTest extends GWTTestCase {

   /**
    * must refer to a valid module that sources this class.
    */
   public String getModuleName() {
      return "com.tutorialspoint.HelloWorldJUnit";
   }

   /**
    * tests the FieldVerifier.
    */
   public void testFieldVerifier() {
      assertFalse(FieldVerifier.isValidName(null));
      assertFalse(FieldVerifier.isValidName(""));
      assertFalse(FieldVerifier.isValidName("a"));
      assertFalse(FieldVerifier.isValidName("ab"));
      assertFalse(FieldVerifier.isValidName("abc"));
      assertTrue(FieldVerifier.isValidName("abcd"));
   }

   /**
      * this test will send a request to the server using the greetServer
      *  method in GreetingService and verify the response.
   */
   public void testGreetingService() {
      /* create the service that we will test. */
      GreetingServiceAsync greetingService =
      GWT.create(GreetingService.class);
      ServiceDefTarget target = (ServiceDefTarget) greetingService;
      target.setServiceEntryPoint(GWT.getModuleBaseURL()
      + "helloworld/greet");

      /* since RPC calls are asynchronous, we will need to wait
       for a response after this test method returns. This line
       tells the test runner to wait up to 10 seconds
       before timing out. */
      delayTestFinish(10000);

      /* send a request to the server. */
      greetingService.greetServer("GWT User",
         new AsyncCallback<String>() {
         public void onFailure(Throwable caught) {
            /* The request resulted in an unexpected error. */
            fail("Request failure: " + caught.getMessage());
         }

         public void onSuccess(String result) {
            /* verify that the response is correct. */
            assertTrue(result.startsWith("Hello, GWT User!"));

            /* now that we have received a response, we need to
             tell the test runner that the test is complete.
             You must call finishTest() after an asynchronous test
             finishes successfully, or the test will time out.*/
            finishTest();
         }
      });

      /**
         * tests the getGreeting method.
      */
      public void testGetGreeting() {
         HelloWorld helloWorld = new HelloWorld();
         String name = "Robert";
         String expectedGreeting = "Hello "+name+"!";
         assertEquals(expectedGreeting,helloWorld.getGreeting(name));
      }
   }
}
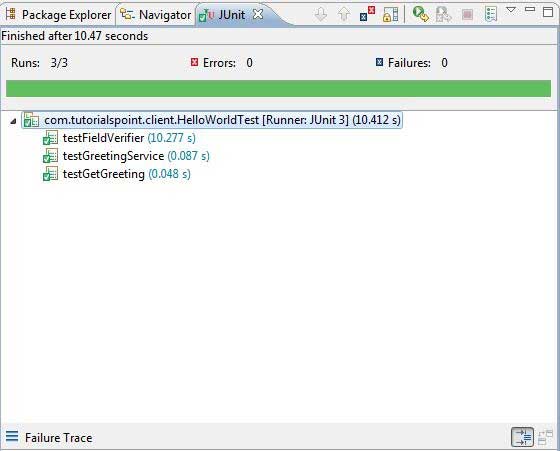
使用生成的启动配置在 Eclipse 中运行测试用例
我们将使用 webAppCreator 为开发模式和生产模式生成的启动配置在 Eclipse 中运行单元测试。
在开发模式下运行 JUnit 测试
- 从 Eclipse 菜单栏中,选择运行 → 运行配置...
- 在 JUnit 部分,选择 HelloWorldTest-dev
- 要将更改保存到参数,请按应用
- 要运行测试,请按运行
如果您的应用程序一切正常,这将产生以下结果 -
在生产模式下运行 JUnit 测试
- 从 Eclipse 菜单栏中,选择运行 → 运行配置...
- 在 JUnit 部分,选择 HelloWorldTest-prod
- 要将更改保存到参数,请按应用
- 要运行测试,请按运行
如果您的应用程序一切正常,这将产生以下结果 -
GWT - 调试应用
GWT 提供了调试客户端和服务器端代码的出色功能。
在开发模式下,GWT 应用程序基于 Java 代码,不会转换为 JavaScript。
当应用程序在开发模式下运行时,Java 虚拟机 (JVM) 实际上正在执行应用程序代码作为已编译的 Java 字节码,使用 GWT 功能连接到浏览器窗口。
GWT 使用基于浏览器的插件连接到 JVM。
因此,开发人员可以自由使用任何基于 Java 的 IDE 来调试客户端 GWT 代码以及服务器端代码。
在本文中,我们将演示使用 Eclipse 调试 GWT 客户端代码的用法。我们将执行以下任务 -
- 在代码中设置断点并在断点资源管理器中查看它们。
- 在调试期间逐行单步执行代码。
- 查看变量的值。
- 检查所有变量的值。
- 检查表达式的值。
- 显示挂起线程的堆栈帧。
调试示例
此示例将引导您完成简单的步骤,以演示调试 GWT 应用程序。请按照以下步骤更新我们在“GWT - 创建应用程序”章节中创建的 GWT 应用程序 -
| 步骤 | 描述 |
|---|---|
| 1 | 在 _GWT - 创建应用程序_ 章节中说明的 _com.tutorialspoint_ 包下创建一个名为 _HelloWorld_ 的项目。 |
| 2 | 修改 _HelloWorld.gwt.xml_、_HelloWorld.css_、_HelloWorld.html_ 和 _HelloWorld.java_,如下所述。保持其余文件不变。 |
| 3 | 编译并运行应用程序以验证实现逻辑的结果。 |
以下是修改后的模块描述符 **src/com.tutorialspoint/HelloWorld.gwt.xml** 的内容。
<?xml version = "1.0" encoding = "UTF-8"?>
<module rename-to = 'helloworld'>
   <!-- Inherit the core Web Toolkit stuff.                        -->
   <inherits name = 'com.google.gwt.user.User'/>

   <!-- Inherit the default GWT style sheet.                       -->
   <inherits name = 'com.google.gwt.user.theme.clean.Clean'/>

   <!-- Specify the app entry point class.                         -->
   <entry-point class = 'com.tutorialspoint.client.HelloWorld'/>

   <!-- Specify the paths for translatable code                    -->
   <source path = 'client'/>
   <source path = 'shared'/>

</module>
以下是修改后的样式表文件 **war/HelloWorld.css** 的内容。
body {
   text-align: center;
   font-family: verdana, sans-serif;
}

h1 {
   font-size: 2em;
   font-weight: bold;
   color: #777777;
   margin: 40px 0px 70px;
   text-align: center;
}

.gwt-Label{
   font-size: 150%;
   font-weight: bold;
   color:red;
   padding:5px;
   margin:5px;
}
以下是修改后的 HTML 主机文件war/HelloWorld.html的内容,以容纳两个按钮。
<html>
   <head>
      <title>Hello World</title>
      <link rel = "stylesheet" href = "HelloWorld.css"/>
      <script language = "javascript" src = "helloworld/helloworld.nocache.js">
      </script>
   </head>

   <body>
      <h1>Debugging Application Demonstration</h1>
      <div id = "gwtContainer"></div>
   </body>
</html>
让我们使用以下 Java 文件 **src/com.tutorialspoint/HelloWorld.java** 的内容,我们将使用它来演示 GWT 代码的调试功能。
package com.tutorialspoint.client;

import com.google.gwt.core.client.EntryPoint;
import com.google.gwt.event.dom.client.ClickEvent;
import com.google.gwt.event.dom.client.ClickHandler;
import com.google.gwt.event.dom.client.KeyCodes;
import com.google.gwt.event.dom.client.KeyUpEvent;
import com.google.gwt.event.dom.client.KeyUpHandler;
import com.google.gwt.user.client.Window;
import com.google.gwt.user.client.ui.Button;
import com.google.gwt.user.client.ui.DecoratorPanel;
import com.google.gwt.user.client.ui.HasHorizontalAlignment;
import com.google.gwt.user.client.ui.HorizontalPanel;
import com.google.gwt.user.client.ui.Label;
import com.google.gwt.user.client.ui.RootPanel;
import com.google.gwt.user.client.ui.TextBox;
import com.google.gwt.user.client.ui.VerticalPanel;

public class HelloWorld implements EntryPoint {

   public void onModuleLoad() {
      /*create UI */
      final TextBox txtName = new TextBox();
      txtName.setWidth("200");
      txtName.addKeyUpHandler(new KeyUpHandler() {
         @Override
         public void onKeyUp(KeyUpEvent event) {
            if(event.getNativeKeyCode() == KeyCodes.KEY_ENTER){
               Window.alert(getGreeting(txtName.getValue()));
            }
         }
      });
      Label lblName = new Label("Enter your name: ");

      Button buttonMessage = new Button("Click Me!");

      buttonMessage.addClickHandler(new ClickHandler() {
      @Override
      public void onClick(ClickEvent event) {
         Window.alert(getGreeting(txtName.getValue()));
      }});

      HorizontalPanel hPanel = new HorizontalPanel();
      hPanel.add(lblName);
      hPanel.add(txtName);
      hPanel.setCellWidth(lblName, "130");

      VerticalPanel vPanel = new VerticalPanel();
      vPanel.setSpacing(10);
      vPanel.add(hPanel);
      vPanel.add(buttonMessage);
      vPanel.setCellHorizontalAlignment(buttonMessage,
      HasHorizontalAlignment.ALIGN_RIGHT);

      DecoratorPanel panel = new DecoratorPanel();
      panel.add(vPanel);

      // Add widgets to the root panel.
      RootPanel.get("gwtContainer").add(panel);
   }

   public String getGreeting(String name){
      return "Hello "+name+"!";
   }
}
步骤 1 - 放置断点
在 HelloWorld.java 的 **onModuleLoad()** 的第一行放置一个断点
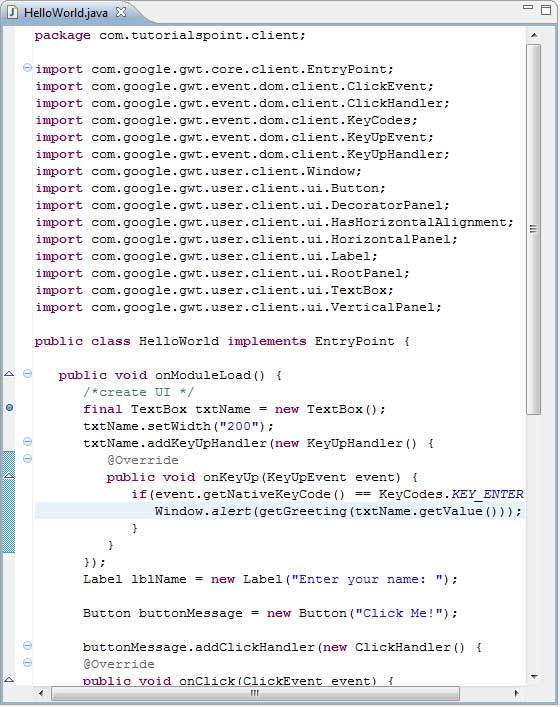
步骤 2 - 调试应用程序
现在单击 ![]() 调试应用程序菜单并选择 **HelloWorld** 应用程序以调试应用程序。
调试应用程序菜单并选择 **HelloWorld** 应用程序以调试应用程序。
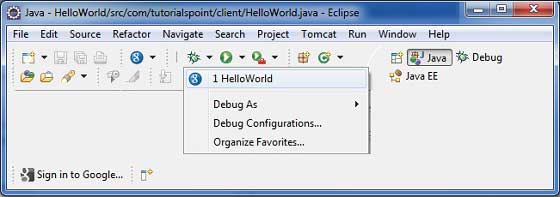
如果一切正常,您应该会看到 Eclipse 中激活的 GWT 开发模式,其中包含一个 URL,如下所示。双击 URL 以打开 GWT 应用程序。
应用程序启动后,您将在 Eclipse 断点处看到焦点,因为我们在入口点方法的第一行放置了断点。
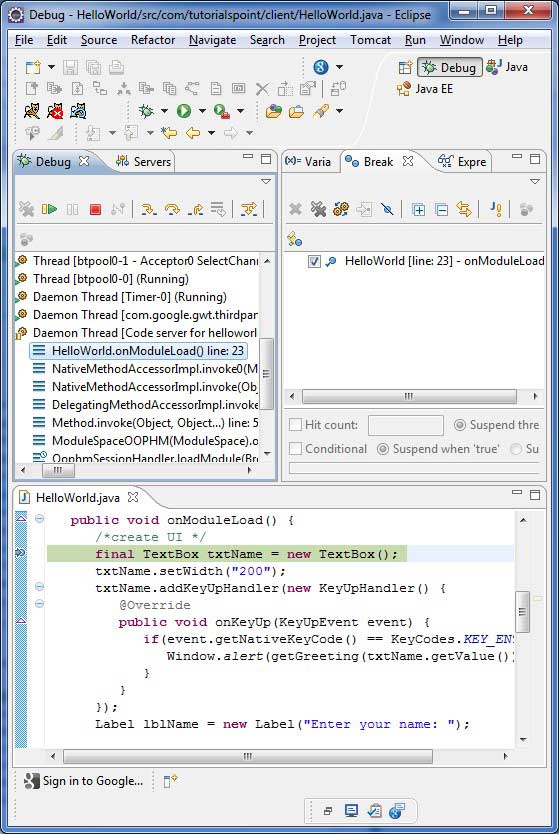
您可以看到挂起线程的堆栈跟踪。
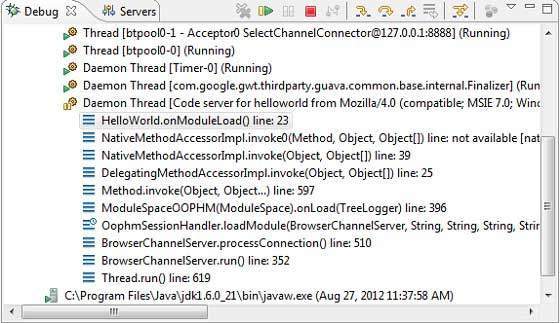
您可以看到表达式的值。

您可以看到已放置的断点列表。
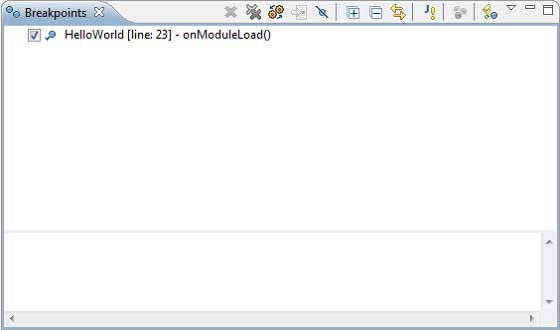
现在继续按 F6 直到到达 onModuleLoad() 方法的最后一行。作为函数键的参考,F6 逐行检查代码,F5 进一步深入,F8 将恢复应用程序。现在您可以看到 onModuleLoad() 方法的所有变量的值列表。
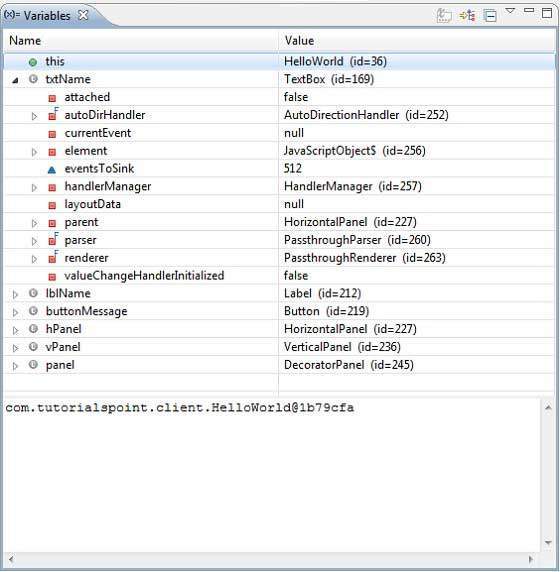
GWT 客户端代码可以像调试 Java 应用程序一样调试。在任何一行放置断点并使用 GWT 的调试功能。
GWT - 国际化
GWT 提供三种国际化 GWT 应用程序的方法,我们将演示静态字符串国际化的使用,这在项目中最常用。
| 序号 | 技术和描述 |
|---|---|
| 1 |
静态字符串国际化 此技术最为普遍,在运行时需要很少的开销;是翻译常量字符串和参数化字符串的非常有效的技术;最简单易于实现。 静态字符串国际化使用标准 Java 属性文件存储翻译后的字符串和参数化消息,并创建强类型 Java 接口来检索它们的值。 |
| 2 |
动态字符串国际化 此技术非常灵活,但比静态字符串国际化慢。主机页面包含本地化字符串,因此当我们添加新的语言环境时,不需要重新编译应用程序。如果 GWT 应用程序要与现有的服务器端本地化系统集成,则应使用此技术。 |
| 3 |
可本地化接口 此技术是三种技术中最强大的。实现 Localizable 允许我们创建自定义类型的本地化版本。这是一种高级国际化技术。 |
国际化 GWT 应用程序的工作流程
步骤 1 - 创建属性文件
创建包含要在应用程序中使用的消息的属性文件。我们在示例中创建了一个 **HelloWorldMessages.properties** 文件。
enterName = Enter your name
clickMe = Click Me
applicationTitle = Application Internationalization Demonstration
greeting = Hello {0}
创建包含特定于语言环境的翻译值的属性文件。我们在示例中创建了一个 **HelloWorldMessages_de.properties** 文件。此文件包含德语翻译。_de 指定德语语言环境,我们将在应用程序中支持德语。
如果您使用 Eclipse 创建属性文件,则将文件的编码更改为 UTF-8。选择文件,然后在其上右键单击以打开其属性窗口。将文本文件编码选择为 **其他 UTF-8**。应用并保存更改。
enterName = Geben Sie Ihren Namen
clickMe = Klick mich
applicationTitle = Anwendung Internationalisierung Demonstration
greeting = Hallo {0}
步骤 2 - 将 i18n 模块添加到模块描述符 XML 文件
更新模块文件 **HelloWorld.gwt.xml** 以包含对德语语言环境的支持
<?xml version = "1.0" encoding = "UTF-8"?>
<module rename-to = 'helloworld'>
   ...
   <extend-property name = "locale" values="de" />
   ...
</module>
步骤 3 - 创建等效于属性文件的接口
通过扩展 GWT 的 Messages 接口创建 HelloWorldMessages.java 接口以包含内部化的支持。它应该包含与属性文件中的键相同的的方法名。占位符将替换为 String 参数。
public interface HelloWorldMessages extends Messages {

   @DefaultMessage("Enter your name")
   String enterName();

   @DefaultMessage("Click Me")
   String clickMe();

   @DefaultMessage("Application Internalization Demonstration")
   String applicationTitle();

   @DefaultMessage("Hello {0}")
   String greeting(String name);
}
步骤 4 - 在 UI 组件中使用消息接口。
使用 **HelloWorld** 中的 **HelloWorldMessages** 对象获取消息。
public class HelloWorld implements EntryPoint {

   /* create an object of HelloWorldMessages interface
      using GWT.create() method */
   private HelloWorldMessages messages =
   GWT.create(HelloWorldMessages.class);

   public void onModuleLoad() {
   ...
      Label titleLabel = new Label(messages.applicationTitle());
      //Add title to the application
      RootPanel.get("gwtAppTitle").add(titleLabel);
   ...
   }
}
国际化 - 完整示例
此示例将引导您完成简单的步骤,演示 GWT 应用程序的国际化功能。
按照以下步骤更新我们在 *GWT - 创建应用程序* 章节中创建的 GWT 应用程序:
| 步骤 | 描述 |
|---|---|
| 1 | 在 _GWT - 创建应用程序_ 章节中说明的 _com.tutorialspoint_ 包下创建一个名为 _HelloWorld_ 的项目。 |
| 2 | 修改 _HelloWorld.gwt.xml_、_HelloWorld.css_、_HelloWorld.html_ 和 _HelloWorld.java_,如下所述。保持其余文件不变。 |
| 3 | 编译并运行应用程序以验证实现逻辑的结果。 |
以下是修改后的模块描述符 **src/com.tutorialspoint/HelloWorld.gwt.xml** 的内容。
<?xml version = "1.0" encoding = "UTF-8"?>
<module rename-to = 'helloworld'>
  <!-- Inherit the core Web Toolkit stuff.                        -->
  <inherits name = 'com.google.gwt.user.User'/>

  <!-- Inherit the default GWT style sheet.                       -->
  <inherits name = 'com.google.gwt.user.theme.clean.Clean'/>

  <!-- Specify the app entry point class.                         -->
  <entry-point class = 'com.tutorialspoint.client.HelloWorld'/>
  <extend-property name = "locale" values="de" />
  <!-- Specify the paths for translatable code                    -->
  <source path = 'client'/>
  <source path = 'shared'/>

</module>
以下是修改后的样式表文件 **war/HelloWorld.css** 的内容。
body {
   text-align: center;
   font-family: verdana, sans-serif;
}

h1 {
   font-size: 2em;
   font-weight: bold;
   color: #777777;
   margin: 40px 0px 70px;
   text-align: center;
}
以下是修改后的 HTML 主机文件 **war/HelloWorld.html** 的内容。
<html>
   <head>
      <title>Hello World</title>
      <link rel = "stylesheet" href = "HelloWorld.css"/>
      <script language = "javascript" src = "helloworld/helloworld.nocache.js">
      </script>
   </head>
   <body>

      <h1 id = "gwtAppTitle"></h1>
      <div id = "gwtContainer"></div>

   </body>
</html>
现在在 **src/com.tutorialspoint/client** 包中创建 HelloWorldMessages.properties 文件,并将以下内容放置其中
enterName = Enter your name
clickMe = Click Me
applicationTitle = Application Internationalization Demonstration
greeting = Hello {0}
现在在 **src/com.tutorialspoint/client** 包中创建 HelloWorldMessages_de.properties 文件,并将以下内容放置其中
enterName = Geben Sie Ihren Namen
clickMe = Klick mich
applicationTitle = Anwendung Internationalisierung Demonstration
greeting = Hallo {0}
现在在 **src/com.tutorialspoint/client** 包中创建 HelloWorldMessages.java 类,并将以下内容放置其中
package com.tutorialspoint.client;
import com.google.gwt.i18n.client.Messages;

public interface HelloWorldMessages extends Messages {
   @DefaultMessage("Enter your name")
   String enterName();

   @DefaultMessage("Click Me")
   String clickMe();

   @DefaultMessage("Application Internationalization Demonstration")
   String applicationTitle();

   @DefaultMessage("Hello {0}")
   String greeting(String name);
}
让我们使用以下 Java 文件 **src/com.tutorialspoint/HelloWorld.java** 的内容,演示 GWT 代码的国际化功能。
package com.tutorialspoint.client;

import com.google.gwt.core.client.EntryPoint;
import com.google.gwt.core.client.GWT;

import com.google.gwt.event.dom.client.ClickEvent;
import com.google.gwt.event.dom.client.ClickHandler;
import com.google.gwt.event.dom.client.KeyCodes;
import com.google.gwt.event.dom.client.KeyUpEvent;
import com.google.gwt.event.dom.client.KeyUpHandler;

import com.google.gwt.user.client.Window;
import com.google.gwt.user.client.ui.Button;
import com.google.gwt.user.client.ui.DecoratorPanel;
import com.google.gwt.user.client.ui.HasHorizontalAlignment;
import com.google.gwt.user.client.ui.HorizontalPanel;
import com.google.gwt.user.client.ui.Label;
import com.google.gwt.user.client.ui.RootPanel;
import com.google.gwt.user.client.ui.TextBox;
import com.google.gwt.user.client.ui.VerticalPanel;

public class HelloWorld implements EntryPoint {

   /* create an object of HelloWorldMessages interface
      using GWT.create() method */
   private HelloWorldMessages messages =
   GWT.create(HelloWorldMessages.class);

   public void onModuleLoad() {
      /*create UI */
      final TextBox txtName = new TextBox();
      txtName.setWidth("200");
      txtName.addKeyUpHandler(new KeyUpHandler() {
         @Override
         public void onKeyUp(KeyUpEvent event) {
            if(event.getNativeKeyCode() == KeyCodes.KEY_ENTER){
               Window.alert(getGreeting(txtName.getValue()));
            }
         }
      });
      Label lblName = new Label(messages.enterName() + ": ");

      Button buttonMessage = new Button(messages.clickMe() + "!");

      buttonMessage.addClickHandler(new ClickHandler() {
         @Override
         public void onClick(ClickEvent event) {
            Window.alert(getGreeting(txtName.getValue()));
         }
      });

      HorizontalPanel hPanel = new HorizontalPanel();
      hPanel.add(lblName);
      hPanel.add(txtName);

      VerticalPanel vPanel = new VerticalPanel();
      vPanel.setSpacing(10);
      vPanel.add(hPanel);
      vPanel.add(buttonMessage);
      vPanel.setCellHorizontalAlignment(buttonMessage,
      HasHorizontalAlignment.ALIGN_RIGHT);

      DecoratorPanel panel = new DecoratorPanel();
      panel.add(vPanel);
      Label titleLabel = new Label(messages.applicationTitle());
      //Add title to the application
      RootPanel.get("gwtAppTitle").add(titleLabel);
      // Add widgets to the root panel.
      RootPanel.get("gwtContainer").add(panel);
   }

   public String getGreeting(String name){
      return messages.greeting(name + "!");
   }
}
完成所有更改后,让我们像在 GWT - 创建应用程序 章节中所做的那样,在开发模式下编译并运行应用程序。如果您的应用程序一切正常,这将产生以下结果 -
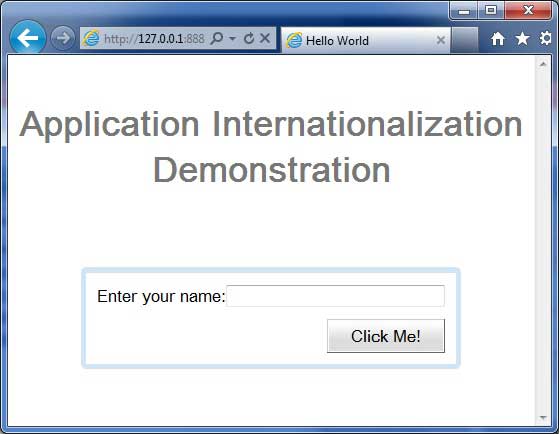
现在更新 URL 以包含 locale=de。设置 URL:http://127.0.0.1:8888/HelloWorld.html?gwt.codesvr=127.0.0.1:9997&locale=de。如果您的应用程序一切正常,这将产生以下结果:
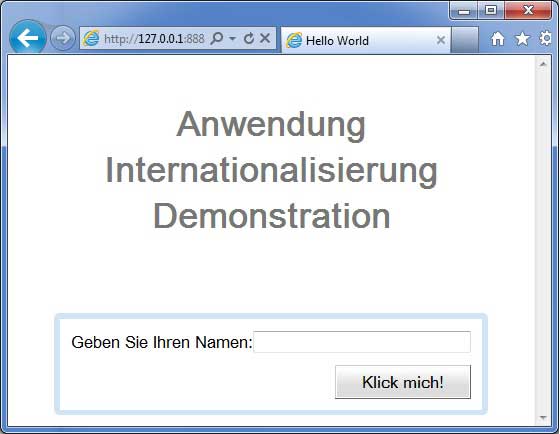
GWT - History 类
GWT 应用程序通常是运行 JavaScript 的单页面应用程序,并且不包含很多页面,因此浏览器不会跟踪用户与应用程序的交互。要使用浏览器的历史记录功能,应用程序应为每个可导航页面生成唯一的 URL 片段。
GWT 提供 **历史机制** 来处理这种情况。
GWT 使用术语 **标记**,它只是一个字符串,应用程序可以解析它以返回到特定状态。应用程序将此标记保存在浏览器的历史记录中作为 URL 片段。
例如,名为“pageIndex1”的历史标记将按如下方式添加到 URL 中:
https://tutorialspoint.com/HelloWorld.html#pageIndex0
历史管理工作流
步骤 1 - 启用历史记录支持
为了使用 GWT 历史记录支持,我们必须首先将以下 iframe 嵌入到我们的主机 HTML 页面中。
<iframe src = "javascript:''"
   id = "__gwt_historyFrame"
   style = "width:0;height:0;border:0"></iframe>
步骤 2 - 将标记添加到历史记录
以下示例说明如何将标记添加到浏览器历史记录
int index = 0;
History.newItem("pageIndex" + index);
步骤 3 - 从历史记录中检索标记
当用户使用浏览器的后退/前进按钮时,我们将检索标记并相应地更新我们的应用程序状态。
History.addValueChangeHandler(new ValueChangeHandler<String>() {
   @Override
   public void onValueChange(ValueChangeEvent<String> event) {
      String historyToken = event.getValue();
      /* parse the history token */
      try {
         if (historyToken.substring(0, 9).equals("pageIndex")) {
            String tabIndexToken = historyToken.substring(9, 10);
            int tabIndex = Integer.parseInt(tabIndexToken);
            /* select the specified tab panel */
            tabPanel.selectTab(tabIndex);
         } else {
            tabPanel.selectTab(0);
         }
      } catch (IndexOutOfBoundsException e) {
         tabPanel.selectTab(0);
      }
   }
});
现在让我们看看 History 类的实际应用。
History 类 - 完整示例
此示例将引导您完成简单的步骤,演示 GWT 应用程序的历史记录管理。按照以下步骤更新我们在 *GWT - 创建应用程序* 章节中创建的 GWT 应用程序:
| 步骤 | 描述 |
|---|---|
| 1 | 在 _GWT - 创建应用程序_ 章节中说明的 _com.tutorialspoint_ 包下创建一个名为 _HelloWorld_ 的项目。 |
| 2 | 修改 _HelloWorld.gwt.xml_、_HelloWorld.css_、_HelloWorld.html_ 和 _HelloWorld.java_,如下所述。保持其余文件不变。 |
| 3 | 编译并运行应用程序以验证实现逻辑的结果。 |
以下是修改后的模块描述符 **src/com.tutorialspoint/HelloWorld.gwt.xml** 的内容。
<?xml version = "1.0" encoding = "UTF-8"?>
<module rename-to = 'helloworld'>
   <!-- Inherit the core Web Toolkit stuff.                        -->
   <inherits name = 'com.google.gwt.user.User'/>

   <!-- Inherit the default GWT style sheet.                       -->
   <inherits name = 'com.google.gwt.user.theme.clean.Clean'/>

   <!-- Specify the app entry point class.                         -->
   <entry-point class = 'com.tutorialspoint.client.HelloWorld'/>
   <!-- Specify the paths for translatable code                    -->
   <source path = 'client'/>
   <source path = 'shared'/>

</module>
以下是修改后的样式表文件 **war/HelloWorld.css** 的内容。
body {
   text-align: center;
   font-family: verdana, sans-serif;
}

h1 {
   font-size: 2em;
   font-weight: bold;
   color: #777777;
   margin: 40px 0px 70px;
   text-align: center;
}
以下是修改后的 HTML 主机文件 **war/HelloWorld.html** 的内容
<html>
   <head>
      <title>Hello World</title>
      <link rel = "stylesheet" href = "HelloWorld.css"/>
      <script language = "javascript" src = "helloworld/helloworld.nocache.js">
      </script>
   </head>

   <body>
      <iframe src = "javascript:''"id = "__gwt_historyFrame"
         style = "width:0;height:0;border:0"></iframe>
      <h1> History Class Demonstration</h1>
      <div id = "gwtContainer"></div>
   </body>
</html>
让我们使用以下 Java 文件 **src/com.tutorialspoint/HelloWorld.java** 的内容,演示 GWT 代码中的历史记录管理。
package com.tutorialspoint.client;

import com.google.gwt.core.client.EntryPoint;

import com.google.gwt.event.logical.shared.SelectionEvent;
import com.google.gwt.event.logical.shared.SelectionHandler;
import com.google.gwt.event.logical.shared.ValueChangeEvent;
import com.google.gwt.event.logical.shared.ValueChangeHandler;

import com.google.gwt.user.client.History;
import com.google.gwt.user.client.ui.HTML;
import com.google.gwt.user.client.ui.RootPanel;
import com.google.gwt.user.client.ui.TabPanel;

public class HelloWorld implements EntryPoint {

   /**
    * This is the entry point method.
    */
   public void onModuleLoad() {
      /* create a tab panel to carry multiple pages */
      final TabPanel tabPanel = new TabPanel();

      /* create pages */
      HTML firstPage = new HTML("<h1>We are on first Page.</h1>");
      HTML secondPage = new HTML("<h1>We are on second Page.</h1>");
      HTML thirdPage = new HTML("<h1>We are on third Page.</h1>");

      String firstPageTitle = "First Page";
      String secondPageTitle = "Second Page";
      String thirdPageTitle = "Third Page";
      tabPanel.setWidth("400");

	  /* add pages to tabPanel*/
      tabPanel.add(firstPage, firstPageTitle);
      tabPanel.add(secondPage,secondPageTitle);
      tabPanel.add(thirdPage, thirdPageTitle);

      /* add tab selection handler */
      tabPanel.addSelectionHandler(new SelectionHandler<Integer>() {
         @Override
         public void onSelection(SelectionEvent<Integer> event) {
            /* add a token to history containing pageIndex
             History class will change the URL of application
             by appending the token to it.
            */
            History.newItem("pageIndex" + event.getSelectedItem());
         }
      });

      /* add value change handler to History
       this method will be called, when browser's
       Back button or Forward button are clicked
       and URL of application changes.
       */
      History.addValueChangeHandler(new ValueChangeHandler<String>() {
         @Override
         public void onValueChange(ValueChangeEvent<String> event) {
            String historyToken = event.getValue();
            /* parse the history token */
            try {
               if (historyToken.substring(0, 9).equals("pageIndex")) {
                  String tabIndexToken = historyToken.substring(9, 10);
                  int tabIndex = Integer.parseInt(tabIndexToken);
                  /* select the specified tab panel */
                  tabPanel.selectTab(tabIndex);
               } else {
                  tabPanel.selectTab(0);
               }
            } catch (IndexOutOfBoundsException e) {
               tabPanel.selectTab(0);
            }
         }
      });

      /* select the first tab by default */
      tabPanel.selectTab(0);

      /* add controls to RootPanel */
      RootPanel.get().add(tabPanel);
   }
}
完成所有更改后,让我们像在 GWT - 创建应用程序 章节中所做的那样,在开发模式下编译并运行应用程序。如果您的应用程序一切正常,这将产生以下结果 -
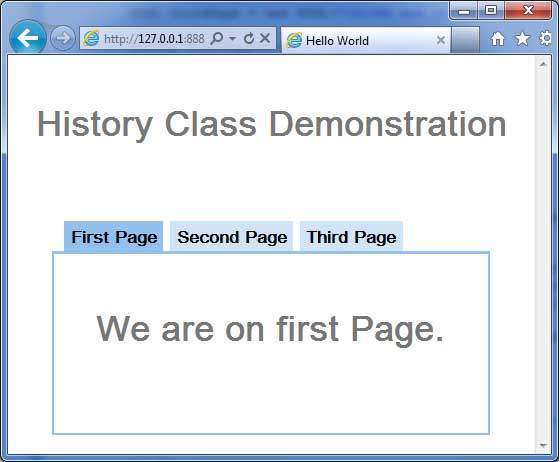
现在点击每个选项卡以选择不同的页面。
您应该注意到,当选择每个选项卡时,应用程序 URL 会更改,并且 #pageIndex 会添加到 URL 中。
您还可以看到浏览器的后退和前进按钮现在已启用。
使用浏览器的后退和前进按钮,您将看到不同的选项卡被相应地选中。
GWT - 书签支持
GWT 使用 History 类支持浏览器历史记录管理,您可以参考 *GWT - History 类* 章节。
GWT 使用术语 **标记**,它只是一个字符串,应用程序可以解析它以返回到特定状态。应用程序将此标记保存在浏览器的历史记录中作为 URL 片段。
在 *GWT - History 类* 章节中,我们通过编写代码处理标记的创建和在历史记录中的设置。
在本文中,我们将讨论一个特殊的部件 Hyperlink,它会自动为我们创建标记和管理历史记录,并使应用程序能够添加书签。
添加书签示例
此示例将引导您完成简单的步骤,演示 GWT 应用程序的添加书签功能。
以下步骤更新我们在 *GWT - 创建应用程序* 章节中创建的 GWT 应用程序:
| 步骤 | 描述 |
|---|---|
| 1 | 在 _GWT - 创建应用程序_ 章节中说明的 _com.tutorialspoint_ 包下创建一个名为 _HelloWorld_ 的项目。 |
| 2 | 修改 _HelloWorld.gwt.xml_、_HelloWorld.css_、_HelloWorld.html_ 和 _HelloWorld.java_,如下所述。保持其余文件不变。 |
| 3 | 编译并运行应用程序以验证实现逻辑的结果。 |
以下是修改后的模块描述符 **src/com.tutorialspoint/HelloWorld.gwt.xml** 的内容。
<?xml version = "1.0" encoding = "UTF-8"?>
<module rename-to = 'helloworld'>
   <!-- Inherit the core Web Toolkit stuff.                        -->
   <inherits name = 'com.google.gwt.user.User'/>

   <!-- Inherit the default GWT style sheet.                       -->
   <inherits name = 'com.google.gwt.user.theme.clean.Clean'/>

   <!-- Specify the app entry point class.                         -->
   <entry-point class = 'com.tutorialspoint.client.HelloWorld'/>
   <!-- Specify the paths for translatable code                    -->
   <source path = 'client'/>
   <source path = 'shared'/>

</module>
以下是修改后的样式表文件 **war/HelloWorld.css** 的内容。
body {
   text-align: center;
   font-family: verdana, sans-serif;
}

h1 {
   font-size: 2em;
   font-weight: bold;
   color: #777777;
   margin: 40px 0px 70px;
   text-align: center;
}
以下是修改后的 HTML 主机文件 **war/HelloWorld.html** 的内容
<html>
   <head>
      <title>Hello World</title>
      <link rel = "stylesheet" href = "HelloWorld.css"/>
      <script language = "javascript" src = "helloworld/helloworld.nocache.js">
      </script>
   </head>

   <body>
      <iframe src = "javascript:''"id = "__gwt_historyFrame"
         style = "width:0;height:0;border:0"></iframe>
      <h1> Bookmarking Demonstration</h1>
      <div id = "gwtContainer"></div>
   </body>
</html>
让我们使用以下 Java 文件 **src/com.tutorialspoint/HelloWorld.java** 的内容,演示 GWT 代码中的添加书签功能。
package com.tutorialspoint.client;

import com.google.gwt.core.client.EntryPoint;

import com.google.gwt.event.logical.shared.ValueChangeEvent;
import com.google.gwt.event.logical.shared.ValueChangeHandler;

import com.google.gwt.user.client.History;
import com.google.gwt.user.client.ui.HTML;
import com.google.gwt.user.client.ui.HorizontalPanel;
import com.google.gwt.user.client.ui.Hyperlink;
import com.google.gwt.user.client.ui.RootPanel;
import com.google.gwt.user.client.ui.TabPanel;
import com.google.gwt.user.client.ui.VerticalPanel;

public class HelloWorld implements EntryPoint {

   private TabPanel tabPanel;

   private void selectTab(String historyToken){
      /*  parse the history token */
      try {
         if (historyToken.substring(0, 9).equals("pageIndex")) {
            String tabIndexToken = historyToken.substring(9, 10);
            int tabIndex = Integer.parseInt(tabIndexToken);
            /* Select the specified tab panel */
            tabPanel.selectTab(tabIndex);
         } else {
            tabPanel.selectTab(0);
         }
      } catch (IndexOutOfBoundsException e) {
         tabPanel.selectTab(0);
      }
   }

   /**
    * This is the entry point method.
    */
   public void onModuleLoad() {
      /* create a tab panel to carry multiple pages */
      tabPanel = new TabPanel();

      /* create pages */
      HTML firstPage = new HTML("<h1>We are on first Page.</h1>");
      HTML secondPage = new HTML("<h1>We are on second Page.</h1>");
      HTML thirdPage = new HTML("<h1>We are on third Page.</h1>");

      String firstPageTitle = "First Page";
      String secondPageTitle = "Second Page";
      String thirdPageTitle = "Third Page";

      Hyperlink firstPageLink = new Hyperlink("1", "pageIndex0");
      Hyperlink secondPageLink = new Hyperlink("2", "pageIndex1");
      Hyperlink thirdPageLink = new Hyperlink("3", "pageIndex2");

      HorizontalPanel linksHPanel = new HorizontalPanel();
      linksHPanel.setSpacing(10);
      linksHPanel.add(firstPageLink);
      linksHPanel.add(secondPageLink);
      linksHPanel.add(thirdPageLink);

      /* If the application starts with no history token,
         redirect to a pageIndex0 */
      String initToken = History.getToken();

      if (initToken.length() == 0) {
         History.newItem("pageIndex0");
         initToken = "pageIndex0";
      }

      tabPanel.setWidth("400");
      /* add pages to tabPanel*/
      tabPanel.add(firstPage, firstPageTitle);
      tabPanel.add(secondPage,secondPageTitle);
      tabPanel.add(thirdPage, thirdPageTitle);

      /* add value change handler to History
       * this method will be called, when browser's Back button
       * or Forward button are clicked.
       * and URL of application changes.
       * */
      History.addValueChangeHandler(new ValueChangeHandler<String>() {
         @Override
         public void onValueChange(ValueChangeEvent<String> event) {
            selectTab(event.getValue());
         }
      });

      selectTab(initToken);

      VerticalPanel vPanel = new VerticalPanel();

      vPanel.setSpacing(10);
      vPanel.add(tabPanel);
      vPanel.add(linksHPanel);

      /* add controls to RootPanel */
      RootPanel.get().add(vPanel);
   }
}
完成所有更改后,让我们像在 GWT - 创建应用程序 章节中所做的那样,在开发模式下编译并运行应用程序。如果您的应用程序一切正常,这将产生以下结果 -
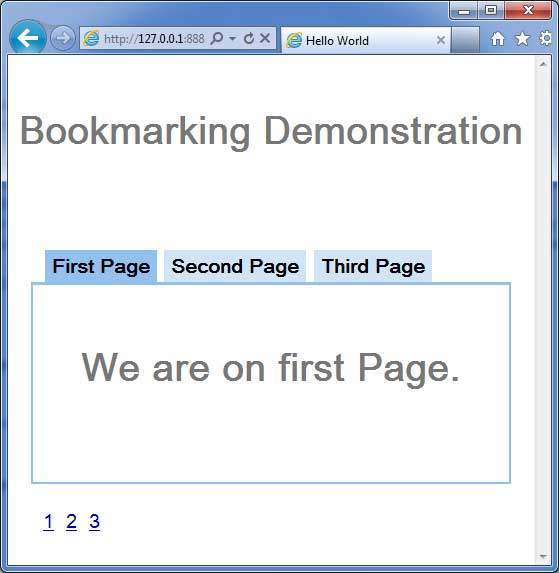
现在点击 1、2 或 3。您可以注意到选项卡会随着索引更改。
您应该注意到,当您点击 1、2 或 3 时,应用程序 URL 会更改,并且 #pageIndex 会添加到 URL 中
您还可以看到浏览器的后退和前进按钮现在已启用。
使用浏览器的后退和前进按钮,您将看到不同的选项卡被相应地选中。
右键点击 1、2 或 3。您可以看到诸如打开、在新窗口中打开、在新选项卡中打开、添加到收藏夹等选项。
右键点击 3。选择添加到收藏夹。将书签保存为页面 3。
打开收藏夹并选择页面 3。您将看到第三个选项卡被选中。
GWT - 日志框架
日志框架模拟 java.util.logging,因此它使用相同的语法并具有与服务器端日志代码相同的行为
GWT 日志使用 .gwt.xml 文件进行配置。
我们可以配置日志的启用/禁用;我们可以启用/禁用特定的处理程序,并更改默认的日志级别。
日志记录器的类型
日志记录器以树状结构组织,根日志记录器位于树的根部。
日志记录器的名称使用 **.** 分隔名称的部分来确定父子关系。
例如,如果我们有两个日志记录器 Hospital.room1 和 Hospital.room2,那么它们是兄弟节点,它们的父节点是名为 Hospital 的日志记录器。Hospital 日志记录器(以及任何名称不包含点“.”的日志记录器)的父节点是根日志记录器。
private static Logger room1Logger = Logger.getLogger("Hospital.room1");
private static Logger room2Logger = Logger.getLogger("Hospital.room2");
private static Logger hospitalLogger = Logger.getLogger("Hospital");
private static Logger rootLogger = Logger.getLogger("");
日志处理程序
GWT 提供默认的处理程序,这些处理程序将显示使用日志记录器生成的日志条目。
| 处理程序 | 日志输出到 | 描述 |
|---|---|---|
| SystemLogHandler | 标准输出 | 这些消息只能在 DevMode 窗口的开发模式下看到。 |
| DevelopmentModeLogHandler | DevMode 窗口 | 通过调用方法 GWT.log 进行日志记录。这些消息只能在 DevMode 窗口的开发模式下看到。 |
| ConsoleLogHandler | JavaScript 控制台 | 日志输出到 JavaScript 控制台,Firebug Lite(用于 IE)、Safari 和 Chrome 使用该控制台。 |
| FirebugLogHandler | Firebug | 日志输出到 Firebug 控制台。 |
| PopupLogHandler | 弹出窗口 | 日志输出到应用程序左上角的弹出窗口(当启用此处理程序时)。 |
| SimpleRemoteLogHandler | 服务器 | 此处理程序将日志消息发送到服务器,在那里将使用服务器端日志记录机制记录它们。 |
在 GWT 应用程序中配置日志记录
需要配置 HelloWorld.gwt.xml 文件以启用 GWT 日志记录,如下所示:
# add logging module
   <inherits name = "com.google.gwt.logging.Logging"/>
# To change the default logLevel
   <set-property name = "gwt.logging.logLevel" value = "SEVERE"/>
# To enable logging
   <set-property name = "gwt.logging.enabled" value = "TRUE"/>
# To disable a popup Handler
   <set-property name = "gwt.logging.popupHandler" value = "DISABLED" />
使用日志记录器记录用户操作
/* Create Root Logger */
private static Logger rootLogger = Logger.getLogger("");
...
rootLogger.log(Level.SEVERE, "pageIndex selected: " + event.getValue());
...
日志框架示例
此示例将引导您完成简单的步骤,演示 GWT 应用程序的日志记录功能。按照以下步骤更新我们在 *GWT - 创建应用程序* 章节中创建的 GWT 应用程序:
| 步骤 | 描述 |
|---|---|
| 1 | 在 _GWT - 创建应用程序_ 章节中说明的 _com.tutorialspoint_ 包下创建一个名为 _HelloWorld_ 的项目。 |
| 2 | 修改 _HelloWorld.gwt.xml_、_HelloWorld.css_、_HelloWorld.html_ 和 _HelloWorld.java_,如下所述。保持其余文件不变。 |
| 3 | 编译并运行应用程序以验证实现逻辑的结果。 |
以下是修改后的模块描述符 **src/com.tutorialspoint/HelloWorld.gwt.xml** 的内容。
<?xml version = "1.0" encoding = "UTF-8"?>
<module rename-to = 'helloworld'>
   <!-- Inherit the core Web Toolkit stuff.                        -->
   <inherits name = 'com.google.gwt.user.User'/>

   <!-- Inherit the default GWT style sheet.                       -->
   <inherits name = 'com.google.gwt.user.theme.clean.Clean'/>
   <inherits name = "com.google.gwt.logging.Logging"/>
   <!-- Specify the app entry point class.                         -->
   <entry-point class = 'com.tutorialspoint.client.HelloWorld'/>
   <!-- Specify the paths for translatable code                    -->
   <source path = 'client'/>
   <source path = 'shared'/>
   <set-property name = "gwt.logging.logLevel" value="SEVERE"/>
   <set-property name = "gwt.logging.enabled" value = "TRUE"/>
   <set-property name = "gwt.logging.popupHandler" value=  "DISABLED" />
</module>
以下是修改后的样式表文件 **war/HelloWorld.css** 的内容。
body {
   text-align: center;
   font-family: verdana, sans-serif;
}

h1 {
   font-size: 2em;
   font-weight: bold;
   color: #777777;
   margin: 40px 0px 70px;
   text-align: center;
}
以下是修改后的 HTML 主机文件 **war/HelloWorld.html** 的内容
<html>
   <head>
      <title>Hello World</title>
      <link rel = "stylesheet" href = "HelloWorld.css"/>
      <script language = "javascript" src = "helloworld/helloworld.nocache.js">
      </script>
   </head>

   <body>
      <iframe src = "javascript:''"id = "__gwt_historyFrame"
         style = "width:0;height:0;border:0"></iframe>
      <h1> Logging Demonstration</h1>
      <div id = "gwtContainer"></div>
   </body>
</html>
让我们使用以下 Java 文件 **src/com.tutorialspoint/HelloWorld.java** 的内容,演示 GWT 代码中的添加书签功能。
package com.tutorialspoint.client;

import java.util.logging.Level;
import java.util.logging.Logger;

import com.google.gwt.core.client.EntryPoint;

import com.google.gwt.event.logical.shared.ValueChangeEvent;
import com.google.gwt.event.logical.shared.ValueChangeHandler;

import com.google.gwt.logging.client.HasWidgetsLogHandler;

import com.google.gwt.user.client.History;
import com.google.gwt.user.client.ui.HTML;
import com.google.gwt.user.client.ui.HorizontalPanel;
import com.google.gwt.user.client.ui.Hyperlink;
import com.google.gwt.user.client.ui.RootPanel;
import com.google.gwt.user.client.ui.TabPanel;
import com.google.gwt.user.client.ui.VerticalPanel;

public class HelloWorld implements EntryPoint {

   private TabPanel tabPanel;
   /* Create Root Logger */
   private static Logger rootLogger = Logger.getLogger("");
   private VerticalPanel customLogArea;

   private void selectTab(String historyToken){
      /*  parse the history token */
      try {
         if (historyToken.substring(0, 9).equals("pageIndex")) {
            String tabIndexToken = historyToken.substring(9, 10);
            int tabIndex = Integer.parseInt(tabIndexToken);
            /* Select the specified tab panel */
            tabPanel.selectTab(tabIndex);
         } else {
            tabPanel.selectTab(0);
         }
      } catch (IndexOutOfBoundsException e) {
         tabPanel.selectTab(0);
      }
   }

   /**
    * This is the entry point method.
    */
   public void onModuleLoad() {
      /* create a tab panel to carry multiple pages */
      tabPanel = new TabPanel();

      /* create pages */
      HTML firstPage = new HTML("<h1>We are on first Page.</h1>");
      HTML secondPage = new HTML("<h1>We are on second Page.</h1>");
      HTML thirdPage = new HTML("<h1>We are on third Page.</h1>");

      String firstPageTitle = "First Page";
      String secondPageTitle = "Second Page";
      String thirdPageTitle = "Third Page";

      Hyperlink firstPageLink = new Hyperlink("1", "pageIndex0");
      Hyperlink secondPageLink = new Hyperlink("2", "pageIndex1");
      Hyperlink thirdPageLink = new Hyperlink("3", "pageIndex2");

      HorizontalPanel linksHPanel = new HorizontalPanel();
      linksHPanel.setSpacing(10);
      linksHPanel.add(firstPageLink);
      linksHPanel.add(secondPageLink);
      linksHPanel.add(thirdPageLink);

      /* If the application starts with no history token,
         redirect to a pageIndex0 */
      String initToken = History.getToken();

      if (initToken.length() == 0) {
         History.newItem("pageIndex0");
         initToken = "pageIndex0";
      }

      tabPanel.setWidth("400");
      /* add pages to tabPanel*/
      tabPanel.add(firstPage, firstPageTitle);
      tabPanel.add(secondPage,secondPageTitle);
      tabPanel.add(thirdPage, thirdPageTitle);

      /* add value change handler to History
       * this method will be called, when browser's Back button
       * or Forward button are clicked.
       * and URL of application changes.
       * */
      History.addValueChangeHandler(new ValueChangeHandler<String>() {
         @Override
         public void onValueChange(ValueChangeEvent<String> event) {
            selectTab(event.getValue());
            rootLogger.log(Level.SEVERE, "pageIndex selected: "
            + event.getValue());
         }
      });

      selectTab(initToken);

      VerticalPanel vPanel = new VerticalPanel();

      vPanel.setSpacing(10);
      vPanel.add(tabPanel);
      vPanel.add(linksHPanel);

      customLogArea = new VerticalPanel();
      vPanel.add(customLogArea);

      /* an example of using own custom logging area. */
      rootLogger.addHandler(new HasWidgetsLogHandler(customLogArea));

      /* add controls to RootPanel */
      RootPanel.get().add(vPanel);
   }
}
完成所有更改后,让我们像在 GWT - 创建应用程序 章节中所做的那样,在开发模式下编译并运行应用程序。如果您的应用程序一切正常,这将产生以下结果 -
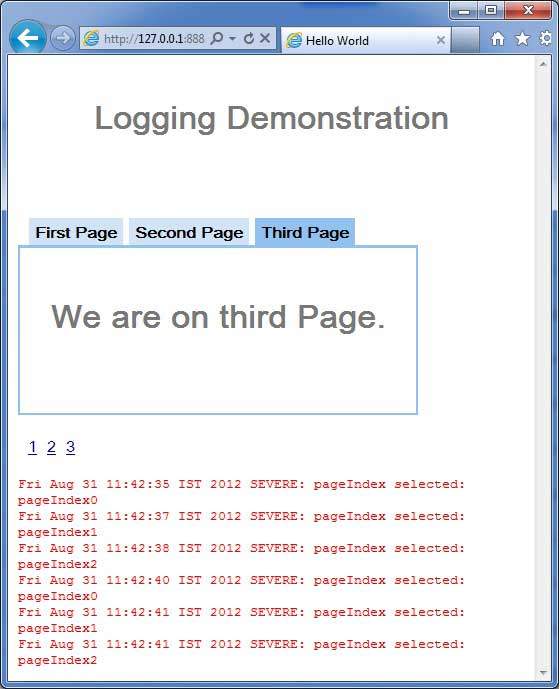
现在点击 1、2 或 3。您可以注意到,当您点击 1、2 或 3 时,您可以看到日志正在打印,显示 pageIndex。检查 Eclipse 中的控制台输出。您可以在 Eclipse 控制台中看到日志正在打印。
Fri Aug 31 11:42:35 IST 2012
SEVERE: pageIndex selected: pageIndex0
Fri Aug 31 11:42:37 IST 2012
SEVERE: pageIndex selected: pageIndex1
Fri Aug 31 11:42:38 IST 2012
SEVERE: pageIndex selected: pageIndex2
Fri Aug 31 11:42:40 IST 2012
SEVERE: pageIndex selected: pageIndex0
Fri Aug 31 11:42:41 IST 2012
SEVERE: pageIndex selected: pageIndex1
Fri Aug 31 11:42:41 IST 2012
SEVERE: pageIndex selected: pageIndex2
现在更新模块描述符 **src/com.tutorialspoint/HelloWorld.gwt.xml** 以启用 popupHandler。
<?xml version = "1.0" encoding = "UTF-8"?>
<module rename-to = 'helloworld'>
  <!-- Inherit the core Web Toolkit stuff.                        -->
   <inherits name = 'com.google.gwt.user.User'/>

   <!-- Inherit the default GWT style sheet.                       -->
   <inherits name = 'com.google.gwt.user.theme.clean.Clean'/>
   <inherits name = "com.google.gwt.logging.Logging"/>
   <!-- Specify the app entry point class.                         -->
   <entry-point class = 'com.tutorialspoint.client.HelloWorld'/>
   <!-- Specify the paths for translatable code                    -->
   <source path = 'client'/>
   <source path = 'shared'/>
   <set-property name = "gwt.logging.logLevel" value = "SEVERE"/>
   <set-property name = "gwt.logging.enabled" value = "TRUE"/>
   <set-property name="gwt.logging.popupHandler" value = "ENABLED" />
</module>
完成所有更改后,通过刷新浏览器窗口重新加载应用程序(按 F5/浏览器的刷新按钮)。注意现在应用程序左上角出现了一个弹出窗口。
现在点击 1、2 或 3。您可以注意到,当您点击 1、2 或 3 时,您可以在弹出窗口中看到日志正在打印,显示 pageIndex。