- GWT 教程
- GWT - 首页
- GWT - 概述
- GWT - 环境设置
- GWT - 应用
- GWT - 创建应用
- GWT - 部署应用
- GWT - 使用 CSS 样式
- GWT - 基本组件
- GWT - 表单组件
- GWT - 复杂组件
- GWT - 布局面板
- GWT - 事件处理
- GWT - 自定义组件
- GWT - UIBinder
- GWT - RPC 通信
- GWT - JUnit 集成
- GWT - 调试应用
- GWT - 国际化
- GWT - History 类
- GWT - 书签支持
- GWT - 日志框架
- GWT 有用资源
- GWT - 问答
- GWT - 快速指南
- GWT - 有用资源
- GWT - 讨论
GWT - CellList 组件
简介
CellList 组件表示单元格的单列列表。
类声明
以下是 com.google.gwt.user.cellview.client.CellList<T> 类的声明:
public class CellList<T>
   extends AbstractHasData<T>
类构造函数
| 序号 | 构造函数 & 描述 |
|---|---|
| 1 |
CellList(Cell<T> cell) 构造一个新的 CellList。 |
| 2 |
CellList(Cell<T> cell, CellList.Resources resources) 使用指定的 CellList.Resources 构造一个新的 CellList。 |
| 3 |
CellList(Cell<T> cell, CellList.Resources resources, ProvidesKey<T> keyProvider) 使用指定的 CellList.Resources 和键提供程序构造一个新的 CellList。 |
| 4 |
CellList(Cell<T> cell, ProvidesKey<T> keyProvider) 使用指定的键提供程序构造一个新的 CellList。 |
类方法
| 序号 | 函数名称 & 描述 |
|---|---|
| 1 |
protected boolean dependsOnSelection() 检查视图中的单元格是否依赖于选择状态。 |
| 2 |
protected void doSelection(Event event, T value, int indexOnPage) 已弃用。请改用 Abstract HasData.add Cell Preview Handler(com.google.gwt.view.client.Cell Preview Event.Handler)。 |
| 3 |
protected void fireEventToCell(Cell.Context context, Event event, Element parent, T value) 向单元格触发一个事件。 |
| 4 |
protected Cell<T> getCell() 返回用于渲染每个项目的单元格。 |
| 5 |
protected Element getCellParent(Element item) 从列表项中获取包装单元格的父元素。 |
| 6 |
protected Element getChildContainer() 返回保存已渲染单元格的元素。 |
| 7 |
SafeHtml getEmptyListMessage() 获取在没有数据时显示的消息。 |
| 8 |
protected Element getKeyboardSelectedElement() 获取具有键盘选择的元素。 |
| 9 |
Element getRowElement(int indexOnPage) 获取指定索引的元素。 |
| 10 |
protected boolean isKeyboardNavigationSuppressed() 检查键盘导航是否被抑制,例如当用户正在编辑单元格时。 |
| 11 |
protected void onBlur() 当小部件失去焦点时调用。 |
| 12 |
protected void onBrowserEvent2(Event event) 在 AbstractHasData.onBrowserEvent(Event) 完成后调用。 |
| 13 |
protected void onFocus() 当小部件获得焦点时调用。 |
| 14 |
protected void renderRowValues(SafeHtmlBuilder sb, java.util.List<T> values, int start, SelectionModel<? super T> selectionModel) 将所有行值渲染到指定的 SafeHtmlBuilder 中。 |
| 15 |
protected boolean resetFocusOnCell() 重置当前聚焦单元格的焦点。 |
| 16 |
void setEmptyListMessage(SafeHtml html) 设置在没有数据时显示的消息。 |
| 17 |
protected void setKeyboardSelected(int index, boolean selected, boolean stealFocus) 更新元素以反映其键盘选择状态。 |
| 18 |
protected void setSelected(Element elem, boolean selected) 已弃用。此方法从未被 AbstractHasData 调用,在 renderRowValues(SafeHtmlBuilder, List, int, SelectionModel) 中渲染选定的样式。 |
| 19 |
void setValueUpdater(ValueUpdater<T> valueUpdater) 设置在单元格修改项目时使用的值更新程序。 |
继承的方法
此类继承以下类的 方法:
com.google.gwt.user.client.ui.UIObject
com.google.gwt.user.client.ui.Widget
com.google.gwt.user.cellview.client.AbstractHasData
java.lang.Object
CellList 组件示例
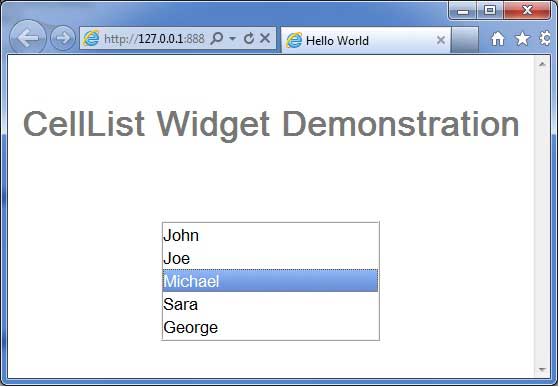
此示例将引导您完成简单的步骤,以展示如何在 GWT 中使用 CellList 组件。按照以下步骤更新我们在 GWT - 创建应用 章节中创建的 GWT 应用:
| 步骤 | 描述 |
|---|---|
| 1 | 在 com.tutorialspoint 包下创建一个名为 HelloWorld 的项目,如 GWT - 创建应用 章节中所述。 |
| 2 | 修改 HelloWorld.gwt.xml、HelloWorld.css、HelloWorld.html 和 HelloWorld.java,如下所述。保持其余文件不变。 |
| 3 | 编译并运行应用程序以验证已实现逻辑的结果。 |
以下是修改后的模块描述符 src/com.tutorialspoint/HelloWorld.gwt.xml 的内容。
<?xml version = "1.0" encoding = "UTF-8"?>
<module rename-to = 'helloworld'>
   <!-- Inherit the core Web Toolkit stuff.                        -->
   <inherits name = 'com.google.gwt.user.User'/>

   <!-- Inherit the default GWT style sheet.                       -->
   <inherits name = 'com.google.gwt.user.theme.clean.Clean'/>

   <!-- Specify the app entry point class.                         -->
   <entry-point class = 'com.tutorialspoint.client.HelloWorld'/>

   <!-- Specify the paths for translatable code                    -->
   <source path = 'client'/>
   <source path = 'shared'/>

</module>
以下是修改后的样式表文件 war/HelloWorld.css 的内容。
body {
   text-align: center;
   font-family: verdana, sans-serif;
}

h1 {
   font-size: 2em;
   font-weight: bold;
   color: #777777;
   margin: 40px 0px 70px;
   text-align: center;
}
以下是修改后的 HTML 主机文件 war/HelloWorld.html 的内容。
<html>
   <head>
      <title>Hello World</title>
      <link rel = "stylesheet" href = "HelloWorld.css"/>
      <script language = "javascript" src = "helloworld/helloworld.nocache.js">
      </script>
   </head>

   <body>
      <h1>CellList Widget Demonstration</h1>
      <div id = "gwtContainer"></div>
   </body>
</html>
让我们在 Java 文件 src/com.tutorialspoint/HelloWorld.java 中包含以下内容,它将演示 CellList 组件的使用。
package com.tutorialspoint.client;

import java.util.Arrays;
import java.util.List;

import com.google.gwt.cell.client.AbstractCell;
import com.google.gwt.cell.client.Cell;
import com.google.gwt.core.client.EntryPoint;
import com.google.gwt.safehtml.shared.SafeHtmlBuilder;
import com.google.gwt.user.cellview.client.CellList;
import com.google.gwt.user.client.ui.RootPanel;
import com.google.gwt.user.client.ui.VerticalPanel;
import com.google.gwt.view.client.ProvidesKey;
import com.google.gwt.view.client.SelectionModel;
import com.google.gwt.view.client.SingleSelectionModel;

public class HelloWorld implements EntryPoint {
   /**
    * A simple data type that represents a contact.
    */

   private static class Contact {
      private static int nextId = 0;
      private final int id;
      private String name;

      public Contact(String name) {
         nextId++;
         this.id = nextId;
         this.name = name;
      }
   }

   /**
    * A custom {@link Cell} used to render a {@link Contact}.
    */

   private static class ContactCell extends AbstractCell<Contact> {
      @Override
      public void render(Contact value, Object key, SafeHtmlBuilder sb) {
         if (value != null) {
            sb.appendEscaped(value.name);
         }
      }
   }

   /**
    * The list of data to display.
    */

   private static final List<Contact> CONTACTS = Arrays.asList(new Contact(
      "John"), new Contact("Joe"), new Contact("Michael"),
      new Contact("Sarah"), new Contact("George"));

   public void onModuleLoad() {
      /*
       * Define a key provider for a Contact. We use the unique ID
       * as the key, which allows to maintain selection even if the
       * name changes.
       */

      ProvidesKey<Contact> keyProvider = new ProvidesKey<Contact>() {
         public Object getKey(Contact item) {
            // Always do a null check.
            return (item == null) ? null : item.id;
         }
      };

      // Create a CellList using the keyProvider.
      CellList<Contact> cellList = new CellList<Contact>(new ContactCell(),
      keyProvider);

      // Push data into the CellList.
      cellList.setRowCount(CONTACTS.size(), true);
      cellList.setRowData(0, CONTACTS);

      // Add a selection model using the same keyProvider.
      SelectionModel<Contact> selectionModel
      = new SingleSelectionModel<Contact>(
      keyProvider);
      cellList.setSelectionModel(selectionModel);

      /*
       * Select a contact. The selectionModel will select based on the
       * ID because we used a keyProvider.
       */
      Contact sarah = CONTACTS.get(3);
      selectionModel.setSelected(sarah, true);

      // Modify the name of the contact.
      sarah.name = "Sara";

      /*
       * Redraw the CellList. Sarah/Sara will still be selected because we
       * identify her by ID. If we did not use a keyProvider,
       * Sara would not be selected.
       */
      cellList.redraw();

      VerticalPanel panel = new VerticalPanel();
      panel.setBorderWidth(1);
      panel.setWidth("200");
      panel.add(cellList);

      // Add the widgets to the root panel.
      RootPanel.get().add(panel);
   }
}
准备好所有更改后,让我们像在 GWT - 创建应用 章节中一样,在开发模式下编译并运行应用程序。如果您的应用程序一切正常,这将产生以下结果: