- GWT 教程
- GWT - 首页
- GWT - 概述
- GWT - 环境搭建
- GWT - 应用
- GWT - 创建应用
- GWT - 部署应用
- GWT - 使用 CSS 样式
- GWT - 基本组件
- GWT - 表单组件
- GWT - 复杂组件
- GWT - 布局面板
- GWT - 事件处理
- GWT - 自定义组件
- GWT - UIBinder
- GWT - RPC 通信
- GWT - JUnit 集成
- GWT - 调试应用
- GWT - 国际化
- GWT - History 类
- GWT - 书签支持
- GWT - 日志框架
- GWT 有用资源
- GWT - 问答
- GWT - 快速指南
- GWT - 有用资源
- GWT - 讨论
GWT - FlowPanel 组件
简介
FlowPanel 组件表示一个面板,它使用默认的 HTML 布局行为来格式化其子组件。
类声明
以下是 com.google.gwt.user.client.ui.FlowPanel 类的声明:
public class FlowPanel
   extends ComplexPanel
      implements InsertPanel.ForIsWidget
类构造函数
| 序号 | 构造函数 & 描述 |
|---|---|
| 1 |
FlowPanel() 空 FlowPanel 的构造函数。 |
类方法
| 序号 | 函数名称 & 描述 |
|---|---|
| 1 |
void add(Widget w) 向面板添加一个新的子组件。 |
| 2 |
void clear() 移除所有子组件。 |
| 3 |
void insert(IsWidget w, int beforeIndex) |
| 4 |
void insert(Widget w, int beforeIndex) 在指定索引之前插入一个组件。 |
继承的方法
此类继承自以下类的方法:
com.google.gwt.user.client.ui.UIObject
com.google.gwt.user.client.ui.Widget
com.google.gwt.user.client.ui.Panel
com.google.gwt.user.client.ui.ComplexPanel
java.lang.Object
FlowPanel 组件示例
此示例将引导您完成简单的步骤,以展示如何在 GWT 中使用 FlowPanel 组件。按照以下步骤更新我们在“GWT - 创建应用”章节中创建的 GWT 应用:
| 步骤 | 描述 |
|---|---|
| 1 | 在 com.tutorialspoint 包下创建一个名为 HelloWorld 的项目,如“GWT - 创建应用”章节中所述。 |
| 2 | 修改 HelloWorld.gwt.xml、HelloWorld.css、HelloWorld.html 和 HelloWorld.java,如下所述。保持其余文件不变。 |
| 3 | 编译并运行应用程序以验证已实现逻辑的结果。 |
以下是修改后的模块描述符 src/com.tutorialspoint/HelloWorld.gwt.xml 的内容。
<?xml version = "1.0" encoding = "UTF-8"?>
<module rename-to = 'helloworld'>
   <!-- Inherit the core Web Toolkit stuff.                        -->
   <inherits name = 'com.google.gwt.user.User'/>

   <!-- Inherit the default GWT style sheet.                       -->
   <inherits name = 'com.google.gwt.user.theme.clean.Clean'/>

   <!-- Specify the app entry point class.                         -->
   <entry-point class = 'com.tutorialspoint.client.HelloWorld'/>

   <!-- Specify the paths for translatable code                    -->
   <source path = 'client'/>
   <source path = 'shared'/>

</module>
以下是修改后的样式表文件 war/HelloWorld.css 的内容。
body {
   text-align: center;
   font-family: verdana, sans-serif;
}

h1 {
   font-size: 2em;
   font-weight: bold;
   color: #777777;
   margin: 40px 0px 70px;
   text-align: center;
}

.gwt-CheckBox {
   margin: 10px;
}
以下是修改后的 HTML 宿主文件 war/HelloWorld.html 的内容。
<html>
<head>
<title>Hello World</title>
<link rel = "stylesheet" href = "HelloWorld.css"/>
<script language = "javascript" src = "helloworld/helloworld.nocache.js">
</script>
</head>
<body>
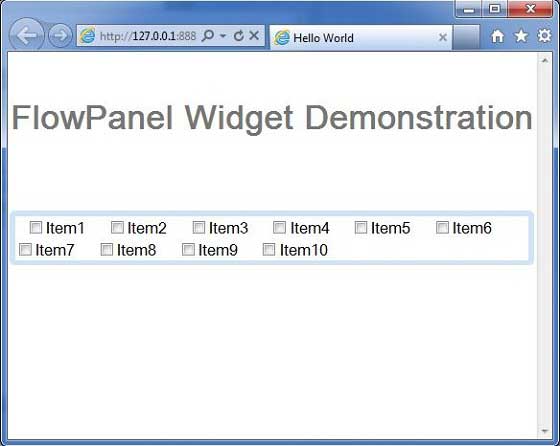
<h1>FlowPanel Widget Demonstration</h1>
<div id = "gwtContainer"></div>
</body>
</html>
让我们看看 Java 文件 src/com.tutorialspoint/HelloWorld.java 的内容,它将演示 FlowPanel 组件的使用。
package com.tutorialspoint.client;

import com.google.gwt.core.client.EntryPoint;
import com.google.gwt.user.client.ui.CheckBox;
import com.google.gwt.user.client.ui.DecoratorPanel;
import com.google.gwt.user.client.ui.FlowPanel;
import com.google.gwt.user.client.ui.RootPanel;

public class HelloWorld implements EntryPoint {

   public void onModuleLoad() {
      // Create a flow panel
      FlowPanel flowPanel = new FlowPanel();

      // Add CheckBoxes to flow Panel
      for(int i = 1;  i <= 10; i++){
         CheckBox checkBox = new CheckBox("Item" + i);
         flowPanel.add(checkBox);
      }

      DecoratorPanel decoratorPanel = new DecoratorPanel();
      decoratorPanel.setWidth("500");
      decoratorPanel.add(flowPanel);

      // Add the widgets to the root panel.
      RootPanel.get().add(decoratorPanel);
   }
}
完成所有更改后,让我们像在 GWT - 创建应用 章节中一样,在开发模式下编译并运行应用程序。如果您的应用程序一切正常,这将产生以下结果: