- WebdriverIO 教程
- WebdriverIO - 首页
- WebdriverIO - 简介
- WebdriverIO - 前提条件
- WebdriverIO - 架构
- WebdriverIO - 使用 NodeJS 入门
- WebdriverIO - NPM 安装
- WebdriverIO - VS Code 安装
- WebdriverIO - package.json
- WebdriverIO - Mocha 安装
- Selenium 独立服务器安装
- WebdriverIO - 配置文件生成
- WebdriverIO - VS Code 智能提示
- WebdriverIO - wdio.conf.js 文件
- WebdriverIO - XPath 定位器
- WebdriverIO - CSS 定位器
- WebdriverIO - 链接文本定位器
- WebdriverIO - ID 定位器
- WebdriverIO - 标签名定位器
- WebdriverIO - 类名定位器
- WebdriverIO - 名称定位器
- 断言的 Expect 语句
- WebdriverIO - 成功路径流程
- WebdriverIO - 常用浏览器命令
- WebdriverIO - 处理浏览器尺寸
- WebdriverIO - 浏览器导航命令
- 处理复选框和下拉菜单
- WebdriverIO - 鼠标操作
- 处理子窗口/弹出窗口
- WebdriverIO - 隐藏元素
- WebdriverIO - 框架
- WebdriverIO - 拖放操作
- WebdriverIO - 双击
- WebdriverIO - Cookie
- WebdriverIO - 处理单选按钮
- Web元素上的 Chai 断言
- WebdriverIO - 多个窗口/标签页
- WebdriverIO - 滚动操作
- WebdriverIO - 警报
- WebdriverIO - 调试代码
- WebdriverIO - 捕获屏幕截图
- WebdriverIO - JavaScript 执行器
- WebdriverIO - 等待
- WebdriverIO - 并行运行测试
- WebdriverIO - 数据驱动测试
- 从命令行参数运行测试
- 使用 Mocha 选项执行测试
- 从 Allure 生成 HTML 报告
- WebdriverIO 有用资源
- WebdriverIO - 快速指南
- WebdriverIO - 有用资源
- WebdriverIO - 讨论
WebdriverIO - 拖放操作
WebdriverIO 可以使用 dragAndDrop 方法执行鼠标操作,例如拖放。使用此方法,我们对当前对象(源)执行点击并按住事件,然后将对象传递到目标元素。最后,释放鼠标。
语法
语法如下:
let p = $('#loc')
let t = $('#target')
p.dragAndDrop(t)
这里,p 是源定位器,t 是目标定位器。
让我们对以下元素执行拖放功能:
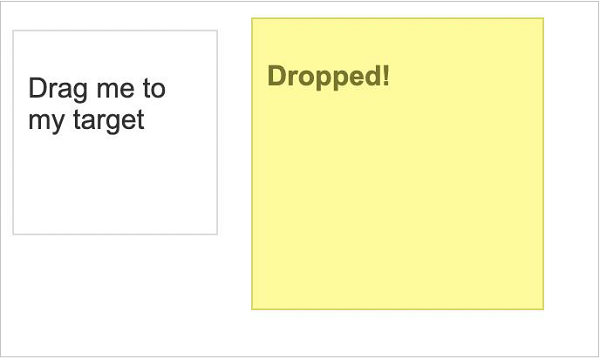
在上图中,名为“Drag me to my target”的元素必须拖放到名为“Dropped!”的元素上。
首先,请按照名为“使用 WebdriverIO 的成功路径流程”章节中的步骤 1 到 5 操作,步骤如下:
步骤 1 - 安装 NodeJS。有关如何执行此安装的详细信息,请参阅名为“使用 NodeJS 入门”的章节。
步骤 2 - 安装 NPM。有关如何执行此安装的详细信息,请参阅名为“NPM 安装”的章节。
步骤 3 - 安装 VS Code。有关如何执行此安装的详细信息,请参阅名为“VS Code 安装”的章节。
步骤 4 - 创建配置文件。有关如何执行此安装的详细信息,请参阅名为“配置文件生成”的章节。
步骤 5 - 创建一个规范文件。有关如何执行此安装的详细信息,请参阅名为“Mocha 安装”的章节。
步骤 6 - 在创建的 Mocha 规范文件中添加以下代码。
// test suite name
describe('Tutorialspoint application', function(){
   //test case
   it('Drag and Drop', function(){
      // launch url
      browser.url('https://jqueryui.jqueryjs.cn/droppable/')
      //maximize browser
      browser.maximizeWindow()
      //switch to frame
      browser.switchToFrame($(".demo-frame"))
      //identify source element
      const src = $('#draggable')
      //identify target element
      const trg = $('#droppable')
      //drag and drop
      src.dragAndDrop(trg)
   });
});
运行配置文件 - wdio.conf.js 文件,使用以下命令:
npx wdio run wdio.conf.js
有关如何创建配置文件的详细信息,请参阅名为“wdio.conf.js 文件”和“配置文件生成”的章节。
您的计算机上将显示以下屏幕:
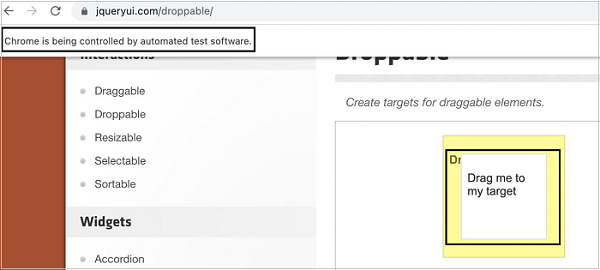
执行后,名为“Drag me to my target”的元素已拖放到名为“Dropped!”的元素上。
广告