- WebdriverIO 教程
- WebdriverIO - 首页
- WebdriverIO - 简介
- WebdriverIO - 先决条件
- WebdriverIO - 架构
- WebdriverIO - 使用 NodeJS 入门
- WebdriverIO - NPM 的安装
- WebdriverIO - VS Code 安装
- WebdriverIO - package.json
- WebdriverIO - Mocha 安装
- Selenium 独立服务器安装
- WebdriverIO - 配置文件生成
- WebdriverIO - VS Code 智能提示
- WebdriverIO - wdio.conf.js 文件
- WebdriverIO - XPath 定位器
- WebdriverIO - CSS 定位器
- WebdriverIO - 链接文本定位器
- WebdriverIO - ID 定位器
- WebdriverIO - 标签名定位器
- WebdriverIO - 类名定位器
- WebdriverIO - 名称定位器
- 断言的 Expect 语句
- WebdriverIO - 成功路径流程
- WebdriverIO - 常用浏览器命令
- WebdriverIO - 处理浏览器大小
- WebdriverIO - 浏览器导航命令
- 处理复选框和下拉列表
- WebdriverIO - 鼠标操作
- 处理子窗口/弹出窗口
- WebdriverIO - 隐藏元素
- WebdriverIO - 框架
- WebdriverIO - 拖放
- WebdriverIO - 双击
- WebdriverIO - Cookie
- WebdriverIO - 处理单选按钮
- Web元素上的 Chai 断言
- WebdriverIO - 多个窗口/选项卡
- WebdriverIO - 滚动操作
- WebdriverIO - 警报
- WebdriverIO - 调试代码
- WebdriverIO - 捕获屏幕截图
- WebdriverIO - JavaScript 执行器
- WebdriverIO - 等待
- WebdriverIO - 并行运行测试
- WebdriverIO - 数据驱动测试
- 从命令行参数运行测试
- 使用 Mocha 选项执行测试
- 从 Allure 生成 HTML 报告
- WebdriverIO 有用资源
- WebdriverIO - 快速指南
- WebdriverIO - 有用资源
- WebdriverIO - 讨论
从 Allure 生成 HTML 报告
在 WebdriverIO 中,我们有一个报告程序插件来生成 Allure 测试报告。Allure 是一款轻量级的测试报告工具,它根据自动化运行的测试结果创建简明且记录良好的报告。
要安装 Allure 并将其条目创建到 package.json 文件中,我们需要运行以下命令:
npm install @wdio/allure-reporter --save-dev
有关 package.json 的详细信息在标题为“package.json 文件”的章节中进行了讨论。
您的计算机上将显示以下屏幕:

安装 Allure 后,我们需要在配置文件 wdio.conf.js 中的 reporter 选项中配置输出目录,方法是添加以下代码。
有关如何创建配置文件的详细信息在标题为“wdio.conf.js 文件”和“配置文件生成”的章节中进行了详细讨论。
reporters: [['allure', {
   outputDir: 'allure-results',
   disableWebdriverScreenshotsReporting: false,
}]],
您的计算机上将显示以下屏幕:

这里,outputDir 具有默认目录 /allure-results。自动化完成后,我们将发现此目录已生成。它将包含 specs 文件夹中每个测试文件(包含在运行中)的 .xml 文件以及 .txt、.png 和其他文件。
此外,为了附加失败测试的屏幕截图,我们已将参数 disableWebdriverScreenshotsReporting 设置为 false。
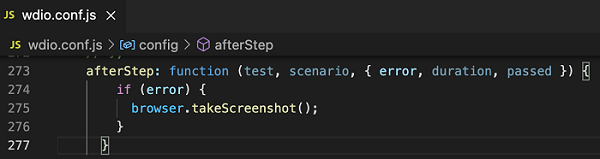
但是,我们还需要在 wdio.conf.js 文件中添加一个 afterStep 钩子,代码如下所示:
afterStep: function (test, scenario, { error, duration, passed }) {
   if (error) {
      browser.takeScreenshot();
   }
}
您的计算机上将显示以下屏幕:
使用以下命令运行配置文件 - wdio.conf.js 文件:
npx wdio run wdio.conf.js
有关如何创建配置文件的详细信息在标题为“wdio.conf.js 文件”和“配置文件生成”的章节中进行了详细讨论。
您的计算机上将显示以下屏幕:
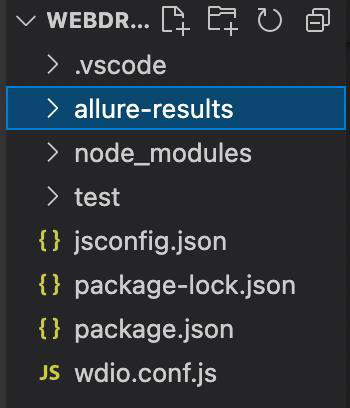
成功执行命令后,将在 WebdriverIO 项目中生成一个名为 allure-results(如 wdio.conf.js 中指定)的文件夹。它包含 xml 格式的报告。
接下来,我们需要将这些报告转换为 HTML 格式。为此,我们将首先安装 Allure 命令行工具,用于从测试结果生成 Allure 报告。
这是通过运行以下命令完成的:
npm install -g allure-commandline --save-dev
安装完成后,我们可以使用以下命令以 HTML 格式生成结果:
allure generate [allure_output_dir] && allure open
要覆盖现有结果,我们需要运行以下命令:
allure generate [allure_output_dir] --clean && allure open
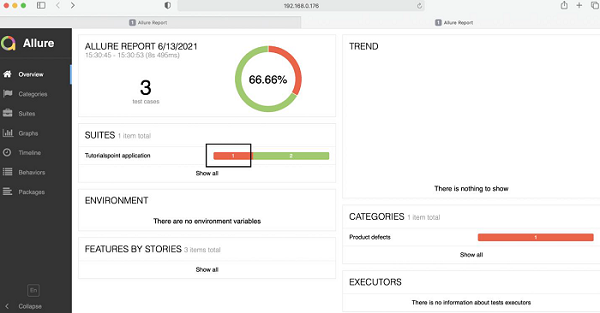
您的计算机上将显示以下屏幕:

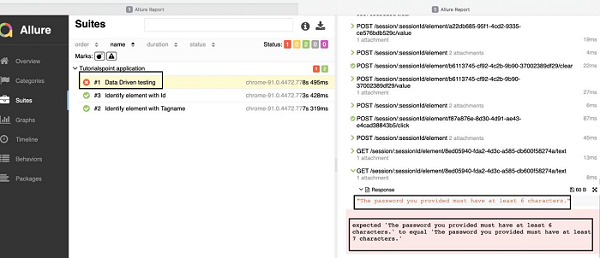
成功执行命令后,将打开一个包含测试结果的浏览器。您的计算机上将显示以下屏幕:
单击失败的测试(用红色标记),我们将获得测试的详细信息,包括预期输出、实际输出和失败的屏幕截图(在展开“响应”后获得)。
您的计算机上将显示以下屏幕: