- WebdriverIO 教程
- WebdriverIO - 首页
- WebdriverIO - 简介
- WebdriverIO - 前提条件
- WebdriverIO - 架构
- WebdriverIO - 使用 NodeJS 入门
- WebdriverIO - NPM 的安装
- WebdriverIO - VS Code 安装
- WebdriverIO - Package.json
- WebdriverIO - Mocha 安装
- Selenium 独立服务器安装
- WebdriverIO - 配置文件生成
- WebdriverIO - VS Code 智能提示
- WebdriverIO - wdio.conf.js 文件
- WebdriverIO - XPath 定位器
- WebdriverIO - CSS 定位器
- WebdriverIO - 链接文本定位器
- WebdriverIO - ID 定位器
- WebdriverIO - 标签名定位器
- WebdriverIO - 类名定位器
- WebdriverIO - 名称定位器
- 断言的 Expect 语句
- WebdriverIO - 成功路径流程
- WebdriverIO - 常用浏览器命令
- WebdriverIO - 处理浏览器大小
- WebdriverIO - 浏览器导航命令
- 处理复选框和下拉列表
- WebdriverIO - 鼠标操作
- 处理子窗口/弹出窗口
- WebdriverIO - 隐藏元素
- WebdriverIO - 框架
- WebdriverIO - 拖放
- WebdriverIO - 双击
- WebdriverIO - Cookie
- WebdriverIO - 处理单选按钮
- Web元素上的 Chai 断言
- WebdriverIO - 多个窗口/标签页
- WebdriverIO - 滚动操作
- WebdriverIO - 警报
- WebdriverIO - 调试代码
- WebdriverIO - 捕获屏幕截图
- WebdriverIO - JavaScript 执行器
- WebdriverIO - 等待
- WebdriverIO - 并行运行测试
- WebdriverIO - 数据驱动测试
- 从命令行参数运行测试
- 使用 Mocha 选项执行测试
- 从 Allure 生成 HTML 报告
- WebdriverIO 有用资源
- WebdriverIO - 快速指南
- WebdriverIO - 有用资源
- WebdriverIO - 讨论
WebdriverIO - 断言的 Expect 语句
要将 WebdriverIO 用作自动化测试工具,我们需要设置检查点,这将帮助我们得出测试是否通过或失败的结论。WebdriverIO 中提供了各种断言,我们可以使用它们来验证测试是否成功验证了一个步骤。
在断言中,我们可以将测试的预期结果与实际结果进行比较。如果两者相同,则测试应通过,否则应失败。WebdriverIO 中的 expect 语句可以应用于浏览器、模拟对象或元素。
我们必须添加一个名为 Chai 的 NodeJS 库。Chai 库包含用于断言的 expect 语句。
我们必须在代码中添加以下语句以实现 Chai 断言:
const e = require('chai').expect
应用于浏览器的断言
这些断言列在下面:
toHaveUrl
它检查浏览器是否打开了特定页面。语法如下:
expect(browser).toHaveUrl('https://tutorialspoint.com/index.htm')
toHaveUrlContaining
它检查页面的 URL 是否包含特定值。
语法
语法如下:
expect(browser).toHaveUrlContaining('tutorialspoint')
toHaveUrl
它检查页面是否具有特定标题。
语法
语法如下:
expect(browser).toHaveTitle('Terms of Use - Tutorialspoint')
应用于元素的断言
这些断言列在下面:
toBeDisplayed
它检查元素是否显示。
语法
语法如下:
const e = $('#loc')
expect(e).toBeDisplayed()
toExist
它检查元素是否存在。
语法
语法如下:
const e = $('#loc')
expect(e).toExist()
toBePresent
它检查元素是否存在。
语法
语法如下:
const e = $('#loc')
expect(e).toBePresent()
toBeExisting
它与 toExist 相同。
toBeFocussed
它检查元素是否获得焦点。
语法
语法如下:
const e = $('#loc')
expect(e).toBeFocussed()
toHaveAttribute
它检查元素属性是否具有特定值。
语法
语法如下:
const e = $('#loc')
expect(e).toHaveAttribute('name', 'search')
toHaveAttr
它与 toExist 相同。
toHaveAttributeContaining
它检查元素属性是否包含特定值。
语法
语法如下:
const e = $('#loc')
expect(e).toHaveAttributeContaining('name', 'srch')
toHaveElementClass
它检查元素是否具有特定类名。
语法
语法如下:
const e = $('#loc')
expect(e).toHaveElementClass('name', { message: 'Not available!', })
toHaveElementClassContaining
它检查元素类名是否包含特定值。
语法
语法如下:
const e = $('#loc')
expect(e).toHaveElementClassContaining('nam')
toHaveElementProperty
它检查元素是否具有特定属性。
语法
语法如下:
const e = $('#loc')
expect(e).toHaveElementProperty('width', 15)
//verify negative scenario
expect(e).not.toHaveElementProperty('width', 20)
toHaveValue
它检查输入元素是否具有特定值。
语法
语法如下:
const e = $('#loc')
expect(e).toHaveValue('Selenium', { ignoreCase: false})
toHaveValueContaining
它检查输入元素是否包含特定值
语法
语法如下:
const e = $('#loc')
expect(e).toHaveValueContaining('srch')
toBeClickable
它检查元素是否可点击。
语法
语法如下:
const e = $('#loc')
expect(e).toBeClickable()
toBeDisabled
它检查元素是否被禁用。
语法
语法如下:
const e = $('#loc')
expect(e).toBeDisabled()
//verify negative scenario
expect(e).not.toBeEnabled()
toBeEnabled
它检查元素是否已启用。
语法
语法如下:
const e = $('#loc')
expect(e).toBeEnabled()
toBeSelected
它与 toBeEnabled 相同。
toBeChecked
它与 toBeEnabled 相同。
toHaveHref
它检查链接元素是否具有特定链接目标。
语法
语法如下:
const e = $('<a>')
expect(e).toHaveHref('https://tutorialspoint.com/index.htm')
toHaveLink
它与 toHaveHref 相同。
toHaveHrefContaining
它检查链接元素是否包含特定链接目标。
语法
语法如下:
const e = $('<a>')
expect(e).toHaveHrefContaining('tutorialspoint.com')
toHaveLinkContaining
它与 HaveHrefContaining 相同。
toHaveId
它检查元素是否具有特定 id 属性值。
语法
语法如下:
const e = $('#loc')
expect(e).toHaveId('loc')
toHaveText
它检查元素是否具有特定文本。
语法
语法如下:
const e = $('#loc')
expect(e).toHaveText('Learning WebdriverIO')
toHaveTextContaining
它检查元素是否包含特定文本。
语法
语法如下:
const e = $('#loc')
expect(e).toHaveTextContaining('Learning WebdriverIO')
toBeDisplayedInViewpoint
它检查元素是否在视口中。
语法
语法如下:
const e = $('#loc')
expect(e).toBeDisplayedInViewpoint()
应用于模拟对象的断言
这些断言列在下面:
toBeRequested
它检查模拟是否被调用。
语法
语法如下:
const m = browser.mock('**/api/list*')
expect(m).toBeRequested()
toBeRequestedTimes
它检查模拟是否被调用了预期次数。
语法
语法如下:
const m = browser.mock('**/api/list*')
expect(m).toBeRequestedTimes(2)
首先,请按照“使用 WebdriverIO 的成功路径流程”一章中步骤 1 到 5 的操作,步骤如下:
步骤 1 - 安装 NodeJS。有关如何执行此安装的详细信息,请参阅“使用 NodeJS 入门”一章。
步骤 2 - 安装 NPM。有关如何执行此安装的详细信息,请参阅“NPM 的安装”一章。
步骤 3 - 安装 VS Code。有关如何执行此安装的详细信息,请参阅“VS Code 安装”一章。
步骤 4 - 创建配置文件。有关如何执行此安装的详细信息,请参阅“配置文件生成”一章。
步骤 5 - 创建一个规范文件。有关如何执行此安装的详细信息,请参阅“Mocha 安装”一章。
步骤 6 - 在创建的 Mocha 规范文件中添加以下代码。
// test suite name
describe('Tutorialspoint application', function(){
   //test case
   it('Assertion with expect', function(){
      // launch url
      browser.url('https://tutorialspoint.com/about/about_careers.htm')
      //identify element with link text then click
      $("=Terms of Use").click()
      browser.pause(1000)
      //verify page title with assertion
      expect(browser).toHaveTitleContaining('Terms of Use - Tuter')
   });
});
运行配置文件 - wdio.conf.js 文件,使用以下命令:
npx wdio run wdio.conf.js
有关如何创建配置文件的详细信息,请参阅“wdio.conf.js 文件”和“配置文件生成”一章。
您的计算机上将显示以下屏幕:
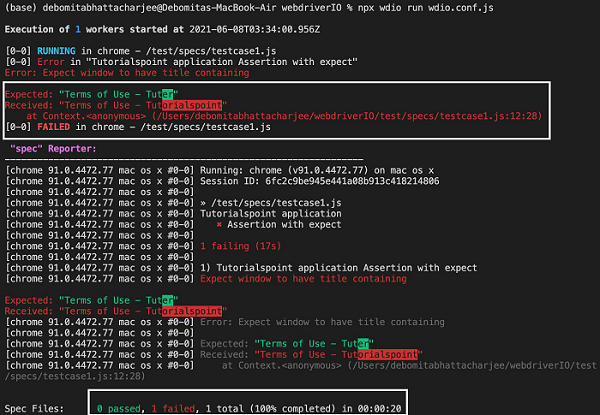
成功执行命令后,我们发现结果为 1 个失败。因为预期结果是“使用条款 - Tuter”,而接收到的输出是“使用条款 - Tutorialspoint”。
此外,WebdriverIO expect 语句突出显示了预期结果和接收到的文本不匹配的文本部分。