- WebdriverIO 教程
- WebdriverIO - 首页
- WebdriverIO - 简介
- WebdriverIO - 预备条件
- WebdriverIO - 架构
- WebdriverIO - 使用 NodeJS 入门
- WebdriverIO - NPM 安装
- WebdriverIO - VS Code 安装
- WebdriverIO - package.json
- WebdriverIO - Mocha 安装
- Selenium 独立服务器安装
- WebdriverIO - 配置文件生成
- WebdriverIO - VS Code 智能提示
- WebdriverIO - wdio.conf.js 文件
- WebdriverIO - XPath 定位器
- WebdriverIO - CSS 定位器
- WebdriverIO - 链接文本定位器
- WebdriverIO - ID 定位器
- WebdriverIO - 标签名定位器
- WebdriverIO - 类名定位器
- WebdriverIO - 名称定位器
- 断言的 Expect 语句
- WebdriverIO - 正确流程
- WebdriverIO - 常用浏览器命令
- WebdriverIO - 处理浏览器大小
- WebdriverIO - 浏览器导航命令
- 处理复选框和下拉菜单
- WebdriverIO - 鼠标操作
- 处理子窗口/弹出窗口
- WebdriverIO - 隐藏元素
- WebdriverIO - 框架
- WebdriverIO - 拖放
- WebdriverIO - 双击
- WebdriverIO - Cookie
- WebdriverIO - 处理单选按钮
- Web元素的 Chai 断言
- WebdriverIO - 多个窗口/标签页
- WebdriverIO - 滚动操作
- WebdriverIO - 警报
- WebdriverIO - 调试代码
- WebdriverIO - 截取屏幕截图
- WebdriverIO - JavaScript 执行器
- WebdriverIO - 等待
- WebdriverIO - 并行运行测试
- WebdriverIO - 数据驱动测试
- 从命令行参数运行测试
- 使用 Mocha 选项执行测试
- 从 Allure 生成 HTML 报告
- WebdriverIO 有用资源
- WebdriverIO - 快速指南
- WebdriverIO - 有用资源
- WebdriverIO - 讨论
WebdriverIO - 链接文本定位器
导航到网页后,我们可以通过单击链接与 Web 元素交互以完成自动化测试用例。链接文本定位器用于具有锚标签的元素。
我们可以识别具有匹配文本的锚元素。在 WebdriverIO 代码中,我们可以选择以下格式指定元素的链接:
$('=value of the anchor text')
或者,我们可以将此表达式存储在变量中,如下所示:
const p = $('=value of the anchor text')
让我们识别下面图片中高亮的链接并单击它:
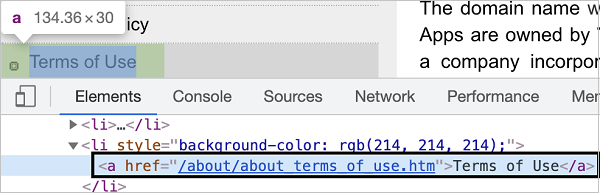
上图中高亮的链接具有标签名 - a 和锚文本 - 使用条款。
首先,请按照“使用 WebdriverIO 的正确流程”章节中的步骤 1 到步骤 5 操作,步骤如下:
步骤 1 - 安装 NodeJS。有关如何执行此安装的详细信息,请参阅“使用 NodeJS 入门”章节。
步骤 2 - 安装 NPM。有关如何执行此安装的详细信息,请参阅“NPM 安装”章节。
步骤 3 - 安装 VS Code。有关如何执行此安装的详细信息,请参阅“VS Code 安装”章节。
步骤 4 - 创建配置文件。有关如何执行此安装的详细信息,请参阅“配置文件生成”章节。
步骤 5 - 创建规范文件。有关如何执行此安装的详细信息,请参阅“Mocha 安装”章节。
步骤 6 - 在创建的 Mocha 规范文件中添加以下代码。
/ test suite name
describe('Tutorialspoint application', function(){
   //test case
   it('Identify element with Link Text', function(){
      // launch url
      browser.url('https://tutorialspoint.com/about/about_careers.htm')
      //identify element with link text then click
      $("=Terms of Use").click()
      console.log('Page title after click: ' + browser.getTitle())
   });
});
使用以下命令运行配置文件 - wdio.conf.js 文件:
npx wdio run wdio.conf.js.
有关如何创建配置文件的详细信息,请参阅“wdio.conf.js 文件”章节和“配置文件生成”章节。
您的计算机上将显示以下屏幕:
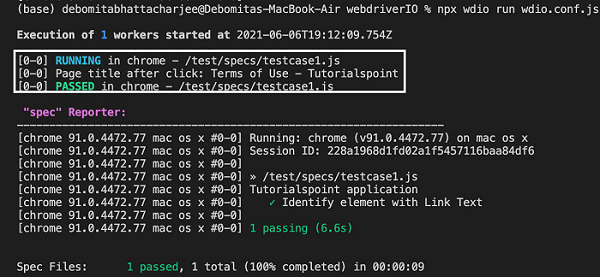
成功执行命令后,单击“使用条款”后页面的标题 - Tutorialspoint 将打印在控制台中。
部分链接文本定位器
导航到网页后,我们可以通过单击链接与 Web 元素交互以完成自动化测试用例。部分链接文本定位器用于具有锚标签的元素。
我们可以识别具有匹配文本的锚元素。在 WebdriverIO 代码中,我们可以选择以下格式指定元素的部分链接:
$('*=value of the anchor text which is matching')
或者,我们可以将此表达式存储在变量中,如下所示:
const p = $('*=value of the anchor text which is matching')
部分链接文本类似于链接文本,唯一的区别在于它有助于处理锚元素的某些字符是固定的而其余字符是动态的情况。
让我们识别下面图片中高亮的链接并单击它:

上图中高亮的链接具有标签名 - a 和锚文本 - 使用条款。
首先,请按照“使用 WebdriverIO 的正确流程”章节中的步骤 1 到步骤 5 操作,步骤如下:
步骤 1 - 安装 NodeJS。有关如何执行此安装的详细信息,请参阅“使用 NodeJS 入门”章节。
步骤 2 - 安装 NPM。有关如何执行此安装的详细信息,请参阅“NPM 安装”章节。
步骤 3 - 安装 VS Code。有关如何执行此安装的详细信息,请参阅“VS Code 安装”章节。
步骤 4 - 创建配置文件。有关如何执行此安装的详细信息,请参阅“配置文件生成”章节。
步骤 5 - 创建规范文件。有关如何执行此安装的详细信息,请参阅“Mocha 安装”章节。
步骤 6 - 在创建的 Mocha 规范文件中添加以下代码。
// test suite name
describe('Tutorialspoint application', function(){
   //test case
   it('Identify element with Partial Link Text', function(){
      // launch url
      browser.url('https://tutorialspoint.com/about/about_careers.htm')
      //identify element with partial link text then click
      $("*=Terms of").click()
      console.log('Page title after click: ' + browser.getTitle())
   });
});
使用以下命令运行配置文件 - wdio.conf.js 文件:
npx wdio run wdio.conf.js
有关如何创建配置文件的详细信息,请参阅“wdio.conf.js 文件”章节和“配置文件生成”章节。
您的计算机上将显示以下屏幕:

成功执行命令后,单击“使用条款”后页面的标题 - Tutorialspoint 将打印在控制台中。