- 生成式AI教程
- 生成式AI - 首页
- 生成式AI基础
- 生成式AI基础
- 生成式AI发展史
- 机器学习与生成式AI
- 生成式AI模型
- 判别式模型与生成式模型
- 生成式AI模型类型
- 概率分布
- 概率密度函数
- 最大似然估计
- 生成式AI网络
- GAN的工作原理?
- GAN - 架构
- 条件GAN
- StyleGAN和CycleGAN
- 训练GAN
- GAN应用
- 生成式AI Transformer
- Transformer在生成式AI中的应用
- Transformer在生成式AI中的架构
- Transformer中的输入嵌入
- 多头注意力机制
- 位置编码
- 前馈神经网络
- Transformer中的残差连接
- 生成式AI自编码器
- 自编码器在生成式AI中的应用
- 自编码器类型及应用
- 使用Python实现自编码器
- 变分自编码器
- 生成式AI和ChatGPT
- 一个生成式AI模型
- 生成式AI杂项
- 生成式AI在制造业中的应用
- 生成式AI在开发者中的应用
- 生成式AI在网络安全中的应用
- 生成式AI在软件测试中的应用
- 生成式AI在市场营销中的应用
- 生成式AI在教育中的应用
- 生成式AI在医疗保健中的应用
- 生成式AI在学生中的应用
- 生成式AI在工业中的应用
- 生成式AI在电影中的应用
- 生成式AI在音乐中的应用
- 生成式AI在烹饪中的应用
- 生成式AI在媒体中的应用
- 生成式AI在通信中的应用
- 生成式AI在摄影中的应用
- 生成式AI资源
- 生成式AI - 有用资源
- 生成式AI - 讨论
使用Python实现自编码器
自编码器是一种用于学习未标记数据高效编码的人工神经网络 (ANN)。它们已成为机器学习和深度学习领域的重要工具。本章提供了一个分步指南,介绍如何在Python编程语言中实现自编码器。我们将使用MNIST数据集作为示例。
我们将介绍必要的设置、数据预处理、模型构建、训练和结果可视化。我们将使用手写数字的MNIST数据集作为示例。
使用Python实现自编码器的分步指南
让我们探索使用Python编程语言实现自编码器的步骤:
步骤1:设置环境
在开始实现之前,我们必须确保已安装必要的库。如果尚未安装,可以使用以下给出的pip命令安装它们:
pip install numpy matplotlib tensorflow
步骤2:导入库
安装完成后,我们需要导入必要的库:
# Import necessary libraries
import numpy as np
import matplotlib.pyplot as plt
from tensorflow.keras.datasets import mnist
from tensorflow.keras.models import Model
from tensorflow.keras.layers import Input, Dense, Flatten, Reshape
from tensorflow.keras.optimizers import Adam
步骤3:加载和预处理MNIST数据集
在此步骤中,我们将加载MNIST手写数字数据集并对像素值进行归一化,如下所示:
# Load the dataset
(x_train, _), (x_test, _) = mnist.load_data()

# Normalize the data
x_train = x_train.astype('float32') / 255.0
x_test = x_test.astype('float32') / 255.0

# Reshape the data to include the channel dimension
x_train = np.reshape(x_train, (len(x_train), 28, 28, 1))
x_test = np.reshape(x_test, (len(x_test), 28, 28, 1))
步骤4:构建自编码器模型
在此步骤中,我们将通过定义编码器和解码器部分来构建自编码器模型:
# Define the input shape for the autoencoder
input_shape = (28, 28, 1)

# Define the encoder part of the autoencoder
input_img = Input(shape=input_shape)
x = Flatten()(input_img)
encoded = Dense(64, activation='relu')(x)

# Define the decoder part of the autoencoder
decoded = Dense(784, activation='sigmoid')(encoded)
decoded = Reshape((28, 28, 1))(decoded)

# Define the complete autoencoder model
autoencoder = Model(input_img, decoded)
autoencoder.compile(optimizer=Adam(), loss='binary_crossentropy')

# Print the summary of the autoencoder model
autoencoder.summary()
步骤5:训练自编码器模型
接下来,我们需要使用训练数据训练自编码器,如下所示:
# Train the autoencoder
autoencoder.fit(x_train, x_train,
   epochs = 50,		# Number of epochs to train
   batch_size=256,	# Batch size for training
   shuffle=True,
   validation_data = (x_test, x_test)
)
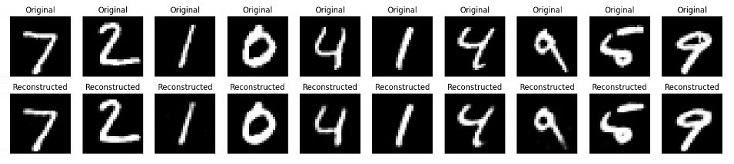
步骤6:可视化原始数据和重建数据
在此最后一步中,我们将可视化一些原始图像和重建图像,以检查自编码器的性能如何。
# Predict the reconstructed images from the test set
decoded_imgs = autoencoder.predict(x_test)

# Number of digits to display
n = 10

# Create a figure with a specified size
plt.figure(figsize=(20, 4))

# Loop through the first n test images

for i in range(n):

   # Display the original image
   ax = plt.subplot(2, n, i + 1)  # Create a subplot for the original image

   # Reshape and plot the original image
   plt.imshow(x_test[i].reshape(28, 28), cmap='gray')
   plt.title("Original")  # Set the title of the plot
   plt.axis('off')

   # Display the reconstructed image
   ax = plt.subplot(2, n, i + 1 + n)
   plt.imshow(decoded_imgs[i].reshape(28, 28), cmap='gray')
   plt.title("Reconstructed")
   plt.axis('off')

# Show the figure
plt.show()
完整的Python实现代码
以下是上述示例及其输出的完整Python脚本:
# Import necessary libraries
import numpy as np
import matplotlib.pyplot as plt
from tensorflow.keras.datasets import mnist
from tensorflow.keras.models import Model
from tensorflow.keras.layers import Input, Dense, Flatten, Reshape
from tensorflow.keras.optimizers import Adam

# Load the dataset
(x_train, _), (x_test, _) = mnist.load_data()

# Normalize the data
x_train = x_train.astype('float32') / 255.0
x_test = x_test.astype('float32') / 255.0

# Reshape the data to include the channel dimension
x_train = np.reshape(x_train, (len(x_train), 28, 28, 1))
x_test = np.reshape(x_test, (len(x_test), 28, 28, 1))

# Define the input shape for the autoencoder
input_shape = (28, 28, 1)

# Define the encoder part of the autoencoder
input_img = Input(shape=input_shape)
x = Flatten()(input_img)
encoded = Dense(64, activation='relu')(x)

# Define the decoder part of the autoencoder
decoded = Dense(784, activation='sigmoid')(encoded)
decoded = Reshape((28, 28, 1))(decoded)

# Define the complete autoencoder model
autoencoder = Model(input_img, decoded)

autoencoder.compile(optimizer=Adam(), loss='binary_crossentropy')

# Print the summary of the autoencoder model
autoencoder.summary()

# Train the autoencoder
autoencoder.fit(x_train, x_train,
   epochs=50,  # Number of epochs to train
   batch_size=256,  # Batch size for training
   shuffle=True,
   validation_data=(x_test, x_test)
)

# Predict the reconstructed images from the test set
decoded_imgs = autoencoder.predict(x_test)

# Number of digits to display
n = 10

# Create a figure with a specified size
plt.figure(figsize=(20, 4))

# Loop through the first n test images
for i in range(n):
   # Display the original image
   ax = plt.subplot(2, n, i + 1)
   plt.imshow(x_test[i].reshape(28, 28), cmap='gray')
   plt.title("Original")  # Set the title of the plot
   plt.axis('off')

   # Display the reconstructed image
   ax = plt.subplot(2, n, i + 1 + n)
   plt.imshow(decoded_imgs[i].reshape(28, 28), cmap='gray')
   plt.title("Reconstructed")
   plt.axis('off')

# Show the figure
plt.show()
输出
运行上述脚本后,它将首先打印自编码器模型的摘要,然后是训练轮数。最后,我们将得到一个显示原始数据和重建数据的图表。
Model: "functional_1"
| 层 (类型) | 输出形状 | 参数数量 |
|---|---|---|
| input_layer_3 (InputLayer) | (None, 28, 28, 1) | 0 |
| flatten_3 (Flatten) | (None, 784) | 0 |
| dense_6 (Dense) | (None, 64) | 50, 240 |
| dense_7 (Dense) | (None, 784) | 50, 960 |
| reshape_3 (Reshape) | (None, 28, 28, 1) | 0 |
Total params: 101,200 (395.31 KB)
Trainable params: 101,200 (395.31 KB)
Non-trainable params: 0 (0.00 B)
结论
自编码器是强大的无监督学习工具,可以应用于各种任务,例如降维、特征提取和图像去噪。
在本章中,我们解释了如何使用Python实现简单的自编码器并将其应用于MNIST手写数据集。这包括设置环境、预处理数据、构建和训练模型以及可视化结果以评估模型的性能。
广告