- Ionic 基础教程
- Ionic - 首页
- Ionic - 概述
- Ionic - 环境搭建
- Ionic CSS 组件
- Ionic - 颜色
- Ionic - 内容
- Ionic - 页眉
- Ionic - 页脚
- Ionic - 按钮
- Ionic - 列表
- Ionic - 卡片
- Ionic - 表单
- Ionic - 开关
- Ionic - 复选框
- Ionic - 单选按钮
- Ionic - 滑块
- Ionic - 选择框
- Ionic - 标签页
- Ionic - 网格
- Ionic - 图标
- Ionic - 内边距
- Ionic JavaScript 组件
- Ionic - JS 动作面板
- Ionic - JS 背景
- Ionic - JS 内容
- Ionic - JS 表单
- Ionic - JS 事件
- Ionic - JS 页眉
- Ionic - JS 页脚
- Ionic - JS 键盘
- Ionic - JS 列表
- Ionic - JS 加载
- Ionic - JS 模态框
- Ionic - JS 导航
- Ionic - JS 弹出框
- Ionic - JS 弹窗
- Ionic - JS 滚动
- Ionic - JS 侧边菜单
- Ionic - JS 滑块
- Ionic - JS 标签页
- Ionic 高级概念
- Ionic - Cordova 集成
- Ionic - AdMob
- Ionic - 相机
- Ionic - Facebook
- Ionic - 应用内浏览器
- Ionic - 原生音频
- Ionic - 定位
- Ionic - 多媒体
- Ionic - 启动画面
- Ionic 有用资源
- Ionic - 快速指南
- Ionic - 有用资源
- Ionic - 讨论
Ionic - 表单
Ionic 表单主要用于与用户交互并收集所需信息。本章将介绍各种文本输入表单,后续章节将解释如何使用 Ionic 框架使用其他表单元素。
使用输入表单
使用表单的最佳方法是使用列表和项目作为主要类。您的应用程序通常包含多个表单元素,因此将其组织为列表是有意义的。在以下示例中,您可以注意到项目元素是一个标签。
您可以使用任何其他元素,但标签将提供点击元素任何部分以聚焦文本输入的功能。您可以设置一个占位符,它看起来与输入文本不同,并且一旦您开始键入,它就会隐藏。您可以在下面的示例中看到这一点。
<div class = "list">
   <label class = "item item-input">
      <input type = "text" placeholder = "Placeholder 1" />
   </label>

   <label class = "item item-input">
      <input type = "text" placeholder = "Placeholder 2" />
   </label>
</div>
以上代码将生成以下屏幕:

Ionic 标签
Ionic 提供了其他一些标签选项。如果您希望在键入文本时占位符位于左侧,可以使用input-label类。
<div class = "list">
   <label class = "item item-input">
      <input type = "text" placeholder = "Placeholder 1" />
   </label>

   <label class = "item item-input">
      <input type = "text" placeholder = "Placeholder 2" />
   </label>
</div>
以上代码将生成以下屏幕:
堆叠标签
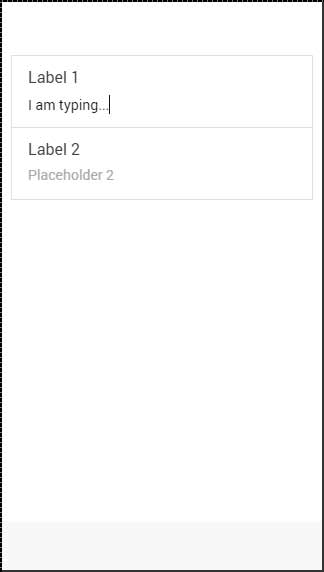
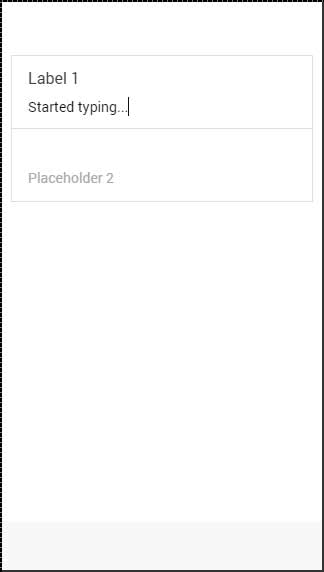
堆叠标签是另一个选项,允许您将标签移动到输入的顶部或底部。为此,我们将item-stacked-label类添加到我们的标签元素,我们需要创建一个新元素并为其分配input-label类。如果我们希望它位于顶部,我们只需要在input标签之前添加此元素。这在以下示例中显示。
请注意,span标签位于input标签之前。如果我们改变它们的位置,它将出现在屏幕上的下方。
<div class = "list">
   <label class = "item item-input item-stacked-label">
      <span class = "input-label">Label 1</span>
      <input type = "text" placeholder = "Placeholder 1" />
   </label>

   <label class = "item item-input item-stacked-label">
      <span class = "input-label">Label 2</span>
      <input type = "text" placeholder = "Placeholder 2" />
   </label>
</div>
以上代码将生成以下屏幕:
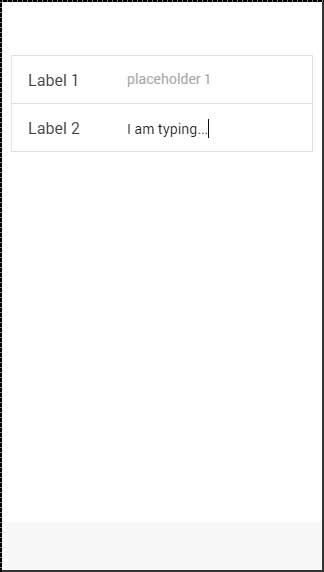
浮动标签
浮动标签是我们可以使用的第三个选项。这些标签在我们开始键入之前将被隐藏。一旦开始键入,它们将以漂亮的浮动动画出现在元素的顶部。我们可以像使用堆叠标签一样使用浮动标签。唯一的区别是这次我们将使用item-floating-label类。
<div class = "list">
   <label class = "item item-input item-floating-label">
      <span class = "input-label"t>Label 1</span>
      <input type = "text" placeholder = "Placeholder 1" />
   </label>

   <label class = "item item-input item-floating-label">
      <span class = "input-label">Label 2</span>
      <input type = "text" placeholder = "Placeholder 2" />
   </label>
</div>
以上代码将生成以下屏幕:
内嵌输入
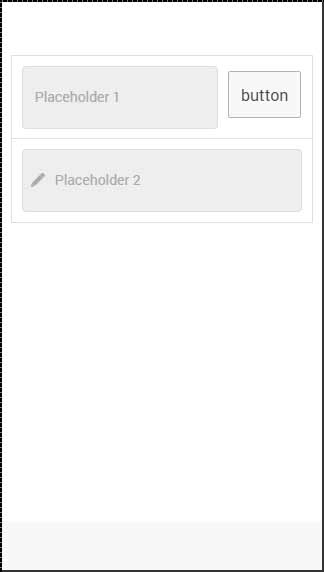
在上一章中,我们讨论了如何内嵌 Ionic 元素。您也可以通过将item-input-inset类添加到您的项目和item-input-wrapper类添加到您的标签来内嵌输入。包装器将为您的标签添加额外的样式。
如果您在标签旁边添加其他元素,标签大小将调整以适应新元素。您也可以在标签内添加元素(通常是图标)。
以下示例显示了两个内嵌输入。第一个在标签旁边有一个按钮,第二个在标签内有一个图标。我们使用placeholder-icon类使图标与占位符文本颜色相同。如果没有它,图标将使用标签的颜色。
<div class = "list">
   <div class = "item item-input-inset">
      <label class = "item item-input-wrapper">
         <input type = "text" placeholder = "Placeholder 1" />
      </label>
      <button class = "button">button</button>
   </div>

   <div class = "item item-input-inset">
      <label class = "item item-input-wrapper">
         <i class = "icon ion-edit placeholder-icon"></i>
         <input type = "text" placeholder = "Placeholder 2" />
      </label>
   </div>
</div>
以上代码将生成以下屏幕: