- OpenCV 教程
- OpenCV - 首页
- OpenCV - 概述
- OpenCV - 环境配置
- OpenCV - 图像存储
- OpenCV - 读取图像
- OpenCV - 写入图像
- OpenCV - 图形用户界面 (GUI)
- 绘图函数
- OpenCV - 绘制圆形
- OpenCV - 绘制直线
- OpenCV - 绘制矩形
- OpenCV - 绘制椭圆
- OpenCV - 绘制折线
- OpenCV - 绘制凸多边形
- OpenCV - 绘制带箭头的直线
- OpenCV - 添加文本
- 滤波
- OpenCV - 双边滤波
- OpenCV - 方框滤波
- OpenCV - 平方盒滤波
- OpenCV - Filter2D
- OpenCV - 膨胀
- OpenCV - 腐蚀
- OpenCV - 形态学操作
- OpenCV - 图像金字塔
- Sobel 算子
- OpenCV - Sobel 算子
- OpenCV - Scharr 算子
- 图像变换操作
- OpenCV - 拉普拉斯变换
- OpenCV - 距离变换
- 摄像头和人脸检测
- OpenCV - 使用摄像头
- OpenCV - 图片中的人脸检测
- 使用摄像头进行人脸检测
- OpenCV 有用资源
- OpenCV 快速指南
- OpenCV - 有用资源
- OpenCV - 讨论
OpenCV 快速指南
OpenCV - 概述
OpenCV是一个跨平台库,我们可以用它来开发实时的计算机视觉应用程序。它主要关注图像处理、视频捕获和分析,包括人脸检测和物体检测等功能。
让我们从定义“计算机视觉”这个术语开始本章节。
计算机视觉
计算机视觉可以定义为一门学科,它解释如何根据场景中存在的结构属性,从其二维图像重建、解释和理解三维场景。它处理使用计算机软件和硬件模拟和复制人类视觉。
计算机视觉与以下领域有很大的重叠:
图像处理 - 它专注于图像操作。
模式识别 - 它解释各种分类模式的技术。
摄影测量学 - 它关注从图像中获取精确测量。
计算机视觉与图像处理
图像处理处理图像到图像的转换。图像处理的输入和输出都是图像。
计算机视觉是从图像中构建对物理对象的明确、有意义的描述。计算机视觉的输出是对三维场景中结构的描述或解释。
计算机视觉的应用
这里列出了一些计算机视觉大量使用的主要领域。
机器人应用
定位 - 自动确定机器人位置
导航
避障
装配(销孔、焊接、喷漆)
操作(例如 PUMA 机器人机械手)
人机交互 (HRI) - 智能机器人与人互动和服务人
医学应用
- 分类和检测(例如病灶或细胞分类和肿瘤检测)
- 二维/三维分割
- 三维人体器官重建(MRI 或超声波)
- 视觉引导机器人手术
工业自动化应用
- 工业检测(缺陷检测)
- 装配
- 条形码和包装标签阅读
- 物体分拣
- 文档理解(例如 OCR)
安全应用
生物识别技术(虹膜、指纹、人脸识别)
监控 - 检测某些可疑活动或行为
交通应用
- 自动驾驶车辆
- 安全,例如驾驶员警觉性监控
OpenCV 库的功能
使用 OpenCV 库,您可以:
读取和写入图像
捕获和保存视频
处理图像(滤波、变换)
执行特征检测
检测视频或图像中特定对象,例如人脸、眼睛、汽车。
分析视频,即估计视频中的运动,减去背景,并跟踪视频中的对象。
OpenCV 最初是用 C++ 开发的。除此之外,还提供了 Python 和 Java 绑定。OpenCV 运行在各种操作系统上,例如 Windows、Linux、OSx、FreeBSD、Net BSD、Open BSD 等。
本教程使用 Java 绑定解释 OpenCV 的概念和示例。
OpenCV 库模块
以下是 OpenCV 库的主要库模块。
核心功能
此模块涵盖用于构建 OpenCV 应用程序的基本数据结构,例如 Scalar、Point、Range 等。除此之外,它还包括用于存储图像的多维数组Mat。在 OpenCV 的 Java 库中,此模块作为名为org.opencv.core的包包含。
图像处理
此模块涵盖各种图像处理操作,例如图像滤波、几何图像变换、颜色空间转换、直方图等。在 OpenCV 的 Java 库中,此模块作为名为org.opencv.imgproc的包包含。
视频
此模块涵盖视频分析概念,例如运动估计、背景减法和对象跟踪。在 OpenCV 的 Java 库中,此模块作为名为org.opencv.video的包包含。
视频 I/O
此模块解释使用 OpenCV 库进行视频捕获和视频编解码。在 OpenCV 的 Java 库中,此模块作为名为org.opencv.videoio的包包含。
calib3d
此模块包括关于基本多视图几何算法、单目和立体相机标定、物体姿态估计、立体对应和三维重建元素的算法。在 OpenCV 的 Java 库中,此模块作为名为org.opencv.calib3d的包包含。
features2d
此模块包括特征检测和描述的概念。在 OpenCV 的 Java 库中,此模块作为名为org.opencv.features2d的包包含。
Objdetect
此模块包括检测对象和预定义类的实例,例如人脸、眼睛、杯子、人、汽车等。在 OpenCV 的 Java 库中,此模块作为名为org.opencv.objdetect的包包含。
Highgui
这是一个易于使用的界面,具有简单的 UI 功能。在 OpenCV 的 Java 库中,此模块的功能包含在两个不同的包中,即org.opencv.imgcodecs和org.opencv.videoio。
OpenCV 简史
OpenCV 最初是英特尔的一个研究项目,旨在辅助 CPU 密集型应用。它于 1999 年正式启动。
- 2006 年,其第一个主要版本 OpenCV 1.0 发布。
- 2009 年 10 月,第二个主要版本 OpenCV 2 发布。
- 2012 年 8 月,OpenCV 被非营利组织 OpenCV.org 接管。
OpenCV - 环境配置
在本节中,您将学习如何在您的系统中安装 OpenCV 并设置其环境。
安装 OpenCV
首先,您需要将 OpenCV 下载到您的系统。请按照以下步骤操作。
步骤 1 - 点击以下链接打开OpenCV的主页:https://opencv.ac.cn/ 点击后,您将看到如下所示的主页。
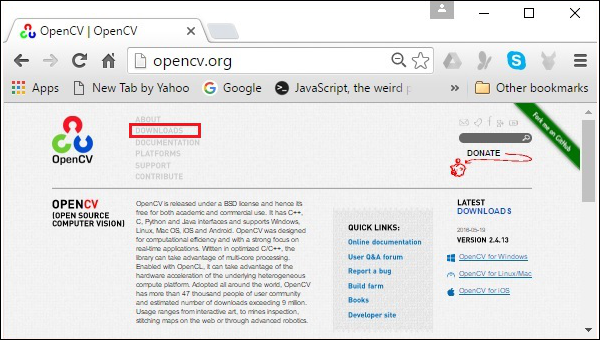
步骤 2 - 现在,点击上面截图中突出显示的下载链接。点击后,您将被定向到 OpenCV 的下载页面。

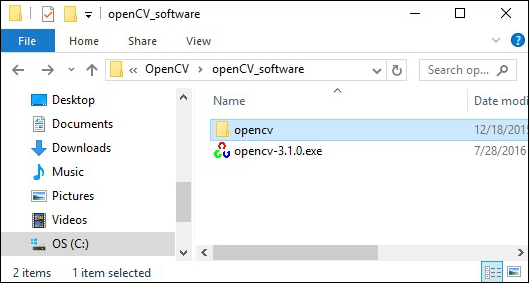
步骤 3 - 点击上面截图中突出显示的链接后,将下载一个名为opencv-3.1.0.exe的文件。解压此文件,在您的系统中生成一个名为opencv的文件夹,如下面的截图所示。
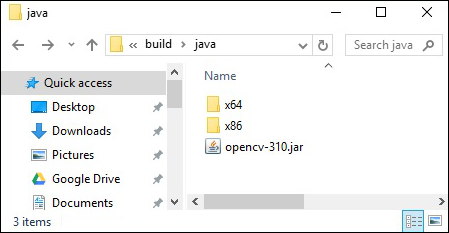
步骤 4 - 打开文件夹OpenCV → build → java。在这里,您将找到名为opencv-310.jar的 OpenCV jar 文件。将此文件保存到单独的文件夹中以便日后使用。
Eclipse 安装
下载所需的 JAR 文件后,您必须将这些 JAR 文件嵌入到您的 Eclipse 环境中。您可以通过为这些 JAR 文件设置构建路径并使用pom.xml来实现。
设置构建路径
以下是如何在 Eclipse 中设置 OpenCV 的步骤:
步骤 1 - 确保您已经在系统中安装了 Eclipse。如果没有,请下载并在您的系统中安装 Eclipse。
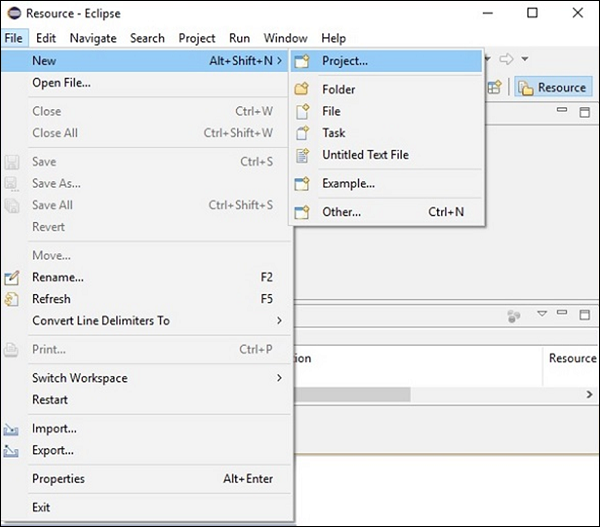
步骤 2 - 打开 Eclipse,点击文件,新建,并打开一个新项目,如下面的截图所示。
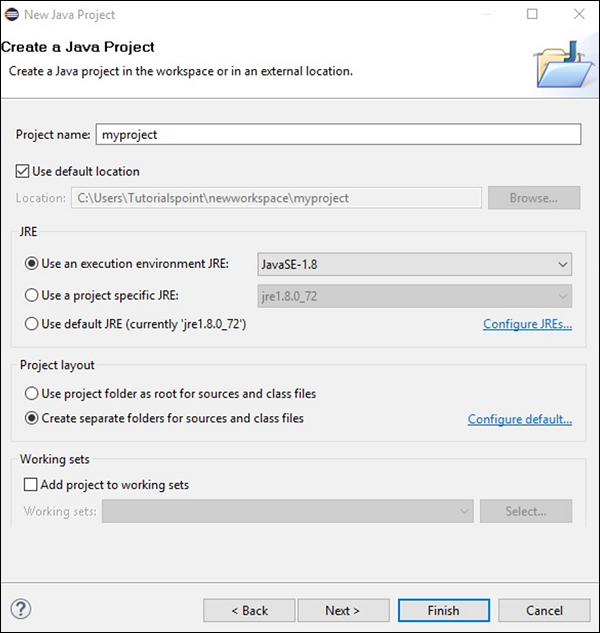
步骤 3 - 选择项目后,您将获得新建项目向导。在此向导中,选择 Java 项目,然后点击下一步按钮继续,如下面的截图所示。

步骤 4 - 继续前进,您将被定向到新建 Java 项目向导。创建一个新项目并点击下一步,如下面的截图所示。
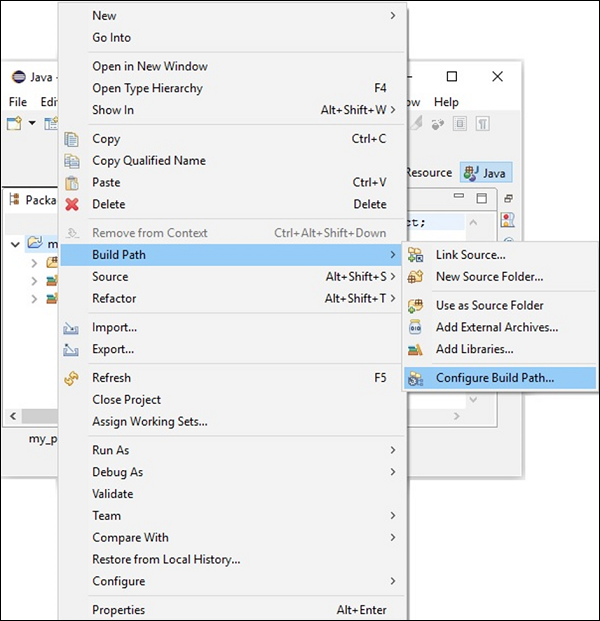
步骤 5 - 创建新项目后,右键单击它。选择构建路径并点击配置构建路径…,如下面的截图所示。
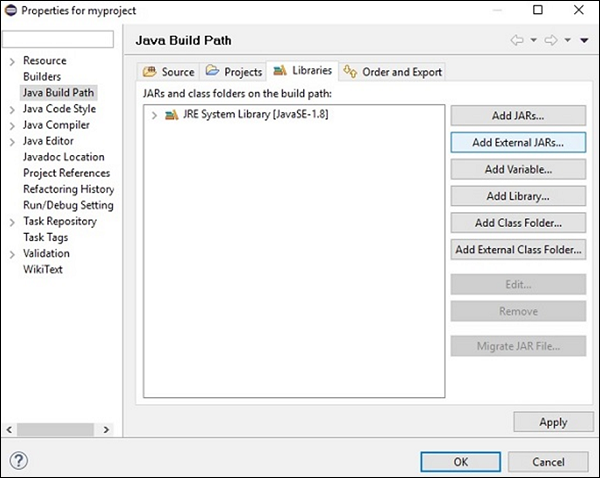
步骤 6 - 点击构建路径选项后,您将被定向到Java 构建路径向导。点击添加外部 JARs按钮,如下面的截图所示。
步骤 7 - 选择您保存文件opencv-310.jar的路径。
步骤 8 - 点击上面截图中的打开按钮,这些文件将添加到您的库中。
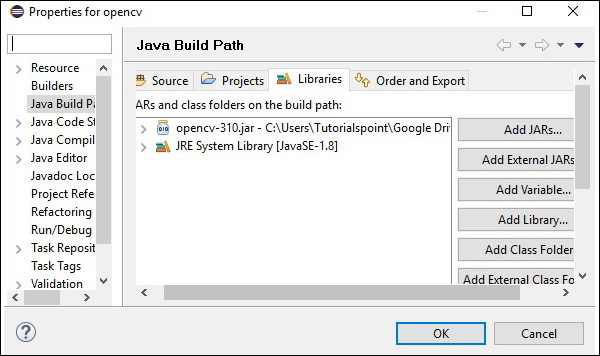
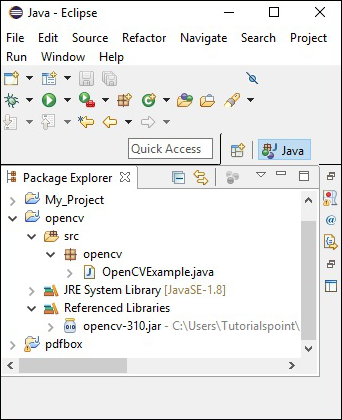
步骤 9 - 点击确定,您将成功地将所需的 JAR 文件添加到当前项目中,您可以通过展开“引用库”来验证这些已添加的库。
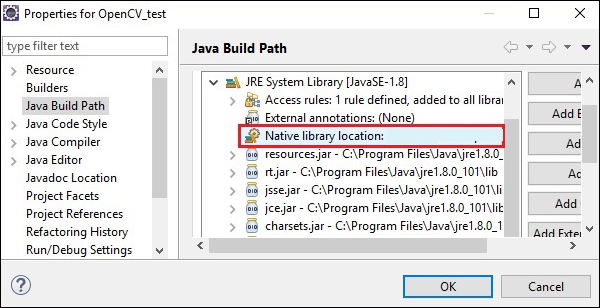
设置原生库的路径
除了 JAR 文件外,您还需要为 OpenCV 的原生库(DLL 文件)设置路径。
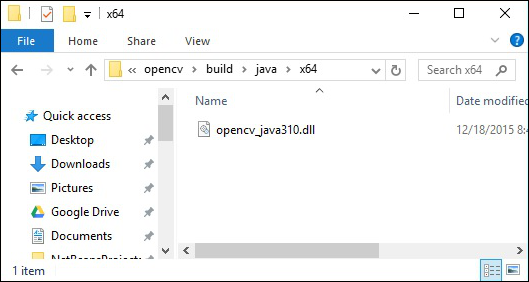
DLL 文件的位置 - 打开OpenCV的安装文件夹,然后转到子文件夹build → java。在这里,您将找到包含 OpenCV dll 文件的两个文件夹x64(64 位)和x86(32 位)。

打开适合您操作系统的相应文件夹,然后您可以看到dll文件,如下面的截图所示。
现在,请按照以下步骤设置此文件的路径:
步骤 1 - 再次打开 JavaBuildPath 窗口。在这里,您可以看到已添加的 JAR 文件和JRE 系统库。
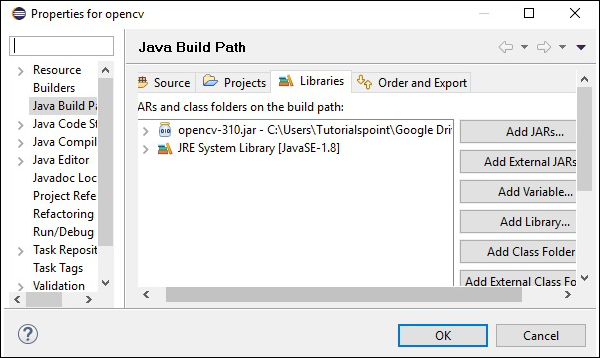
步骤 2 - 展开后,您将获得系统库和原生库位置,如下面的截图中突出显示的那样。
步骤 3 − 双击原生库位置。在这里,您可以看到如下所示的原生库文件夹配置窗口。
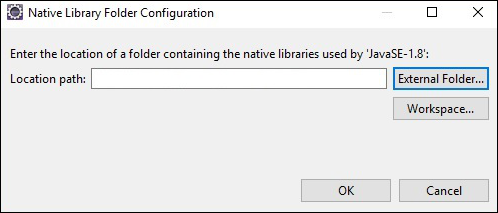
在此处,单击外部文件夹…按钮,然后选择系统中dll文件的位置。
OpenCV - 图像存储
为了捕获图像,我们使用相机和扫描仪等设备。这些设备记录图像的数值(例如:像素值)。OpenCV 是一个处理数字图像的库,因此我们需要存储这些图像以便进行处理。
OpenCV 库的Mat类用于存储图像的值。它表示一个 n 维数组,用于存储灰度或彩色图像、体素体积、矢量场、点云、张量、直方图等图像数据。
此类包含两个数据部分:头部和指针
头部 − 包含诸如大小、存储方法和矩阵地址(大小恒定)等信息。
指针 − 存储图像的像素值(持续变化)。
Mat 类
OpenCV Java 库在org.opencv.core包中提供具有相同名称(Mat)的此类。
构造函数
OpenCV Java 库的 Mat 类具有各种构造函数,可以使用这些构造函数来构造 Mat 对象。
| 序号 | 构造函数和描述 |
|---|---|
| 1 |
Mat() 在大多数情况下,这是没有参数的默认构造函数。我们使用此构造函数来创建一个空矩阵,并将其传递给其他 OpenCV 方法。 |
| 2 |
Mat(int rows, int cols, int type) 此构造函数接受三个整型参数,分别表示二维数组中的行数和列数以及数组的类型(用于存储数据)。 |
| 3 |
Mat(int rows, int cols, int type, Scalar s) 除了前一个构造函数的参数外,此构造函数还额外接受 Scalar 类的一个对象作为参数。 |
| 4 |
Mat(Size size, int type) 此构造函数接受两个参数,一个表示矩阵大小的对象和一个表示用于存储数据的数组类型的整数。 |
| 5 |
Mat(Size size, int type, Scalar s) 除了前一个构造函数的参数外,此构造函数还额外接受 Scalar 类的一个对象作为参数。 |
| 6 | Mat(long addr) |
| 7 |
Mat(Mat m, Range rowRange) 此构造函数接受另一个矩阵的对象和 Range 类的一个对象,该对象表示要用于创建新矩阵的行范围。 |
| 8 |
Mat(Mat m, Range rowRange, Range colRange) 除了前一个构造函数的参数外,此构造函数还额外接受 Range 类的一个对象,表示列范围。 |
| 9 |
Mat(Mat m, Rect roi) 此构造函数接受两个对象,一个表示另一个矩阵,另一个表示感兴区 (Region Of Interest)。 |
注意 −
数组类型。使用 CV_8UC1、…、CV_64FC4 创建 1-4 通道矩阵,或使用 CV_8UC(n)、…、CV_64FC(n) 创建多通道(最多 CV_CN_MAX 通道)矩阵。
矩阵的类型由org.opencv.core包中CvType类的各个字段表示。
方法和描述
以下是 Mat 类提供的一些方法。
| 序号 | 方法和描述 |
|---|---|
| 1 |
Mat col(int x) 此方法接受一个整数参数,表示列的索引,并检索并返回该列。 |
| 2 |
Mat row(int y) 此方法接受一个整数参数,表示行的索引,并检索并返回该行。 |
| 3 |
int cols() 此方法返回矩阵中的列数。 |
| 4 |
int rows() 此方法返回矩阵中的行数。 |
| 5 |
Mat setTo(Mat value) 此方法接受Mat类型的对象,并将数组元素设置为指定的值。 |
| 6 |
Mat setTo(Scalar s) 此方法接受Scalar类型的对象,并将数组元素设置为指定的值。 |
创建和显示矩阵
在本节中,我们将讨论我们的第一个 OpenCV 示例。我们将看到如何创建和显示一个简单的 OpenCV 矩阵。
以下是使用 OpenCV 创建和显示矩阵的步骤。
步骤 1:加载 OpenCV 原生库
使用 OpenCV 库编写 Java 代码时,第一步需要使用loadLibrary()加载 OpenCV 的原生库。如下所示加载 OpenCV 原生库。
//Loading the core library
System.loadLibrary(Core.NATIVE_LIBRARY_NAME);
步骤 2:实例化 Mat 类
使用本章前面提到的任何函数实例化 Mat 类。
//Creating a matrix
Mat matrix = new Mat(5, 5, CvType.CV_8UC1, new Scalar(0));
步骤 3:使用方法填充矩阵
您可以通过向row()/col()方法传递索引值来检索矩阵的特定行/列。
并且,您可以使用setTo()方法的任何变体为其设置值。
//Retrieving the row with index 0
Mat row0 = matrix.row(0);

//setting values of all elements in the row with index 0
row0.setTo(new Scalar(1));

//Retrieving the row with index 3
Mat col3 = matrix.col(3);

//setting values of all elements in the row with index 3
col3.setTo(new Scalar(3));
示例
您可以使用以下程序代码使用 OpenCV 库在 Java 中创建和显示一个简单的矩阵。
import org.opencv.core.Core;
import org.opencv.core.Mat;
import org.opencv.core.CvType;
import org.opencv.core.Scalar;

class DisplayingMatrix {
   public static void main(String[] args) {
      //Loading the core library
      System.loadLibrary(Core.NATIVE_LIBRARY_NAME);

      //Creating a matrix
      Mat matrix = new Mat(5, 5, CvType.CV_8UC1, new Scalar(0));

      //Retrieving the row with index 0
      Mat row0 = matrix.row(0);

      //setting values of all elements in the row with index 0
      row0.setTo(new Scalar(1));

      //Retrieving the row with index 3
      Mat col3 = matrix.col(3);

      //setting values of all elements in the row with index 3
      col3.setTo(new Scalar(3));

      //Printing the matrix
      System.out.println("OpenCV Mat data:\n" + matrix.dump());
   }
}
执行上述程序后,您将获得以下输出 −
OpenCV Mat data:
[  1,   1,   1,   3,   1;
   0,   0,   0,   3,   0;
   0,   0,   0,   3,   0;
   0,   0,   0,   3,   0;
   0,   0,   0,   3,   0]
使用 JavaSE API 加载图像
java.awt.image.BufferedImage包的BufferedImage类用于存储图像,import javax.imageio包的ImageIO类提供读取和写入图像的方法。
示例
您可以使用以下程序代码使用 JavaSE 库加载和保存图像。
import java.awt.image.BufferedImage;
import java.io.File;
import java.io.IOException;
import javax.imageio.ImageIO;

public class LoadingImage_JSE_library {
   public static void main( String[] args ) throws IOException {
      //Input File
      File input = new File("C:/EXAMPLES/OpenCV/sample.jpg");

      //Reading the image
      BufferedImage image = ImageIO.read(input);

      //Saving the image with a different name
      File ouptut = new File("C:/OpenCV/sample.jpg");
      ImageIO.write(image, "jpg", ouptut);

      System.out.println("image Saved");
   }
}
执行上述程序后,您将获得以下输出 −
image Saved
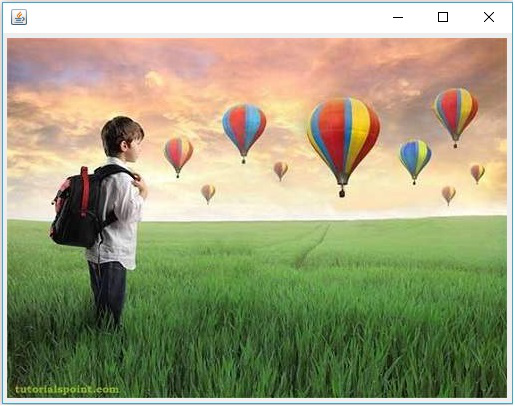
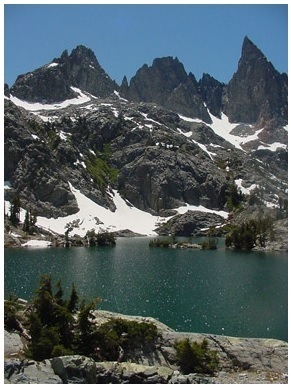
如果您打开指定的路径,您可以观察到保存的图像如下所示 −

OpenCV - 读取图像
org.opencv.imgcodecs包的Imgcodecs类提供读取和写入图像的方法。使用 OpenCV,您可以读取图像并将其存储在矩阵中(如果需要,可以在矩阵上执行转换)。之后,您可以将处理后的矩阵写入文件。
Imgcodecs类的read()方法用于使用 OpenCV 读取图像。以下是此方法的语法。
imread(filename)
它接受一个参数(filename),一个表示要读取的文件路径的 String 类型变量。
以下是使用 OpenCV 库在 Java 中读取图像的步骤。
步骤 1:加载 OpenCV 原生库
使用load()方法加载 OpenCV 原生库,如下所示。
//Loading the core library
System.loadLibrary(Core.NATIVE_LIBRARY_NAME);
步骤 2:实例化 Imgcodecs 类
实例化Imgcodecs类。
//Instantiating the Imgcodecs class
Imgcodecs imageCodecs = new Imgcodecs();
步骤 3:读取图像
使用imread()方法读取图像。此方法接受一个表示图像路径的字符串参数,并返回作为Mat对象的读取图像。
//Reading the Image from the file
Mat matrix = imageCodecs.imread(Path of the image);
示例
以下程序代码显示了如何使用 OpenCV 库读取图像。
import org.opencv.core.Core;
import org.opencv.core.Mat;
import org.opencv.imgcodecs.Imgcodecs;

public class ReadingImages {
   public static void main(String args[]) {
      //Loading the OpenCV core library
      System.loadLibrary( Core.NATIVE_LIBRARY_NAME );

      //Instantiating the Imagecodecs class
      Imgcodecs imageCodecs = new Imgcodecs();

      //Reading the Image from the file
      String file ="C:/EXAMPLES/OpenCV/sample.jpg";
      Mat matrix = imageCodecs.imread(file);

      System.out.println("Image Loaded");
   }
}
执行上述程序后,OpenCV 将加载指定的图像并显示以下输出 −
Image Loaded
OpenCV - 写入图像
Imgcodecs类的write()方法用于使用 OpenCV 写入图像。要写入图像,请重复前面示例中的前三个步骤。
要写入图像,您需要调用Imgcodecs类的imwrite()方法。
以下是此方法的语法。
imwrite(filename, mat)
此方法接受以下参数 −
filename − 一个表示要保存文件路径的String变量。
mat − 一个表示要写入图像的Mat对象。
示例
以下程序是使用 OpenCV 库使用 Java 程序写入图像的示例。
import org.opencv.core.Core;
import org.opencv.core.Mat;
import org.opencv.imgcodecs.Imgcodecs;

public class WritingImages {
   public static void main(String args[]) {
      //Loading the OpenCV core library
      System.loadLibrary(Core.NATIVE_LIBRARY_NAME);

      //Instantiating the imagecodecs class
      Imgcodecs imageCodecs = new Imgcodecs();

      //Reading the Image from the file and storing it in to a Matrix object
      String file ="C:/EXAMPLES/OpenCV/sample.jpg";
      Mat matrix = imageCodecs.imread(file);

      System.out.println("Image Loaded ..........");
      String file2 = "C:/EXAMPLES/OpenCV/sample_resaved.jpg";

      //Writing the image
      imageCodecs.imwrite(file2, matrix);
      System.out.println("Image Saved ............");
   }
}
执行上述程序后,您将获得以下输出 −
Image Loaded ..........
Image Saved ...........
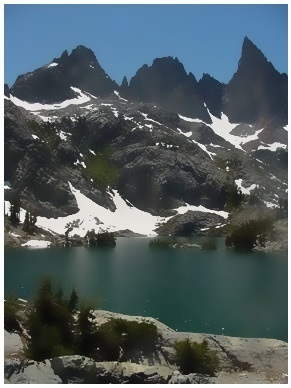
如果您打开指定的路径,您可以观察到保存的图像如下所示 −

OpenCV - 图形用户界面 (GUI)
在前面的章节中,我们已经讨论了如何使用 OpenCV Java 库读取和保存图像。除此之外,我们还可以使用 AWT/Swings 和 JavaFX 等 GUI 库在单独的窗口中显示加载的图像。
将 Mat 转换为 Buffered Image
要读取图像,我们使用imread()方法。此方法以矩阵的形式返回读取的图像。但是,要将此图像与 GUI 库(AWT/Swings 和 JavaFX)一起使用,应将其转换为java.awt.image.BufferedImage包的BufferedImage类的对象。
以下是将 OpenCV 的Mat对象转换为BufferedImage对象的步骤。
步骤 1:将 Mat 编码为 MatOfByte
首先,您需要将矩阵转换为字节矩阵。您可以使用Imgcodecs类的imencode()方法来完成此操作。以下是此方法的语法。
imencode(ext, image, matOfByte);
此方法接受以下参数 −
Ext − 一个指定图像格式(.jpg、.png 等)的 String 参数。
image − 图像的 Mat 对象。
matOfByte − MatOfByte 类的一个空对象。
使用此方法编码图像,如下所示。
//Reading the image
Mat image = Imgcodecs.imread(file);

//instantiating an empty MatOfByte class
MatOfByte matOfByte = new MatOfByte();

//Converting the Mat object to MatOfByte
Imgcodecs.imencode(".jpg", image, matOfByte);
步骤 2:将 MatOfByte 对象转换为字节数组
使用toArray()方法将MatOfByte对象转换为字节数组。
byte[] byteArray = matOfByte.toArray();
步骤 3:准备 InputStream 对象
通过将上一步中创建的字节数组传递给ByteArrayInputStream类的构造函数来准备 InputStream 对象。
//Preparing the InputStream object
InputStream in = new ByteArrayInputStream(byteArray);
步骤 4:准备 InputStream 对象
将上一步中创建的 Input Stream 对象传递给ImageIO类的read()方法。这将返回一个 BufferedImage 对象。
//Preparing the BufferedImage
BufferedImage bufImage = ImageIO.read(in);
使用 AWT/Swings 显示图像
要使用 AWT/Swings 框架显示图像,首先使用imread()方法读取图像,并按照上述步骤将其转换为BufferedImage。
然后,实例化JFrame类并将创建的缓冲图像添加到 JFrame 的 ContentPane 中,如下所示 −
//Instantiate JFrame
JFrame frame = new JFrame();

//Set Content to the JFrame
frame.getContentPane().add(new JLabel(new ImageIcon(bufImage)));
frame.pack();
frame.setVisible(true);
示例
以下程序代码显示了如何使用 OpenCV 库读取图像并通过 Swing 窗口显示图像。
import java.awt.image.BufferedImage;

import java.io.ByteArrayInputStream;
import java.io.InputStream;

import javax.imageio.ImageIO;
import javax.swing.ImageIcon;
import javax.swing.JFrame;
import javax.swing.JLabel;

import org.opencv.core.Core;
import org.opencv.core.Mat;
import org.opencv.core.MatOfByte;
import org.opencv.imgcodecs.Imgcodecs;

public class DisplayingImagesUsingSwings {
   public static void main(String args[]) throws Exception {
      //Loading the OpenCV core library
      System.loadLibrary( Core.NATIVE_LIBRARY_NAME );

      //Reading the Image from the file and storing it in to a Matrix object
      String file = "C:/EXAMPLES/OpenCV/sample.jpg";
      Mat image = Imgcodecs.imread(file);

      //Encoding the image
      MatOfByte matOfByte = new MatOfByte();
      Imgcodecs.imencode(".jpg", image, matOfByte);

      //Storing the encoded Mat in a byte array
      byte[] byteArray = matOfByte.toArray();

      //Preparing the Buffered Image
      InputStream in = new ByteArrayInputStream(byteArray);
      BufferedImage bufImage = ImageIO.read(in);

      //Instantiate JFrame
      JFrame frame = new JFrame();

      //Set Content to the JFrame
      frame.getContentPane().add(new JLabel(new ImageIcon(bufImage)));
      frame.pack();
      frame.setVisible(true);

      System.out.println("Image Loaded");
   }
}
执行上述程序后,您将获得以下输出 −
Image Loaded
除此之外,您还可以看到一个显示加载图像的窗口,如下所示 −
使用 JavaFX 显示图像
要使用 JavaFX 显示图像,首先使用imread()方法读取图像,并将其转换为BufferedImage。然后,将 BufferedImage 转换为 WritableImage,如下所示。
WritableImage writableImage = SwingFXUtils.toFXImage(bufImage, null);
将此WritableImage对象传递给ImageView类的构造函数。
ImageView imageView = new ImageView(writableImage);
示例
以下程序代码显示了如何使用 OpenCV 库读取图像并通过 JavaFX 窗口显示图像。
import java.awt.image.BufferedImage;

import java.io.ByteArrayInputStream;
import java.io.IOException;
import java.io.InputStream;

import javafx.application.Application;
import javafx.embed.swing.SwingFXUtils;
import javafx.scene.Group;
import javafx.scene.Scene;
import javafx.scene.image.ImageView;
import javafx.scene.image.WritableImage;
import javafx.stage.Stage;

import javax.imageio.ImageIO;

import org.opencv.core.Core;
import org.opencv.core.Mat;
import org.opencv.core.MatOfByte;
import org.opencv.imgcodecs.Imgcodecs;

public class DisplayingImagesJavaFX extends Application {
   @Override
   public void start(Stage stage) throws IOException {
      WritableImage writableImage = loadImage();

      //Setting the image view
      ImageView imageView = new ImageView(writableImage);

      //Setting the position of the image
      imageView.setX(50);
      imageView.setY(25);

      //setting the fit height and width of the image view
      imageView.setFitHeight(400);
      imageView.setFitWidth(500);

      //Setting the preserve ratio of the image view
      imageView.setPreserveRatio(true);

      //Creating a Group object
      Group root = new Group(imageView);

      //Creating a scene object
      Scene scene = new Scene(root, 600, 400);

      //Setting title to the Stage
      stage.setTitle("Loading an image");

      //Adding scene to the stage
      stage.setScene(scene);

      //Displaying the contents of the stage
      stage.show();
   }
   public WritableImage loadImage() throws IOException {
      //Loading the OpenCV core library
      System.loadLibrary( Core.NATIVE_LIBRARY_NAME );

      //Reading the Image from the file and storing it in to a Matrix object
      String file ="C:/EXAMPLES/OpenCV/sample.jpg";
      Mat image = Imgcodecs.imread(file);

      //Encoding the image
      MatOfByte matOfByte = new MatOfByte();
      Imgcodecs.imencode(".jpg", image, matOfByte);

      //Storing the encoded Mat in a byte array
      byte[] byteArray = matOfByte.toArray();

      //Displaying the image
      InputStream in = new ByteArrayInputStream(byteArray);
      BufferedImage bufImage = ImageIO.read(in);

      System.out.println("Image Loaded");
      WritableImage writableImage = SwingFXUtils.toFXImage(bufImage, null);
      return writableImage;
   }
   public static void main(String args[]) {
      launch(args);
   }
}
执行上述程序后,您将获得以下输出 −
Image Loaded
除此之外,您还可以看到一个显示加载图像的窗口,如下所示 −

OpenCV - IMREAD_XXX 参数
OpenCV 支持各种类型的图像,例如彩色、二值、灰度等。使用imread()方法和Imgcodecs类的预定义字段,您可以将给定图像读取为另一种类型。
imread() 方法的标志参数 (IMREAD_XXX)
在前面的章节中,我们看到了Imgcodecs类的imread()方法的语法。它接受一个表示要读取的图像位置的字符串参数。
imread(filename)
imread()方法还有另一种语法。
imread(filename, int flags)
此语法接受两个参数 −
filename − 它接受一个参数(filename),一个表示要读取的文件路径的 String 类型变量。
flags − 一个整数值,表示预定义的标志值。对于每个值,这都会将给定图像读取为特定类型(灰度颜色等)。
以下是列出Imgproc类中作为此参数值的各个字段的表格。
| 序号 | 字段和描述 |
|---|---|
| 1 |
IMREAD_COLOR 如果标志设置为此值,则加载的图像将被转换为3通道BGR(蓝绿红)彩色图像。 |
| 2 |
IMREAD_GRAYSCALE 如果标志设置为此值,则加载的图像将被转换为单通道灰度图像。 |
| 3 |
IMREAD_LOAD_GDAL 如果标志设置为此值,则可以使用gdal驱动程序加载图像。 |
| 4 |
IMREAD_ANYCOLOR 如果标志设置为此值,则图像将以任何可能的颜色格式读取。 |
| 5 |
IMREAD_REDUCED_COLOR_2 IMREAD_REDUCED_COLOR_4 IMREAD_REDUCED_COLOR_8 如果标志设置为此值,则图像将作为三通道BGR读取,并且图像大小将根据所使用的字段减少到原始图像大小的½、¼或⅛。 |
| 6 |
IMREAD_REDUCED_GRAYSCALE_2 IMREAD_REDUCED_GRAYSCALE_4 IMREAD_REDUCED_GRAYSCALE_8 如果标志设置为此值,则图像将作为单通道灰度图像读取,并且图像大小将根据所使用的字段减少到原始图像大小的½、¼或⅛。 |
| 7 |
IMREAD_UNCHANGED 如果标志设置为此值,则加载的图像将原样返回。 |
OpenCV - 将图像读取为灰度
以下程序演示如何将彩色图像读取为灰度图像,并使用JavaFX窗口显示它。在这里,我们通过传递标志IMREAD_GRAYSCALE以及包含彩色图像路径的字符串来读取图像。
import java.awt.image.BufferedImage;
import org.opencv.core.Core;
import org.opencv.core.Mat;
import org.opencv.imgcodecs.Imgcodecs;
import javafx.application.Application;
import javafx.embed.swing.SwingFXUtils;
import javafx.scene.Group;
import javafx.scene.Scene;
import javafx.scene.image.ImageView;
import javafx.scene.image.WritableImage;
import javafx.stage.Stage;
public class ReadingAsGrayscale extends Application {
@Override
public void start(Stage stage) throws Exception {
WritableImage writableImage = loadAndConvert();
// Setting the image view
ImageView imageView = new ImageView(writableImage);
// Setting the position of the image
imageView.setX(10);
imageView.setY(10);
// setting the fit height and width of the image view
imageView.setFitHeight(400);
imageView.setFitWidth(600);
// Setting the preserve ratio of the image view
imageView.setPreserveRatio(true);
// Creating a Group object
Group root = new Group(imageView);
// Creating a scene object
Scene scene = new Scene(root, 600, 400);
// Setting title to the Stage
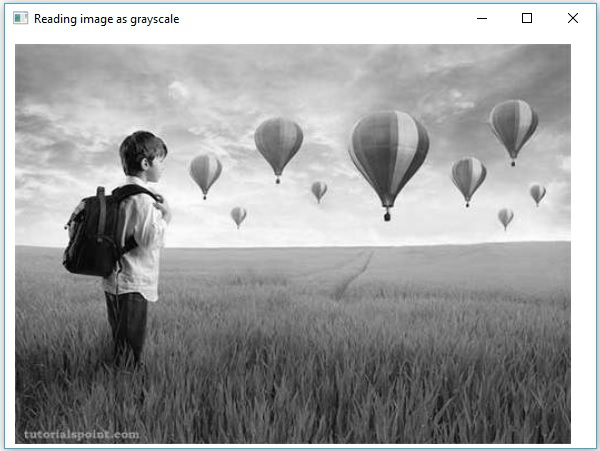
stage.setTitle("Reading image as grayscale");
// Adding scene to the stage
stage.setScene(scene);
// Displaying the contents of the stage
stage.show();
}
public WritableImage loadAndConvert() throws Exception {
// Loading the OpenCV core library
System.loadLibrary( Core.NATIVE_LIBRARY_NAME );
// Instantiating the imagecodecs class
Imgcodecs imageCodecs = new Imgcodecs();
String input = "C:/EXAMPLES/OpenCV/sample.jpg";
// Reading the image
Mat src = imageCodecs.imread(input, Imgcodecs.IMREAD_GRAYSCALE);
byte[] data1 = new byte[src.rows() * src.cols() * (int)(src.elemSize())];
src.get(0, 0, data1);
// Creating the buffered image
BufferedImage bufImage = new BufferedImage(src.cols(),src.rows(),
BufferedImage.TYPE_BYTE_GRAY);
// Setting the data elements to the image
bufImage.getRaster().setDataElements(0, 0, src.cols(), src.rows(), data1);
// Creating a WritableImage
WritableImage writableImage = SwingFXUtils.toFXImage(bufImage, null);
System.out.println("Image Read");
return writableImage;
}
public static void main(String args[]) throws Exception {
launch(args);
}
}
输入图像
假设以上程序中指定的输入图像是sample.jpg。

输出图像
执行程序后,您将获得以下输出。
OpenCV - 读取BGR图像
以下程序演示如何将彩色图像读取为BGR类型图像,并使用JavaFX窗口显示它。在这里,我们通过将标志IMREAD_COLOR以及包含彩色图像路径的字符串传递给方法imread()来读取图像。
import java.awt.image.BufferedImage;
import org.opencv.core.Core;
import org.opencv.core.Mat;
import org.opencv.imgcodecs.Imgcodecs;
import javafx.application.Application;
import javafx.embed.swing.SwingFXUtils;
import javafx.scene.Group;
import javafx.scene.Scene;
import javafx.scene.image.ImageView;
import javafx.scene.image.WritableImage;
import javafx.stage.Stage;
public class ReadingAsColored extends Application {
@Override
public void start(Stage stage) throws Exception {
WritableImage writableImage = loadAndConvert();
// Setting the image view
ImageView imageView = new ImageView(writableImage);
// Setting the position of the image
imageView.setX(10);
imageView.setY(10);
// setting the fit height and width of the image view
imageView.setFitHeight(400);
imageView.setFitWidth(600);
// Setting the preserve ratio of the image view
imageView.setPreserveRatio(true);
// Creating a Group object
Group root = new Group(imageView);
// Creating a scene object
Scene scene = new Scene(root, 600, 400);
// Setting title to the Stage
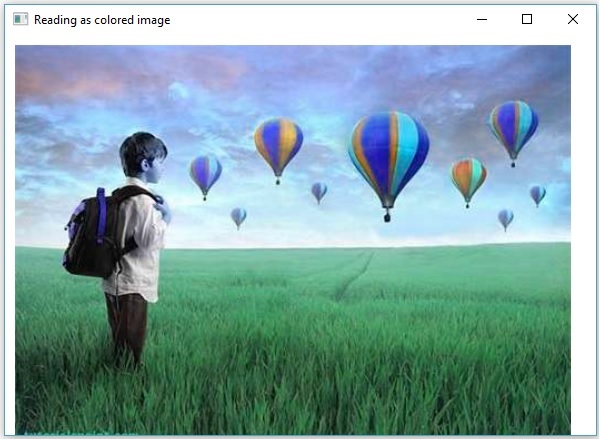
stage.setTitle("Reading as colored image");
// Adding scene to the stage
stage.setScene(scene);
// Displaying the contents of the stage
stage.show();
}
public WritableImage loadAndConvert() throws Exception {
// Loading the OpenCV core library
System.loadLibrary( Core.NATIVE_LIBRARY_NAME );
String input = "C:/EXAMPLES/OpenCV/sample.jpg";
Mat dst = new Mat();
// Reading the image
Mat src = Imgcodecs.imread(input, Imgcodecs.IMREAD_COLOR);
byte[] data1 = new byte[src.rows() * src.cols() * (int)(src.elemSize())];
src.get(0, 0, data1);
// Creating the buffered image
BufferedImage bufImage = new BufferedImage(src.cols(),src.rows(),
BufferedImage.TYPE_3BYTE_BGR);
// Setting the data elements to the image
bufImage.getRaster().setDataElements(0, 0, src.cols(), src.rows(), data1);
// Creating a WritableImage
WritableImage writableImage = SwingFXUtils.toFXImage(bufImage, null);
System.out.println("Image read");
return writableImage;
}
public static void main(String args[]) throws Exception {
launch(args);
}
}
输入图像
假设以上程序中指定的输入图像是sample.jpg。
输出图像
执行程序后,您将获得以下输出。
OpenCV - 彩色图像转换为灰度
在前面的章节中,我们讨论了如何将输入图像读取为不同的类型(二进制、灰度、BGR等)。在本节中,我们将学习如何将一种类型的图像转换为另一种类型。
包org.opencv.imgproc中的名为Imgproc的类提供将图像从一种颜色转换为另一种颜色方法。
将彩色图像转换为灰度
名为cvtColor()的方法用于将彩色图像转换为灰度图像。以下是此方法的语法。
cvtColor(Mat src, Mat dst, int code)
此方法接受以下参数 −
src − 代表源的矩阵。
dst − 代表目标的矩阵。
code − 代表转换类型的整数代码,例如,RGB到灰度。
您可以通过将代码Imgproc.COLOR_RGB2GRAY以及源矩阵和目标矩阵作为参数传递给cvtColor()方法来将彩色图像转换为灰度图像。
示例
以下程序演示如何将彩色图像读取为灰度图像,并使用JavaFX窗口显示它。
import java.awt.image.BufferedImage;
import org.opencv.core.Core;
import org.opencv.core.Mat;
import org.opencv.imgcodecs.Imgcodecs;
import org.opencv.imgproc.Imgproc;
import javafx.application.Application;
import javafx.embed.swing.SwingFXUtils;
import javafx.scene.Group;
import javafx.scene.Scene;
import javafx.scene.image.ImageView;
import javafx.scene.image.WritableImage;
import javafx.stage.Stage;
public class ColorToGrayscale extends Application {
@Override
public void start(Stage stage) throws Exception {
WritableImage writableImage = loadAndConvert();
// Setting the image view
ImageView imageView = new ImageView(writableImage);
// Setting the position of the image
imageView.setX(10);
imageView.setY(10);
// setting the fit height and width of the image view
imageView.setFitHeight(400);
imageView.setFitWidth(600);
// Setting the preserve ratio of the image view
imageView.setPreserveRatio(true);
// Creating a Group object
Group root = new Group(imageView);
// Creating a scene object
Scene scene = new Scene(root, 600, 400);
// Setting title to the Stage
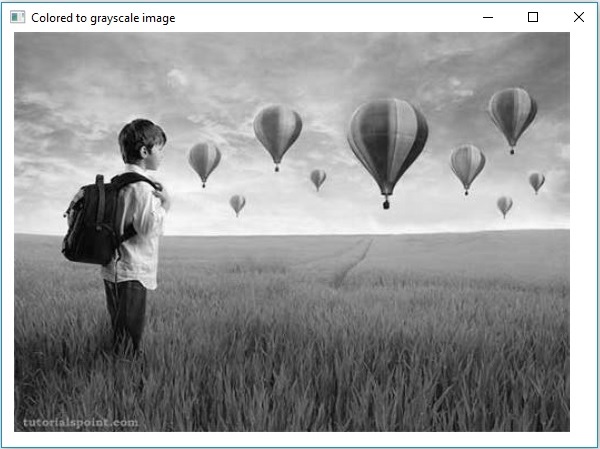
stage.setTitle("Colored to grayscale image");
// Adding scene to the stage
stage.setScene(scene);
// Displaying the contents of the stage
stage.show();
}
public WritableImage loadAndConvert() throws Exception {
//Loading the OpenCV core library
System.loadLibrary( Core.NATIVE_LIBRARY_NAME );
String input = "C:/EXAMPLES/OpenCV/sample.jpg";
//Reading the image
Mat src = Imgcodecs.imread(input);
//Creating the empty destination matrix
Mat dst = new Mat();
//Converting the image to gray sacle and saving it in the dst matrix
Imgproc.cvtColor(src, dst, Imgproc.COLOR_RGB2GRAY);
//Extracting data from the transformed image (dst)
byte[] data1 = new byte[dst.rows() * dst.cols() * (int)(dst.elemSize())];
dst.get(0, 0, data1);
//Creating Buffered image using the data
BufferedImage bufImage = new BufferedImage(dst.cols(),dst.rows(),
BufferedImage.TYPE_BYTE_GRAY);
//Setting the data elements to the image
bufImage.getRaster().setDataElements(0, 0, dst.cols(), dst.rows(), data1);
//Creating a WritableImage
WritableImage writableImage = SwingFXUtils.toFXImage(bufImage, null);
System.out.println("Converted to Grayscale");
return writableImage;
}
public static void main(String args[]) throws Exception {
launch(args);
}
}
输入图像
假设以上程序中指定的输入图像是sample.jpg。
输出图像
执行程序后,您将获得以下输出。
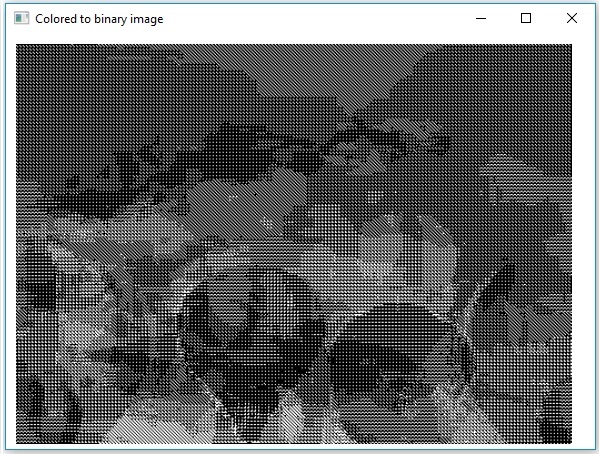
OpenCV - 彩色图像转换为二值图像
名为threshold()的方法用于将灰度图像转换为二值图像。以下是此方法的语法。
threshold(Mat src, Mat dst, double thresh, double maxval, int type)
此方法接受以下参数 −
mat − 代表输入图像的Mat对象。
dst − 代表输出图像的Mat对象。
thresh − 代表阈值的整数。
maxval − 代表与THRESH_BINARY和THRESH_BINARY_INV阈值类型一起使用的最大值的整数。
type − 代表转换类型的整数代码,例如,RGB到灰度。
您可以通过将代码Imgproc.THRESH_BINARY以及值传递给其余参数来将灰度图像转换为二值图像。
示例
以下程序演示如何将彩色图像读取为二值图像,并使用JavaFX窗口显示它。
import java.awt.image.BufferedImage;

import org.opencv.core.Core;
import org.opencv.core.Mat;
import org.opencv.imgcodecs.Imgcodecs;
import org.opencv.imgproc.Imgproc;

import javafx.application.Application;
import javafx.embed.swing.SwingFXUtils;
import javafx.scene.Group;
import javafx.scene.Scene;
import javafx.scene.image.ImageView;
import javafx.scene.image.WritableImage;
import javafx.stage.Stage;

public class ColorToBinary extends Application {
   @Override
   public void start(Stage stage) throws Exception {
      WritableImage writableImage = loadAndConvert();

      // Setting the image view
      ImageView imageView = new ImageView(writableImage);

      // Setting the position of the image
      imageView.setX(10);
      imageView.setY(10);

      // setting the fit height and width of the image view
      imageView.setFitHeight(400);
      imageView.setFitWidth(600);

      // Setting the preserve ratio of the image view
      imageView.setPreserveRatio(true);

      // Creating a Group object
      Group root = new Group(imageView);

      // Creating a scene object
      Scene scene = new Scene(root, 600, 400);

      // Setting title to the Stage
      stage.setTitle("Loading an image");

      // Adding scene to the stage
      stage.setScene(scene);

      // Displaying the contents of the stage
      stage.show();
   }
   public WritableImage loadAndConvert() throws Exception {
      // Loading the OpenCV core library
      System.loadLibrary( Core.NATIVE_LIBRARY_NAME );

      // Instantiating the Imgcodecs class
      Imgcodecs imageCodecs = new Imgcodecs();

      // File input = new File("C:/EXAMPLES/OpenCV/sample.jpg");
      String input = "C:/EXAMPLES/OpenCV/sample.jpg";

      // Reading the image
      Mat src = imageCodecs.imread(input);

      // Creating the destination matrix
      Mat dst = new Mat();

      // Converting to binary image...
      Imgproc.threshold(src, dst, 200, 500, Imgproc.THRESH_BINARY);

      // Extracting data from the transformed image (dst)
      byte[] data1 = new byte[dst.rows() * dst.cols() * (int)(dst.elemSize())];
      dst.get(0, 0, data1);

      // Creating Buffered image using the data
      BufferedImage bufImage = new BufferedImage(dst.cols(),dst.rows(),
         BufferedImage.TYPE_BYTE_GRAY);

      // Setting the data elements to the image
      bufImage.getRaster().setDataElements(0, 0, dst.cols(), dst.rows(), data1);

      // Creating a Writable image
      WritableImage writableImage = SwingFXUtils.toFXImage(bufImage, null);

      System.out.println("Converted to binary");
      return writableImage;
   }
   public static void main(String args[]) throws Exception {
      launch(args);
   }
}
输入图像
假设以上程序中指定的输入图像是sample.jpg。
输出图像
执行程序后,您将获得以下输出。
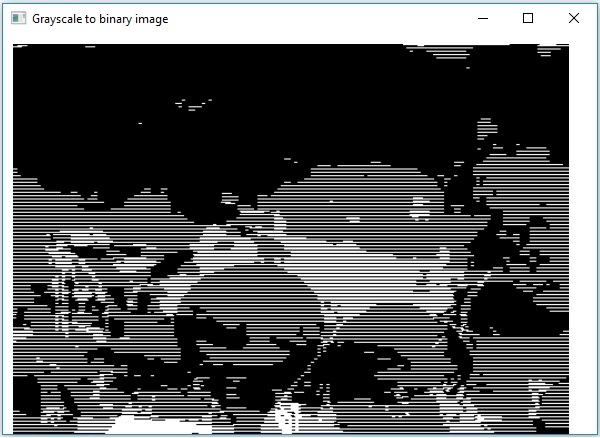
OpenCV - 灰度图像转换为二值图像
您可以使用上一章中提到的相同方法将灰度图像转换为二值图像。只需将灰度图像的路径作为输入传递给此程序。
示例
以下程序演示如何将灰度图像读取为二值图像,并使用JavaFX窗口显示它。
import java.awt.image.BufferedImage;

import org.opencv.core.Core;
import org.opencv.core.Mat;
import org.opencv.imgcodecs.Imgcodecs;
import org.opencv.imgproc.Imgproc;

import javafx.application.Application;
import javafx.embed.swing.SwingFXUtils;
import javafx.scene.Group;
import javafx.scene.Scene;
import javafx.scene.image.ImageView;
import javafx.scene.image.WritableImage;
import javafx.stage.Stage;

public class GrayScaleToBinary extends Application {
   @Override
   public void start(Stage stage) throws Exception {
      WritableImage writableImage = loadAndConvert();

      // Setting the image view
      ImageView imageView = new ImageView(writableImage);

      // Setting the position of the image
      imageView.setX(10);
      imageView.setY(10);

      // Setting the fit height and width of the image view
      imageView.setFitHeight(400);
      imageView.setFitWidth(600);

      // Setting the preserve ratio of the image view
      imageView.setPreserveRatio(true);

      // Creating a Group object
      Group root = new Group(imageView);

      // Creating a scene object
      Scene scene = new Scene(root, 600, 400);

      // Setting title to the Stage
      stage.setTitle("Grayscale to binary image");

      // Adding scene to the stage
      stage.setScene(scene);

      // Displaying the contents of the stage
      stage.show();
   }
   public WritableImage loadAndConvert() throws Exception {
      // Loading the OpenCV core library
      System.loadLibrary( Core.NATIVE_LIBRARY_NAME );

      // Instantiating the imagecodecs class
      Imgcodecs imageCodecs = new Imgcodecs();

      String input = "E:/OpenCV/chap7/grayscale.jpg";

      // Reading the image
      Mat src = imageCodecs.imread(input);

      // Creating the destination matrix
      Mat dst = new Mat();

      // Converting to binary image...
      Imgproc.threshold(src, dst, 200, 500, Imgproc.THRESH_BINARY);

      // Extracting data from the transformed image (dst)
      byte[] data1 = new byte[dst.rows() * dst.cols() * (int)(dst.elemSize())];
      dst.get(0, 0, data1);

      // Creating Buffered image using the data
      BufferedImage bufImage = new BufferedImage(dst.cols(),dst.rows(),
         BufferedImage.TYPE_BYTE_BINARY);

      // Setting the data elements to the image
      bufImage.getRaster().setDataElements(0, 0, dst.cols(), dst.rows(), data1);

      // Creating a Writable image
      WritableImage writableImage = SwingFXUtils.toFXImage(bufImage, null);

      System.out.println("Converted to binary");
      return writableImage;
   }
   public static void main(String args[]) throws Exception {
      launch(args);
   }
}
输入图像
假设以上程序中指定的输入图像是sample.jpg。
输出图像
执行程序后,您将获得以下输出。
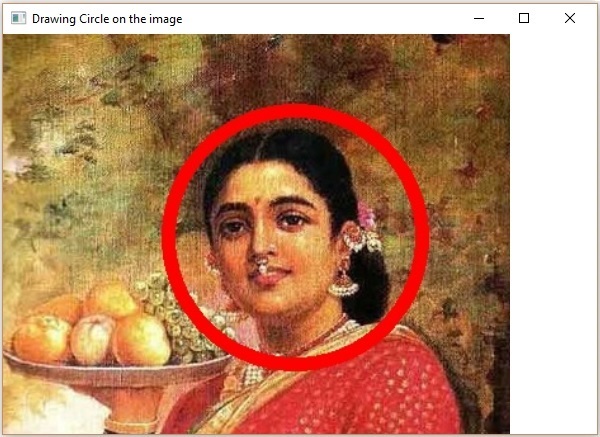
OpenCV - 绘制圆形
您可以使用org.opencv.imgproc包的相应方法在图像上绘制各种形状,如圆形、矩形、线条、椭圆、折线、凸多边形和折线。
您可以使用imgproc类的circle()方法在图像上绘制圆形。以下是此方法的语法:
circle(img, center, radius, color, thickness)
此方法接受以下参数 −
mat − 代表要绘制圆形的图像的Mat对象。
point − 代表圆心Point对象。
radius − 代表圆形的半径的整数类型变量。
scalar − 代表圆形颜色的Scalar对象。(BGR)
thickness − 代表圆形粗细的整数;默认情况下,粗细值为1。
示例
以下程序演示如何在图像上绘制圆形并使用JavaFX窗口显示它。
import java.awt.image.BufferedImage;

import java.io.ByteArrayInputStream;
import java.io.InputStream;
import javax.imageio.ImageIO;

import javafx.application.Application;
import javafx.embed.swing.SwingFXUtils;
import javafx.scene.Group;
import javafx.scene.Scene;
import javafx.scene.image.ImageView;
import javafx.scene.image.WritableImage;
import javafx.stage.Stage;

import org.opencv.core.Core;
import org.opencv.core.Mat;
import org.opencv.core.MatOfByte;
import org.opencv.core.Point;
import org.opencv.core.Scalar;
import org.opencv.imgcodecs.Imgcodecs;
import org.opencv.imgproc.Imgproc;

public class DrawingCircle extends Application {
   Mat matrix = null;

   @Override
   public void start(Stage stage) throws Exception {
      // Capturing the snapshot from the camera
      DrawingCircle obj = new DrawingCircle();
      WritableImage writableImage = obj.LoadImage();

      // Setting the image view
      ImageView imageView = new ImageView(writableImage);

      // setting the fit height and width of the image view
      imageView.setFitHeight(600);
      imageView.setFitWidth(600);

      // Setting the preserve ratio of the image view
      imageView.setPreserveRatio(true);

      // Creating a Group object
      Group root = new Group(imageView);

      // Creating a scene object
      Scene scene = new Scene(root, 600, 400);

      // Setting title to the Stage
      stage.setTitle("Drawing Circle on the image");

      // Adding scene to the stage
      stage.setScene(scene);

      // Displaying the contents of the stage
      stage.show();
   }
   public WritableImage LoadImage() throws Exception {
      // Loading the OpenCV core library
      System.loadLibrary( Core.NATIVE_LIBRARY_NAME );

      // Reading the Image from the file and storing it in to a Matrix object
      String file ="E:/OpenCV/chap8/input.jpg";
      Mat matrix = Imgcodecs.imread(file);

      //Drawing a Circle
      Imgproc.circle (
         matrix,                 //Matrix obj of the image
         new Point(230, 160),    //Center of the circle
         100,                    //Radius
         new Scalar(0, 0, 255),  //Scalar object for color
         10                      //Thickness of the circle
      );

      // Encoding the image
      MatOfByte matOfByte = new MatOfByte();
      Imgcodecs.imencode(".jpg", matrix, matOfByte);

      // Storing the encoded Mat in a byte array
      byte[] byteArray = matOfByte.toArray();

      // Displaying the image
      InputStream in = new ByteArrayInputStream(byteArray);
      BufferedImage bufImage = ImageIO.read(in);
      this.matrix = matrix;

      // Creating the Writable Image
      WritableImage writableImage = SwingFXUtils.toFXImage(bufImage, null);

      return writableImage;
   }
   public static void main(String args[]) {
      launch(args);
   }
}
执行上述程序后,您将获得以下输出 −
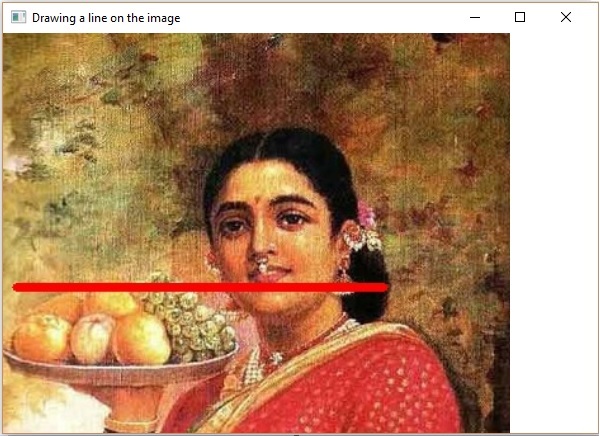
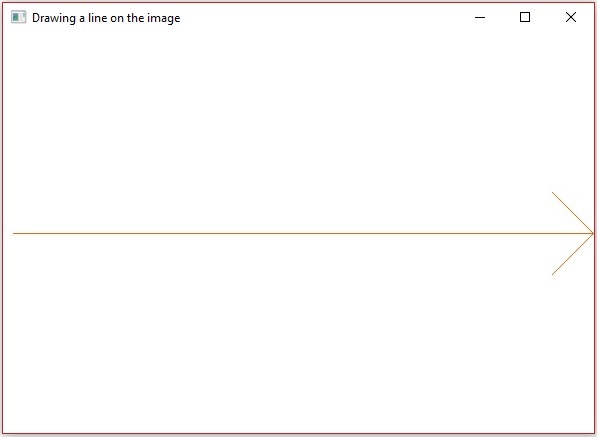
OpenCV - 绘制直线
您可以使用imgproc类的line()方法在图像上绘制线条。以下是此方法的语法。
line(img, pt1, pt2, color, thickness)
此方法接受以下参数 −
mat − 代表要绘制线条的图像的Mat对象。
pt1和pt2 − 两个Point对象,代表要绘制线条的两个点。
scalar − 代表圆形颜色的Scalar对象。(BGR)
thickness − 代表线条粗细的整数;默认情况下,粗细值为1。
示例
以下程序演示如何在图像上绘制线条并使用JavaFX窗口显示它。
import java.awt.image.BufferedImage;

import java.io.ByteArrayInputStream;
import java.io.InputStream;
import javax.imageio.ImageIO;

import javafx.application.Application;
import javafx.embed.swing.SwingFXUtils;
import javafx.scene.Group;
import javafx.scene.Scene;
import javafx.scene.image.ImageView;
import javafx.scene.image.WritableImage;
import javafx.stage.Stage;

import org.opencv.core.Core;
import org.opencv.core.Mat;
import org.opencv.core.MatOfByte;
import org.opencv.core.Point;
import org.opencv.core.Scalar;
import org.opencv.imgcodecs.Imgcodecs;
import org.opencv.imgproc.Imgproc;

public class DrawingLine extends Application {
   Mat matrix = null;

   @Override
   public void start(Stage stage) throws Exception {

      // Capturing the snapshot from the camera
      DrawingLine obj = new DrawingLine();
      WritableImage writableImage = obj.LoadImage();

      // Setting the image view
      ImageView imageView = new ImageView(writableImage);

      // setting the fit height and width of the image view
      imageView.setFitHeight(600);
      imageView.setFitWidth(600);

      // Setting the preserve ratio of the image view
      imageView.setPreserveRatio(true);

      // Creating a Group object
      Group root = new Group(imageView);

      // Creating a scene object
      Scene scene = new Scene(root, 600, 400);

      // Setting title to the Stage
      stage.setTitle("Drawing a line on the image");

      // Adding scene to the stage
      stage.setScene(scene);

      // Displaying the contents of the stage
      stage.show();
   }
   public WritableImage LoadImage() throws Exception {
      // Loading the OpenCV core library
      System.loadLibrary( Core.NATIVE_LIBRARY_NAME );

      // Reading the Image from the file and storing it in to a Matrix object
      String file ="E:/OpenCV/chap8/input.jpg";
      Mat matrix = Imgcodecs.imread(file);

      // Drawing a line
      Imgproc.line (
         matrix,                    //Matrix obj of the image
         new Point(10, 200),        //p1
         new Point(300, 200),       //p2
         new Scalar(0, 0, 255),     //Scalar object for color
         5                          //Thickness of the line
      );
      // Encoding the image
      MatOfByte matOfByte = new MatOfByte();
      Imgcodecs.imencode(".jpg", matrix, matOfByte);

      // Storing the encoded Mat in a byte array
      byte[] byteArray = matOfByte.toArray();

      // Displaying the image
      InputStream in = new ByteArrayInputStream(byteArray);
      BufferedImage bufImage = ImageIO.read(in);

      this.matrix = matrix;

      // Creating the Writable Image
      WritableImage writableImage = SwingFXUtils.toFXImage(bufImage, null);
      return writableImage;
   }
   public static void main(String args[]) {
      launch(args);
   }
}
执行上述程序后,您将获得以下输出 −
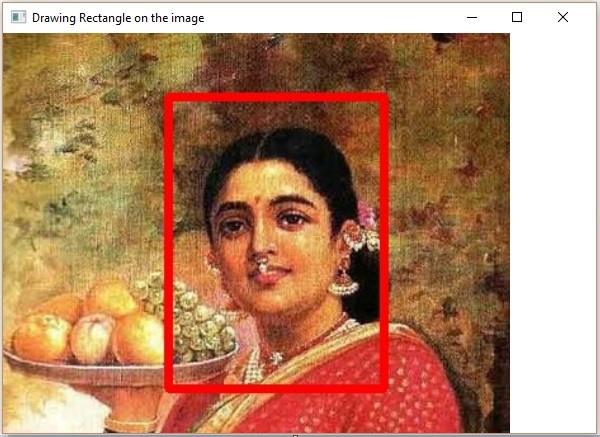
OpenCV - 绘制矩形
您可以使用imgproc类的rectangle()方法在图像上绘制矩形。以下是此方法的语法:
rectangle(img, pt1, pt2, color, thickness)
此方法接受以下参数 −
mat − 代表要绘制矩形的图像的Mat对象。
pt1和pt2 − 两个Point对象,代表要绘制矩形的顶点。
scalar − 代表矩形颜色的Scalar对象。(BGR)
thickness − 代表矩形粗细的整数;默认情况下,粗细值为1。
示例
以下示例演示如何在图像上绘制矩形并使用JavaFX窗口显示它。
import java.awt.image.BufferedImage;

import java.io.ByteArrayInputStream;
import java.io.InputStream;
import javax.imageio.ImageIO;

import javafx.application.Application;
import javafx.embed.swing.SwingFXUtils;
import javafx.scene.Group;
import javafx.scene.Scene;
import javafx.scene.image.ImageView;
import javafx.scene.image.WritableImage;
import javafx.stage.Stage;

import org.opencv.core.Core;
import org.opencv.core.Mat;
import org.opencv.core.MatOfByte;
import org.opencv.core.Point;
import org.opencv.core.Scalar;
import org.opencv.imgcodecs.Imgcodecs;
import org.opencv.imgproc.Imgproc;

public class DrawingRectangle extends Application {
   Mat matrix = null;

   @Override
   public void start(Stage stage) throws Exception {
      // Capturing the snapshot from the camera
      DrawingRectangle obj = new DrawingRectangle();
      WritableImage writableImage = obj.LoadImage();

      // Setting the image view
      ImageView imageView = new ImageView(writableImage);

      // setting the fit height and width of the image view
      imageView.setFitHeight(600);
      imageView.setFitWidth(600);

      // Setting the preserve ratio of the image view
      imageView.setPreserveRatio(true);

      // Creating a Group object
      Group root = new Group(imageView);

      // Creating a scene object
      Scene scene = new Scene(root, 600, 400);

      // Setting title to the Stage
      stage.setTitle("Drawing Rectangle on the image");

      // Adding scene to the stage
      stage.setScene(scene);

      // Displaying the contents of the stage
      stage.show();
   }
   public WritableImage LoadImage() throws Exception {
      // Loading the OpenCV core library
      System.loadLibrary( Core.NATIVE_LIBRARY_NAME );

      // Reading the Image from the file and storing it in to a Matrix object
      String file ="E:/OpenCV/chap8/input.jpg";
      Mat matrix = Imgcodecs.imread(file);

      // Drawing a Rectangle
      Imgproc.rectangle (
         matrix,                    //Matrix obj of the image
         new Point(130, 50),        //p1
         new Point(300, 280),       //p2
         new Scalar(0, 0, 255),     //Scalar object for color
         5                          //Thickness of the line
      );

      // Encoding the image
      MatOfByte matOfByte = new MatOfByte();
      Imgcodecs.imencode(".jpg", matrix, matOfByte);

      // Storing the encoded Mat in a byte array
      byte[] byteArray = matOfByte.toArray();

      // Displaying the image
      InputStream in = new ByteArrayInputStream(byteArray);
      BufferedImage bufImage = ImageIO.read(in);

      this.matrix = matrix;

      // Creating the Writable Image
      WritableImage writableImage = SwingFXUtils.toFXImage(bufImage, null);
      return writableImage;
   }
   public static void main(String args[]) {
      launch(args);
   }
}
执行上述程序后,您将获得以下输出 −
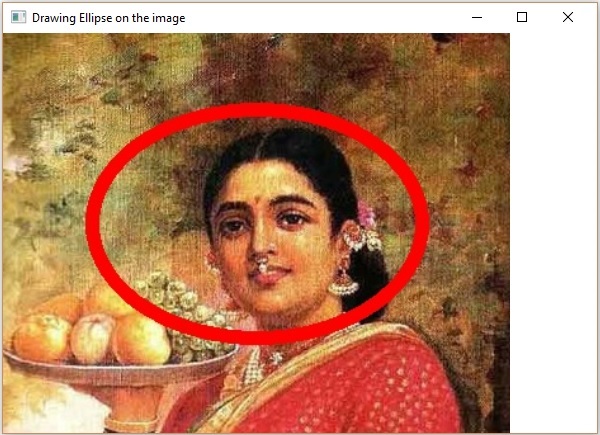
OpenCV - 绘制椭圆
您可以使用imgproc类的rectangle()方法在图像上绘制椭圆。以下是此方法的语法:
ellipse(img, box, color, thickness)
此方法接受以下参数 −
mat − 代表要绘制矩形的图像的Mat对象。
box − RotatedRect 对象(椭圆绘制在此矩形内切)
scalar − 代表矩形颜色的Scalar对象。(BGR)
thickness − 代表矩形粗细的整数;默认情况下,粗细值为1。
RotatedRect类的构造函数接受Point类对象、Size类对象和double类型变量,如下所示。
RotatedRect(Point c, Size s, double a)
示例
以下程序演示如何在图像上绘制椭圆并使用JavaFX窗口显示它。
import java.awt.image.BufferedImage;

import java.io.ByteArrayInputStream;
import java.io.InputStream;
import javax.imageio.ImageIO;

import javafx.application.Application;
import javafx.embed.swing.SwingFXUtils;
import javafx.scene.Group;
import javafx.scene.Scene;
import javafx.scene.image.ImageView;
import javafx.scene.image.WritableImage;
import javafx.stage.Stage;

import org.opencv.core.Core;
import org.opencv.core.Mat;
import org.opencv.core.MatOfByte;
import org.opencv.core.Point;
import org.opencv.core.RotatedRect;
import org.opencv.core.Scalar;
import org.opencv.core.Size;
import org.opencv.imgcodecs.Imgcodecs;
import org.opencv.imgproc.Imgproc;

public class DrawingEllipse extends Application {
   Mat matrix = null;

   @Override
   public void start(Stage stage) throws Exception {
      // Capturing the snapshot from the camera
      DrawingEllipse obj = new DrawingEllipse();
      WritableImage writableImage = obj.LoadImage();

      // Setting the image view
      ImageView imageView = new ImageView(writableImage);

      // setting the fit height and width of the image view
      imageView.setFitHeight(600);
      imageView.setFitWidth(600);

      // Setting the preserve ratio of the image view
      imageView.setPreserveRatio(true);

      // Creating a Group object
      Group root = new Group(imageView);

      // Creating a scene object
      Scene scene = new Scene(root, 600, 400);

      // Setting title to the Stage
      stage.setTitle("Drawing Ellipse on the image");

      // Adding scene to the stage
      stage.setScene(scene);

      // Displaying the contents of the stage
      stage.show();
   }
   public WritableImage LoadImage() throws Exception {
      // Loading the OpenCV core library
      System.loadLibrary( Core.NATIVE_LIBRARY_NAME );

      // Reading the Image from the file and storing it in to a Matrix object
      String file ="E:/OpenCV/chap8/input.jpg";
      Mat matrix = Imgcodecs.imread(file);

      // Drawing an Ellipse
      Imgproc.ellipse (
         matrix,                          //Matrix obj of the image
         new RotatedRect (                // RotatedRect(Point c, Size s, double a)
            new Point(200, 150),
            new Size(260, 180), 180
         ),
         new Scalar(0, 0, 255),           //Scalar object for color
         10                               //Thickness of the line
      );

      // Encoding the image
      MatOfByte matOfByte = new MatOfByte();
      Imgcodecs.imencode(".jpg", matrix, matOfByte);

      // Storing the encoded Mat in a byte array
      byte[] byteArray = matOfByte.toArray();

      // Displaying the image
      InputStream in = new ByteArrayInputStream(byteArray);
      BufferedImage bufImage = ImageIO.read(in);

      this.matrix = matrix;

      // Creating the Writable Image
      WritableImage writableImage = SwingFXUtils.toFXImage(bufImage, null);

      return writableImage;
   }
   public static void main(String args[]) {
      launch(args);
   }
}
执行上述程序后,您将获得以下输出 −
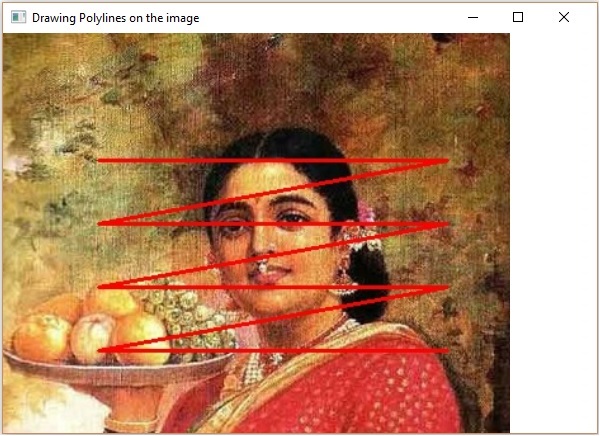
OpenCV - 绘制折线
您可以使用imgproc类的polylines()方法在图像上绘制折线。以下是此方法的语法。
polylines(img, pts, isClosed, color, thickness)
此方法接受以下参数 −
mat − 代表要绘制折线的图像的Mat对象。
pts − 包含MatOfPoint类型对象的List对象。
isClosed − 指定折线是否闭合的布尔类型参数。
scalar − 代表折线颜色的Scalar对象。(BGR)
thickness − 代表折线粗细的整数;默认情况下,粗细值为1。
MatOfPoint类的构造函数接受Point类对象。
MatOfPoint(Point... a)
示例
以下程序演示如何在图像上绘制折线并使用JavaFX窗口显示它。
import java.awt.image.BufferedImage;

import java.io.ByteArrayInputStream;
import java.io.InputStream;

import java.util.ArrayList;
import java.util.List;
import javax.imageio.ImageIO;

import javafx.application.Application;
import javafx.embed.swing.SwingFXUtils;
import javafx.scene.Group;
import javafx.scene.Scene;
import javafx.scene.image.ImageView;
import javafx.scene.image.WritableImage;
import javafx.stage.Stage;

import org.opencv.core.Core;
import org.opencv.core.Mat;
import org.opencv.core.MatOfByte;
import org.opencv.core.MatOfPoint;
import org.opencv.core.Point;
import org.opencv.core.Scalar;
import org.opencv.imgcodecs.Imgcodecs;
import org.opencv.imgproc.Imgproc;

public class DrawingPolyLines extends Application {
   Mat matrix = null;

   @Override
   public void start(Stage stage) throws Exception {
      // Capturing the snapshot from the camera
      DrawingPolyLines obj = new DrawingPolyLines();
      WritableImage writableImage = obj.LoadImage();

      // Setting the image view
      ImageView imageView = new ImageView(writableImage);

      // setting the fit height and width of the image view
      imageView.setFitHeight(600);
      imageView.setFitWidth(600);

      // Setting the preserve ratio of the image view
      imageView.setPreserveRatio(true);

      // Creating a Group object
      Group root = new Group(imageView);

      // Creating a scene object
      Scene scene = new Scene(root, 600, 400);

      // Setting title to the Stage
      stage.setTitle("Drawing Polylines on the image");

      // Adding scene to the stage
      stage.setScene(scene);

      // Displaying the contents of the stage
      stage.show();
   }
   public WritableImage LoadImage() throws Exception {
      // Loading the OpenCV core library
      System.loadLibrary( Core.NATIVE_LIBRARY_NAME );

      // Reading the Image from the file and storing it in to a Matrix object
      String file ="E:/OpenCV/chap8/input.jpg";
      Mat matrix = Imgcodecs.imread(file);

      List<MatOfPoint> list = new ArrayList();
      list.add(
         new MatOfPoint (
            new Point(75, 100), new Point(350, 100),
            new Point(75, 150), new Point(350, 150),
            new Point(75, 200), new Point(350, 200),
            new Point(75, 250), new Point(350, 250)
         )
      );
      // Drawing polylines
      Imgproc.polylines (
         matrix,                    // Matrix obj of the image
         list,                      // java.util.List<MatOfPoint> pts
         false,                     // isClosed
         new Scalar(0, 0, 255),     // Scalar object for color
         2                          // Thickness of the line
      );
      // Encoding the image
      MatOfByte matOfByte = new MatOfByte();
      Imgcodecs.imencode(".jpg", matrix, matOfByte);

      // Storing the encoded Mat in a byte array
      byte[] byteArray = matOfByte.toArray();

      // Displaying the image
      InputStream in = new ByteArrayInputStream(byteArray);
      BufferedImage bufImage = ImageIO.read(in);

      this.matrix = matrix;

      // Creating the Writable Image
      WritableImage writableImage = SwingFXUtils.toFXImage(bufImage, null);
      return writableImage;
   }
   public static void main(String args[]) {
      launch(args);
   }
}
执行上述程序后,您将获得以下输出 −
OpenCV - 绘制凸多边形
您可以使用imgproc类的fillconvexPoly()方法在图像上绘制凸多边形。以下是此方法的语法。
fillConvexPoly(Mat img, MatOfPoint points, Scalar color)
此方法接受以下参数 −
mat − 代表要绘制凸多边形的图像的Mat对象。
points − 代表要绘制凸多边形的点的MatOfPoint对象。
scalar − 代表凸多边形颜色的Scalar对象。(BGR)
MatOfPoint类的构造函数接受Point类对象。
MatOfPoint(Point... a)
示例
以下程序演示如何在图像上绘制凸多边形并使用JavaFX窗口显示它。
import java.awt.image.BufferedImage;

import java.io.ByteArrayInputStream;
import java.io.InputStream;
import javax.imageio.ImageIO;

import javafx.application.Application;
import javafx.embed.swing.SwingFXUtils;
import javafx.scene.Group;
import javafx.scene.Scene;
import javafx.scene.image.ImageView;
import javafx.scene.image.WritableImage;
import javafx.stage.Stage;

import org.opencv.core.Core;
import org.opencv.core.Mat;
import org.opencv.core.MatOfByte;
import org.opencv.core.MatOfPoint;
import org.opencv.core.Point;
import org.opencv.core.Scalar;
import org.opencv.imgcodecs.Imgcodecs;
import org.opencv.imgproc.Imgproc;

public class FillConvexPoly extends Application {
   Mat matrix = null;

   @Override
   public void start(Stage stage) throws Exception {
      // Capturing the snapshot from the camera
      FillConvexPoly obj = new FillConvexPoly();
      WritableImage writableImage = obj.LoadImage();

      // Setting the image view
      ImageView imageView = new ImageView(writableImage);

      // setting the fit height and width of the image view
      imageView.setFitHeight(600);
      imageView.setFitWidth(600);

      //Setting the preserve ratio of the image view
      imageView.setPreserveRatio(true);

      // Creating a Group object
      Group root = new Group(imageView);

      // Creating a scene object
      Scene scene = new Scene(root, 600, 400);

      // Setting title to the Stage
      stage.setTitle("Drawing convex Polylines (fill) on the image");

      // Adding scene to the stage
      stage.setScene(scene);

      // Displaying the contents of the stage
      stage.show();
   }
   public WritableImage LoadImage() throws Exception {
      // Loading the OpenCV core library
      System.loadLibrary( Core.NATIVE_LIBRARY_NAME );

      // Reading the Image from the file and storing it in to a Matrix object
      String file ="E:/OpenCV/chap8/input.jpg";
      Mat matrix = Imgcodecs.imread(file);

      MatOfPoint matOfPoint = new MatOfPoint (
         new Point(75, 100), new Point(350, 100),
         new Point(75, 150), new Point(350, 150),
         new Point(75, 200), new Point(350, 200),
         new Point(75, 250), new Point(350, 250)
      );
      // Drawing polylines
      Imgproc.fillConvexPoly (
         matrix,                       // Matrix obj of the image
         matOfPoint,                   // java.util.List<MatOfPoint> pts
         new Scalar(0, 0, 255)         // Scalar object for color
      );
      // Encoding the image
      MatOfByte matOfByte = new MatOfByte();
      Imgcodecs.imencode(".jpg", matrix, matOfByte);

      // Storing the encoded Mat in a byte array
      byte[] byteArray = matOfByte.toArray();

      // Displaying the image
      InputStream in = new ByteArrayInputStream(byteArray);
      BufferedImage bufImage = ImageIO.read(in);
      this.matrix = matrix;

      // Creating the Writable Image
      WritableImage writableImage = SwingFXUtils.toFXImage(bufImage, null);
      return writableImage;
   }
   public static void main(String args[]) {
      launch(args);
   }
}
执行上述程序后,您将获得以下输出 −

OpenCV - 绘制带箭头的直线
您可以使用imgproc类的arrowedLine()方法在图像上绘制带箭头的线条。以下是此方法的语法:
arrowedLine(Mat img, Point pt1, Point pt2, Scalar color)
此方法接受以下参数 −
mat − 代表要绘制带箭头线条的图像的Mat对象。
pt1和pt2 − 两个Point对象,代表要绘制带箭头线条的两个点。
scalar − 代表带箭头线条颜色的Scalar对象。(BGR)
示例
以下程序演示如何在图像上绘制带箭头线条并使用JavaFX窗口显示它。
import java.awt.image.BufferedImage;
import java.io.ByteArrayInputStream;
import java.io.InputStream;
import javax.imageio.ImageIO;
import javafx.application.Application;
import javafx.embed.swing.SwingFXUtils;
import javafx.scene.Group;
import javafx.scene.Scene;
import javafx.scene.image.ImageView;
import javafx.scene.image.WritableImage;
import javafx.stage.Stage;
import org.opencv.core.Core;
import org.opencv.core.Mat;
import org.opencv.core.MatOfByte;
import org.opencv.core.Point;
import org.opencv.core.Scalar;
import org.opencv.imgcodecs.Imgcodecs;
import org.opencv.imgproc.Imgproc;
public class DrawingArrowedLine extends Application {
Mat matrix = null;
@Override
public void start(Stage stage) throws Exception {
// Capturing the snapshot from the camera
DrawingArrowedLine obj = new DrawingArrowedLine();
WritableImage writableImage = obj.LoadImage();
// Setting the image view
ImageView imageView = new ImageView(writableImage);
// setting the fit height and width of the image view
imageView.setFitHeight(600);
imageView.setFitWidth(600);
// Setting the preserve ratio of the image view
imageView.setPreserveRatio(true);
// Creating a Group object
Group root = new Group(imageView);
// Creating a scene object
Scene scene = new Scene(root, 600, 400);
// Setting title to the Stage
stage.setTitle("Drawing a line on the image");
// Adding scene to the stage
stage.setScene(scene);
// Displaying the contents of the stage
stage.show();
}
public WritableImage LoadImage() throws Exception {
// Loading the OpenCV core library
System.loadLibrary( Core.NATIVE_LIBRARY_NAME );
// Reading the Image from the file and storing it in to a Matrix object
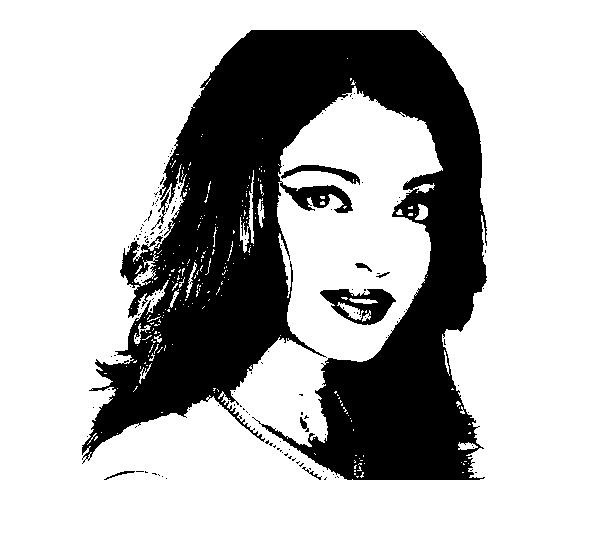
String file ="C:/EXAMPLES/OpenCV/Aish.jpg";
Mat matrix = Imgcodecs.imread(file);
//Drawing a line
Imgproc.arrowedLine(
matrix, // Matrix obj of the image
new Point(10, 200), // p1
new Point(590, 200), // p2
new Scalar(0, 100, 255) // Scalar object for color
);
// arrowedLine(Mat img, Point pt1, Point pt2, Scalar color)
// Encoding the image
MatOfByte matOfByte = new MatOfByte();
Imgcodecs.imencode(".jpg", matrix, matOfByte);
// Storing the encoded Mat in a byte array
byte[] byteArray = matOfByte.toArray();
// Displaying the image
InputStream in = new ByteArrayInputStream(byteArray);
BufferedImage bufImage = ImageIO.read(in);
this.matrix = matrix;
// Creating the Writable Image
WritableImage writableImage = SwingFXUtils.toFXImage(bufImage, null);
return writableImage;
}
public static void main(String args[]) {
launch(args);
}
}
执行上述程序后,您将获得以下输出 −
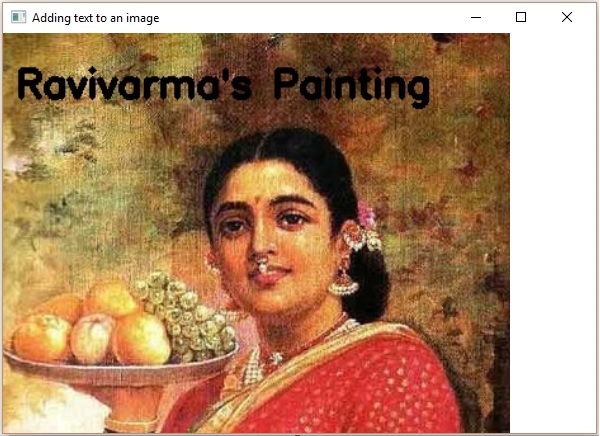
OpenCV - 添加文本
您可以使用imgproc类的arrowedLine()方法向图像添加文本。以下是此方法的语法。
putText(img, text, org, fontFace, fontScale, Scalar color, int thickness)
此方法接受以下参数 −
mat − 代表要添加文本的图像的Mat对象。
text − 代表要添加文本的字符串变量。
org − 代表图像中文本字符串左下角的Point对象。
fontFace − 代表字体类型的整数类型变量。
fontScale − 代表乘以字体特定基准大小的比例因子的double类型变量。
scalar − 代表要添加文本颜色的Scalar对象。(BGR)
thickness − 代表线条粗细的整数;默认情况下,粗细值为1。
示例
以下程序演示如何向图像添加文本并使用JavaFX窗口显示它。
import java.awt.image.BufferedImage;

import java.io.ByteArrayInputStream;
import java.io.InputStream;
import javax.imageio.ImageIO;

import javafx.application.Application;
import javafx.embed.swing.SwingFXUtils;
import javafx.scene.Group;
import javafx.scene.Scene;
import javafx.scene.image.ImageView;
import javafx.scene.image.WritableImage;
import javafx.stage.Stage;

import org.opencv.core.Core;
import org.opencv.core.Mat;
import org.opencv.core.MatOfByte;
import org.opencv.core.Point;
import org.opencv.core.Scalar;
import org.opencv.imgcodecs.Imgcodecs;
import org.opencv.imgproc.Imgproc;

public class AddingTextToImage extends Application {
   Mat matrix = null;

   @Override
   public void start(Stage stage) throws Exception {
      // Capturing the snapshot from the camera
      AddingTextToImage obj = new AddingTextToImage();
      WritableImage writableImage = obj.LoadImage();

      // Setting the image view
      ImageView imageView = new ImageView(writableImage);

      // setting the fit height and width of the image view
      imageView.setFitHeight(600);
      imageView.setFitWidth(600);

      // Setting the preserve ratio of the image view
      imageView.setPreserveRatio(true);

      // Creating a Group object
      Group root = new Group(imageView);

      // Creating a scene object
      Scene scene = new Scene(root, 600, 400);

      // Setting title to the Stage
      stage.setTitle("Adding text to an image");

      // Adding scene to the stage
      stage.setScene(scene);

      // Displaying the contents of the stage
      stage.show();
   }
   public WritableImage LoadImage() throws Exception {
      // Loading the OpenCV core library
      System.loadLibrary( Core.NATIVE_LIBRARY_NAME );

      // Reading the Image from the file and storing it in to a Matrix object
      String file ="E:/OpenCV/chap8/input.jpg";
      Mat matrix = Imgcodecs.imread(file);

      // Adding Text
      Imgproc.putText (
         matrix,                          // Matrix obj of the image
         "Ravivarma's Painting",          // Text to be added
         new Point(10, 50),               // point
         Core.FONT_HERSHEY_SIMPLEX ,      // front face
         1,                               // front scale
         new Scalar(0, 0, 0),             // Scalar object for color
         4                                // Thickness
      );

      // Encoding the image
      MatOfByte matOfByte = new MatOfByte();
      Imgcodecs.imencode(".jpg", matrix, matOfByte);

      // Storing the encoded Mat in a byte array
      byte[] byteArray = matOfByte.toArray();

      // Displaying the image
      InputStream in = new ByteArrayInputStream(byteArray);
      BufferedImage bufImage = ImageIO.read(in);
      this.matrix = matrix;

      //Creating the Writable Image
      WritableImage writableImage = SwingFXUtils.toFXImage(bufImage, null);
      return writableImage;
   }
   public static void main(String args[]) {
      launch(args);
   }
}
执行上述程序后,您将获得以下输出 −
OpenCV - 均值模糊
模糊(平滑)是常用的图像处理操作,用于减少图像噪点。此过程会去除图像中的高频内容(如边缘),使其平滑。
一般情况下,模糊化是通过卷积(图像的每个元素与其局部邻域元素相加,并由卷积核加权)图像通过低通滤波器卷积核来实现的。
模糊(平均)
在此操作过程中,图像与箱式滤波器(归一化)进行卷积。在这个过程中,图像的中心元素被卷积核区域内所有像素的平均值所替换。
您可以使用imgproc类的blur()方法对图像执行此操作。以下是此方法的语法:
blur(src, dst, ksize, anchor, borderType)
此方法接受以下参数 −
src − 一个Mat对象,代表此操作的源(输入图像)。
dst − 一个Mat对象,代表此操作的目标(输出图像)。
ksize − 一个Size对象,代表卷积核的大小。
anchor − 一个整数类型的变量,代表锚点。
borderType − 一个整数类型的变量,代表用于输出的边界类型。
示例
下面的程序演示了如何在图像上执行平均(模糊)操作。
import org.opencv.core.Core;
import org.opencv.core.Mat;
import org.opencv.core.Point;
import org.opencv.core.Size;
import org.opencv.imgcodecs.Imgcodecs;
import org.opencv.imgproc.Imgproc;

public class BlurTest {
   public static void main(String args[]) {
      // Loading the OpenCV core library
      System.loadLibrary( Core.NATIVE_LIBRARY_NAME );

      // Reading the Image from the file and storing it in to a Matrix object
      String file ="C:/EXAMPLES/OpenCV/sample.jpg";
      Mat src = Imgcodecs.imread(file);

      // Creating an empty matrix to store the result
      Mat dst = new Mat();

      // Creating the Size and Point objects
      Size size = new Size(45, 45);
      Point point = new Point(20, 30);

      // Applying Blur effect on the Image
      Imgproc.blur(src, dst, size, point, Core.BORDER_DEFAULT);

      // blur(Mat src, Mat dst, Size ksize, Point anchor, int borderType)
      // Writing the image
      Imgcodecs.imwrite("E:/OpenCV/chap9/blur.jpg", dst);
      System.out.println("Image processed");
   }
}
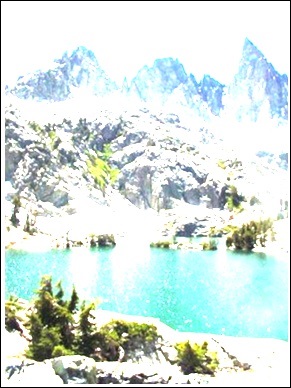
假设以上程序中指定的输入图像是sample.jpg。
输出
执行程序后,您将获得以下输出:
Image Processed
如果您打开指定的路径,您可以观察到如下所示的输出图像:
OpenCV - 高斯模糊
在高斯模糊操作中,图像与高斯滤波器而不是箱式滤波器进行卷积。高斯滤波器是一种低通滤波器,它去除高频分量。
您可以使用imgproc类的GaussianBlur()方法对图像执行此操作。以下是此方法的语法:
GaussianBlur(src, dst, ksize, sigmaX)
此方法接受以下参数 −
src − 一个Mat对象,代表此操作的源(输入图像)。
dst − 一个Mat对象,代表此操作的目标(输出图像)。
ksize − 一个Size对象,代表卷积核的大小。
sigmaX − 一个双精度类型的变量,代表 X 方向上的高斯核标准差。
示例
下面的程序演示了如何在图像上执行高斯模糊操作。
import org.opencv.core.Core;
import org.opencv.core.Mat;
import org.opencv.core.Size;
import org.opencv.imgcodecs.Imgcodecs;
import org.opencv.imgproc.Imgproc;

public class GaussianTest {
   public static void main(String args[]) {
      // Loading the OpenCV core library
      System.loadLibrary(Core.NATIVE_LIBRARY_NAME);

      // Reading the Image from the file and storing it in to a Matrix object
      String file ="C:/EXAMPLES/OpenCV/sample.jpg";
      Mat src = Imgcodecs.imread(file);

      // Creating an empty matrix to store the result
      Mat dst = new Mat();

      // Applying GaussianBlur on the Image
      Imgproc.GaussianBlur(src, dst, new Size(45, 45), 0);

      // Writing the image
      Imgcodecs.imwrite("E:/OpenCV/chap9/Gaussian.jpg", dst);
      System.out.println("Image Processed");
   }
}
假设以上程序中指定的输入图像是sample.jpg。
输出
执行程序后,您将获得以下输出:
Image Processed
如果您打开指定的路径,您可以观察到如下所示的输出图像:

OpenCV - 中值模糊
中值模糊操作类似于其他平均方法。在这里,图像的中心元素被卷积核区域内所有像素的中值所替换。此操作在去除噪声的同时处理边缘。
您可以使用imgproc类的medianBlur()方法对图像执行此操作。以下是此方法的语法:
medianBlur(src, dst, ksize)
此方法接受以下参数 −
src − 一个Mat对象,代表此操作的源(输入图像)。
dst − 一个Mat对象,代表此操作的目标(输出图像)。
ksize − 一个Size对象,代表卷积核的大小。
示例
下面的程序演示了如何在图像上执行中值模糊操作。
import org.opencv.core.Core;
import org.opencv.core.Mat;
import org.opencv.imgcodecs.Imgcodecs;
import org.opencv.imgproc.Imgproc;

public class MedianBlurTest {
   public static void main(String args[]) {
      // Loading the OpenCV core library
      System.loadLibrary( Core.NATIVE_LIBRARY_NAME );

      // Reading the Image from the file and storing it in to a Matrix object
      String file ="C:/EXAMPLES/OpenCV/sample.jpg";
      Mat src = Imgcodecs.imread(file);

      // Creating an empty matrix to store the result
      Mat dst = new Mat();

      // Applying MedianBlur on the Image
      Imgproc.medianBlur(src, dst, 15);

      // Writing the image
      Imgcodecs.imwrite("E:/OpenCV/chap9/median.jpg", dst);

      System.out.println("Image Processed");
   }
}
假设以上程序中指定的输入图像是sample.jpg。
输出
执行程序后,您将获得以下输出:
Image Processed
如果您打开指定的路径,您可以观察到如下所示的输出图像:

OpenCV - 双边滤波
图像滤波允许您对图像应用各种效果。在本章和接下来的三章中,我们将讨论各种滤波操作,例如双边滤波器、箱式滤波器、SQR 箱式滤波器和 Filter2D。
双边滤波器
双边滤波器操作将双边图像应用于滤波器。您可以使用imgproc类的medianBlur()方法对图像执行此操作。以下是此方法的语法。
bilateralFilter(src, dst, d, sigmaColor, sigmaSpace, borderType)
此方法接受以下参数 −
src − 一个Mat对象,代表此操作的源(输入图像)。
dst − 一个Mat对象,代表此操作的目标(输出图像)。
d − 一个整数类型的变量,代表像素邻域的直径。
sigmaColor − 一个整数类型的变量,代表颜色空间中的滤波器 sigma。
sigmaSpace − 一个整数类型的变量,代表坐标空间中的滤波器 sigma。
borderType − 一个整数对象,代表使用的边界类型。
示例
下面的程序演示了如何在图像上执行双边滤波器操作。
import org.opencv.core.Core;
import org.opencv.core.Mat;
import org.opencv.imgcodecs.Imgcodecs;
import org.opencv.imgproc.Imgproc;

public class BilateralFilter {
   public static void main(String args[]) {
      // Loading the OpenCV core library
      System.loadLibrary( Core.NATIVE_LIBRARY_NAME );

      // Reading the Image from the file and storing it in to a Matrix object
      String file ="E:/OpenCV/chap11/filter_input.jpg";
      Mat src = Imgcodecs.imread(file);

      // Creating an empty matrix to store the result
      Mat dst = new Mat();

      // Applying Bilateral filter on the Image
      Imgproc.bilateralFilter(src, dst, 15, 80, 80, Core.BORDER_DEFAULT);

      // Writing the image
      Imgcodecs.imwrite("E:/OpenCV/chap11/bilateralfilter.jpg", dst);

      System.out.println("Image Processed");
   }
}
假设上面程序中指定的输入图像是filter_input.jpg。
输出
执行程序后,您将获得以下输出:
Image Processed
如果您打开指定的路径,您可以观察到如下所示的输出图像:
OpenCV - 方框滤波
箱式滤波器操作类似于平均模糊操作;它将双边图像应用于滤波器。在这里,您可以选择是否应该对箱子进行归一化。
您可以使用imgproc类的boxFilter()方法对图像执行此操作。以下是此方法的语法:
boxFilter(src, dst, ddepth, ksize, anchor, normalize, borderType)
此方法接受以下参数 −
src − 一个Mat对象,代表此操作的源(输入图像)。
dst − 一个Mat对象,代表此操作的目标(输出图像)。
ddepth − 一个整数类型的变量,代表输出图像的深度。
ksize − 一个Size对象,代表模糊核的大小。
anchor − 一个整数类型的变量,代表锚点。
Normalize − 一个布尔类型的变量,指定是否应该对核进行归一化。
borderType − 一个整数对象,代表使用的边界类型。
示例
下面的程序演示了如何在图像上执行箱式滤波器操作。
import org.opencv.core.Core;
import org.opencv.core.Mat;
import org.opencv.core.Point;
import org.opencv.core.Size;
import org.opencv.imgcodecs.Imgcodecs;
import org.opencv.imgproc.Imgproc;

public class BoxFilterTest {
   public static void main( String[] args ) {
      // Loading the OpenCV core library
      System.loadLibrary( Core.NATIVE_LIBRARY_NAME );

      // Reading the Image from the file and storing it in to a Matrix object
      String file = "E:/OpenCV/chap11/filter_input.jpg";
      Mat src = Imgcodecs.imread(file);

      // Creating an empty matrix to store the result
      Mat dst = new Mat();

      // Creating the objects for Size and Point
      Size size = new Size(45, 45);
      Point point = Point(-1, -1);

      // Applying Box Filter effect on the Image
      Imgproc.boxFilter(src, dst, 50, size, point, true, Core.BORDER_DEFAULT);

      // Writing the image
      Imgcodecs.imwrite("E:/OpenCV/chap11/boxfilterjpg", dst);

      System.out.println("Image Processed");
   }
}
假设上面程序中指定的输入图像是filter_input.jpg。
输出
执行程序后,您将获得以下输出:
Image Processed
如果您打开指定的路径,您可以观察到如下所示的输出图像:
OpenCV - 平方盒滤波
您可以使用imgproc类的boxFilter()方法对图像执行 SQR 箱式滤波器操作。以下是此方法的语法:
sqrBoxFilter(src, dst, ddepth, ksize)
此方法接受以下参数 −
src − 一个Mat对象,代表此操作的源(输入图像)。
dst − 一个Mat对象,代表此操作的目标(输出图像)。
ddepth − 一个整数类型的变量,代表输出图像的深度。
ksize − 一个Size对象,代表模糊核的大小。
示例
下面的程序演示了如何在给定图像上执行 Sqrbox 滤波器操作。
import org.opencv.core.Core;
import org.opencv.core.Mat;
import org.opencv.core.Size;
import org.opencv.imgcodecs.Imgcodecs;
import org.opencv.imgproc.Imgproc;

public class SqrBoxFilterTest {
   public static void main( String[] args ) {
      // Loading the OpenCV core library
      System.loadLibrary( Core.NATIVE_LIBRARY_NAME );

      // Reading the Image from the file and storing it in to a Matrix object
      String file ="E:/OpenCV/chap11/filter_input.jpg";
      Mat src = Imgcodecs.imread(file);

      // Creating an empty matrix to store the result
      Mat dst = new Mat();

      // Applying Box Filter effect on the Image
      Imgproc.sqrBoxFilter(src, dst, -1, new Size(1, 1));

      // Writing the image
      Imgcodecs.imwrite("E:/OpenCV/chap11/sqrboxfilter.jpg", dst);

      System.out.println("Image Processed");
   }
}
假设上面程序中指定的输入图像是filter_input.jpg。
输出
执行程序后,您将获得以下输出:
Image Processed
如果您打开指定的路径,您可以观察到如下所示的输出图像:
OpenCV - Filter2D
Filter2D 操作将图像与核进行卷积。您可以使用imgproc类的Filter2D()方法对图像执行此操作。以下是此方法的语法:
filter2D(src, dst, ddepth, kernel)
此方法接受以下参数 −
src − 一个Mat对象,代表此操作的源(输入图像)。
dst − 一个Mat对象,代表此操作的目标(输出图像)。
ddepth − 一个整数类型的变量,代表输出图像的深度。
kernel − 一个Mat对象,代表卷积核。
示例
下面的程序演示了如何在图像上执行 Filter2D 操作。
import org.opencv.core.Core;
import org.opencv.core.CvType;
import org.opencv.core.Mat;
import org.opencv.imgcodecs.Imgcodecs;
import org.opencv.imgproc.Imgproc;

public class Filter2D {
   public static void main( String[] args ) {
      //Loading the OpenCV core library
      System.loadLibrary( Core.NATIVE_LIBRARY_NAME );

      //Reading the Image from the file and storing it in to a Matrix object
      String file ="E:/OpenCV/chap11/filter_input.jpg";
      Mat src = Imgcodecs.imread(file);

      //Creating an empty matrix to store the result
      Mat dst = new Mat();

      // Creating kernel matrix
      Mat kernel = Mat.ones(2,2, CvType.CV_32F);

      for(int i = 0; i<kernel.rows(); i++) {
         for(int j = 0; j<kernel.cols(); j++) {
            double[] m = kernel.get(i, j);

            for(int k = 1; k<m.length; k++) {
               m[k] = m[k]/(2 * 2);
            }
            kernel.put(i,j, m);
         }
      }
      Imgproc.filter2D(src, dst, -1, kernel);
      Imgcodecs.imwrite("E:/OpenCV/chap11/filter2d.jpg", dst);
      System.out.println("Image Processed");
   }
}
假设上面程序中指定的输入图像是filter_input.jpg。
输出
执行程序后,您将获得以下输出:
Image Processed
如果您打开指定的路径,您可以观察到如下所示的输出图像:
OpenCV - 膨胀
腐蚀和膨胀是两种形态学操作。顾名思义,形态学操作是一组根据图像形状处理图像的操作。
基于给定的输入图像,开发了一个“结构元素”。这可以通过两种程序中的任何一种来完成。这些旨在去除噪声并消除缺陷,使图像清晰。
膨胀
此过程遵循与某种特定形状(例如正方形或圆形)的核进行卷积。此核具有一个锚点,表示其中心。
此核与图片重叠以计算最大像素值。计算后,图片将被中心处的锚点替换。通过此过程,明亮区域的面积会增大,因此图像大小会增大。
例如,白色阴影或明亮阴影中对象的尺寸会增加,而黑色阴影或黑暗阴影中对象的尺寸会减小。
您可以使用imgproc类的dilate()方法对图像执行膨胀操作。以下是此方法的语法。
dilate(src, dst, kernel)
此方法接受以下参数 −
src − 一个Mat对象,代表此操作的源(输入图像)。
dst − 一个Mat对象,代表此操作的目标(输出图像)。
kernel − 一个Mat对象,代表卷积核。
示例
您可以使用getStructuringElement()方法准备核矩阵。此方法接受一个代表morph_rect类型的整数和一个Size类型的对象。
Imgproc.getStructuringElement(int shape, Size ksize);
下面的程序演示了如何在给定图像上执行膨胀操作。
import org.opencv.core.Core;
import org.opencv.core.Mat;
import org.opencv.core.Size;
import org.opencv.imgcodecs.Imgcodecs;
import org.opencv.imgproc.Imgproc;

public class DilateTest {
   public static void main( String[] args ) {
      // Loading the OpenCV core library
      System.loadLibrary( Core.NATIVE_LIBRARY_NAME );

      // Reading the Image from the file and storing it in to a Matrix object
      String file ="C:/EXAMPLES/OpenCV/sample.jpg";
      Mat src = Imgcodecs.imread(file);

      // Creating an empty matrix to store the result
      Mat dst = new Mat();

      // Preparing the kernel matrix object
      Mat kernel = Imgproc.getStructuringElement(Imgproc.MORPH_RECT,
         new  Size((2*2) + 1, (2*2)+1));

      // Applying dilate on the Image
      Imgproc.dilate(src, dst, kernel);

      // Writing the image
      Imgcodecs.imwrite("E:/OpenCV/chap10/Dilation.jpg", dst);

      System.out.println("Image Processed");
   }
}
输入
假设以上程序中指定的输入图像是sample.jpg。
输出
执行程序后,您将获得以下输出:
Image Processed
如果您打开指定的路径,您可以观察到如下所示的输出图像:

OpenCV - 腐蚀
腐蚀与膨胀的过程非常相似。但是这里计算的像素值是最小值,而不是膨胀中的最大值。图像在锚点下用该最小像素值替换。
通过此过程,黑暗区域的面积会增大,而明亮区域会减小。例如,黑暗阴影或黑色阴影中对象的尺寸会增加,而在白色阴影或明亮阴影中则会减小。
示例
您可以使用imgproc类的erode()方法对图像执行此操作。以下是此方法的语法:
erode(src, dst, kernel)
此方法接受以下参数 −
src − 一个Mat对象,代表此操作的源(输入图像)。
dst − 一个Mat对象,代表此操作的目标(输出图像)。
kernel − 一个Mat对象,代表卷积核。
您可以使用getStructuringElement()方法准备核矩阵。此方法接受一个代表morph_rect类型的整数和一个Size类型的对象。
Imgproc.getStructuringElement(int shape, Size ksize);
下面的程序演示了如何在给定图像上执行腐蚀操作。
import org.opencv.core.Core;
import org.opencv.core.Mat;
import org.opencv.core.Size;
import org.opencv.imgcodecs.Imgcodecs;
import org.opencv.imgproc.Imgproc;

public class ErodeTest {
   public static void main( String[] args ) {
      // Loading the OpenCV core library
      System.loadLibrary( Core.NATIVE_LIBRARY_NAME );

      // Reading the Image from the file and storing it in to a Matrix object
      String file ="C:/EXAMPLES/OpenCV/sample.jpg";
      Mat src = Imgcodecs.imread(file);

      // Creating an empty matrix to store the result
      Mat dst = new Mat();

      // Preparing the kernel matrix object
      Mat kernel = Imgproc.getStructuringElement(Imgproc.MORPH_RECT,
         new  Size((2*2) + 1, (2*2)+1));

      // Applying erode on the Image
      Imgproc.erode(src, dst, kernel);

      // Writing the image
      Imgcodecs.imwrite("E:/OpenCV/chap10/Erosion.jpg", dst);

      System.out.println("Image processed");
   }
}
假设以上程序中指定的输入图像是sample.jpg。
输出
执行程序后,您将获得以下输出:
Image Loaded
如果您打开指定的路径,您可以观察到如下所示的输出图像:

OpenCV - 形态学操作
在前面的章节中,我们讨论了腐蚀和膨胀的过程。除了这两个之外,OpenCV 还有更多形态学变换。Imgproc类的morphologyEx()方法用于对给定图像执行这些操作。
以下是此方法的语法:
morphologyEx(src, dst, op, kernel)
此方法接受以下参数 −
src − 一个Mat类对象,代表源(输入)图像。
dst − 一个Mat类对象,代表目标(输出)图像。
op − 一个整数,代表形态学操作的类型。
kernel − 一个核矩阵。
示例
下面的程序演示了如何使用 OpenCV 库在图像上应用“顶帽”形态学操作。
import org.opencv.core.Core;
import org.opencv.core.CvType;
import org.opencv.core.Mat;
import org.opencv.imgcodecs.Imgcodecs;
import org.opencv.imgproc.Imgproc;

public class MorphologyExTest {
   public static void main(String args[]) {
      // Loading the OpenCV core library
      System.loadLibrary( Core.NATIVE_LIBRARY_NAME );

      // Reading the Image from the file and storing it in to a Matrix object
      String file ="E:/OpenCV/chap12/morph_input.jpg";
      Mat src = Imgcodecs.imread(file);

      // Creating an empty matrix to store the result
      Mat dst = new Mat();

      // Creating kernel matrix
      Mat kernel = Mat.ones(5,5, CvType.CV_32F);

      // Applying Blur effect on the Image
      Imgproc.morphologyEx(src, dst, Imgproc.MORPH_TOPHAT, kernel);

      // Writing the image
      Imgcodecs.imwrite("E:/OpenCV/chap12/morph_tophat.jpg", dst);

      System.out.println("Image Processed");
   }
}
假设上面程序中指定的输入图像是morph_input.jpg。
输出
执行程序后,您将获得以下输出:
Image Processed
如果您打开指定的路径,您可以观察到如下所示的输出图像:

更多操作
除了前面示例中演示的TOPHAT形态学操作之外,OpenCV 还提供各种其他类型的形态学操作。所有这些类型都由Imgproc类的预定义静态字段(固定值)表示。
您可以通过将其各自的预定义值传递给morphologyEx()方法的op参数来选择所需的形态学类型。
// Applying Blur effect on the Image
Imgproc.morphologyEx(src, dst, Imgproc.MORPH_TOPHAT, kernel);
以下是代表形态学操作类型及其各自输出的值。
| 操作和描述 | 输出 |
|---|---|
| MORPH_BLACKHAT |  |
| MORPH_CLOSE |  |
| MORPH_CROSS |  |
| MORPH_DILATE | 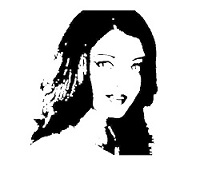 |
| MORPH_ELLIPSE | 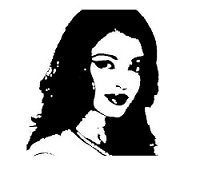 |
| MORPH_ERODE | 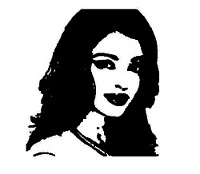 |
| MORPH_GRADIENT | 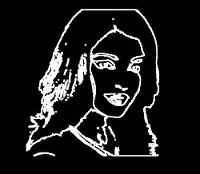 |
| MORPH_OPEN |  |
| MORPH_RECT |  |
| MORPH_TOPHAT |  |
OpenCV - 图像金字塔
金字塔是对图像的操作,其中:
输入图像最初使用特定的平滑滤波器(例如:高斯、拉普拉斯)进行平滑,然后对平滑后的图像进行二次采样。
此过程重复多次。
在金字塔操作期间,图像的平滑度增加,分辨率(大小)减小。
金字塔向上
在金字塔向上操作中,图像最初被上采样,然后被模糊。您可以使用imgproc类的pyrUP()方法对图像执行金字塔向上操作。以下是此方法的语法:
pyrUp(src, dst, dstsize, borderType)
此方法接受以下参数 −
src − 一个Mat类对象,代表源(输入)图像。
mat − 一个Mat类对象,代表目标(输出)图像。
size − 一个Size类对象,代表图像要增大或减小到的尺寸。
borderType − 一个整数类型的变量,代表要使用的边界类型。
示例
下面的程序演示了如何在图像上执行金字塔向上操作。
import org.opencv.core.Core;
import org.opencv.core.Mat;
import org.opencv.core.Size;
import org.opencv.imgcodecs.Imgcodecs;
import org.opencv.imgproc.Imgproc;

public class PyramidUp {
   public static void main( String[] args ) {
      // Loading the OpenCV core library
      System.loadLibrary( Core.NATIVE_LIBRARY_NAME );

      // Reading the Image from the file and storing it in to a Matrix object
      String file ="E:/OpenCV/chap13/pyramid_input.jpg";
      Mat src = Imgcodecs.imread(file);

      // Creating an empty matrix to store the result
      Mat dst = new Mat();

      // Applying pyrUp on the Image
      Imgproc.pyrUp(src, dst, new Size(src.cols()*2,  src.rows()*2), Core.BORDER_DEFAULT);

      // Writing the image
      Imgcodecs.imwrite("E:/OpenCV/chap13/pyrUp_output.jpg", dst);

      System.out.println("Image Processed");
   }
}
假设上面程序中指定的输入图像是pyramid_input.jpg。

输出
执行程序后,您将获得以下输出:
Image Processed
如果您打开指定的路径,您可以观察到如下所示的输出图像:
金字塔向下
在金字塔向下操作中,图像最初被模糊,然后被下采样。您可以使用imgproc类的pyrDown()方法对图像执行金字塔向下操作。以下是此方法的语法:
pyrDown(src, dst, dstsize, borderType)
此方法接受以下参数 −
src − 一个Mat类对象,代表源(输入)图像。
mat − 一个Mat类对象,代表目标(输出)图像。
size − 一个Size类对象,代表图像要增大或减小到的尺寸。
borderType − 一个整数类型的变量,代表要使用的边界类型。
示例
下面的程序演示了如何在图像上执行金字塔向下操作。
import org.opencv.core.Core;
import org.opencv.core.Mat;
import org.opencv.core.Size;
import org.opencv.imgcodecs.Imgcodecs;
import org.opencv.imgproc.Imgproc;

public class PyramidDown {
   public static void main( String[] args ) {
      // Loading the OpenCV core library
      System.loadLibrary( Core.NATIVE_LIBRARY_NAME );

      // Reading the Image from the file and storing it in to a Matrix object
      String file ="E:/OpenCV/chap13/pyramid_input.jpg";
      Mat src = Imgcodecs.imread(file);

      // Creating an empty matrix to store the result
      Mat dst = new Mat();

      // Applying pyrDown on the Image
      Imgproc.pyrDown(src, dst, new Size(src.cols()/2,  src.rows()/2),
         Core.BORDER_DEFAULT);

      // Writing the image
      Imgcodecs.imwrite("E:/OpenCV/chap13/pyrDown_output.jpg", dst);

      System.out.println("Image Processed");
   }
}
假设上面程序中指定的输入图像是pyramid_input.jpg。
输出
执行程序后,您将获得以下输出:
Image Processed
如果您打开指定的路径,您可以观察到如下所示的输出图像:

均值漂移滤波
在均值漂移金字塔操作中,首先对图像进行均值漂移分割。
您可以使用imgproc类的pyrDown()方法对图像执行金字塔均值漂移滤波操作。以下是此方法的语法。
pyrMeanShiftFiltering(src, dst, sp, sr)
此方法接受以下参数 −
src − 一个Mat类对象,代表源(输入)图像。
mat − 一个Mat类对象,代表目标(输出)图像。
sp − 一个双精度类型的变量,代表空间窗口半径。
sr − 一个双精度类型的变量,代表颜色窗口半径。
示例
下面的程序演示了如何在给定图像上执行均值漂移滤波操作。
import org.opencv.core.Core;
import org.opencv.core.Mat;
import org.opencv.imgcodecs.Imgcodecs;
import org.opencv.imgproc.Imgproc;

public class PyramidMeanShift {
   public static void main( String[] args ) {
      // Loading the OpenCV core library
      System.loadLibrary( Core.NATIVE_LIBRARY_NAME );

      // Reading the Image from the file and storing it in to a Matrix object
      String file ="E:/OpenCV/chap13/pyramid_input.jpg";
      Mat src = Imgcodecs.imread(file);

      // Creating an empty matrix to store the result
      Mat dst = new Mat();

      // Applying meanShifting on the Image
      Imgproc.pyrMeanShiftFiltering(src, dst, 200, 300);

      // Writing the image
      Imgcodecs.imwrite("E:/OpenCV/chap13/meanShift_output.jpg", dst);

      System.out.println("Image Processed");
   }
}
假设上面程序中指定的输入图像是pyramid_input.jpg。
输出
执行程序后,您将获得以下输出:
Image Processed
如果您打开指定的路径,您可以观察到如下所示的输出图像:

OpenCV - 简单阈值化
阈值化是一种图像分割方法,一般用于创建二值图像。阈值化分为两种类型,即简单阈值化和自适应阈值化。
简单阈值化
在简单阈值化操作中,像素值大于指定阈值的值将被赋予一个标准值。
您可以使用Imgproc 类的threshold()方法对图像执行简单的阈值操作,以下是此方法的语法。
threshold(src, dst, thresh, maxval, type)
此方法接受以下参数 −
src − 一个Mat类对象,代表源(输入)图像。
dst − 一个Mat类对象,代表目标(输出)图像。
thresh − 一个双精度类型的变量,代表阈值。
maxval − 一个双精度类型的变量,代表如果像素值大于阈值则要赋予的值。
type − 一个整数类型的变量,代表要使用的阈值类型。
示例
以下程序演示如何在OpenCV中对图像执行简单的阈值操作。
import org.opencv.core.Core;
import org.opencv.core.Mat;
import org.opencv.imgcodecs.Imgcodecs;
import org.opencv.imgproc.Imgproc;

public class Thresh {
   public static void main(String args[]) {
      // Loading the OpenCV core library
      System.loadLibrary( Core.NATIVE_LIBRARY_NAME );

      // Reading the Image from the file and storing it in to a Matrix object
      String file ="E:/OpenCV/chap14/thresh_input.jpg";
      Mat src = Imgcodecs.imread(file);

      // Creating an empty matrix to store the result
      Mat dst = new Mat();
      Imgproc.threshold(src, dst, 50, 255, Imgproc.THRESH_BINARY);

      // Writing the image
      Imgcodecs.imwrite("E:/OpenCV/chap14/thresh_trunc.jpg", dst);

      System.out.println("Image Processed");
   }
}
假设以上程序中指定的输入图像为thresh_input.jpg。

输出
执行程序后,您将获得以下输出:
Image Processed
如果您打开指定的路径,您可以观察到如下所示的输出图像:
其他类型的简单阈值化
除了前面示例中演示的THRESH_BINARY操作外,OpenCV还提供各种其他类型的阈值操作。所有这些类型都由Imgproc类的预定义静态字段(固定值)表示。
您可以通过将相应的预定义值传递给threshold()方法名为type的参数来选择所需的阈值操作类型。
Imgproc.threshold(src, dst, 50, 255, Imgproc.THRESH_BINARY);
以下是表示各种阈值操作类型及其各自输出的值。
| 操作和描述 | 输出 |
|---|---|
| THRESH_BINARY |  |
| THRESH_BINARY_INV |  |
| THRESH_TRUNC |  |
| THRESH_TOZERO |  |
| THRESH_TOZERO_INV |  |
OpenCV - 自适应阈值化
在简单阈值化中,阈值是全局的,即对图像中的所有像素都相同。自适应阈值化是一种为较小区域计算阈值的方法,因此不同区域将具有不同的阈值。
在OpenCV中,您可以使用Imgproc类的adaptiveThreshold()方法对图像执行自适应阈值操作。以下是此方法的语法。
adaptiveThreshold(src, dst, maxValue, adaptiveMethod, thresholdType, blockSize, C)
此方法接受以下参数 −
src − 一个Mat类对象,代表源(输入)图像。
dst − 一个Mat类对象,代表目标(输出)图像。
maxValue − 一个双精度型变量,表示如果像素值大于阈值则要赋予的值。
adaptiveMethod − 一个整型变量,表示要使用的自适应方法。这将是以下两个值之一:
ADAPTIVE_THRESH_MEAN_C − 阈值是邻域区域的平均值。
ADAPTIVE_THRESH_GAUSSIAN_C − 阈值是邻域值的加权和,权重为高斯窗口。
thresholdType − 一个整型变量,表示要使用的阈值类型。
blockSize − 一个整型变量,表示用于计算阈值大小的像素邻域。
C − 一个双精度型变量,表示两种方法中使用的常数(从平均值或加权平均值中减去)。
示例
以下程序演示如何在OpenCV中对图像执行自适应阈值操作。这里我们选择类型为binary的自适应阈值和ADAPTIVE_THRESH_MEAN_C作为阈值方法。
import org.opencv.core.Core;
import org.opencv.core.Mat;
import org.opencv.imgcodecs.Imgcodecs;
import org.opencv.imgproc.Imgproc;

public class AdaptiveThresh {
   public static void main(String args[]) throws Exception {
      // Loading the OpenCV core library
      System.loadLibrary( Core.NATIVE_LIBRARY_NAME );

      // Reading the Image from the file and storing it in to a Matrix object
      String file ="E:/OpenCV/chap14/thresh_input.jpg";

      // Reading the image
      Mat src = Imgcodecs.imread(file,0);

      // Creating an empty matrix to store the result
      Mat dst = new Mat();

      Imgproc.adaptiveThreshold(src, dst, 125, Imgproc.ADAPTIVE_THRESH_MEAN_C,
         Imgproc.THRESH_BINARY, 11, 12);

      // Writing the image
      Imgcodecs.imwrite("E:/OpenCV/chap14/Adaptivemean_thresh_binary.jpg", dst);

      System.out.println("Image Processed");
   }
}
假设以上程序中指定的输入图像为thresh_input.jpg。
输出
执行程序后,您将获得以下输出:
Image Processed
如果您打开指定的路径,您可以观察到如下所示的输出图像:

其他类型的自适应阈值化
除了前面示例中演示的ADAPTIVE_THRESH_MEAN_C作为自适应方法和THRESH_BINARY作为阈值类型外,我们还可以选择这两种值的更多组合。
Imgproc.adaptiveThreshold(src, dst, 125, Imgproc.ADAPTIVE_THRESH_MEAN_C,
   Imgproc.THRESH_BINARY, 11, 12);
以下是表示参数adaptiveMethod和thresholdType的各种组合值及其各自输出的值。
| adaptiveMethod / thresholdType | ADAPTIVE_THRESH_MEAN_C | ADAPTIVE_THRESH_GAUSSIAN_C |
|---|---|---|
| THRESH_BINARY |  |
 |
| THRESH_BINARY_INV |  |
 |
OpenCV - 添加边界
本章将教你如何向图像添加边界。
copyMakeBorder() 方法
您可以使用名为Core的类的copyMakeBorder()方法向图像添加各种边界,该类属于org.opencv.core包。以下是此方法的语法。
copyMakeBorder(src, dst, top, bottom, left, right, borderType)
此方法接受以下参数 −
src − 一个Mat类对象,代表源(输入)图像。
dst − 一个Mat类对象,代表目标(输出)图像。
top − 一个整型变量,表示图像顶部边界的长度。
bottom − 一个整型变量,表示图像底部边界的长度。
left − 一个整型变量,表示图像左侧边界的长度。
right − 一个整型变量,表示图像右侧边界的长度。
borderType − 一个整型变量,表示要使用的边界类型。
示例
以下程序是一个示例,演示如何向给定图像添加边界。
import org.opencv.core.Core;
import org.opencv.core.Mat;
import org.opencv.imgcodecs.Imgcodecs;

public class AddingBorder {
   public static void main( String[] args ) {
      // Loading the OpenCV core library
      System.loadLibrary( Core.NATIVE_LIBRARY_NAME );

      // Reading the Image from the file and storing it in to a Matrix object
      String file ="E:/OpenCV/chap15/input.jpg";
      Mat src = Imgcodecs.imread(file);

      // Creating an empty matrix to store the result
      Mat dst = new Mat();

      Core.copyMakeBorder(src, dst, 20, 20, 20, 20, Core.BORDER_CONSTANT);
      Imgcodecs.imwrite("E:/OpenCV/chap15/border_constant.jpg", dst);

      System.out.println("Image Processed");
   }
}
假设以上程序中指定的输入图像为thresh_input.jpg。
输出
执行程序后,您将获得以下输出:
Image Processed
如果您打开指定的路径,您可以观察到如下所示的输出图像:

其他类型的边界
除了前面示例中演示的边界类型BORDER_CONSTANT外,OpenCV还提供各种其他类型的边界。所有这些类型都由Core类的预定义静态字段(固定值)表示。
您可以通过将相应的预定义值传递给copyMakeBorder()方法名为borderType的参数来选择所需的边界类型。
Core.copyMakeBorder(src, dst, 20, 20, 20, 20, Core.BORDER_CONSTANT);
以下是表示各种边界操作类型及其各自输出的值。
| 操作和描述 | 输出 |
|---|---|
| BORDER_CONSTANT |  |
| BORDER_ISOLATED |  |
| BORDER_DEFAULT |  |
| BORDER_REFLECT |  |
| BORDER_REFLECT_101 |  |
| BORDER_REFLECT101 |  |
| BORDER_REPLICATE |  |
| BORDER_WRAP |  |
OpenCV - Sobel 算子
使用Sobel算子,您可以检测图像在水平和垂直方向上的边缘。您可以使用sobel()方法对图像应用Sobel算子。以下是此方法的语法:
Sobel(src, dst, ddepth, dx, dy)
此方法接受以下参数 −
src − 一个Mat类对象,代表源(输入)图像。
dst − 一个Mat类对象,代表目标(输出)图像。
ddepth − 一个整型变量,表示图像的深度(-1)
dx − 一个整型变量,表示x导数。(0或1)
dy − 一个整型变量,表示y导数。(0或1)
示例
以下程序演示如何在给定图像上执行Sobel操作。
import org.opencv.core.Core;
import org.opencv.core.Mat;

import org.opencv.imgcodecs.Imgcodecs;
import org.opencv.imgproc.Imgproc;

public class SobelTest {
   public static void main(String args[]) {
      // Loading the OpenCV core library
      System.loadLibrary(Core.NATIVE_LIBRARY_NAME);

      // Reading the Image from the file and storing it in to a Matrix object
      String file ="E:/OpenCV/chap16/sobel_input.jpg";
      Mat src = Imgcodecs.imread(file);

      // Creating an empty matrix to store the result
      Mat dst = new Mat();

      // Applying sobel on the Image
      Imgproc.Sobel(src, dst, -1, 1, 1);

      // Writing the image
      Imgcodecs.imwrite("E:/OpenCV/chap16/sobel_output.jpg", dst);

      System.out.println("Image processed");
   }
}
假设以上程序中指定的输入图像为sobel_input.jpg。

输出
执行程序后,您将获得以下输出:
Image Processed
如果您打开指定的路径,您可以观察到如下所示的输出图像:
Sobel 变体
将不同的值传递给最后两个参数(dx 和 dy)(在 0 和 1 之间),您将获得不同的输出:
// Applying sobel on the Image
Imgproc.Sobel(src, dst, -1, 1, 1);
下表列出了Sobel()方法的变量dx和dy的各种值及其各自的输出。
| X导数 | Y导数 | 输出 |
|---|---|---|
| 0 | 1 |  |
| 1 | 0 |  |
| 1 | 1 |  |
OpenCV - Scharr 算子
Scharr也用于检测图像在水平和垂直方向上的二阶导数。您可以使用scharr()方法对图像执行Scharr操作。以下是此方法的语法:
Scharr(src, dst, ddepth, dx, dy)
此方法接受以下参数 −
src − 一个Mat类对象,代表源(输入)图像。
dst − 一个Mat类对象,代表目标(输出)图像。
ddepth − 一个整型变量,表示图像的深度(-1)
dx − 一个整型变量,表示x导数。(0或1)
dy − 一个整型变量,表示y导数。(0或1)
示例
以下程序演示如何将Scharr应用于给定图像。
import org.opencv.core.Core;
import org.opencv.core.Mat;

import org.opencv.imgcodecs.Imgcodecs;
import org.opencv.imgproc.Imgproc;

public class ScharrTest {

   public static void main( String[] args ) {

      // Loading the OpenCV core library
      System.loadLibrary( Core.NATIVE_LIBRARY_NAME );

      // Reading the Image from the file and storing it in to a Matrix object
      String file ="E:/OpenCV/chap16/sobel_input.jpg";
      Mat src = Imgcodecs.imread(file);

      // Creating an empty matrix to store the result
      Mat dst = new Mat();

      // Applying Box Filter effect on the Image
      Imgproc.Scharr(src, dst, Imgproc.CV_SCHARR, 0, 1);

      // Writing the image
      Imgcodecs.imwrite("E:/OpenCV/chap16/scharr_output.jpg", dst);

      System.out.println("Image processed");
   }
}
假设以上程序中指定的输入图像为scharr_input.jpg。
输出
执行后,您将获得以下输出:
Image Processed
如果您打开指定的路径,您可以观察到输出图像如下:

更多 Scharr 导数
将不同的值传递给最后两个参数 (dx 和 dy) (在 0 和 1 之间),您将获得不同的输出:
// Applying scharr on the Image
Imgproc.Scharr(src, dst, -1, 1, 1);
下表列出了scharr()方法的变量dx和dy的各种值及其各自的输出。
| X导数 | Y导数 | 输出 |
|---|---|---|
| 0 | 1 |  |
| 1 | 0 |  |
OpenCV - 拉普拉斯变换
拉普拉斯算子也是一个导数算子,用于查找图像中的边缘。它是一个二阶导数掩码。在这个掩码中,我们有两个进一步的分类,一个是正拉普拉斯算子,另一个是负拉普拉斯算子。
与其他算子不同,拉普拉斯算子不会在任何特定方向上提取边缘,而是按以下分类提取边缘。
- 内边缘
- 外边缘
您可以使用imgproc类的Laplacian()方法对图像执行拉普拉斯变换操作,以下是此方法的语法。
Laplacian(src, dst, ddepth)
此方法接受以下参数 −
src − 一个Mat对象,代表此操作的源(输入图像)。
dst − 一个Mat对象,代表此操作的目标(输出图像)。
ddepth − 一个整型变量,表示目标图像的深度。
示例
以下程序演示如何在给定图像上执行拉普拉斯变换操作。
import org.opencv.core.Core;
import org.opencv.core.Mat;
import org.opencv.imgcodecs.Imgcodecs;
import org.opencv.imgproc.Imgproc;

public class LaplacianTest {
   public static void main(String args[]) {
      // Loading the OpenCV core library
      System.loadLibrary(Core.NATIVE_LIBRARY_NAME);

      //Reading the Image from the file and storing it in to a Matrix object
      String file ="E:/OpenCV/chap18/laplacian_input.jpg";
      Mat src = Imgcodecs.imread(file);

      // Creating an empty matrix to store the result
      Mat dst = new Mat();

      // Applying GaussianBlur on the Image
      Imgproc.Laplacian(src, dst, 10);

      // Writing the image
      Imgcodecs.imwrite("E:/OpenCV/chap18/laplacian.jpg", dst);

      System.out.println("Image Processed");
   }
}
假设以上程序中指定的输入图像为laplacian_input.jpg。
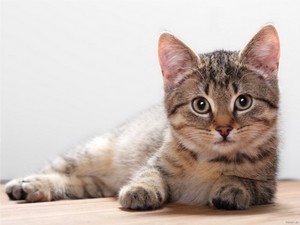
输出
执行程序后,您将获得以下输出:
Image Processed
如果您打开指定的路径,您可以观察到如下所示的输出图像:
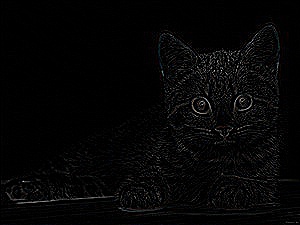
OpenCV - 距离变换
距离变换算子通常以二值图像作为输入。在此操作中,前景区域内点的灰度强度会更改为它们到最近的0值(边界)的距离。
您可以使用distanceTransform()方法在OpenCV中应用距离变换。以下是此方法的语法。
distanceTransform(src, dst, distanceType, maskSize)
此方法接受以下参数 −
src − 一个Mat类对象,代表源(输入)图像。
dst − 一个Mat类对象,代表目标(输出)图像。
distanceType − 一个整型变量,表示要应用的距离变换类型。
maskSize − 一个整型变量,表示要使用的掩码大小。
示例
以下程序演示如何在给定图像上执行距离变换操作。
import org.opencv.core.Core;
import org.opencv.core.Mat;
import org.opencv.imgcodecs.Imgcodecs;
import org.opencv.imgproc.Imgproc;

public class DistanceTransform {
   public static void main(String args[]) {
      // Loading the OpenCV core library
      System.loadLibrary( Core.NATIVE_LIBRARY_NAME );

      // Reading the Image from the file and storing it in to a Matrix object
      String file ="E:/OpenCV/chap19/input.jpg";
      Mat src = Imgcodecs.imread(file,0);

      // Creating an empty matrix to store the results
      Mat dst = new Mat();
      Mat binary = new Mat();

      // Converting the grayscale image to binary image
      Imgproc.threshold(src, binary, 100, 255, Imgproc.THRESH_BINARY);

      // Applying distance transform
      Imgproc.distanceTransform(mat, dst, Imgproc.DIST_C, 3);

      // Writing the image
      Imgcodecs.imwrite("E:/OpenCV/chap19/distnceTransform.jpg", dst);

      System.out.println("Image Processed");
   }
}
假设以上程序中指定的输入图像为input.jpg。
输出
执行程序后,您将获得以下输出:
Image Processed
如果您打开指定的路径,您可以观察到如下所示的输出图像:

距离变换操作类型
除了前面示例中演示的距离操作类型DIST_C外,OpenCV还提供各种其他类型的距离变换操作。所有这些类型都由Imgproc类的预定义静态字段(固定值)表示。
您可以通过将相应的预定义值传递给distanceTransform()方法名为distanceType的参数来选择所需的距离变换操作类型。
// Applying distance transform
Imgproc.distanceTransform(mat, dst, Imgproc.DIST_C, 3);
以下是表示各种distanceTransform操作类型及其各自输出的值。
| 操作和描述 | 输出 |
|---|---|
| DIST_C | 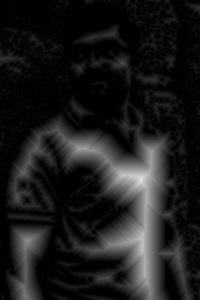 |
| DIST_L1 | 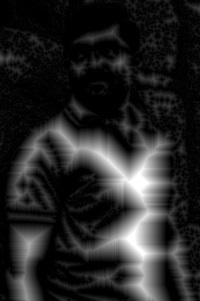 |
| DIST_L2 |  |
| DIST_LABEL_PIXEL | |
| DIST_MASK_3 |  |
OpenCV - 使用摄像头
在本章中,我们将学习如何使用OpenCV使用系统摄像头捕获帧。org.opencv.videoio包的VideoCapture类包含使用摄像头捕获视频的类和方法。让我们一步一步地学习如何捕获帧:
步骤 1:加载 OpenCV 原生库
使用 OpenCV 库编写 Java 代码时,第一步需要使用loadLibrary()加载 OpenCV 的原生库。如下所示加载 OpenCV 原生库。
// Loading the core library
System.loadLibrary(Core.NATIVE_LIBRARY_NAME);
步骤2:实例化视频捕获类
使用本教程前面提到的任何函数实例化Mat类。
// Instantiating the VideoCapture class (camera:: 0)
VideoCapture capture = new VideoCapture(0);
步骤3:读取帧
您可以使用VideoCapture类的read()方法读取来自摄像头的帧。此方法接受Mat类的对象来存储读取的帧。
// Reading the next video frame from the camera
Mat matrix = new Mat();
capture.read(matrix);
示例
以下程序演示如何使用摄像头捕获帧并使用JavaFX窗口显示它。它还保存捕获的帧。
import java.awt.image.BufferedImage;
import java.awt.image.DataBufferByte;
import java.awt.image.WritableRaster;

import java.io.FileNotFoundException;
import java.io.IOException;

import javafx.application.Application;
import javafx.embed.swing.SwingFXUtils;
import javafx.scene.Group;
import javafx.scene.Scene;
import javafx.scene.image.ImageView;
import javafx.scene.image.WritableImage;
import javafx.stage.Stage;

import org.opencv.core.Core;
import org.opencv.core.Mat;
import org.opencv.imgcodecs.Imgcodecs;
import org.opencv.videoio.VideoCapture;

public class CameraSnapshotJavaFX extends Application {
   Mat matrix = null;

   @Override
   public void start(Stage stage) throws FileNotFoundException, IOException {
      // Capturing the snapshot from the camera
      CameraSnapshotJavaFX obj = new CameraSnapshotJavaFX();
      WritableImage writableImage = obj.capureSnapShot();

      // Saving the image
      obj.saveImage();

      // Setting the image view
      ImageView imageView = new ImageView(writableImage);

      // setting the fit height and width of the image view
      imageView.setFitHeight(400);
      imageView.setFitWidth(600);

      // Setting the preserve ratio of the image view
      imageView.setPreserveRatio(true);

      // Creating a Group object
      Group root = new Group(imageView);

      // Creating a scene object
      Scene scene = new Scene(root, 600, 400);

      // Setting title to the Stage
      stage.setTitle("Capturing an image");

      // Adding scene to the stage
      stage.setScene(scene);

      // Displaying the contents of the stage
      stage.show();
   }
   public WritableImage capureSnapShot() {
      WritableImage WritableImage = null;

      // Loading the OpenCV core library
      System.loadLibrary( Core.NATIVE_LIBRARY_NAME );

      // Instantiating the VideoCapture class (camera:: 0)
      VideoCapture capture = new VideoCapture(0);

      // Reading the next video frame from the camera
      Mat matrix = new Mat();
      capture.read(matrix);

      // If camera is opened
      if( capture.isOpened()) {
         // If there is next video frame
         if (capture.read(matrix)) {
            // Creating BuffredImage from the matrix
            BufferedImage image = new BufferedImage(matrix.width(),
               matrix.height(), BufferedImage.TYPE_3BYTE_BGR);

            WritableRaster raster = image.getRaster();
            DataBufferByte dataBuffer = (DataBufferByte) raster.getDataBuffer();
            byte[] data = dataBuffer.getData();
            matrix.get(0, 0, data);
            this.matrix = matrix;

            // Creating the Writable Image
            WritableImage = SwingFXUtils.toFXImage(image, null);
         }
      }
      return WritableImage;
   }
   public void saveImage() {
      // Saving the Image
      String file = "E:/OpenCV/chap22/sanpshot.jpg";

      // Instantiating the imgcodecs class
      Imgcodecs imageCodecs = new Imgcodecs();

      // Saving it again
      imageCodecs.imwrite(file, matrix);
   }
   public static void main(String args[]) {
      launch(args);
   }
}
输出
执行程序后,您将获得以下输出。
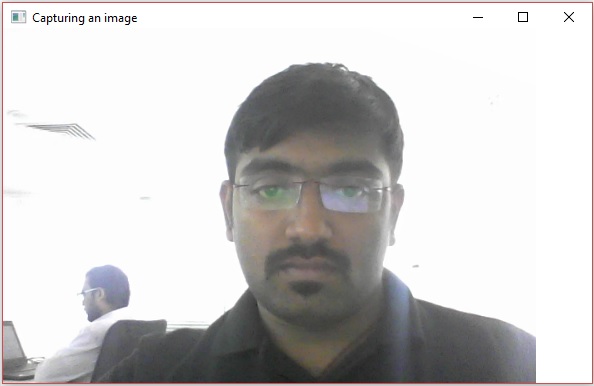
如果您打开指定的路径,您可以看到保存为jpg文件的相同帧。
OpenCV - 图片中的人脸检测
org.opencv.videoio包的VideoCapture类包含使用系统摄像头捕获视频的类和方法。让我们一步一步地学习如何做到这一点。
步骤 1:加载 OpenCV 原生库
使用 OpenCV 库编写 Java 代码时,第一步需要使用loadLibrary()加载 OpenCV 的原生库。如下所示加载 OpenCV 原生库。
// Loading the core library
System.loadLibrary(Core.NATIVE_LIBRARY_NAME);
步骤2:实例化CascadeClassifier类
org.opencv.objdetect包的CascadeClassifier类用于加载分类器文件。通过传递xml文件lbpcascade_frontalface.xml来实例化此类,如下所示。
// Instantiating the CascadeClassifier
String xmlFile = "E:/OpenCV/facedetect/lbpcascade_frontalface.xml";
CascadeClassifier classifier = new CascadeClassifier(xmlFile);
步骤3:检测人脸
您可以使用名为CascadeClassifier类的detectMultiScale()方法检测图像中的人脸。此方法接受持有输入图像的Mat类对象和MatOfRect类对象来存储检测到的人脸。
// Detecting the face in the snap
MatOfRect faceDetections = new MatOfRect();
classifier.detectMultiScale(src, faceDetections);
示例
以下程序演示如何在图像中检测人脸。
import org.opencv.core.Core;
import org.opencv.core.Mat;
import org.opencv.core.MatOfRect;
import org.opencv.core.Point;
import org.opencv.core.Rect;
import org.opencv.core.Scalar;

import org.opencv.imgcodecs.Imgcodecs;
import org.opencv.imgproc.Imgproc;
import org.opencv.objdetect.CascadeClassifier;

public class FaceDetectionImage {
   public static void main (String[] args) {
      // Loading the OpenCV core library
      System.loadLibrary( Core.NATIVE_LIBRARY_NAME );

      // Reading the Image from the file and storing it in to a Matrix object
      String file ="E:/OpenCV/chap23/facedetection_input.jpg";
      Mat src = Imgcodecs.imread(file);

      // Instantiating the CascadeClassifier
      String xmlFile = "E:/OpenCV/facedetect/lbpcascade_frontalface.xml";
      CascadeClassifier classifier = new CascadeClassifier(xmlFile);

      // Detecting the face in the snap
      MatOfRect faceDetections = new MatOfRect();
      classifier.detectMultiScale(src, faceDetections);
      System.out.println(String.format("Detected %s faces",
         faceDetections.toArray().length));

      // Drawing boxes
      for (Rect rect : faceDetections.toArray()) {
         Imgproc.rectangle(
            src,                                               // where to draw the box
            new Point(rect.x, rect.y),                            // bottom left
            new Point(rect.x + rect.width, rect.y + rect.height), // top right
            new Scalar(0, 0, 255),
            3                                                     // RGB colour
         );
      }

      // Writing the image
      Imgcodecs.imwrite("E:/OpenCV/chap23/facedetect_output1.jpg", src);

      System.out.println("Image Processed");
   }
}
假设以上程序中指定的输入图像为facedetection_input.jpg。
输出
执行程序后,您将获得以下输出:
Detected 3 faces
Image Processed
如果您打开指定的路径,您可以观察到如下所示的输出图像:
OpenCV - 使用摄像头进行人脸检测
以下程序演示如何使用系统摄像头检测人脸并使用JavaFX窗口显示它。
示例
import java.awt.image.BufferedImage;
import java.awt.image.DataBufferByte;
import java.awt.image.WritableRaster;

import java.io.FileNotFoundException;
import java.io.IOException;

import javafx.application.Application;
import javafx.embed.swing.SwingFXUtils;
import javafx.scene.Group;
import javafx.scene.Scene;
import javafx.scene.image.ImageView;
import javafx.scene.image.WritableImage;
import javafx.stage.Stage;

import org.opencv.core.Core;
import org.opencv.core.Mat;
import org.opencv.core.MatOfRect;
import org.opencv.core.Point;
import org.opencv.core.Rect;
import org.opencv.core.Scalar;
import org.opencv.imgcodecs.Imgcodecs;
import org.opencv.imgproc.Imgproc;
import org.opencv.objdetect.CascadeClassifier;
import org.opencv.videoio.VideoCapture;

public class faceDetectionJavaFXX extends Application {
   Mat matrix = null;

   @Override
   public void start(Stage stage) throws FileNotFoundException, IOException {
      // Capturing the snapshot from the camera
      faceDetectionJavaFXX obj = new faceDetectionJavaFXX();
      WritableImage writableImage = obj.capureFrame();

      // Saving the image
      obj.saveImage();

      // Setting the image view
      ImageView imageView = new ImageView(writableImage);

      // setting the fit height and width of the image view
      imageView.setFitHeight(400);
      imageView.setFitWidth(600);

      // Setting the preserve ratio of the image view
      imageView.setPreserveRatio(true);

      // Creating a Group object
      Group root = new Group(imageView);

      // Creating a scene object
      Scene scene = new Scene(root, 600, 400);

      // Setting title to the Stage
      stage.setTitle("Capturing an image");

      // Adding scene to the stage
      stage.setScene(scene);

      // Displaying the contents of the stage
      stage.show();
   }
   public WritableImage capureFrame() {
      WritableImage writableImage = null;

      // Loading the OpenCV core library
      System.loadLibrary( Core.NATIVE_LIBRARY_NAME );

      // Instantiating the VideoCapture class (camera:: 0)
      VideoCapture capture = new VideoCapture(0);

      // Reading the next video frame from the camera
      Mat matrix = new Mat();
      capture.read(matrix);

      // If camera is opened
      if(!capture.isOpened()) {
         System.out.println("camera not detected");
      } else
         System.out.println("Camera detected ");

      // If there is next video frame
      if (capture.read(matrix)) {
         /////// Detecting the face in the snap /////
         String file = "E:/OpenCV/facedetect/lbpcascade_frontalface.xml";
         CascadeClassifier classifier = new CascadeClassifier(file);

         MatOfRect faceDetections = new MatOfRect();
         classifier.detectMultiScale(matrix, faceDetections);
         System.out.println(String.format("Detected %s faces",
            faceDetections.toArray().length));

         // Drawing boxes
         for (Rect rect : faceDetections.toArray()) {
            Imgproc.rectangle(
               matrix,                                   //where to draw the box
               new Point(rect.x, rect.y),                            //bottom left
               new Point(rect.x + rect.width, rect.y + rect.height), //top right
               new Scalar(0, 0, 255)                                 //RGB colour
            );
         }
         // Creating BuffredImage from the matrix
         BufferedImage image = new BufferedImage(matrix.width(), matrix.height(),
            BufferedImage.TYPE_3BYTE_BGR);

         WritableRaster raster = image.getRaster();
         DataBufferByte dataBuffer = (DataBufferByte) raster.getDataBuffer();
         byte[] data = dataBuffer.getData();
         matrix.get(0, 0, data);

         this.matrix = matrix;

         // Creating the Writable Image
         writableImage = SwingFXUtils.toFXImage(image, null);
      }
      return writableImage;
   }
   public void saveImage() {
      // Saving the Image
      String file = "E:/OpenCV/chap23/facedetected.jpg";

      // Instantiating the imagecodecs class
      Imgcodecs imageCodecs = new Imgcodecs();

      // Saving it again
      imageCodecs.imwrite(file, matrix);
   }
   public static void main(String args[]) {
      launch(args);
   }
}
输出
执行程序后,您将获得以下输出。
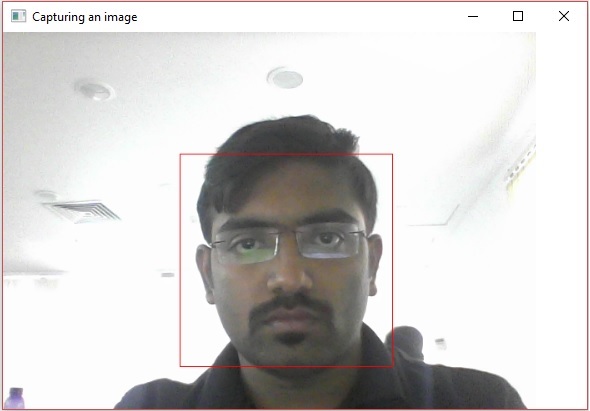
如果您打开指定的路径,您可以看到保存为jpg图像的相同快照。
OpenCV - 仿射变换(平移)
您可以使用imgproc类的warpAffine()方法对图像执行仿射变换。以下是此方法的语法:
Imgproc.warpAffine(src, dst, tranformMatrix, size);
此方法接受以下参数 −
src − 一个Mat对象,代表此操作的源(输入图像)。
dst − 一个Mat对象,代表此操作的目标(输出图像)。
tranformMatrix − 一个Mat对象,表示变换矩阵。
size − 一个整型变量,表示输出图像的大小。
示例
以下程序演示如何在给定图像上应用仿射操作。
import org.opencv.core.Core;
import org.opencv.core.Mat;
import org.opencv.core.MatOfPoint2f;
import org.opencv.core.Point;
import org.opencv.core.Size;
import org.opencv.imgcodecs.Imgcodecs;
import org.opencv.imgproc.Imgproc;

public class AffineTranslation {
   public static void main(String args[]) {
      // Loading the OpenCV core library
      System.loadLibrary( Core.NATIVE_LIBRARY_NAME );

      // Reading the Image from the file and storing it in to a Matrix object
      String file ="E:/OpenCV/chap24/transform_input.jpg";
      Mat src = Imgcodecs.imread(file);

      //Creating an empty matrix to store the result
      Mat dst = new Mat();

      Point p1 = new Point( 0,0 );
      Point p2 = new Point( src.cols() - 1, 0 );
      Point p3 = new Point( 0, src.rows() - 1 );
      Point p4 = new Point( src.cols()*0.0, src.rows()*0.33 );
      Point p5 = new Point( src.cols()*0.85, src.rows()*0.25 );
      Point p6 = new Point( src.cols()*0.15, src.rows()*0.7 );

      MatOfPoint2f ma1 = new MatOfPoint2f(p1,p2,p3);
      MatOfPoint2f ma2 = new MatOfPoint2f(p4,p5,p6);

      // Creating the transformation matrix
      Mat tranformMatrix = Imgproc.getAffineTransform(ma1,ma2);

      // Creating object of the class Size
      Size size = new Size(src.cols(), src.cols());

      // Applying Wrap Affine
      Imgproc.warpAffine(src, dst, tranformMatrix, size);

      // Writing the image
      Imgcodecs.imwrite("E:/OpenCV/chap24/Affinetranslate.jpg", dst);

      System.out.println("Image Processed");
   }
}
假设以上程序中指定的输入图像为transform_input.jpg。

输出
执行后,您将获得以下输出:
Image Processed
如果您打开指定的路径,您可以观察到如下所示的输出图像:
OpenCV - 旋转
可以使用imgproc类的warpAffine()方法对图像进行旋转操作。以下是此方法的语法:
Imgproc.warpAffine(src, dst, rotationMatrix, size);
此方法接受以下参数 −
src − 一个Mat对象,代表此操作的源(输入图像)。
dst − 一个Mat对象,代表此操作的目标(输出图像)。
rotationMatrix − 表示旋转矩阵的Mat对象。
size − 一个整型变量,表示输出图像的大小。
示例
下面的程序演示了如何旋转图像。
import org.opencv.core.Core;
import org.opencv.core.Mat;
import org.opencv.core.Point;
import org.opencv.core.Size;

import org.opencv.imgcodecs.Imgcodecs;
import org.opencv.imgproc.Imgproc;

public class Rotation {
   public static void main(String args[]) {
      // Loading the OpenCV core library
      System.loadLibrary( Core.NATIVE_LIBRARY_NAME );

      // Reading the Image from the file and storing it in to a Matrix object
      String file ="E:/OpenCV/chap24/transform_input.jpg";
      Mat src = Imgcodecs.imread(file);

      // Creating an empty matrix to store the result
      Mat dst = new Mat();

      // Creating a Point object
      Point point = new Point(300, 200)

      // Creating the transformation matrix M
      Mat rotationMatrix = Imgproc.getRotationMatrix2D(point, 30, 1);

      // Creating the object of the class Size
      Size size = new Size(src.cols(), src.cols());

      // Rotating the given image
      Imgproc.warpAffine(src, dst, rotationMatrix, size);

      // Writing the image
      Imgcodecs.imwrite("E:/OpenCV/chap24/rotate_output.jpg", dst);

      System.out.println("Image Processed");
   }
}
假设以上程序中指定的输入图像为transform_input.jpg。
输出
执行程序后,您将获得以下输出:
Image Processed
如果您打开指定的路径,您可以观察到如下所示的输出图像:
OpenCV - 缩放
可以使用imgproc类的resize()方法对图像进行缩放。以下是此方法的语法。
resize(Mat src, Mat dst, Size dsize, double fx, double fy, int interpolation)
此方法接受以下参数 −
src − 一个Mat对象,代表此操作的源(输入图像)。
dst − 一个Mat对象,代表此操作的目标(输出图像)。
dsize − 表示输出图像大小的Size对象。
fx − 一个double类型的变量,表示水平方向的缩放因子。
fy − 一个double类型的变量,表示垂直方向的缩放因子。
Interpolation − 一个整型变量,表示插值方法。
示例
下面的程序演示了如何将缩放变换应用于图像。
import org.opencv.core.Core;
import org.opencv.core.Mat;
import org.opencv.core.Size;

import org.opencv.imgcodecs.Imgcodecs;
import org.opencv.imgproc.Imgproc;

public class Scaling {
   public static void main(String args[]) {
      // Loading the OpenCV core library
      System.loadLibrary( Core.NATIVE_LIBRARY_NAME );

      // Reading the Image from the file and storing it in to a Matrix object
      String file ="E:/OpenCV/chap24/transform_input.jpg";
      Mat src = Imgcodecs.imread(file);

      // Creating an empty matrix to store the result
      Mat dst = new Mat();

      // Creating the Size object
      Size size = new Size(src.rows()*2, src.rows()*2);

      // Scaling the Image
      Imgproc.resize(src, dst, size, 0, 0, Imgproc.INTER_AREA);

      // Writing the image
      Imgcodecs.imwrite("E:/OpenCV/chap24/scale_output.jpg", dst);

      System.out.println("Image Processed");
   }
}
假设上面程序中指定的输入图像为transform_input.jpg(大小:宽度300像素,高度300像素)。
输出
执行程序后,您将获得以下输出:
Image Processed
如果打开指定的路径,您可以看到输出图像如下所示(大小:宽度600像素,高度600像素):

OpenCV - 颜色映射
在OpenCV中,您可以使用Imgproc类的applyColorMap()方法将不同的颜色映射应用于图像。以下是此方法的语法:
applyColorMap(Mat src, Mat dst, int colormap)
它接受三个参数:
src − 一个Mat类对象,代表源(输入)图像。
dst − 一个Mat类对象,代表目标(输出)图像。
colormap − 一个整型变量,表示要应用的颜色映射类型。
示例
下面的程序演示了如何将颜色映射应用于图像。
import org.opencv.core.Core;
import org.opencv.core.Mat;

import org.opencv.imgcodecs.Imgcodecs;
import org.opencv.imgproc.Imgproc;

public class ColorMapTest {
   public static void main(String args[]) {
      // Loading the OpenCV core library
      System.loadLibrary(Core.NATIVE_LIBRARY_NAME);

      // Reading the Image from the file and storing it in to a Matrix object
      String file ="E:/OpenCV/chap25/color_input.jpg";
      Mat src = Imgcodecs.imread(file);

      // Creating an empty matrix to store the result
      Mat dst = new Mat();

      // Applying color map to an image
      Imgproc.applyColorMap(src, dst, Imgproc.COLORMAP_HOT);

      // Writing the image
      Imgcodecs.imwrite("E:/OpenCV/chap25/colormap_hot.jpg", dst);
      System.out.println("Image processed");
   }
}
假设上面程序中指定的输入图像为color_input.jpg。
输出
执行上述程序后,您将获得以下输出 −
Image Processed
如果您打开指定的路径,您可以观察到如下所示的输出图像:

更多操作
除了前面示例中演示的COLORMAP_HOT之外,OpenCV还提供了各种其他类型的颜色映射。所有这些类型都由Imgproc类的预定义静态字段(固定值)表示。
您可以通过将相应的预定义值传递给applyColorMap()方法的colormap参数来选择所需的颜色映射类型。
Imgproc.applyColorMap(src, dst, Imgproc.COLORMAP_HOT);
以下是表示各种颜色映射类型及其相应输出的值。
| 操作和描述 | 输出 |
|---|---|
| COLORMAP_AUTUMN |  |
| COLORMAP_BONE |  |
| COLORMAP_COOL |  |
| COLORMAP_HOT |  |
| COLORMAP_HSV |  |
| COLORMAP_JET |  |
| COLORMAP_OCEAN |  |
| COLORMAP_PARULA |  |
| COLORMAP_PINK |  |
| COLORMAP_RAINBOW |  |
| COLORMAP_SPRING |  |
| COLORMAP_SUMMER |  |
| COLORMAP_WINTER |  |
OpenCV - Canny 边缘检测
Canny边缘检测用于检测图像中的边缘。它接受灰度图像作为输入,并使用多阶段算法。
您可以使用imgproc类的Canny()方法对图像执行此操作,以下是此方法的语法。
Canny(image, edges, threshold1, threshold2)
此方法接受以下参数 −
image − 表示此操作的源(输入图像)的Mat对象。
edges − 表示此操作的目标(边缘)的Mat对象。
threshold1 − 一个double类型的变量,表示滞后过程的第一个阈值。
threshold2 − 一个double类型的变量,表示滞后过程的第二个阈值。
示例
下面的程序是一个示例,演示了如何在给定图像上执行Canny边缘检测操作。
import org.opencv.core.Core;
import org.opencv.core.Mat;

import org.opencv.imgcodecs.Imgcodecs;
import org.opencv.imgproc.Imgproc;

public class CannyEdgeDetection {
   public static void main(String args[]) throws Exception {
      // Loading the OpenCV core library
      System.loadLibrary(Core.NATIVE_LIBRARY_NAME);

      // Reading the Image from the file and storing it in to a Matrix object
      String file = "E:/OpenCV/chap17/canny_input.jpg";

      // Reading the image
      Mat src = Imgcodecs.imread(file);

      // Creating an empty matrix to store the result
      Mat gray = new Mat();

      // Converting the image from color to Gray
      Imgproc.cvtColor(src, gray, Imgproc.COLOR_BGR2GRAY);
      Mat edges = new Mat();

      // Detecting the edges
      Imgproc.Canny(gray, edges, 60, 60*3);

      // Writing the image
      Imgcodecs.imwrite("E:/OpenCV/chap17/canny_output.jpg", edges);
      System.out.println("Image Loaded");
   }
}
假设上面程序中指定的输入图像为canny_input.jpg。
输出
执行上述程序后,您将获得以下输出 −
Image Processed
如果您打开指定的路径,您可以观察到如下所示的输出图像:
OpenCV - Hough 线变换
您可以通过使用Imgproc类的HoughLines()方法应用霍夫变换技术来检测给定图像的形状。以下是此方法的语法。
HoughLines(image, lines, rho, theta, threshold)
此方法接受以下参数 −
image − 表示源(输入)图像的Mat类对象。
lines − 一个存储存储线的参数 (r, Φ) 的向量的Mat类对象。
rho − 一个double类型的变量,表示参数r的分辨率(以像素为单位)。
theta − 一个double类型的变量,表示参数Φ的分辨率(以弧度为单位)。
threshold − 一个整型变量,表示检测一条线的最小交叉点数量。
示例
下面的程序演示了如何在给定图像中检测霍夫线。
import org.opencv.core.Core;
import org.opencv.core.Mat;
import org.opencv.core.Point;
import org.opencv.core.Scalar;

import org.opencv.imgcodecs.Imgcodecs;
import org.opencv.imgproc.Imgproc;

public class HoughlinesTest {
   public static void main(String args[]) throws Exception {
      // Loading the OpenCV core library
      System.loadLibrary( Core.NATIVE_LIBRARY_NAME );

      // Reading the Image from the file and storing it in to a Matrix object
      String file = "E:/OpenCV/chap21/hough_input.jpg";

      // Reading the image
      Mat src = Imgcodecs.imread(file,0);

      // Detecting edges of it
      Mat canny = new Mat();
      Imgproc.Canny(src, canny, 50, 200, 3, false);

      // Changing the color of the canny
      Mat cannyColor = new Mat();
      Imgproc.cvtColor(canny, cannyColor, Imgproc.COLOR_GRAY2BGR);

      // Detecting the hough lines from (canny)
      Mat lines = new Mat();
      Imgproc.HoughLines(canny, lines, 1, Math.PI/180, 100);

      System.out.println(lines.rows());
      System.out.println(lines.cols());

      // Drawing lines on the image
      double[] data;
      double rho, theta;
      Point pt1 = new Point();
      Point pt2 = new Point();
      double a, b;
      double x0, y0;

      for (int i = 0; i < lines.cols(); i++) {
         data = lines.get(0, i);
         rho = data[0];
         theta = data[1];

         a = Math.cos(theta);
         b = Math.sin(theta);
         x0 = a*rho;
         y0 = b*rho;

         pt1.x = Math.round(x0 + 1000*(-b));
         pt1.y = Math.round(y0 + 1000*(a));
         pt2.x = Math.round(x0 - 1000*(-b));
         pt2.y = Math.round(y0 - 1000 *(a));
         Imgproc.line(cannyColor, pt1, pt2, new Scalar(0, 0, 255), 6);
      }
      // Writing the image
      Imgcodecs.imwrite("E:/OpenCV/chap21/hough_output.jpg", cannyColor);

      System.out.println("Image Processed");
   }
}
假设上面程序中指定的输入图像为hough_input.jpg。
输出
执行程序后,您将获得以下输出:
143
1
Image Processed
如果您打开指定的路径,您可以观察到如下所示的输出图像:

OpenCV - 直方图均衡化
图像的直方图显示了像素强度值的频率。在图像直方图中,X轴显示灰度强度,Y轴显示这些强度的频率。
直方图均衡化提高了图像的对比度,以扩展强度范围。您可以使用Imgproc类的equalizeHist()方法均衡给定图像的直方图。以下是此方法的语法。
equalizeHist(src, dst)
此方法接受以下参数 −
src − 一个Mat类对象,代表源(输入)图像。
dst − 表示输出的Mat类对象。(均衡直方图后获得的图像)
示例
下面的程序演示了如何均衡给定图像的直方图。
import java.util.ArrayList;
import java.util.List;

import org.opencv.core.Core;
import org.opencv.core.Mat;
import org.opencv.core.Size;
import org.opencv.imgcodecs.Imgcodecs;
import org.opencv.imgproc.Imgproc;

public class HistoTest {
   public static void main (String[] args) {
      // Loading the OpenCV core library
      System.loadLibrary( Core.NATIVE_LIBRARY_NAME );

      // Reading the Image from the file and storing it in to a Matrix object
      String file ="E:/OpenCV/chap20/histo_input.jpg";

      // Load the image
      Mat img = Imgcodecs.imread(file);

      // Creating an empty matrix
      Mat equ = new Mat();
      img.copyTo(equ);

      // Applying blur
      Imgproc.blur(equ, equ, new Size(3, 3));

      // Applying color
      Imgproc.cvtColor(equ, equ, Imgproc.COLOR_BGR2YCrCb);
      List<Mat> channels = new ArrayList<Mat>();

      // Splitting the channels
      Core.split(equ, channels);

      // Equalizing the histogram of the image
      Imgproc.equalizeHist(channels.get(0), channels.get(0));
      Core.merge(channels, equ);
      Imgproc.cvtColor(equ, equ, Imgproc.COLOR_YCrCb2BGR);

      Mat gray = new Mat();
      Imgproc.cvtColor(equ, gray, Imgproc.COLOR_BGR2GRAY);
      Mat grayOrig = new Mat();
      Imgproc.cvtColor(img, grayOrig, Imgproc.COLOR_BGR2GRAY);

      Imgcodecs.imwrite("E:/OpenCV/chap20/histo_output.jpg", equ);
      System.out.println("Image Processed");
   }
}
假设上面程序中指定的输入图像为histo_input.jpg。
输出
执行程序后,您将获得以下输出:
Image Processed
如果您打开指定的路径,您可以观察到如下所示的输出图像: