
- Pygame 教程
- Pygame - 首页
- Pygame - 概述
- Pygame - Hello World
- Pygame - 显示模式
- Pygame - Locals 模块
- Pygame - 颜色对象
- Pygame - 事件对象
- Pygame - 键盘事件
- Pygame - 鼠标事件
- Pygame - 绘制图形
- Pygame - 加载图像
- Pygame - 在窗口中显示文本
- Pygame - 移动图像
- Pygame - 使用数字键盘移动
- Pygame - 使用鼠标移动
- Pygame - 移动矩形物体
- Pygame - 使用文本作为按钮
- Pygame - 图像变换
- Pygame - 音效对象
- Pygame - 混音器通道
- Pygame - 播放音乐
- Pygame - 播放视频
- Pygame - 使用摄像头模块
- Pygame - 加载光标
- Pygame - 访问 CDROM
- Pygame - 精灵模块
- Pygame - PyOpenGL
- Pygame - 错误和异常
- Pygame 有用资源
- Pygame 快速指南
- Pygame - 有用资源
- Pygame - 讨论
Pygame 快速指南
Pygame - 概述
Pygame 是一个流行的 Python 库,用于开发视频游戏。它是一个免费、开源且跨平台的 Simple DirectMedia Library (SDL) 封装库。Pygame 提供的 SDL 函数抽象使得使用 Python 开发多媒体应用程序变得非常容易。
Pygame 最初由 Peter Shinners、Lenard Lindstrom、René Dudfield 和其他人于 2000 年 10 月开发,最新版本为 2.0.1,于 2020 年 12 月发布。除了 SDL 功能外,Pygame 还提供其他功能,例如矢量数学、碰撞检测、摄像头和 MIDI 支持等。Pygame 应用程序也可以在基于 Android 的手机上使用。
环境设置
在任何机器上安装 Pygame 最简单的方法是使用标准 Python 发行版附带的 PIP 安装程序。确保您拥有最新版本的 pip。建议使用以下命令在新虚拟环境中安装 Pygame:
pip3 install pygame
对于树莓派,Pygame 在 Raspbian Linux 发行版中预安装。至于在 MacOS 上的安装,较新的版本需要 Pygame 2.0。许多 Linux 版本都提供了预构建的二进制软件包。可以使用相应的包管理器实用程序安装它们。
对于 Ubuntu,命令如下:
sudo apt-get install pygame
对于 Fedora,命令如下:
sudo yum install pygame
也可以编译 Pygame 的源代码(可在 https://github.com/pygame/pygame) 上找到)并在目标操作系统上安装,方法是使用相应的 C/C++ 编译器和 Python 的 setuptools 库。
要验证 Pygame 是否已成功安装,请尝试导入 pygame 包并检查其版本。
(pygmenv) C:\pygmenv>python
Python 3.7.4 (tags/v3.7.4:e09359112e, Jul 8 2019, 20:34:20) [MSC v.1916 64 bit (AMD64)] on win32
Type "help", "copyright", "credits" or "license" for more information.
>>> import pygame
pygame 2.0.1 (SDL 2.0.14, Python 3.7.4)
Hello from the pygame community. https://www.pygame.org/contribute.html
Pygame 库包含以下模块:
| pygame._sdl2.touch | 用于处理触摸输入 |
| pygame.camera | 摄像头使用 |
| pygame.cdrom | 音频 CDROM 控制 |
| pygame.cursors | 光标资源 |
| pygame.display | 控制显示窗口和屏幕 |
| pygame.draw | 绘制图形 |
| pygame.event | 与事件和队列交互 |
| pygame.examples | 示例程序模块 |
| pygame.fastevent | 从多个线程与事件和队列交互。 |
| pygame.font | 加载和渲染字体 |
| pygame.freetype | 加载和渲染计算机字体 |
| pygame.gfxdraw | 绘制图形 |
| pygame.image | 图像传输 |
| pygame.joystick | 与操纵杆、游戏手柄和轨迹球交互。 |
| pygame.key | 用于处理键盘 |
| pygame.locals | Pygame 常量 |
| pygame.mask | 图像蒙版。 |
| pygame.math | 向量类 |
| pygame.midi | 与 MIDI 输入和输出交互。 |
| pygame.mixer | 加载和播放声音 |
| pygame.mixer.music | 控制流式音频 |
| pygame.mouse | 用于处理鼠标 |
| pygame.pixelcopy | 通用像素数组复制 |
| pygame.scrap | 剪贴板支持。 |
| pygame.sndarray | 访问声音样本数据 |
| pygame.sprite | 基本游戏对象类 |
| pygame.surfarray | 使用数组接口访问表面像素数据 |
| pygame.tests | 单元测试套件包 |
| pygame.time | 监控时间 |
| pygame.transform | 变换表面 |
Pygame - Hello World
第一步是使用 init() 函数导入并初始化 pygame 模块。
import pygame
pygame.init()
现在我们设置首选大小的 Pygame 显示窗口,并为其提供标题。
screen = pygame.display.set_mode((640, 480))
pygame.display.set_caption("Hello World")
这将呈现一个游戏窗口,需要将其置于无限事件循环中。用户交互(如鼠标移动和点击等)生成的所有事件对象都存储在事件队列中。当拦截到 pygame.QUIT 时,我们将终止事件循环。当用户点击标题栏上的关闭按钮时,会生成此事件。
while True:
   for event in pygame.event.get():
      if event.type == pygame.QUIT:
         pygame.quit()
显示带有 Hello World 标题的 Pygame 窗口的完整代码如下:
import pygame, sys

pygame.init()
screen = pygame.display.set_mode((640, 480))
pygame.display.set_caption("Hello World")
while True:
   for event in pygame.event.get():
      if event.type == pygame.QUIT:
         pygame.quit()
         sys.exit()
将以上脚本保存为 hello.py 并运行,以获得以下输出:

只有当点击关闭 (X) 按钮时,此窗口才会关闭。
Pygame - 显示模式
如上例所示,显示表面由 pygame.display 模块中定义的 set_mode() 函数创建。
pygame.display.set_mode(size, flags, depth, display, vsync)
size 参数是以像素为单位的宽度和高度的元组。如果未设置大小,则表面将具有当前分辨率的大小。
flags 参数控制以下预定义常量表示的显示类型:
| pygame.FULLSCREEN | 创建全屏显示 |
| pygame.DOUBLEBUF | 推荐用于 HWSURFACE 或 OPENGL |
| pygame.HWSURFACE | 硬件加速,仅在 FULLSCREEN 中 |
| pygame.OPENGL | 创建可渲染 OpenGL 的显示 |
| pygame.RESIZABLE | 显示窗口应可调整大小 |
| pygame.NOFRAME | 显示窗口将没有边框或控件 |
| pygame.SCALED | 分辨率取决于桌面大小并缩放图形 |
| pygame.SHOWN | 窗口以可见模式打开(默认) |
| pygame.HIDDEN | 窗口以隐藏模式打开 |
如果将 vsync 参数设置为 1,则可以获得具有垂直同步的显示,但不能保证一定能获得。该请求仅对使用 pygame.OPENGL 或 pygame.SCALED 标志调用 set_mode() 时才有效。
显示索引 0 表示使用默认显示。Depth 参数将默认为系统最佳和最快的颜色深度。对于给定的宽度和高度,Pygame 将从 list_modes() 中选择可用的最佳模式。
>>> print (pygame.display.list_modes())
[(1366, 768), (1360, 768), (1280, 768), (1280, 720), (1024, 768), (800, 600), (640, 480)]
pygame.display.mode_ok()
此函数选择显示模式的最佳颜色深度。它用于确定请求的显示模式是否可用。如果无法设置显示模式,它将返回 0。否则,它将返回与请求的显示最匹配的像素深度。
pygame.display.update()
此函数将更新整个显示的内容。
Pygame - Locals 模块
此模块包含 Pygame 应用程序中经常使用的各种常量的定义。虽然这些常量在各自的模块中定义,但从 locals 模块使用它们会更容易。
例如,键盘或鼠标事件(如 KEYDOWN 或 MOUSEBUTTONDOWN)分别定义为 pygame.key.KEYDOWN 或 pygame.mouse.MOUSEBUTTON,通过从 locals 模块导入,可以使用这些常量而不限定模块名称。
在这里,我们使用 locals 模块中的 QUIT 事件。
import pygame,sys
from pygame.locals import *
pygame.init()
canvas=pygame.display.set_mode((400,300))
pygame.display.set_caption("Hello")
canvas.fill((0,0,0))
while True:
   for event in pygame.event.get():
      if(event.type == QUIT):
         pygame.quit()
            sys.exit(1)
Pygame - 颜色对象
Pygame 中的 Color 类用于表示屏幕背景、文本、图形和所有其他 Pygame 对象的颜色。它通过传递红色、绿色、蓝色颜色的颜色值以及可选的表示不透明值的 alpha 值来构造。这些值中的每一个都在 0 到 255 之间。
color = pygame.Color(r, g, b, a=255)
alpha 的默认值为 255,表示完全不透明。可以访问各个属性并进行设置。
| pygame.Color.r | 获取或设置颜色的红色值。 |
| pygame.Color.g | 获取或设置颜色的绿色值。 |
| pygame.Color.b | 获取或设置颜色的蓝色值。 |
| pygame.Color.a | 获取或设置颜色的 alpha 值。 |
也可以使用 CMY、HSVA、HSLA 和 i1i2i3 等替代颜色模型。
| pygame.Color.cmy | 获取或设置颜色的 CMY 表示形式。青色、品红色、黄色 |
| pygame.Color.hsva | 获取或设置颜色的 HSVA 表示形式。色相、饱和度、明度 |
| pygame.Color.hsla | 获取或设置颜色的 HSLA 表示形式。色相、饱和度、亮度 |
| pygame.Color.i1i2i3 | 获取或设置颜色的 I1I2I3 表示形式。 |
我们可以使用预定义的字符串常量来表示 RGBA 颜色组合。一些预定义的颜色列在下面:
- 'black': (0, 0, 0, 255)
- 'blue': (0, 0, 255, 255),
- 'cyan': (0, 255, 255, 255),
- 'gold': (255, 215, 0, 255),
- 'gray': (190, 190, 190, 255),
- 'green': (0, 255, 0, 255),
- 'orange': (255, 165, 0, 255),
- 'purple': (160, 32, 240, 255),
- 'red': (255, 0, 0, 255),
- 'violet': (238, 130, 238, 255)
- 'yellow': (255, 255, 0, 255),
- 'white': (255, 255, 255, 255)
要列出所有预定义的颜色,请运行以下 for 循环:
for k, v in THECOLORS.items():
   THECOLORS[unicode_(k)] = v
Pygame - 事件对象
所有事件都是 pygame.event.EventType 类的实例。Pygame 识别以下事件类型:
| 事件类型 | 属性 |
|---|---|
| QUIT | 无 |
| ACTIVEEVENT | gain, state |
| KEYDOWN | unicode, key, mod |
| KEYUP | key, mod |
| MOUSEMOTION | pos, rel, buttons |
| MOUSEBUTTONUP | pos, button |
| MOUSEBUTTONDOWN | pos, button |
| JOYAXISMOTION | joy, axis, value |
| JOYBALLMOTION | joy, ball, rel |
| JOYHATMOTION | joy, hat, value |
| JOYBUTTONUP | joy, button |
| JOYBUTTONDOWN | joy, button |
| VIDEORESIZE | size, w, h |
| VIDEOEXPOSE | 无 |
| USEREVENT | Code |
Pygame - 键盘事件
Pygame 识别 KEYUP 和 KEYDOWN 事件。pygame.key 模块定义了用于处理键盘交互的有用函数。当按键按下和释放时,pygame.KEYDOWN 和 pygame.KEYUP 事件会被插入事件队列。key 属性是一个整数 ID,表示键盘上的每个按键。
import pygame, sys
pygame.init()
screen = pygame.display.set_mode((640, 480))
pygame.display.set_caption("Hello World")
while True:
   for event in pygame.event.get():
      if event.type == pygame.QUIT:
         pygame.quit()
         sys.exit()
      if event.type == pygame.KEYDOWN:
         key=pygame.key.name(event.key)
         print (key, "Key is pressed")
      if event.type == pygame.KEYUP:
         key=pygame.key.name(event.key)
         print (key, "Key is released")
运行上述代码,并在 Pygame 窗口处于活动状态时按下各种按键。以下是 Python 控制台上的示例输出。
q Key is pressed
q Key is released
right shift Key is released
1 Key is pressed
1 Key is released
enter Key is pressed
enter Key is released
backspace Key is pressed
backspace Key is released
x Key is pressed
x Key is released
home Key is pressed
home Key is released
f1 Key is pressed
f1 Key is released
left Key is pressed
left Key is released
right Key is pressed
right Key is released
up Key is pressed
up Key is released
down Key is pressed
down Key is released
如我们所见,event.key 属性返回与每个按键关联的唯一标识符。在游戏场景中,左右、上下箭头键经常被使用。如果检测到特定的按键按下,我们可以编写相应的逻辑。
pygame.key 模块中其他有用的属性如下所示:
| pygame.key.get_pressed | 获取所有键盘按钮的状态 |
| pygame.key.get_mods | 确定哪些修饰键被按下 |
| pygame.key.set_repeat | 控制按住的按键如何重复 |
| pygame.key.get_repeat | 查看按住的按键如何重复 |
| pygame.key.name | 获取按键标识符的名称 |
| pygame.key.key_code | 根据按键名称获取按键标识符 |
| pygame.key.start_text_input | 开始处理 Unicode 文本输入事件 |
| pygame.key.stop_text_input | 停止处理 Unicode 文本输入事件 |
Pygame - 鼠标事件
Pygame 识别三种鼠标事件,即 MOUSEMOTION、MOUSEBUTTONUP 和 MOUSEBUTTONDOWN。相应的事件对象返回鼠标按下/释放时位置的坐标和按钮编号。
例如,MOUSEBUTTONDOWN 事件对象将显示以下结果:
<Event(1025-MouseButtonDown {'pos': (398, 328), 'button': 1, 'window': None})>
示例
要获取按钮按下位置的坐标,我们可以使用与事件对象关联的 get_pos() 函数。
import pygame, sys

pygame.init()
screen = pygame.display.set_mode((640, 480))
pygame.display.set_caption("Hello World")
while True:
   for event in pygame.event.get():
      if event.type == pygame.QUIT:
         pygame.quit()
         sys.exit()
      if event.type == pygame.MOUSEBUTTONDOWN:
         pos=pygame.mouse.get_pos()
         btn=pygame.mouse
         print ("x = {}, y = {}".format(pos[0], pos[1]))
输出
运行上述代码,并在游戏窗口的随机位置按下鼠标按钮。
x = 192, y = 160
x = 419, y = 245
x = 204, y = 405
x = 449, y = 17
x = 12, y = 15
MOUSEMOTION 事件对象捕获移动鼠标位置的瞬时位置。
if event.type == pygame.MOUSEMOTION:
   pos=event.pos
   print ("x = {}, y = {}".format(pos[0], pos[1]))
pygame.mouse 模块中其他重要的函数和属性如下所示:
| pygame.key.get_pressed | 获取鼠标按钮的状态 |
| pygame.mouse.get_pos | 获取鼠标光标位置 |
| pygame.mouse.get_rel | 获取鼠标移动量 |
| pygame.mouse.set_pos | 设置鼠标光标位置 |
| pygame.mouse.set_visible | 隐藏或显示鼠标光标 |
| pygame.mouse.get_visible | 获取鼠标光标的当前可见性状态 |
| pygame.mouse.get_focused | 检查显示器是否正在接收鼠标输入 |
| pygame.mouse.set_cursor | 设置鼠标光标的图像 |
| pygame.mouse.set_system_cursor | 将鼠标光标设置为系统变体 |
Pygame 定义了以下系统光标:
| pygame.SYSTEM_CURSOR_ARROW | 箭头 |
| pygame.SYSTEM_CURSOR_IBEAM | I 形光标 |
| pygame.SYSTEM_CURSOR_WAIT | 等待 |
| pygame.SYSTEM_CURSOR_CROSSHAIR | 十字准星 |
| pygame.SYSTEM_CURSOR_SIZENWSE | 指向西北和东南的双箭头 |
| pygame.SYSTEM_CURSOR_SIZENESW | 指向东北和西南的双箭头 |
| pygame.SYSTEM_CURSOR_SIZEWE | 指向西和东的双箭头 |
| pygame.SYSTEM_CURSOR_SIZENS | 指向北和南的双箭头 |
| pygame.SYSTEM_CURSOR_SIZEALL | 四角箭头 |
| pygame.SYSTEM_CURSOR_NO | 斜线圆圈或骷髅标志 |
| pygame.SYSTEM_CURSOR_HAND | 手 |
以下语句将游戏窗口光标设置为十字准星。
pygame.mouse.set_system_cursor(pygame.SYSTEM_CURSOR_CROSSHAIR)
Pygame - 绘制形状
可以使用 pygame.draw 模块中的函数在游戏窗口上绘制不同的形状,例如矩形、圆形、椭圆形、多边形和线条:
| 绘制矩形 | rect(surface, color, rect) |
| 绘制多边形 | polygon(surface, color, points) |
| 绘制圆形 | circle(surface, color, center, radius) |
| 绘制椭圆形 | ellipse(surface, color, rect) |
| 绘制椭圆弧 | arc(surface, color, rect, start_angle, stop_angle) |
| 绘制直线 | line(surface, color, start_pos, end_pos, width) |
示例
以下示例使用这些函数来绘制不同的形状:
import pygame

pygame.init()
screen = pygame.display.set_mode((400, 300))
done = False
red = (255,0,0)
green = (0,255,0)
blue = (0,0,255)
white = (255,255,255)
while not done:
   for event in pygame.event.get():
      if event.type == pygame.QUIT:
         done = True
   pygame.draw.rect(screen, red, pygame.Rect(100, 30, 60, 60))
   pygame.draw.polygon(screen, blue, ((25,75),(76,125),(275,200),(350,25),(60,280)))
   pygame.draw.circle(screen, white, (180,180), 60)
   pygame.draw.line(screen, red, (10,200), (300,10), 4)
   pygame.draw.ellipse(screen, green, (250, 200, 130, 80))
   pygame.display.update()
输出
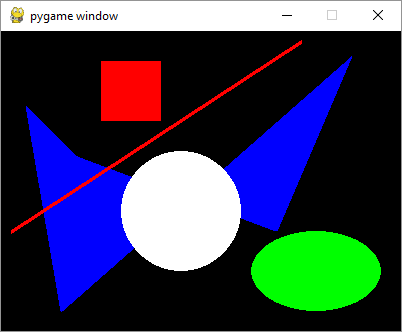
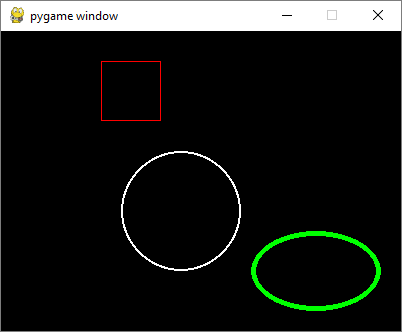
如果向函数添加可选的整数参数,则形状将以指定的颜色作为轮廓颜色绘制。数字对应于轮廓的厚度和形状内部的背景颜色。
pygame.draw.rect(screen, red, pygame.Rect(100, 30, 60, 60),1)
pygame.draw.circle(screen, white, (180,180), 60,2)
pygame.draw.ellipse(screen, green, (250, 200, 130, 80),5)
输出
Pygame - 加载图像
pygame.image 模块包含用于从文件或类文件对象加载和保存图像的函数。图像被加载为 Surface 对象,最终渲染在 Pygame 显示窗口上。
首先,我们通过 load() 函数获取一个 Surface 对象。
img = pygame.image.load('pygame.png')
接下来,我们从该 Surface 中获取一个 rect 对象,然后使用 Surface.blit() 函数渲染图像:
rect = img.get_rect()
rect.center = 200, 150
screen.blit(img, rect)
示例
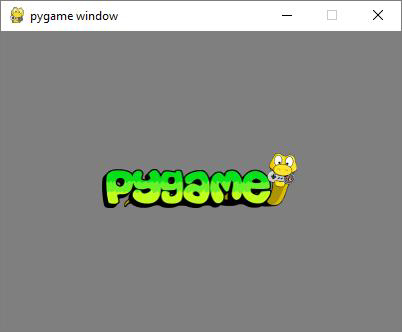
在显示窗口上显示 Pygame 徽标的完整程序如下所示:
import pygame

pygame.init()
screen = pygame.display.set_mode((400, 300))
img = pygame.image.load('pygame.png')
done = False
bg = (127,127,127)
while not done:
   for event in pygame.event.get():
      screen.fill(bg)
      rect = img.get_rect()
      rect.center = 200, 150
      screen.blit(img, rect)
      if event.type == pygame.QUIT:
      done = True
   pygame.display.update()
输出
上述代码的输出如下所示:
blit() 函数可以带有一个可选的特殊标志参数,该参数具有以下值之一:
BLEND_RGBA_ADD
BLEND_RGBA_SUB
BLEND_RGBA_MULT
BLEND_RGBA_MIN
BLEND_RGBA_MAX
BLEND_RGB_ADD
BLEND_RGB_SUB
BLEND_RGB_MULT
BLEND_RGB_MIN
BLEND_RGB_MAX
pygame.Surface 模块还有一个 convert() 函数,它可以优化图像格式并使绘制速度更快。
pygame.image 模块有一个 save() 函数,可以将 Surface 对象的内容保存到图像文件。Pygame 支持以下图像格式:
| 加载图像格式 | 保存图像格式 |
|---|---|
|
JPG PNG GIF(非动画) BMP PCX TGA(未压缩) TIF LBM(和 PBM) PBM(和 PGM、PPM) XPM |
BMP TGA PNG JPEG |
示例
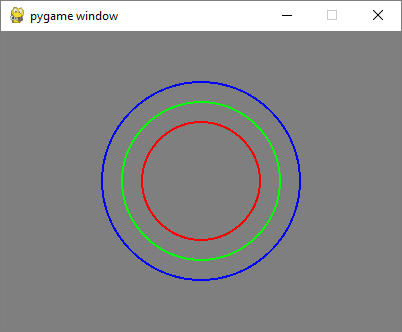
以下程序在显示曲面上绘制三个圆圈,并使用 image.save() 函数将其保存为 circles.png 文件。
import pygame

pygame.init()
screen = pygame.display.set_mode((400, 300))
done = False
white=(255,255,255)
red = (255,0,0)
green = (0,255,0)
blue = (0,0,255)

bg = (127,127,127)
while not done:
   for event in pygame.event.get():
      screen.fill(bg)
      if event.type == pygame.QUIT:
         done = True
      pygame.draw.circle(screen, red, (200,150), 60,2)
      pygame.draw.circle(screen, green, (200,150), 80,2)
      pygame.draw.circle(screen, blue, (200,150), 100,2)
   pygame.display.update()
   pygame.image.save(screen, "circles.png")
输出
Pygame - 在窗口中显示文本
要在 Pygame 窗口上显示文本,我们需要首先获取一个字体对象,借助于 pygame.font 模块中定义的 SysFont() 函数。
Fnt= SysFont(name, size, bold=False, italic=False)
当前机器上安装的字体列表可以通过 get_fonts() 函数获取。
fonts = pygame.font.get_fonts()
for f in fonts:
   print(f)
让我们定义一个表示 36 点大小的 Arial 字体的字体对象。
font = pygame.font.SysFont("Arial", 36)
接下来,我们使用 Font 对象的 render() 方法,为在新建字体中渲染“Hello World”文本获取一个新的 Surface 对象。
txtsurf = font.render("Hello, World", True, white)
第一个参数是一个单行字符串,第二个参数表示抗锯齿。如果将其设置为 False,则渲染的图像是 8 位图像,如果为 True,则为 24 位图像。还可以使用可选的背景颜色参数。
现在我们需要将文本 Surface 贴在屏幕窗口的中心。
screen.blit(txtsurf,(200 - txtsurf.get_width() // 2, 150 - txtsurf.get_height() // 2))
示例
完整的代码如下所示:
import pygame

pygame.init()
screen = pygame.display.set_mode((400, 300))
done = False
white=(255,255,255)
red = (255,0,0)
green = (0,255,0)
blue = (0,0,255)

bg = (127,127,127)
while not done:
   for event in pygame.event.get():
      screen.fill(bg)
      if event.type == pygame.QUIT:
         done = True
      font = pygame.font.SysFont("Arial", 36)
   txtsurf = font.render("Hello, World", True, white)
   screen.blit(txtsurf,(200 - txtsurf.get_width() // 2, 150 - txtsurf.get_height() // 2))
pygame.display.update()
输出
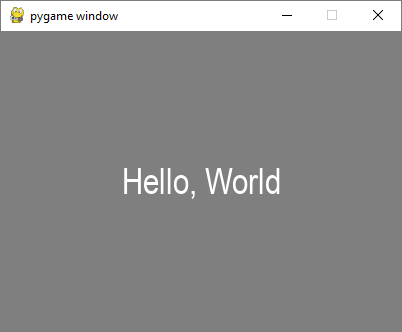
除了 SysFont() 方法外,还可以从字体文件(具有 .ttf 扩展名)或指向 ttf 文件的 Python 文件对象获取 Font 对象。也可以使用 .ttc 文件构造字体对象。font 类定义了以下方法:
| bold() | 获取或设置字体是否应以粗体渲染。 |
| italic() | 获取或设置字体是否应以斜体渲染。 |
| underline() | 获取或设置字体是否应带下划线渲染。 |
| render() | 在新的 Surface 上绘制文本 |
| size() | 计算渲染文本所需的尺寸 |
| set_underline() | 控制文本是否带下划线渲染 |
| get_underline() | 检查文本是否将带下划线渲染 |
| set_bold() | 启用粗体文本的伪渲染 |
| get_bold() | 检查文本是否将以粗体渲染 |
| set_italic() | 启用斜体文本的伪渲染 |
| metrics() | 获取每个字符的度量 |
| get_italic() | 检查文本是否将以斜体渲染 |
| get_linesize() | 获取字体的行间距 |
| get_height() | 获取字体的的高度 |
| get_ascent() | 获取字体的上行高度 |
| get_descent() | 获取字体的下行高度 |
下面是使用 ttf 和 ttc 文件渲染文本的示例。
font1 = pygame.font.SysFont('chalkduster.ttf', 72)
img1 = font1.render('Hello World', True, BLUE)
font2 = pygame.font.SysFont('didot.ttc', 72)
img2 = font2.render('Hello Pygame', True, GREEN)

screen.blit(img1, (20, 50))
screen.blit(img2, (20, 120))
pygame.display.update()
在上面的示例中,预定义的字符串已被渲染为 Surface 对象。但是,可以读取 KEYDOWN 事件的键值以交互式地输入字符串并显示它。
首先,我们渲染一个空字符串。接下来,我们定义边界矩形,然后定义一个光标矩形,该矩形放置在覆盖文本边界矩形的位置。在 KEYDOWN 事件中识别的每个击键都附加到原始空字符串中并重复渲染。
示例
以下代码最初显示一个空白窗口。按下的每个字母都将彼此并排显示。
import pygame

pygame.init()
screen = pygame.display.set_mode((400, 300))
done = False
white=(255,255,255)
red = (255,0,0)
green = (0,255,0)
blue = (0,0,255)

bg = (127,127,127)
text=""
while not done:
   for event in pygame.event.get():
      screen.fill(bg)
      if event.type == pygame.QUIT:
         done = True
      if event.type == pygame.KEYDOWN:
         text=text+event.unicode
      font = pygame.font.SysFont("Arial", 36)
      img = font.render(text, True, white)
      rect = img.get_rect()
      cursor = pygame.Rect(rect.topright, (3, rect.height))
      img = font.render(text, True, white)
      rect.size=img.get_size()
      cursor.topleft = rect.topright
      screen.blit(img,(200 - img.get_width() // 2, 150 - img.get_height() // 2))
   pygame.display.update()
输出
运行上述代码并输入一些文本。示例输出如下所示:
Pygame - 移动图像
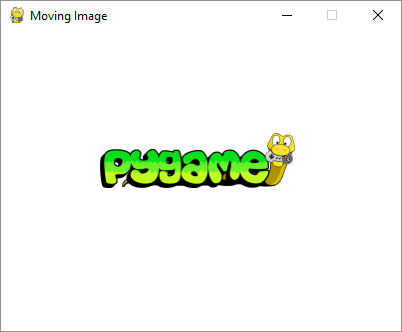
对象移动是任何电脑游戏的关键方面。电脑游戏通过在增量位置绘制和擦除对象来产生移动的错觉。以下代码通过在事件循环中递增 x 坐标位置来绘制图像,并用背景颜色擦除它。
示例
image_filename = 'pygame.png'
import pygame
from pygame.locals import *
from sys import exit
pygame.init()
screen = pygame.display.set_mode((400,300), 0, 32)
pygame.display.set_caption("Moving Image")
img = pygame.image.load(image_filename)
x = 0
while True:
   screen.fill((255,255,255))
   for event in pygame.event.get():
      if event.type == QUIT:
         exit()
   screen.blit(img, (x, 100))
   x= x+0.5

   if x > 400:
      x = x-400
   pygame.display.update()
输出
Pygame 徽标图像开始显示在左侧边框处,并重复向右移动。如果它到达右侧边框,则其位置将重置为左侧。
在以下程序中,图像最初显示在 (0,150) 位置。当用户按下箭头键(左、右、上、下)时,图像的位置会改变 5 像素。如果发生 KEYDOWN 事件,程序会检查键值是否为 K_LEFT、K_RIGHT、K_UP 或 K_DOWN。如果为 K_LEFT 或 K_RIGHT,则 x 坐标会改变 +5 或 -5。如果键值为 K_UP 或 K_DOWN,则 y 坐标的值会改变 -5 或 +5。
image_filename = 'pygame.png'
import pygame
from pygame.locals import *
from sys import exit
pygame.init()
screen = pygame.display.set_mode((400,300))
pygame.display.set_caption("Moving with arrows")
img = pygame.image.load(image_filename)
x = 0
y= 150
while True:
   screen.fill((255,255,255))
   screen.blit(img, (x, y))
   for event in pygame.event.get():
      if event.type == QUIT:
         exit()

      if event.type == KEYDOWN:
         if event.key == K_RIGHT:
            x= x+5
         if event.key == K_LEFT:
            x=x-5
         if event.key == K_UP:
            y=y-5
         if event.key == K_DOWN:
            y=y+5
         pygame.display.update()
Pygame - 使用数字键盘按键移动
如果我们想影响游戏窗口上对象的斜向移动,我们需要使用数字键盘按键。虽然按键 4、6、8 和 2 分别对应于左、右、上和下箭头,但数字键 7、9、3 和 1 可用于使对象进行左上、右上、右下和左下斜向移动。这些按键由 Pygame 使用以下值识别:
K_KP1       keypad 1
K_KP2       keypad 2
K_KP3       keypad 3
K_KP4       keypad 4
K_KP5       keypad 5
K_KP6       keypad 6
K_KP7       keypad 7
K_KP8       keypad 8
K_KP9       keypad 9
示例
对于左右、上下箭头键按下,x 和 y 坐标像以前一样递增/递减。对于斜向移动,两个坐标都根据方向更改。例如,对于 K_KP7 按键按下,x 和 y 都递减 5,对于 K_KP9,x 递增,y 递减。
image_filename = 'pygame.png'
import pygame
from pygame.locals import *
from sys import exit
pygame.init()
screen = pygame.display.set_mode((400,300))
pygame.display.set_caption("Moving with arrows")
img = pygame.image.load(image_filename)
x = 0
y= 150
while True:
   screen.fill((255,255,255))
   screen.blit(img, (x, y))
   for event in pygame.event.get():
      if event.type == QUIT:
         exit()
      if event.type == KEYDOWN:
         if event.key == K_KP6:
            x= x+5
         if event.key == K_KP4:
            x=x-5
         if event.key == K_KP8:
            y=y-5
         if event.key == K_KP2:
            y=y+5
         if event.key == K_KP7:
            x=x-5
            y=y-5
         if event.key == K_KP9:
            x=x+5
            y=y-5
         if event.key == K_KP3:
            x=x+5
            y=y+5
         if event.key == K_KP1:
            x=x-5
            y=y+5
   pygame.display.update()
Pygame - 使用鼠标移动
根据鼠标指针的移动来移动对象很容易。pygame.mouse 模块定义了 get_pos() 方法。它返回一个包含两个项目的元组,分别对应于鼠标当前位置的 x 和 y 坐标。
(mx,my) = pygame.mouse.get_pos()
捕获 mx 和 my 位置后,使用 bilt() 函数在这些坐标处将图像渲染到 Surface 对象上。
示例
以下程序连续在移动的鼠标光标位置渲染给定的图像。
filename = 'pygame.png'
import pygame
from pygame.locals import *
from sys import exit
pygame.init()
screen = pygame.display.set_mode((400,300))
pygame.display.set_caption("Moving with mouse")
img = pygame.image.load(filename)
x = 0
y= 150
while True:
   mx,my=pygame.mouse.get_pos()
   screen.fill((255,255,255))
   screen.blit(img, (mx, my))
   for event in pygame.event.get():
      if event.type == QUIT:
         exit()
pygame.display.update()
Pygame - 移动矩形对象
Pygame.Rect 类具有存储和操作矩形区域的功能。可以通过左、上、宽和高值构造 Rect 对象。Rect 类中的函数能够复制、移动和调整 Rect 对象的大小。
Rect 对象具有以下虚拟属性:
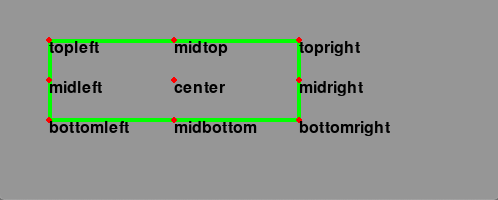
除了移动外,Rect 类还有用于测试矩形之间碰撞的方法。
| copy() | 返回一个新的矩形,该矩形具有与原始矩形相同的位置和大小。 |
| move() | 返回一个新的矩形,该矩形已根据给定的偏移量移动。x 和 y 参数可以是任何整数,正数或负数。 |
| move_ip() | 与 Rect.move() 方法相同,但就地操作。 |
| inflate(x,y) | 返回一个新的矩形,其大小已根据给定的偏移量更改。负值将缩小矩形。 |
| inflate_ip(x, y) | 与 Rect.inflate() 方法相同,但就地操作。 |
| clamp(Rect) | 返回一个新的矩形,该矩形已移动到完全位于参数 Rect 内部。 |
| clip(Rect) | 返回一个新的矩形,该矩形已裁剪为完全位于参数 Rect 内部。 |
| union(Rect) | 返回一个新的矩形,该矩形完全覆盖两个提供的矩形的区域。 |
| union_ip(Rect) | 与 Rect.union() 方法相同,但就地操作。 |
| contains(Rect) | 当参数完全位于 Rect 内部时返回 true。 |
| collidepoint((x,y)) | 如果给定的点位于矩形内部,则返回 true。 |
| colliderect(Rect) | 如果两个矩形的任何一部分重叠,则返回 True |
示例
在下面的程序中,一个 Rect 对象以红色轮廓绘制。使用 copy() 方法创建它的克隆以进行移动。移动由 move_ip() 方法实现。箭头键通过将 x/y 坐标增加/减少 + 或 -5 像素来移动复制矩形的位置。
import pygame
from pygame.locals import *
from sys import exit
pygame.init()
screen = pygame.display.set_mode((400,300))
rect1 = Rect(50, 60, 200, 80)
rect2=rect1.copy()
running = True
x=0
y=0
while running:
   for event in pygame.event.get():
      if event.type == QUIT:
         running = False
      if event.type == KEYDOWN:
         if event.key==K_LEFT:
            x= -5
            y=0
         if event.key == K_RIGHT:
            x=5
            y=0
         if event.key == K_UP:
            x = 0
            y = -5
         if event.key == K_DOWN:
            x = 0
            y = 5
   rect2.move_ip(x,y)
   screen.fill((127,127,127))
   pygame.draw.rect(screen, (255,0,0), rect1, 1)
   pygame.draw.rect(screen, (0,0,255), rect2, 5)
   pygame.display.update()
   pygame.quit()
输出
以下输出显示带红色轮廓的矩形是原始矩形。它的副本不断响应箭头键移动,并具有蓝色轮廓

示例
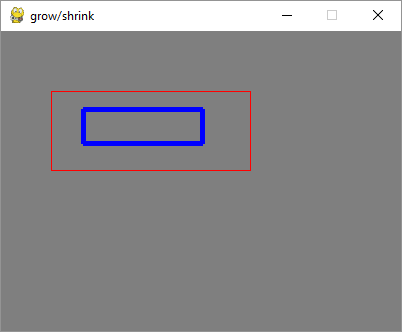
将 move_ip() 方法更改为 inflate_ip() 方法,以根据按下的箭头增大/缩小矩形。
while running:
   for event in pygame.event.get():
      if event.type == QUIT:
         running = False
      if event.type == KEYDOWN:
         if event.key==K_LEFT:
            x= -5
            y=0
         if event.key == K_RIGHT:
            x=5
            y=0
         if event.key == K_UP:
            x = 0
            y = -5
         if event.key == K_DOWN:
            x = 0
            y = 5
      rect2.inflate_ip(x,y)
   screen.fill((127,127,127))
   pygame.draw.rect(screen, (255,0,0), rect1, 1)
   pygame.draw.rect(screen, (0,0,255), rect2, 5)
   pygame.display.update()
输出
以下是箭头键按下活动的屏幕截图 -
示例
为了通过检测 MOUSEMOTION 事件使矩形移动,我们需要首先按下原始矩形内的鼠标。为了验证鼠标位置是否在矩形内,我们使用 Rect 对象的 collidepoint() 方法。当鼠标移动时,矩形对象通过 move_ip() 方法在适当位置移动。当释放鼠标时,移动将停止。
import pygame
from pygame.locals import *
from sys import exit
pygame.init()
screen = pygame.display.set_mode((400,300))
rect = Rect(50, 60, 200, 80)
moving = False
running = True
while running:
   for event in pygame.event.get():
      if event.type == QUIT:
         running = False
      elif event.type == MOUSEBUTTONDOWN:
         if rect.collidepoint(event.pos):
            moving = True
      elif event.type == MOUSEBUTTONUP:
         moving = False
      elif event.type == MOUSEMOTION and moving:
         rect.move_ip(event.rel)
   screen.fill((127,127,127))
   pygame.draw.rect(screen, (255,0,0), rect)
   if moving:
      pygame.draw.rect(screen, (0,0,255), rect, 4)
   pygame.display.flip()
pygame.quit()
输出
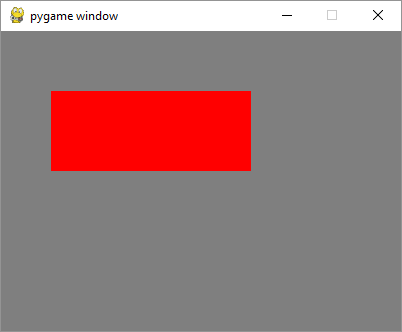
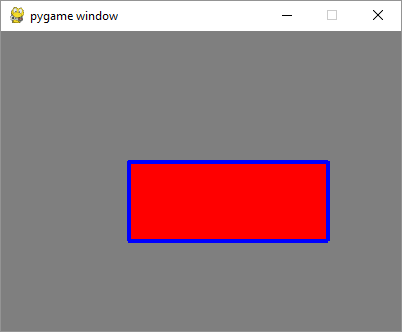
示例
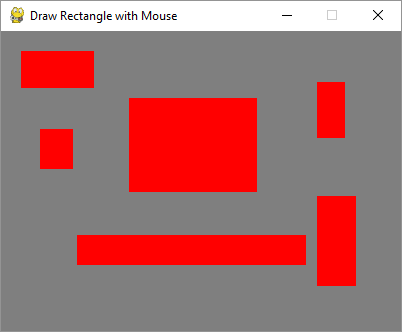
要通过鼠标绘制矩形,请在 MOUSEBUTTONDOWN 和 MOUSEBUTTONUP 事件中捕获鼠标指针坐标,计算左上角坐标、宽度和高度,然后调用 rect() 函数。
import pygame
from pygame.locals import *
from sys import exit
pygame.init()
screen = pygame.display.set_mode((400,300))
pygame.display.set_caption("Draw Rectangle with Mouse")
screen.fill((127,127,127))
x=0
y=0
w=0
h=0
drawmode=True
running = True
while running:
   for event in pygame.event.get():
      if event.type == QUIT:
         running = False
      if event.type == MOUSEBUTTONDOWN:
         x,y = pygame.mouse.get_pos()
         drawmode = True
      if event.type == MOUSEBUTTONUP:
         x1,y1 = pygame.mouse.get_pos()
         w=x1-x
         h=y1-y
         drawmode= False

   rect = pygame.Rect(x,y,w,h)
   if drawmode == False:
      pygame.draw.rect(screen, (255,0,0), rect)
   pygame.display.flip()
pygame.quit()
输出
Pygame - 使用文本作为按钮
按钮是典型游戏窗口中的一个重要元素。我们可以使用文本或图像表面对象作为按钮,以便在单击时可以触发某个操作。
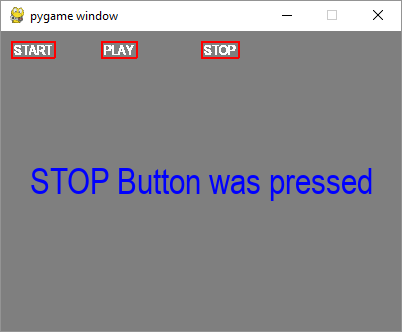
让我们尝试显示三个带有文本标题的按钮。
text1=font.render(" START ", True, white)
text2=font.render(" PLAY ", True, white)
text3=font.render(" STOP ", True, white)
为了在这些按钮周围绘制边框,请获取它们的 Rect 对象。
rect1 = text1.get_rect(topleft=(10,10))
rect2 = text2.get_rect(topleft= (100,10))
rect3 = text3.get_rect(topleft= (200,10))
在事件循环内,使用红色边框绘制文本按钮。
screen.blit(text1, rect1)
pygame.draw.rect(screen, (255,0,0),rect1,2)
screen.blit(text2, rect2)
pygame.draw.rect(screen, (255,0,0),rect2,2)
pygame.draw.rect(screen, (255,0,0),rect3,2)
screen.blit(text3, rect3)
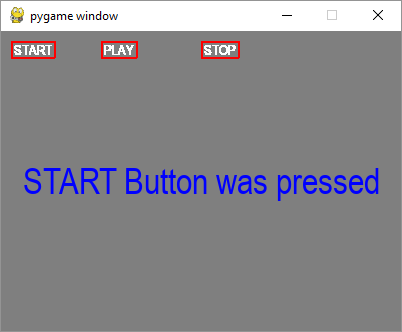
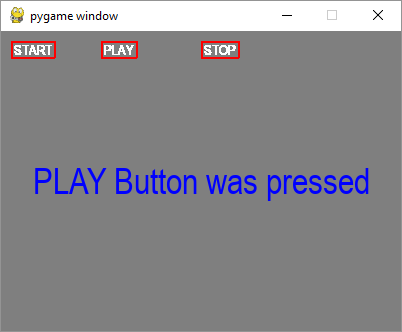
使用 Rect 对象的 collidepoint() 函数来识别哪个按钮被单击。
if event.type == pygame.MOUSEBUTTONDOWN:
   if rect1.collidepoint(event.pos):
      msg = "START Button was pressed"
   if rect2.collidepoint(event.pos):
      msg = "PLAY Button was pressed"
   if rect3.collidepoint(event.pos):
      msg = "STOP Button was pressed"
显示相应的文本表面消息 -
img=font.render(msg, True, (0,0,255))
imgrect=img.get_rect()
imgrect.center = (200 , 150 )
pygame.draw.rect(screen, bg, imgrect)
screen.blit(img, imgrect)
示例
完整的代码如下所示:
import pygame

pygame.init()
screen = pygame.display.set_mode((400, 300))
done = False

font = pygame.font.SysFont("Arial", 14)
text1=font.render(" START ", True, white)
text2=font.render(" PLAY ", True, white)
text3=font.render(" STOP ", True, white)

rect1 = text1.get_rect(topleft=(10,10))
rect2 = text2.get_rect(topleft= (100,10))
rect3 = text3.get_rect(topleft= (200,10))
bg = (127,127,127)
msg=" "
screen = pygame.display.set_mode((400,300))
screen.fill(bg)
while not done:
   for event in pygame.event.get():
      screen.blit(text1, rect1)
      pygame.draw.rect(screen, (255,0,0),rect1,2)
      screen.blit(text2, rect2)
      pygame.draw.rect(screen, (255,0,0),rect2,2)
      pygame.draw.rect(screen, (255,0,0),rect3,2)
      screen.blit(text3, rect3)

      if event.type == pygame.QUIT:
         done = True
      if event.type == pygame.MOUSEBUTTONDOWN:
         if rect1.collidepoint(event.pos):
            msg = "START Button was pressed"
         if rect2.collidepoint(event.pos):
            msg = "PLAY Button was pressed"
         if rect3.collidepoint(event.pos):
            msg = "STOP Button was pressed"
      img=font.render(msg, True, (0,0,255))
      imgrect=img.get_rect()
      imgrect.center = (200 , 150 )
      pygame.draw.rect(screen, bg, imgrect)
      screen.blit(img, imgrect)

   pygame.display.update()
输出
单击每个按钮时,显示窗口将显示以下输出 -
Pygame - 图像变换
pygame.ransform 模块包含许多用于操作从图像或文本块获得的 Surface 对象的函数的定义。对表面的操作包括翻转、旋转、缩放、调整大小和缩放对象。
以下函数在 pygame.transform 模块中找到。
| flip() | 垂直和水平翻转 |
| scale() | 调整到新的分辨率 |
| rotate() | 旋转图像 |
| rotozoom() | 过滤后的缩放和旋转 |
| scale2x() | 专门的图像加倍器 |
| smoothscale() | 将表面平滑地缩放至任意大小 |
| get_smoothscale_backend() | 返回正在使用的 smoothscale 过滤器版本 - 'GENERIC'、'MMX' 或 'SSE' |
| set_smoothscale_backend() | 将 smoothscale 过滤器版本设置为 - 'GENERIC'、'MMX' 或 'SSE' 中的一个 |
| chop() | 获取图像的副本,其中去除了内部区域 |
| laplacian() | 在表面上查找边缘 |
| average_surfaces() | 从多个表面中找到平均表面。 |
| average_color() | 查找表面的平均颜色 |
| threshold() | 查找表面中哪些像素以及有多少像素在 'search_color' 或 'search_surf' 的阈值内。 |
让我们首先使用 flip() 函数,其语法如下 -
flip(Surface, xbool, ybool)
此函数可以水平、垂直或同时翻转表面对象。方向由两个布尔参数决定。
要水平翻转图像,请使用以下命令 -
pygame.transform.flip(img2,True, False)
要垂直翻转,请使用以下命令 -
pygame.transform.flip(img2,False, True)
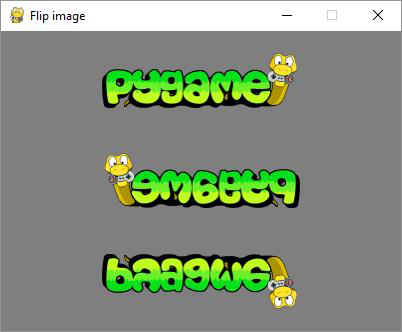
在以下示例中,pygame 徽标图像正常显示并在两个方向上翻转。首先从原始图像对象获取翻转后的表面,获取其 Rect 对象,然后构建它。要渲染水平翻转的图像,
img1 = pygame.image.load('pygame.png')
img2=img1
img2=pygame.transform.flip(img2,True, False)
#inside event loop
rect2 = img2.get_rect()
   rect2.center = 200, 150
   screen.blit(img2, rect2)
示例
渲染原始 Pygame 徽标及其翻转图像的完整代码如下 -
import pygame

pygame.init()
screen = pygame.display.set_mode((400, 300))
pygame.display.set_caption("Flip image")
img1 = pygame.image.load('pygame.png')
img2=img1
img3=img1
img2=pygame.transform.flip(img2,True, False)
img3=pygame.transform.flip(img3, False, True)
done = False
bg = (127,127,127)
while not done:
   for event in pygame.event.get():
      screen.fill(bg)
      rect1 = img1.get_rect()
      rect1.center = 200, 50
      screen.blit(img1, rect1)
      rect2 = img2.get_rect()
      rect2.center = 200, 150
      screen.blit(img2, rect2)
      rect3 = img3.get_rect()
      rect3.center = 200, 250
      screen.blit(img3, rect3)
      if event.type == pygame.QUIT:
         done = True
   pygame.display.update()
输出
rotate() 函数采用以下参数 -
rotate(Surface, angle)
示例
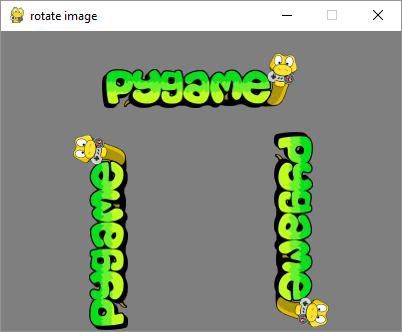
角度的负值使表面顺时针旋转。
import pygame

pygame.init()
screen = pygame.display.set_mode((400, 300))
pygame.display.set_caption("rotate image")
img1 = pygame.image.load('pygame.png')
img2=img1
img3=img1
img2=pygame.transform.rotate(img2,90)
img3=pygame.transform.rotate(img3, -90)
done = False
bg = (127,127,127)
while not done:
   for event in pygame.event.get():
      screen.fill(bg)
      rect1 = img1.get_rect()
      rect1.center = 200, 50
      screen.blit(img1, rect1)
      rect2 = img2.get_rect()
      rect2.center = 100, 200
      screen.blit(img2, rect2)
      rect3 = img3.get_rect()
      rect3.center = 300,200
      screen.blit(img3, rect3)
      if event.type == pygame.QUIT:
         done = True
   pygame.display.update()
输出
示例
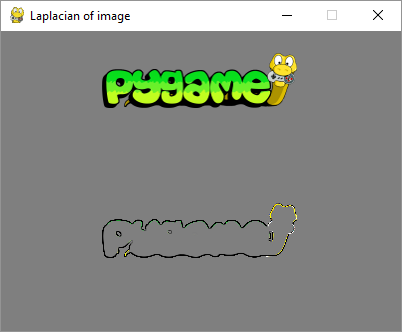
laplacian() 函数提取表面对象的轮廓。该函数只接受一个参数,即图像对象本身。
import pygame
pygame.init()
screen = pygame.display.set_mode((400, 300))
pygame.display.set_caption("Laplacian of image")
img1 = pygame.image.load('pygame.png')
img2=img1
img2=pygame.transform.laplacian(img2)
done = False
bg = (127,127,127)
while not done:
   for event in pygame.event.get():
      screen.fill(bg)
      rect1 = img1.get_rect()
      rect1.center = 200, 50
      screen.blit(img1, rect1)
      rect2 = img2.get_rect()
      rect2.center = 200, 200
      screen.blit(img2, rect2)

      if event.type == pygame.QUIT:
         done = True
   pygame.display.update()
输出
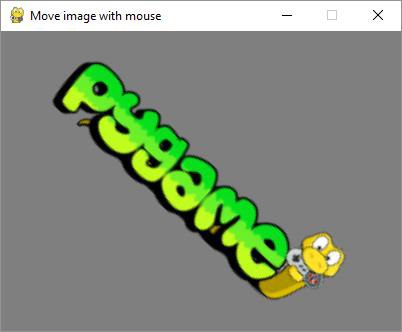
为了使 Surface 对象随鼠标移动而移动,请从图像的中心计算 x、y 坐标。我们还计算中心鼠标距离 d。atan2(y, x) 数学函数允许查找旋转角度。我们需要将弧度转换为度数。从鼠标中心距离,我们计算缩放参数。
mouse = event.pos
Pygame
54
x = mouse[0] - 200
y = mouse[1] - 150
d = math.sqrt(x ** 2 + y ** 2)
angle = math.degrees(-math.atan2(y, x))
scale = abs(5 * d / 400)
最后,我们使用 rotzoom() 函数,该函数执行组合旋转和缩放变换。
rotozoom(Surface, angle, scale)
示例
以下代码渲染可以根据鼠标移动旋转的 Pygame 徽标图像。
import pygame , math
from pygame.locals import *
pygame.init()
screen = pygame.display.set_mode((400, 300))
pygame.display.set_caption("Move image with mouse")
img1 = pygame.image.load('pygame.png')
done = False
bg = (127,127,127)
while not done:
   for event in pygame.event.get():
      screen.fill(bg)

      if event.type == pygame.QUIT:
         done = True
      if event.type == MOUSEMOTION:
         mouse = event.pos
         x = mouse[0] - 200
         y = mouse[1] - 150
         d = math.sqrt(x ** 2 + y ** 2)
         angle = math.degrees(-math.atan2(y, x))
         scale = abs(5 * d / 400)
         img2 = pygame.transform.rotozoom(img1, angle, scale)
         rect = img2.get_rect()
         rect.center = (200,150)
         screen.blit(img2, rect)
   pygame.display.update()
输出
运行以上代码,尝试将鼠标光标沿显示窗口移动。图像将相应地旋转并缩小或增大。
Pygame - 声音对象
使用音乐和声音使任何电脑游戏更具吸引力。Pygame 库通过 pygame.mixer 模块支持此功能。此模块包含 Sound 类,用于加载 Sound 对象和控制播放。所有声音播放都在后台线程中混合。为了减少延迟,请使用较小的缓冲区大小。
要从声音文件或文件对象获取 Sound 对象,请使用以下构造函数 -
pygame.mixer.Sound(filename or file object)
Sound 类定义了以下方法来控制播放 -
| play(loops=0, maxtime=0, fade_ms=0) | 在可用的 Channel 上开始播放声音(即在电脑的扬声器上)。Loops 参数用于重复播放。 |
| stop() | 这将停止在任何活动 Channel 上播放此声音。 |
| fadeout(time) | 这将在以毫秒为单位的时间参数内淡出后停止播放声音。 |
| set_volume(value) | 这将设置此声音的播放音量,如果声音正在播放,则会立即影响声音,以及此声音的任何未来播放。音量范围为 0.0 到 1.0 |
| get_length() | 返回此声音的长度(以秒为单位)。 |
在以下示例中,一个文本按钮渲染在显示窗口的底部。空格键会向上发射一个箭头,并伴随播放声音。
font = pygame.font.SysFont("Arial", 14)
text1=font.render(" SHOOT ", True, bg)
rect1 = text1.get_rect(midbottom=(200,300))
img=pygame.image.load("arrow.png")
rect2=img.get_rect(midtop=(200, 270))
在游戏事件循环内,对于检测到的空格键,一个箭头对象放置在 SHOOT 按钮上方,并以递减的 y 坐标重复渲染。同时也会播放射击声音。
sound=pygame.mixer.Sound("sound.wav")img=pygame.image.load("arrow.png")
rect2=img.get_rect(midtop=(200, 270))

if event.type == pygame.KEYDOWN:
   if event.key == pygame.K_SPACE: 18. Pygame — Sound objects
      print ("space")
      if kup==0:
         screen.blit(img, (190,y))
         kup=1
   if kup==1:
      y=y-1
      screen.blit(img, (190,y))
      sound.play()
      if y<=0:
         kup=0
         y=265
示例
以下列表演示了 Sound 对象的使用。
import pygame
from pygame.locals import *
pygame.init()
screen = pygame.display.set_mode((400, 300))
done = False
white = (255,255,255)
bg = (127,127,127)
sound=pygame.mixer.Sound("sound.wav")
font = pygame.font.SysFont("Arial", 14)
text1=font.render(" SHOOT ", True, bg)
rect1 = text1.get_rect(midbottom=(200,300))
img=pygame.image.load("arrow.png")
rect2=img.get_rect(midtop=(200, 270))
kup=0
psmode=True
screen = pygame.display.set_mode((400,300))
screen.fill(white)
y=265
while not done:

   for event in pygame.event.get():
      screen.blit(text1, rect1)
      pygame.draw.rect(screen, (255,0,0),rect1,2)
      if event.type == pygame.QUIT:
         sound.stop()
         done = True
      if event.type == pygame.KEYDOWN:
         if event.key == pygame.K_SPACE:
            print ("space")
            if kup==0:
               screen.blit(img, (190,y))
               kup=1
   if kup==1:
      y=y-1
      screen.blit(img, (190,y))
      sound.play()
      if y<=0:
         kup=0
         y=265
   pygame.display.update()
Pygame - Mixer 通道
Sound 对象可以在特定通道上播放,而不是自动选择的默认通道。首先使用以下命令创建一个通道对象 -
pygame.mixer.Channel(id)
以下函数在 mixer.channel 类中定义 -
| play(Sound, loops=0, maxtime=0, fade_ms=0) | 这将在特定 Channel 上开始播放声音。 |
| stop() | 停止通道上的声音播放。播放停止后,通道将可用于在其上播放新的声音 |
| pause() | 暂时停止通道上的声音播放。 |
| unpause() | 恢复暂停通道上的播放。 |
| set_volume(value) | 设置正在播放的声音的音量(响度)。value 参数介于 0.0 和 1.0 之间。 |
| queue(Sound) | 当声音在 Channel 上排队时,它将在当前声音完成后立即开始播放。 |
Pygame - 播放音乐
混音器还有一个用于音乐播放的特殊流通道,可以通过 pygame.mixer.musicpygame 模块访问,用于控制流式音频模块。音乐播放和常规声音播放之间的区别在于音乐是流式传输的,并且从未一次全部加载。混音器系统一次只支持一个音乐流。
首先,我们需要从音乐文件加载音乐。Pygame 可以加载 WAV、MP3 或 OGG 文件。
pygame.mixer.music.load(filename or object)
这将加载音乐文件名/文件对象并准备播放。如果音乐流正在播放,它将被停止。这不会开始播放音乐。播放由以下函数控制 -
play(loops=0, start=0.0, fade_ms = 0)
这将播放加载的音乐流。如果音乐正在播放,它将重新启动。loops 参数表示重复音乐的次数。如果此参数设置为 -1,则音乐无限期重复。start 表示音乐从哪里开始播放。位置以秒为单位的时间。fade_ms 参数使音乐以 0 音量开始播放,并在给定时间内逐渐增大到最大音量。
其他有用的函数如下 -
| rewind() | 将当前音乐的播放重置到开头。 |
| stop() | 如果当前音乐正在播放,则停止音乐播放。它不会卸载音乐。 |
| pause() | 暂时停止音乐流的播放。 |
| unpause() | 这将在音乐流暂停后恢复播放。 |
| fadeout(time) | 淡出并停止当前正在播放的音乐。 |
| set_volume(volume) | 设置音乐播放的音量。 |
| set_pos(pos) | 这将设置音乐文件中播放将开始的位置。 |
在以下程序中,音乐文件在单击播放按钮时开始播放。暂停按钮充当切换以暂停/取消暂停播放。单击停止停止播放。
import pygame
pygame.init()
screen = pygame.display.set_mode((400, 300)) 20. Pygame — Playing music
done = False
white = (255,255,255)
pygame.mixer.music.load("mario_theme.wav")
font = pygame.font.SysFont("Arial", 14)
text1=font.render(" PLAY ", True, white)
text2=font.render(" PAUSE ", True, white)
text3=font.render(" STOP ", True, white)
rect1 = text1.get_rect(topleft=(10,10))
rect2 = text2.get_rect(topleft= (100,10))
rect3 = text3.get_rect(topleft= (200,10))
bg = (127,127,127)
psmode=True
screen = pygame.display.set_mode((400,300))
screen.fill(bg)
while not done:
   for event in pygame.event.get():
      screen.blit(text1, rect1)
      pygame.draw.rect(screen, (255,0,0),rect1,2)
      screen.blit(text2, rect2)
      pygame.draw.rect(screen, (255,0,0),rect2,2)
      pygame.draw.rect(screen, (255,0,0),rect3,2)
      screen.blit(text3, rect3)

      if event.type == pygame.QUIT:
         done = True
      if event.type == pygame.MOUSEBUTTONDOWN:
         if rect1.collidepoint(event.pos):
            pygame.mixer.music.play()
         if rect2.collidepoint(event.pos):
            if psmode==True:
               pygame.mixer.music.pause()
               psmode=False
            else:
               if psmode==False:
                  pygame.mixer.music.unpause()
                  psmode=True
            if rect3.collidepoint(event.pos):
               pygame.mixer.music.stop()
   pygame.display.update()
Pygame - 播放视频
Pygame 在其最新版本中已停止支持视频文件。但是,在 Python 2.7 发行版的早期版本中,它仍然可以使用。对于本节,已使用 Pygame 1.9.2 和 Python 2.7.18。
pygame.movie 模块支持从基本编码的 MPEG-1 视频文件中播放视频和音频。视频播放发生在后台线程中,这使得播放易于管理。pygame.mixerpygame 模块用于加载和播放声音模块,如果要播放电影的声音,则必须将其取消初始化。
首先通过以下语法获取 Movie 对象 -
movie = pygame.movie.Movie('sample.mpg')
Movie 类提供以下方法来控制播放。
| pygame.movie.Movie.play | 开始播放电影 |
| pygame.movie.Movie.stop | 停止电影播放 |
| pygame.movie.Movie.pause | 暂时停止和恢复播放 |
| pygame.movie.Movie.skip | 提前电影播放位置 |
| pygame.movie.Movie.rewind | 重新开始电影播放 |
| pygame.movie.Movie.get_time | 获取当前视频播放时间 |
| pygame.movie.Movie.get_length | 电影的总长度(以秒为单位) |
| pygame.movie.Movie.get_size | 获取视频的分辨率 |
| pygame.movie.Movie.has_audio | 检查电影文件是否包含音频 |
| pygame.movie.Movie.set_volume | 设置音频播放音量 |
| pygame.movie.Movie.set_display | 设置视频目标 Surface |
以下代码在 Pygame 显示窗口上播放 .MPG 文件。 -
import pygame

FPS = 60
pygame.init()
clock = pygame.time.Clock()
movie = pygame.movie.Movie('sample_640x360.mpg')
screen = pygame.display.set_mode(movie.get_size())
movie_screen = pygame.Surface(movie.get_size()).convert()

movie.set_display(movie_screen)
movie.play()

playing = True
while playing:
   for event in pygame.event.get():
      if event.type == pygame.QUIT:
         movie.stop()
         playing = False

   screen.blit(movie_screen,(0,0))
   pygame.display.update()
   clock.tick(FPS)
pygame.quit()
Pygame - 使用摄像头模块
Pygame 1.9.6 及之前版本包含 pygame.camera 模块。此模块包含在游戏窗口上捕获摄像头视频流并从中抓取图像的功能。系统可用的摄像头设备列在 list_cameras() 方法返回的列表中。
pygame.camera.list_cameras()
要初始化摄像头对象,请使用摄像头 ID、分辨率和格式参数。
pygame.camera.Camera(device, (width, height), format)
默认格式为 RGB。宽度和高度参数默认为 640x480。
camera 模块在 Camera 类中定义了以下方法。
| pygame.camera.Camera.start() | 打开、初始化并开始捕获 |
| pygame.camera.Camera.stop() | 停止、取消初始化并关闭摄像头 |
| pygame.camera.Camera.get_controls() | 获取用户控件的当前值 |
| pygame.camera.Camera.set_controls() | 如果摄像头支持,则更改摄像头设置 |
| pygame.camera.Camera.get_size() | 返回正在录制图像的尺寸 |
| pygame.camera.Camera.query_image() | 检查帧是否已准备好 |
| pygame.camera.Camera.get_image() | 将图像捕获为 Surface |
| pygame.camera.Camera.get_raw() | 以字符串形式返回未修改的图像 |
示例
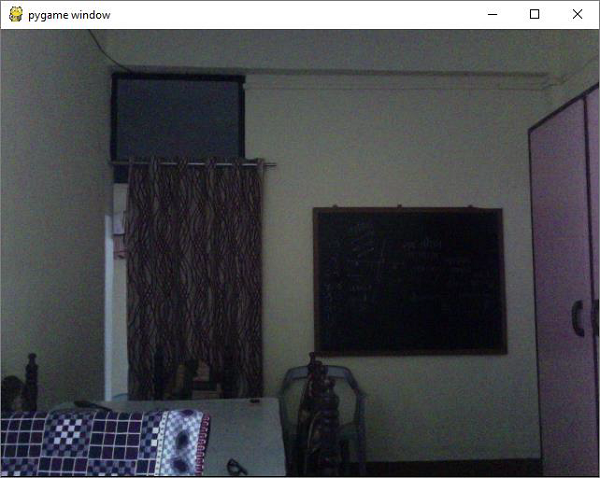
以下程序捕获计算机默认网络摄像头的实时视频流。
import pygame
import pygame.camera

pygame.init()

gameDisplay = pygame.display.set_mode((640,480))

pygame.camera.init()
print (pygame.camera.list_cameras())
cam = pygame.camera.Camera(0)
cam.start()
while True:
   img = cam.get_image()
   gameDisplay.blit(img,(0,0))
   pygame.display.update()
   for event in pygame.event.get() :
      if event.type == pygame.QUIT :
         cam.stop()
         pygame.quit()
         exit()
请注意,在 Windows 操作系统上,您可能需要安装 Videocapture 模块。
pip3 install VideoCapture
输出
Pygame - 加载光标
Pygame 允许您控制系统光标。Pygame 中只能使用黑白光标。pygame.cursors 模块定义包含预定义的光标枚举。
- pygame.cursors.arrow
- pygame.cursors.diamond
- pygame.cursors.broken_x
- pygame.cursors.tri_left
- pygame.cursors.tri_right
箭头光标是默认选择。要使用其他光标,我们使用 pygame.mouse 模块中的 set_cursor() 函数。
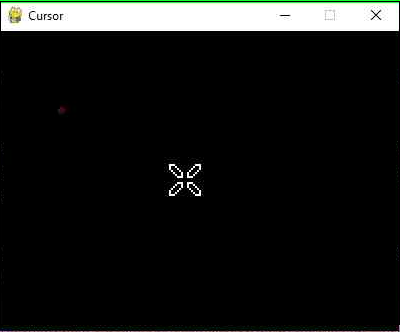
pygame.mouse.set_cursor(pygame.cursors.broken_x)
示例
在以下示例中,此光标可以在显示窗口上看到。
import pygame,sys
from pygame.locals import *
pygame.init()
pygame.mouse.set_cursor(pygame.cursors.broken_x)
canvas=pygame.display.set_mode((400,300))
pygame.display.set_caption("Cursor")
while True:
for event in pygame.event.get():
   if(event.type == QUIT):
      pygame.quit()
      sys.exit(1)
输出
此模块还包含一些格式化字符串形式的光标。要使用它们,请使用 pygame.cursors.compile() 函数。
- pygame.cursors.thickarrow_strings
- pygame.cursors.sizer_x_strings
- pygame.cursors.sizer_y_strings
- pygame.cursors.sizer_xy_strings
- pygame.cursor.textmarker_strings
cursor = pygame.cursors.compile(pygame.cursors.textmarker_strings)
pygame.mouse.set_cursor((10,10), (0, 0), *cursor)
Pygame - 访问 CDROM
pygame 库具有 pygame.cdrom 模块,该模块使程序能够管理来自音频 CD 和 DVD 的播放。我们需要显式初始化此模块才能使用它。
>>> import pygame
>>> pygame.cdrom.init()
该模块定义了所有重要的 CD 类来表示 CDROM 设备。构造函数需要可用的 CDROM 驱动器的 ID,从 0 开始。
>>> obj=pygame.cdrom.CD(0)
CDROM 对象可以访问以下有用的函数来控制播放。
| init() | 初始化 CDROM 驱动器以供使用 |
| quit() | 取消初始化 CDROM 驱动器以供使用 |
| play() | 开始播放音频 |
| stop() | 停止音频播放 |
| pause() | 临时停止音频播放 |
| resume() | 恢复音频播放 |
| eject() | 弹出或打开 CDROM 驱动器 |
| get_busy() | 如果驱动器正在播放音频,则为真 |
| get_paused() | 如果驱动器已暂停,则为真 |
| get_empty() | 如果驱动器中有 CDROM,则为假 |
| get_numtracks() | CDROM 上的轨道数 |
| get_track_audio() | 如果 CDROM 轨道具有音频数据,则为真 |
| get_track_start() | CDROM 轨道的开始时间 |
| get_track_length() | CDROM 轨道的长度 |
首先,初始化对象。
>>> obj.init()
要找出当前 CD 中有多少个轨道 -
>>> obj.get_numtracks()
8
要开始播放所需的轨道,请将其编号传递给 play() 函数。
>>> obj.play(4)
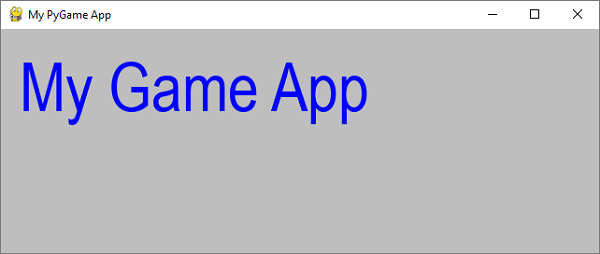
要暂停、恢复和停止播放,我们可以使用上面列出的相关函数。
Pygame - 精灵模块
在游戏窗口中绘制并可以四处移动的任何位图都称为精灵。pygame.sprite 模块包含在游戏开发中很有用的类和功能。除了用于创建精灵对象集合的 Sprite 类之外,还有使精灵对象发生碰撞的函数。
Sprite 类充当游戏中不同对象的基类。您可能需要将一个或多个对象放入组中。为此,也提供了组类。
让我们首先通过继承 sprite.Sprite 类来开发一个 Sprite 类。此 Block 类的每个对象都是一个填充黑色颜色的矩形块。
class Block(pygame.sprite.Sprite):

   def __init__(self, color, width, height):
      super().__init__()

      self.image = pygame.Surface([width, height])
      self.image.fill(color)

      self.rect = self.image.get_rect()
我们将创建 50 个块对象并将它们放入列表中。
for i in range(50):
   block = Block(BLACK, 20, 15)

   # Set a random location for the block
   block.rect.x = random.randrange(screen_width)
   block.rect.y = random.randrange(screen_height)

   # Add the block to the list of objects
   block_list.add(block)
   all_sprites_list.add(block)
我们创建一个红色块,将其称为 player,并将其也添加到列表中。
# Create a RED player block
player = Block(RED, 20, 15)
all_sprites_list.add(player)
在游戏的事件循环内,检测红色块(player)在随鼠标移动以及黑色块移动时发生的碰撞,并计算碰撞次数。
示例
事件循环代码如下 -
while not done:
   for event in pygame.event.get():
      if event.type == pygame.QUIT:
         done = True

   # Clear the screen
   screen.fill(WHITE)

   # Get the current mouse position. This returns the position
   # as a list of two numbers.
   pos = pygame.mouse.get_pos()

   # Fetch the x and y out of the list,
      # just like we'd fetch letters out of a string.
   # Set the player object to the mouse location
   player.rect.x = pos[0]
   player.rect.y = pos[1]

   # See if the player block has collided with anything.
   blocks_hit_list = pygame.sprite.spritecollide(player, block_list, True)

   # Check the list of collisions.
   for block in blocks_hit_list:
      score += 1
      print(score)

   # Draw all the spites
   all_sprites_list.draw(screen)

   # Go ahead and update the screen with what we've drawn.
   pygame.display.flip()

   # Limit to 60 frames per second
   clock.tick(60)

pygame.quit()
输出
运行上述代码。移动 player 块以捕获尽可能多的黑色块。分数将回显在控制台上。
Pygame - PyOpenGL
OpenGL 是一种跨语言、跨平台的 API,用于渲染 2D 和 3D 矢量图形。通过与图形处理单元 (GPU) 交互,它实现了硬件加速渲染。PyOpenGL 库是 Python 的 OpenGL 绑定。
我们需要使用 pip 实用程序安装它 -
pip3 install pyopengl
首先,我们将从 OpenGL.GL 和 OpenGL.GLU(实用程序函数)模块导入函数。
OpenGL 通过定义顶点或节点来指定空间内的对象。顶点之间的线称为边。OpenGL 代码编写在 glBegin 和 glEnd 之间。
在我们的示例中,我们将使用以下顶点和边绘制一个立方体 -
verticies = (
   (1, -1, -1),
   (1, 1, -1),
   (-1, 1, -1),
   (-1, -1, -1),
   (1, -1, 1),
   (1, 1, 1),
   (-1, -1, 1),
   (-1, 1, 1)
)
edges = (
   (0,1),
   (0,3),
   (0,4),
   (2,1),
   (2,3),
   (2,7),
   (6,3),
   (6,4),
   (6,7),
   (5,1),
   (5,4),
   (5,7)
)
cube() 函数执行 OpenGL 绘制 -
def Cube():
   glBegin(GL_LINES)
   for edge in edges:
      for vertex in edge:
         glVertex3fv(verticies[vertex])
   glEnd()
传递给 glBegin() 的 GL_LINES 属性表示要绘制线条。
我们需要在 set_mode() 函数中指定 OPENGL 和 DOUBLEBUF 标志,该函数设置显示。
pygame.display.set_mode(display, DOUBLEBUF|OPENGL)
然后调用 gluPerspective() 来确定透视。第一个参数是视野的度数。第二个值是纵横比。接下来的两个值分别是 znear 和 zfar,它们是近裁剪平面和远裁剪平面。
gluPerspective(45, (display[0]/display[1]), 0.1, 50.0)
glTranslatef(0.0,0.0, -5)
在 Pygame 事件循环内,首先旋转当前矩阵,清除颜色缓冲区和深度缓冲区,然后调用 cube() 函数。最后,我们更新显示窗口。
while True:
   for event in pygame.event.get():
      if event.type == pygame.QUIT:
         pygame.quit()
         quit()

   glRotatef(1, 3, 1, 1)
   glClear(GL_COLOR_BUFFER_BIT|GL_DEPTH_BUFFER_BIT)
   Cube()
   pygame.display.flip()
   pygame.time.wait(10)
示例
示例的完整代码如下 -
import pygame

from pygame.locals import *

from OpenGL.GL import *
from OpenGL.GLU import *

verticies = (
   (1, -1, -1),
   (1, 1, -1),
   (-1, 1, -1),
   (-1, -1, -1),
   (1, -1, 1),
   (1, 1, 1),
   (-1, -1, 1),
   (-1, 1, 1)
)
edges = (
   (0,1),
   (0,3),
   (0,4),
   (2,1),
   (2,3),
   (2,7),
   (6,3),
   (6,4),
   (6,7),
   (5,1),
   (5,4),
   (5,7)
)
def Cube():
   glBegin(GL_LINES)
   for edge in edges:
      for vertex in edge:
         glVertex3fv(verticies[vertex])
   glEnd()

def main():
   pygame.init()
   display = (800,600)
   pygame.display.set_mode(display, DOUBLEBUF|OPENGL)

   gluPerspective(45, (display[0]/display[1]), 0.1, 50.0)

   glTranslatef(0.0,0.0, -5)

   while True:
      for event in pygame.event.get():
         if event.type == pygame.QUIT:
            pygame.quit()
            quit()
      glRotatef(1, 3, 1, 1)
      glClear(GL_COLOR_BUFFER_BIT|GL_DEPTH_BUFFER_BIT)
      Cube()
      pygame.display.flip()
      pygame.time.wait(10)

main()
输出
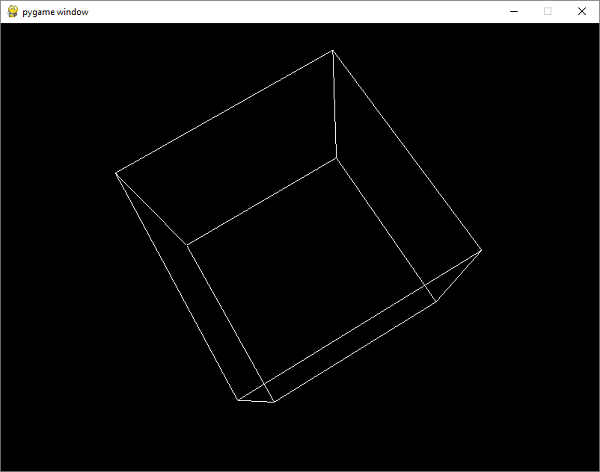
运行上述代码。您将在 Pygame 的窗口表面上看到一个旋转的立方体。这是 PyOpenGL 功能的简短演示。本教程不提供对该库的详细讨论。
Pygame - 错误和异常
顶级 pygame 模块将 pygame.error 定义为标准 Pygame 异常。每当 pygame 或 SDL 操作失败时,都会引发此异常。您可以捕获任何预期的问题并处理错误。此异常始终会引发包含有关问题的描述性消息。
>>> import pygame
pygame 1.9.6
Hello from the pygame community. https://www.pygame.org/contribute.html
>>> screen = pygame.display.set_mode((640, -1))
Traceback (most recent call last):
   File "<pyshell#1>", line 1, in <module>
      screen = pygame.display.set_mode((640, -1))
pygame.error: Cannot set negative sized display mode
派生自 RuntimeError 异常,也可以用来捕获这些引发的错误。
>>> try:
   screen = pygame.display.set_mode((640, -1))
except pygame.error as e:
   print ("unable to set display: ", e)

unable to set display Cannot set: negative sized display mode
此模块中还有两个函数用于设置和检索错误消息。
set_error(error_msg)
SDL 维护一个内部错误消息。当引发 pygame.error() 标准 pygame 异常时,此字符串用作错误消息。
获取当前错误消息。
get_error()
它返回 pygame.error() 消息的错误消息字符串。