- Spring Boot 教程
- Spring Boot - 首页
- Spring Boot - 简介
- Spring Boot - 快速入门
- Spring Boot - 引导
- Spring Tool Suite
- Spring Boot - Tomcat 部署
- Spring Boot - 构建系统
- Spring Boot - 代码结构
- Spring Bean & 依赖注入
- Spring Boot - 运行器
- Spring Boot - 启动器
- Spring Boot - 应用属性
- Spring Boot - 配置
- Spring Boot - 注解
- Spring Boot - 日志
- 构建 RESTful Web 服务
- Spring Boot - 异常处理
- Spring Boot - 拦截器
- Spring Boot - Servlet 过滤器
- Spring Boot - Tomcat 端口号
- Spring Boot - Rest Template
- Spring Boot - 文件处理
- Spring Boot - 服务组件
- Spring Boot - Thymeleaf
- 使用 RESTful Web 服务
- Spring Boot - CORS 支持
- Spring Boot - 国际化
- Spring Boot - 调度
- Spring Boot - 启用 HTTPS
- Spring Boot - Eureka 服务
- 使用 Eureka 进行服务注册
- 网关代理服务器和路由
- Spring Cloud 配置服务器
- Spring Cloud 配置客户端
- Spring Boot - Actuator
- Spring Boot - Admin 服务器
- Spring Boot - Admin 客户端
- Spring Boot - 启用 Swagger2
- Spring Boot - 使用 SpringDoc OpenAPI
- Spring Boot - 创建 Docker 镜像
- 追踪微服务日志
- Spring Boot - Flyway 数据库
- Spring Boot - 发送邮件
- Spring Boot - Hystrix
- Spring Boot - Web Socket
- Spring Boot - 批处理服务
- Spring Boot - Apache Kafka
- Spring Boot - Twilio
- Spring Boot - 单元测试用例
- Rest Controller 单元测试
- Spring Boot - 数据库处理
- 保护 Web 应用
- Spring Boot - 带 JWT 的 OAuth2
- Spring Boot - Google Cloud Platform
- Spring Boot - Google OAuth2 登录
- Spring Boot 资源
- Spring Boot - 快速指南
- Spring Boot - 有用资源
- Spring Boot - 讨论
Spring Boot - Apache Kafka
Apache Kafka 是一个开源项目,用于基于容错消息系统发布和订阅消息。它设计快速、可扩展且分布式。如果您是 Kafka 的初学者,或者想要更好地理解它,请参考此链接 − www.tutorialspoint.com/apache_kafka/
在本章中,我们将了解如何在 Spring Boot 应用程序中实现 Apache Kafka。
配置 Kafka
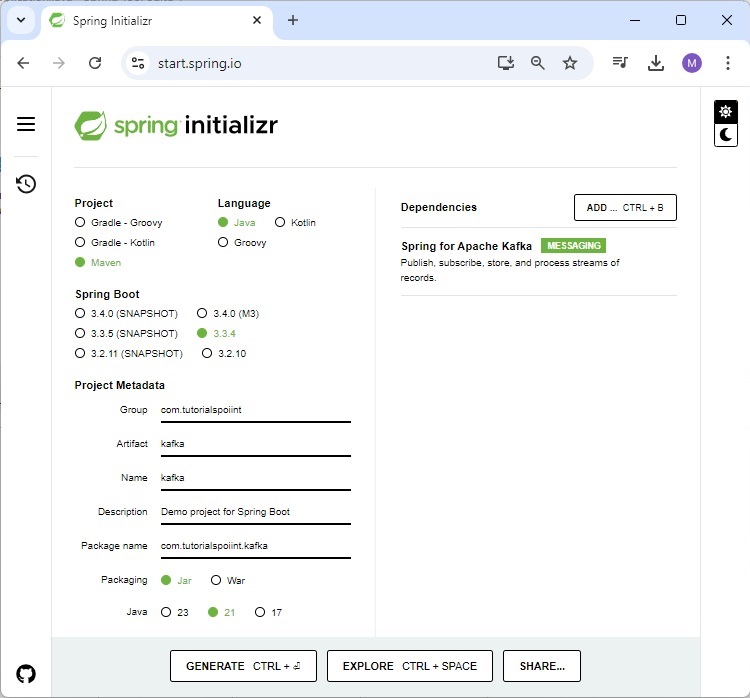
首先,从 Spring Initializer 页面下载 Spring Boot 项目 www.start.spring.io 并选择以下依赖项 −
- 用于 Apache Kafka 的 Spring
首先,我们需要在构建配置文件中添加 Spring Kafka 依赖项。
Maven 用户可以在 pom.xml 文件中添加以下依赖项。
<dependency>
   <groupId>org.springframework.kafka</groupId>
   <artifactId>spring-kafka</artifactId>
</dependency>
Gradle 用户可以在 build.gradle 文件中添加以下依赖项。
compile group: 'org.springframework.kafka', name: 'spring-kafka'
发送消息
为了向 Apache Kafka 发送消息,我们需要定义生产者配置的配置类,如下所示 −
KafkaProducerConfig.java
package com.tutorialspoint.kafka;

import java.util.HashMap;
import java.util.Map;

import org.apache.kafka.clients.producer.ProducerConfig;
import org.apache.kafka.common.serialization.StringSerializer;
import org.springframework.context.annotation.Bean;
import org.springframework.context.annotation.Configuration;
import org.springframework.kafka.core.DefaultKafkaProducerFactory;
import org.springframework.kafka.core.KafkaTemplate;
import org.springframework.kafka.core.ProducerFactory;

@Configuration
public class KafkaProducerConfig {
   @Bean
   ProducerFactory<String, String> producerFactory() {
      Map<String, Object> configProps = new HashMap<>();
      configProps.put(ProducerConfig.BOOTSTRAP_SERVERS_CONFIG, "localhost:9092");
      configProps.put(ProducerConfig.KEY_SERIALIZER_CLASS_CONFIG, StringSerializer.class);
      configProps.put(ProducerConfig.VALUE_SERIALIZER_CLASS_CONFIG, StringSerializer.class);
      return new DefaultKafkaProducerFactory<>(configProps);
   }
   @Bean
   KafkaTemplate<String, String> kafkaTemplate() {
      return new KafkaTemplate<>(producerFactory());
   }
}
要发布消息,请自动连接 Kafka Template 对象并生成消息,如下所示。
@Autowired
private KafkaTemplate<String, String> kafkaTemplate;

public void sendMessage(String msg) {
   kafkaTemplate.send(topicName, msg);
}
消费消息
要消费消息,我们需要编写一个消费者配置类文件,如下所示。
KafkaProducerConfig.java
package com.tutorialspoint.kafka;

import java.util.HashMap;
import java.util.Map;

import org.apache.kafka.clients.consumer.ConsumerConfig;
import org.apache.kafka.common.serialization.StringDeserializer;
import org.springframework.context.annotation.Bean;
import org.springframework.context.annotation.Configuration;
import org.springframework.kafka.annotation.EnableKafka;
import org.springframework.kafka.config.ConcurrentKafkaListenerContainerFactory;
import org.springframework.kafka.core.ConsumerFactory;
import org.springframework.kafka.core.DefaultKafkaConsumerFactory;

@EnableKafka
@Configuration
public class KafkaConsumerConfig {
   @Bean
   public ConsumerFactory<String, String> consumerFactory() {
      Map<String, Object> props = new HashMap<>();
      props.put(ConsumerConfig.BOOTSTRAP_SERVERS_CONFIG, "localhost:2181");
      props.put(ConsumerConfig.GROUP_ID_CONFIG, "group-id");
      props.put(ConsumerConfig.KEY_DESERIALIZER_CLASS_CONFIG, StringDeserializer.class);
      props.put(ConsumerConfig.VALUE_DESERIALIZER_CLASS_CONFIG, StringDeserializer.class);
      return new DefaultKafkaConsumerFactory<>(props);
   }
   @Bean
   public ConcurrentKafkaListenerContainerFactory<String, String> kafkaListenerContainerFactory() {
      ConcurrentKafkaListenerContainerFactory<String, String>
      factory = new ConcurrentKafkaListenerContainerFactory<>();
      factory.setConsumerFactory(consumerFactory());
      return factory;
   }
}
接下来,编写一个监听器来监听消息。
@KafkaListener(topics = "tutorialspoint", groupId = "group-id")
public void listen(String message) {
   System.out.println("Received Messasge in group - group-id: " + message);
}
让我们从主 Spring Boot 应用程序类文件的 ApplicationRunner 类 run 方法中调用 sendMessage() 方法,并从同一个类文件中消费消息。
您的主 Spring Boot 应用程序类文件代码如下所示 −
KafkaDemoApplication.java
package com.tutorialspoint.kafka;

import org.springframework.beans.factory.annotation.Autowired;
import org.springframework.boot.ApplicationArguments;
import org.springframework.boot.ApplicationRunner;
import org.springframework.boot.SpringApplication;
import org.springframework.boot.autoconfigure.SpringBootApplication;
import org.springframework.kafka.annotation.KafkaListener;
import org.springframework.kafka.core.KafkaTemplate;

@SpringBootApplication
public class KafkaDemoApplication implements ApplicationRunner {
   @Autowired
   private KafkaTemplate<String, String> kafkaTemplate;

   public void sendMessage(String msg) {
      kafkaTemplate.send("tutorialspoint", msg);
   }
   public static void main(String[] args) {
      SpringApplication.run(KafkaDemoApplication.class, args);
   }
   @KafkaListener(topics = "tutorialspoint", groupId = "group-id")
   public void listen(String message) {
      System.out.println("Received Messasge in group - group-id: " + message);
   }
   @Override
   public void run(ApplicationArguments args) throws Exception {
      sendMessage("Hi Welcome to Spring For Apache Kafka");
   }
}
完整的构建配置文件代码如下所示。
Maven – pom.xml
<?xml version="1.0" encoding="UTF-8"?>
<project xmlns="http://maven.apache.org/POM/4.0.0" xmlns:xsi="http://www.w3.org/2001/XMLSchema-instance"
   xsi:schemaLocation="http://maven.apache.org/POM/4.0.0 https://maven.apache.org/xsd/maven-4.0.0.xsd">
   <modelVersion>4.0.0</modelVersion>
   <parent>
      <groupId>org.springframework.boot</groupId>
      <artifactId>spring-boot-starter-parent</artifactId>
      <version>3.3.4</version>
      <relativePath/> <!-- lookup parent from repository -->
   </parent>
   <groupId>com.tutorialspoint</groupId>
   <artifactId>kafka</artifactId>
   <version>0.0.1-SNAPSHOT</version>
   <name>kafka</name>
   <description>Demo project for Spring Boot</description>
   <url/>
   <licenses>
      <license/>
   </licenses>
   <developers>
      <developer/>
   </developers>
   <scm>
      <connection/>
      <developerConnection/>
      <tag/>
      <url/>
   </scm>
   <properties>
      <java.version>21</java.version>
   </properties>
   <dependencies>
      <dependency>
         <groupId>org.springframework.boot</groupId>
         <artifactId>spring-boot-starter</artifactId>
      </dependency>
      <dependency>
         <groupId>org.springframework.kafka</groupId>
         <artifactId>spring-kafka</artifactId>
      </dependency>
      <dependency>
         <groupId>org.springframework.boot</groupId>
         <artifactId>spring-boot-starter-test</artifactId>
         <scope>test</scope>
      </dependency>
      <dependency>
         <groupId>org.springframework.kafka</groupId>
         <artifactId>spring-kafka-test</artifactId>
         <scope>test</scope>
      </dependency>
   </dependencies>
   <build>
      <plugins>
         <plugin>
            <groupId>org.springframework.boot</groupId>
            <artifactId>spring-boot-maven-plugin</artifactId>
         </plugin>
      </plugins>
   </build>
</project>
Gradle – build.gradle
buildscript {
   ext {
      springBootVersion = '3.3.4'
   }
   repositories {
      mavenCentral()
   }
   dependencies {
      classpath("org.springframework.boot:spring-boot-gradle-plugin:${springBootVersion}")
   }
}

apply plugin: 'java'
apply plugin: 'eclipse'
apply plugin: 'org.springframework.boot'

group = 'com.tutorialspoint'
version = '0.0.1-SNAPSHOT'
sourceCompatibility = 1.8

repositories {
   mavenCentral()
}
dependencies {
   compile('org.springframework.boot:spring-boot-starter')
   compile group: 'org.springframework.kafka', name: 'spring-kafka')
   testCompile('org.springframework.boot:spring-boot-starter-test')
   testCompile('org.springframework.kafka:spring-kafka-test')
}
现在,创建一个可执行的 JAR 文件,并使用以下 Maven 或 Gradle 命令运行 Spring Boot 应用程序,如下所示 −
对于 Maven,使用如下所示的命令 −
mvn clean install
“BUILD SUCCESS” 后,您可以在 target 目录下找到 JAR 文件。
对于 Gradle,使用如下所示的命令 −
gradle clean build
“BUILD SUCCESSFUL” 后,您可以在 build/libs 目录下找到 JAR 文件。
使用此处提供的命令运行 JAR 文件 −
java –jar <JARFILE>
您可以在控制台窗口中看到输出。
  .   ____          _            __ _ _
 /\\ / ___'_ __ _ _(_)_ __  __ _ \ \ \ \
( ( )\___ | '_ | '_| | '_ \/ _` | \ \ \ \
 \\/  ___)| |_)| | | | | || (_| |  ) ) ) )
  '  |____| .__|_| |_|_| |_\__, | / / / /
 =========|_|==============|___/=/_/_/_/

[32m :: Spring Boot :: [39m              [2m (v3.3.4)[0;39m

[2m2024-09-24T11:51:15.187+05:30[0;39m [32m INFO[0;39m [35m20404[0;39m [2m---[0;39m [2m[kafka] [           main][0;39m [2m[0;39m[36mc.t.kafka.KafkaApplication              [0;39m [2m:[0;39m Starting KafkaApplication using Java 21.0.3 with PID 20404 (E:\Dev\kafka\target\classes started by Tutorialspoint in E:\Dev\kafka)
[2m2024-09-24T11:51:15.189+05:30[0;39m [32m INFO[0;39m [35m20404[0;39m [2m---[0;39m [2m[kafka] [           main][0;39m [2m[0;39m[36mc.t.kafka.KafkaApplication              [0;39m [2m:[0;39m No active profile set, falling back to 1 default profile: "default"
[2m2024-09-24T11:51:16.022+05:30[0;39m [32m INFO[0;39m [35m20404[0;39m [2m---[0;39m [2m[kafka] [           main][0;39m [2m[0;39m[36mo.a.k.clients.consumer.ConsumerConfig   [0;39m [2m:[0;39m ConsumerConfig values:
	allow.auto.create.topics = true
	auto.commit.interval.ms = 5000
	auto.include.jmx.reporter = true
	auto.offset.reset = latest
	bootstrap.servers = [localhost:2181]
	...
	ssl.trustmanager.algorithm = PKIX
	ssl.truststore.certificates = null
	ssl.truststore.location = null
	ssl.truststore.password = null
	ssl.truststore.type = JKS
	value.deserializer = class org.apache.kafka.common.serialization.StringDeserializer

[2m2024-09-24T11:51:16.080+05:30[0;39m [32m INFO[0;39m [35m20404[0;39m [2m---[0;39m [2m[kafka] [           main][0;39m [2m[0;39m[36mo.a.k.c.t.i.KafkaMetricsCollector       [0;39m [2m:[0;39m initializing Kafka metrics collector
[2m2024-09-24T11:51:16.206+05:30[0;39m [32m INFO[0;39m [35m20404[0;39m [2m---[0;39m [2m[kafka] [           main][0;39m
...
[2m2024-09-24T11:51:16.247+05:30[0;39m [32m INFO[0;39m [35m20404[0;39m [2m---[0;39m [2m[kafka] [           main][0;39m [2m[0;39m[36mo.a.k.clients.producer.ProducerConfig   [0;39m [2m:[0;39m ProducerConfig values:
	acks = -1
	auto.include.jmx.reporter = true
	batch.size = 16384
	bootstrap.servers = [localhost:9092]
	buffer.memory = 33554432
	client.dns.lookup = use_all_dns_ips
	client.id = kafka-producer-1
    ...