- Spring Boot 教程
- Spring Boot - 首页
- Spring Boot - 简介
- Spring Boot 快速入门
- Spring Boot - 启动
- Spring Tool Suite
- Spring Boot - Tomcat 部署
- Spring Boot - 构建系统
- Spring Boot - 代码结构
- Spring Bean & 依赖注入
- Spring Boot - 运行器
- Spring Boot - 启动器
- Spring Boot - 应用属性
- Spring Boot - 配置
- Spring Boot - 注解
- Spring Boot - 日志
- 构建 RESTful Web 服务
- Spring Boot - 异常处理
- Spring Boot - 拦截器
- Spring Boot - Servlet 过滤器
- Spring Boot - Tomcat 端口号
- Spring Boot - Rest Template
- Spring Boot - 文件处理
- Spring Boot - 服务组件
- Spring Boot - Thymeleaf
- 消费 RESTful Web 服务
- Spring Boot - CORS 支持
- Spring Boot - 国际化
- Spring Boot - 调度
- Spring Boot - 启用 HTTPS
- Spring Boot - Eureka Server
- 使用 Eureka 注册服务
- 网关代理服务器和路由
- Spring Cloud 配置服务器
- Spring Cloud 配置客户端
- Spring Boot - Actuator
- Spring Boot - Admin 服务器
- Spring Boot - Admin 客户端
- Spring Boot - 启用 Swagger2
- Spring Boot - 使用 SpringDoc OpenAPI
- Spring Boot - 创建 Docker 镜像
- 追踪微服务日志
- Spring Boot - Flyway 数据库
- Spring Boot - 发送邮件
- Spring Boot - Hystrix
- Spring Boot - WebSocket
- Spring Boot - 批处理服务
- Spring Boot - Apache Kafka
- Spring Boot - Twilio
- Spring Boot - 单元测试用例
- Rest Controller 单元测试
- Spring Boot - 数据库处理
- 保护 Web 应用
- Spring Boot - 使用 JWT 的 OAuth2
- Spring Boot - Google Cloud Platform
- Spring Boot - Google OAuth2 登录
- Spring Boot 资源
- Spring Boot - 快速指南
- Spring Boot - 有用资源
- Spring Boot - 讨论
Spring Boot 快速入门
本章将教你如何使用 Maven 和 Gradle 创建 Spring Boot 应用程序。
先决条件
你的系统需要满足以下最低要求才能创建 Spring Boot 应用程序:
- Java 17
- Maven 3.6.3
- Gradle 7.5
Spring Boot CLI
Spring Boot CLI 是一个命令行工具,它允许我们运行 Groovy 脚本。这是使用 Spring Boot 命令行接口创建 Spring Boot 应用程序最简单的方法。你可以在命令提示符本身创建、运行和测试应用程序。
本节解释了手动安装 Spring Boot CLI 的步骤。如需更多帮助,请访问以下链接:https://docs.springframework.org.cn/spring-boot/installing.html
你也可以从 Spring 软件仓库下载 Spring CLI 分发版:https://repo.maven.apache.org/maven2/org/springframework/boot/spring-boot-cli/3.3.3/spring-boot-cli-3.3.3-bin.zip
对于手动安装,你需要使用以下两个存档文件之一:
spring-boot-cli-3.3.3-bin.zip
spring-boot-cli-3.3.3-bin.tar.gz
下载后,解压存档文件并按照 install.txt 文件中的步骤操作。请注意,它不需要任何环境设置。
在 Windows 中,在命令提示符中进入 Spring Boot CLI 的 **bin** 目录,并运行命令 **spring --version** 以确保 Spring CLI 正确安装。执行命令后,你将看到如下所示的 Spring CLI 版本:
E:\spring-3.3.3\bin&t; spring --version
Spring CLI v3.3.3
E:\spring-3.3.3\bin>
使用 Spring Boot CLI 创建欢迎消息 Web 应用程序
E:\spring-3.3.3\bin> spring init --build maven -a test
Using service at https://start.spring.io
Content saved to 'test.zip'
E:\spring-3.3.3\bin>
现在你可以检查到一个基于maven的spring boot项目已创建,其中包含以下pom.xml文件
<?xml version="1.0" encoding="UTF-8"?>
   <project xmlns="http://maven.apache.org/POM/4.0.0" xmlns:xsi="http://www.w3.org/2001/XMLSchema-instance"
   xsi:schemaLocation="http://maven.apache.org/POM/4.0.0 https://maven.apache.org/xsd/maven-4.0.0.xsd">
   <modelVersion>4.0.0</modelVersion>
   <parent>
      <groupId>org.springframework.boot</groupId>
      <artifactId>spring-boot-starter-parent</artifactId>
      <version>3.3.3</version>
      <relativePath/> <!-- lookup parent from repository -->
   </parent>
   <groupId>com.example</groupId>
   <artifactId>test</artifactId>
   <version>0.0.1-SNAPSHOT</version>
   <name>demo</name>
   <description>Demo project for Spring Boot</description>
   <url/>
   <licenses>
      <license/>
   </licenses>
   <developers>
      <developer/>
   </developers>
   <scm>
      <connection/>
      <developerConnection/>
      <tag/>
      <url/>
   </scm>
   <properties>
      <java.version>17</java.version>
   </properties>
   <dependencies>
      <dependency>
         <groupId>org.springframework.boot</groupId>
         <artifactId>spring-boot-starter</artifactId>
      </dependency>
      <dependency>
         <groupId>org.springframework.boot</groupId>
         <artifactId>spring-boot-starter-test</artifactId>
         <scope>test</scope>
      </dependency>
   </dependencies>
   <build>
      <plugins>
         <plugin>
            <groupId>org.springframework.boot</groupId>
            <artifactId>spring-boot-maven-plugin</artifactId>
         </plugin>
      </plugins>
   </build>
</project>
以及一个充当主应用程序类的Java类。
package com.example.test;

import org.springframework.boot.SpringApplication;
import org.springframework.boot.autoconfigure.SpringBootApplication;

@SpringBootApplication
public class DemoApplication {
   public static void main(String[] args) {
      SpringApplication.run(DemoApplication.class, args);
   }
   @RequestMapping("/")
	String home() {
		return "Hello World!";
	}
}
让我们在pom.xml中添加spring boot starter web依赖项。
<dependency>
   <groupId>org.springframework.boot</groupId>
   <artifactId>spring-boot-starter-web</artifactId>
</dependency>
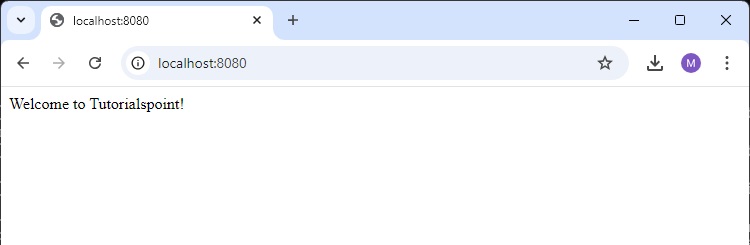
以及带有端点来打印“欢迎来到 Tutorialspoint!”的DemoApplication.java。
package com.example.test;

import org.springframework.boot.SpringApplication;
import org.springframework.boot.autoconfigure.SpringBootApplication;
import org.springframework.web.bind.annotation.GetMapping;
import org.springframework.web.bind.annotation.RestController;

@RestController
@SpringBootApplication
public class DemoApplication {

   public static void main(String[] args) {
      SpringApplication.run(DemoApplication.class, args);
   }

   @GetMapping("/")
   String home() {
      return "Welcome to Tutorialspoint!";
   }
}
现在使用maven命令 **mvn spring-boot:run** 运行应用程序,如下所示:
E:\spring-3.3.3\bin\test>mvn spring-boot:run
运行命令后,所需的依赖项将自动下载,它将在 Tomcat 8080 端口启动应用程序,如下面的屏幕截图所示:
[INFO] Scanning for projects...
[INFO]
[INFO] --------------------------< com.example:test >--------------------------
[INFO] Building demo 0.0.1-SNAPSHOT
[INFO]   from pom.xml
[INFO] --------------------------------[ jar ]---------------------------------
[INFO]
[INFO] >>> spring-boot:3.3.3:run (default-cli) > test-compile @ test >>>
[INFO]
[INFO] --- resources:3.3.1:resources (default-resources) @ test ---
[INFO] Copying 1 resource from src\main\resources to target\classes
[INFO] Copying 0 resource from src\main\resources to target\classes
[INFO]
[INFO] --- compiler:3.13.0:compile (default-compile) @ test ---
[INFO] Recompiling the module because of added or removed source files.
[INFO] Compiling 1 source file with javac [debug parameters release 17] to target\classes
[INFO]
[INFO] --- resources:3.3.1:testResources (default-testResources) @ test ---
[INFO] skip non existing resourceDirectory E:\spring-3.3.3\bin\test\src\test\resources
[INFO]
[INFO] --- compiler:3.13.0:testCompile (default-testCompile) @ test ---
[INFO] Recompiling the module because of changed dependency.
[INFO] Compiling 1 source file with javac [debug parameters release 17] to target\test-classes
[INFO]
[INFO] <<< spring-boot:3.3.3:run (default-cli) < test-compile @ test <<<
[INFO]
[INFO]
[INFO] --- spring-boot:3.3.3:run (default-cli) @ test ---
Downloading from central: https://repo.maven.apache.org/maven2/org/springframework/boot/spring-boot-buildpack-platform/3.3.3/spring-boot-buildpack-platform-3.3.3.pom
...
[INFO] Attaching agents: []

  .   ____          _            __ _ _
 /\\ / ___'_ __ _ _(_)_ __  __ _ \ \ \ \
( ( )\___ | '_ | '_| | '_ \/ _` | \ \ \ \
 \\/  ___)| |_)| | | | | || (_| |  ) ) ) )
  '  |____| .__|_| |_|_| |_\__, | / / / /
 =========|_|==============|___/=/_/_/_/

 :: Spring Boot ::                (v3.3.3)

2024-09-02T16:30:13.931+05:30  INFO 19320 --- [demo] [           main] com.example.test.DemoApplication         : Starting DemoApplication using Java 21.0.2 with PID 19320 (E:\spring-3.3.3\bin\test\target\classes started by Tutorialspoint in E:\spring-3.3.3\bin\test)
2024-09-02T16:30:13.937+05:30  INFO 19320 --- [demo] [           main] com.example.test.DemoApplication         : No active profile set, falling back to 1 default profile: "default"
2024-09-02T16:30:15.753+05:30  INFO 19320 --- [demo] [           main] o.s.b.w.embedded.tomcat.TomcatWebServer  : Tomcat initialized with port 8080 (http)
2024-09-02T16:30:15.801+05:30  INFO 19320 --- [demo] [           main] o.apache.catalina.core.StandardService   : Starting service [Tomcat]
2024-09-02T16:30:15.801+05:30  INFO 19320 --- [demo] [           main] o.apache.catalina.core.StandardEngine    : Starting Servlet engine: [Apache Tomcat/10.1.28]
2024-09-02T16:30:15.975+05:30  INFO 19320 --- [demo] [           main] o.a.c.c.C.[Tomcat].[localhost].[/]       : Initializing Spring embedded WebApplicationContext
2024-09-02T16:30:15.975+05:30  INFO 19320 --- [demo] [           main] w.s.c.ServletWebServerApplicationContext : Root WebApplicationContext: initialization completed in 1946 ms
2024-09-02T16:30:16.625+05:30  INFO 19320 --- [demo] [           main] o.s.b.w.embedded.tomcat.TomcatWebServer  : Tomcat started on port 8080 (http) with context path '/'
2024-09-02T16:30:16.636+05:30  INFO 19320 --- [demo] [           main] com.example.test.DemoApplication         : Started DemoApplication in 3.707 seconds (process running for 4.316)
Tomcat启动后,访问浏览器并输入URL **https://:8080/**,你将看到如下所示的输出。