- Spring Boot 教程
- Spring Boot - 首页
- Spring Boot - 简介
- Spring Boot - 快速入门
- Spring Boot - 引导
- Spring Tool Suite
- Spring Boot - Tomcat 部署
- Spring Boot - 构建系统
- Spring Boot - 代码结构
- Spring Bean & 依赖注入
- Spring Boot - 运行器
- Spring Boot - 启动器
- Spring Boot - 应用属性
- Spring Boot - 配置
- Spring Boot - 注解
- Spring Boot - 日志
- 构建 RESTful Web 服务
- Spring Boot - 异常处理
- Spring Boot - 拦截器
- Spring Boot - Servlet 过滤器
- Spring Boot - Tomcat 端口号
- Spring Boot - Rest 模板
- Spring Boot - 文件处理
- Spring Boot - 服务组件
- Spring Boot - Thymeleaf
- 使用 RESTful Web 服务
- Spring Boot - CORS 支持
- Spring Boot - 国际化
- Spring Boot - 调度
- Spring Boot - 启用 HTTPS
- Spring Boot - Eureka 服务器
- 使用 Eureka 进行服务注册
- 网关代理服务器和路由
- Spring Cloud 配置服务器
- Spring Cloud 配置客户端
- Spring Boot - Actuator
- Spring Boot - Admin 服务器
- Spring Boot - Admin 客户端
- Spring Boot - 启用 Swagger2
- Spring Boot - 使用 SpringDoc OpenAPI
- Spring Boot - 创建 Docker 镜像
- 追踪微服务日志
- Spring Boot - Flyway 数据库
- Spring Boot - 发送电子邮件
- Spring Boot - Hystrix
- Spring Boot - Web Socket
- Spring Boot - 批处理服务
- Spring Boot - Apache Kafka
- Spring Boot - Twilio
- Spring Boot - 单元测试用例
- Rest Controller 单元测试
- Spring Boot - 数据库处理
- 保护 Web 应用程序
- Spring Boot - 使用 JWT 的 OAuth2
- Spring Boot - Google Cloud Platform
- Spring Boot - Google OAuth2 登录
- Spring Boot 资源
- Spring Boot - 快速指南
- Spring Boot - 有用资源
- Spring Boot - 讨论
Spring Boot - 发送电子邮件
使用 Spring Boot RESTful web 服务,您可以使用 Gmail 传输层安全协议发送电子邮件。本章,我们将详细了解如何使用此功能。
首先,我们需要在您的构建配置文件中添加 Spring Boot Starter Mail 依赖项。
Maven 用户可以将以下依赖项添加到 pom.xml 文件中。
<dependency>
   <groupId>org.springframework.boot</groupId>
   <artifactId>spring-boot-starter-mail</artifactId>
</dependency>
Gradle 用户可以在您的 build.gradle 文件中添加以下依赖项。
compile('org.springframework.boot:spring-boot-starter-mail')
以下是主 Spring Boot 应用类文件的代码:
package com.tutorialspoint.emailapp;

import org.springframework.boot.SpringApplication;
import org.springframework.boot.autoconfigure.SpringBootApplication;

@SpringBootApplication
public class EmailappApplication {
   public static void main(String[] args) {
      SpringApplication.run(EmailappApplication.class, args);
   }
}
您可以在 Rest Controller 类文件中编写一个简单的 Rest API 来发送电子邮件,如下所示。
package com.tutorialspoint.emailapp;

import org.springframework.web.bind.annotation.GetMapping;
import org.springframework.web.bind.annotation.RestController;

@RestController
public class EmailController {
   @GetMapping(value = "/sendemail")
   public String sendEmail() {
      return "Email sent successfully";
   }
}
您可以编写一个方法来发送带有附件的电子邮件。定义 mail.smtp 属性并使用 PasswordAuthentication。
private void sendmail() throws AddressException, MessagingException, IOException {
   Properties props = new Properties();
   props.put("mail.smtp.auth", "true");
   props.put("mail.smtp.starttls.enable", "true");
   props.put("mail.smtp.host", "smtp.gmail.com");
   props.put("mail.smtp.port", "587");

   Session session = Session.getInstance(props, new javax.mail.Authenticator() {
      protected PasswordAuthentication getPasswordAuthentication() {
         return new PasswordAuthentication("tutorialspoint@gmail.com", "<your password>");
      }
   });
   Message msg = new MimeMessage(session);
   msg.setFrom(new InternetAddress("tutorialspoint@gmail.com", false));

   msg.setRecipients(Message.RecipientType.TO, InternetAddress.parse("tutorialspoint@gmail.com"));
   msg.setSubject("Tutorials point email");
   msg.setContent("Tutorials point email", "text/html");
   msg.setSentDate(new Date());

   MimeBodyPart messageBodyPart = new MimeBodyPart();
   messageBodyPart.setContent("Tutorials point email", "text/html");

   Multipart multipart = new MimeMultipart();
   multipart.addBodyPart(messageBodyPart);
   MimeBodyPart attachPart = new MimeBodyPart();

   attachPart.attachFile("/var/tmp/image19.png");
   multipart.addBodyPart(attachPart);
   msg.setContent(multipart);
   Transport.send(msg);
}
现在,从 Rest API 调用上面的 sendmail() 方法,如下所示:
@GetMapping(value = "/sendemail")
public String sendEmail() throws AddressException, MessagingException, IOException {
   sendmail();
   return "Email sent successfully";
}
注意 - 发送电子邮件之前,请在您的 Gmail 帐户设置中启用“允许安全性较低的应用”。
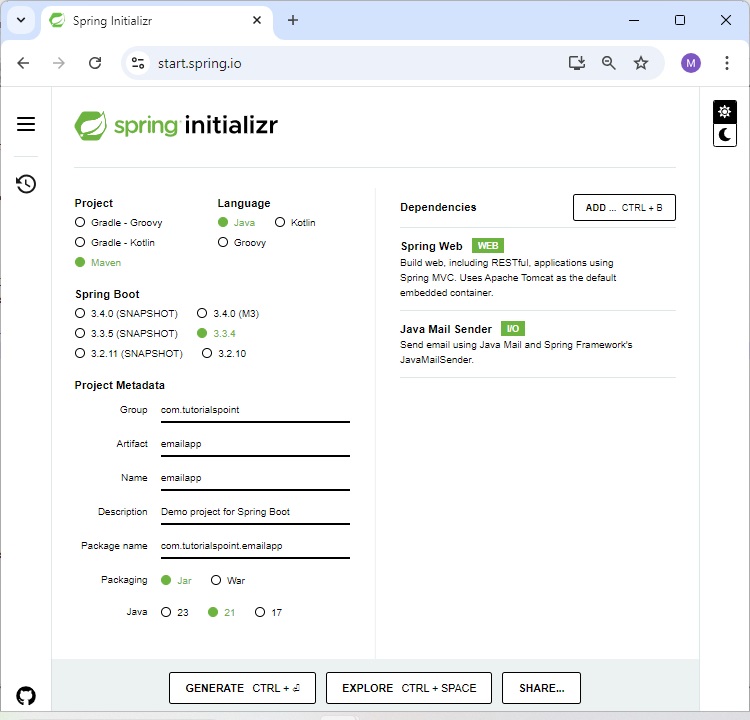
创建邮件服务器
首先,从 Spring Initializer 页面下载 Spring Boot 项目,并选择 Spring Web 和 Java Mail Sender 作为依赖项。请参考下面的截图:
完整的构建配置文件如下所示。
Maven – pom.xml
<?xml version="1.0" encoding="UTF-8"?>
<project xmlns="http://maven.apache.org/POM/4.0.0" xmlns:xsi="http://www.w3.org/2001/XMLSchema-instance"
   xsi:schemaLocation="http://maven.apache.org/POM/4.0.0 https://maven.apache.org/xsd/maven-4.0.0.xsd">
   <modelVersion>4.0.0</modelVersion>
   <parent>
      <groupId>org.springframework.boot</groupId>
      <artifactId>spring-boot-starter-parent</artifactId>
      <version>3.3.4</version>
      <relativePath/> <!-- lookup parent from repository -->
   </parent>
   <groupId>com.tutorialspoint</groupId>
   <artifactId>emailapp</artifactId>
   <version>0.0.1-SNAPSHOT</version>
   <name>emailapp</name>
   <description>Demo project for Spring Boot</description>
   <url/>
   <licenses>
      <license/>
   </licenses>
   <developers>
      <developer/>
   </developers>
   <scm>
      <connection/>
      <developerConnection/>
      <tag/>
      <url/>
   </scm>
   <properties>
      <java.version>21</java.version>
   </properties>
   <dependencies>
      <dependency>
         <groupId>org.springframework.boot</groupId>
         <artifactId>spring-boot-starter-mail</artifactId>
      </dependency>
      <dependency>
         <groupId>org.springframework.boot</groupId>
         <artifactId>spring-boot-starter-web</artifactId>
      </dependency>
      <dependency>
         <groupId>org.springframework.boot</groupId>
         <artifactId>spring-boot-starter-test</artifactId>
         <scope>test</scope>
      </dependency>
   </dependencies>
   <build>
      <plugins>
         <plugin>
            <groupId>org.springframework.boot</groupId>
            <artifactId>spring-boot-maven-plugin</artifactId>
         </plugin>
      </plugins>
   </build>
</project>
Gradle – build.gradle
buildscript {
   ext {
      springBootVersion = '3.3.4'
   }
   repositories {
      mavenCentral()
   }
   dependencies {
      classpath("org.springframework.boot:spring-boot-gradle-plugin:${springBootVersion}")
   }
}

apply plugin: 'java'
apply plugin: 'eclipse'
apply plugin: 'org.springframework.boot'

group = 'com.tutorialspoint'
version = '0.0.1-SNAPSHOT'
sourceCompatibility = 21

repositories {
   mavenCentral()
}
dependencies {
   compile('org.springframework.boot:spring-boot-starter-web')
   compile('org.springframework.boot:spring-boot-starter-mail')
   testCompile('org.springframework.boot:spring-boot-starter-test')
}
EmailController.java
package com.tutorialspoint.emailapp;

import java.io.IOException;
import java.util.Date;
import java.util.Properties;

import org.springframework.web.bind.annotation.GetMapping;
import org.springframework.web.bind.annotation.RestController;

import jakarta.mail.Authenticator;
import jakarta.mail.Message;
import jakarta.mail.MessagingException;
import jakarta.mail.Multipart;
import jakarta.mail.PasswordAuthentication;
import jakarta.mail.Session;
import jakarta.mail.Transport;
import jakarta.mail.internet.AddressException;
import jakarta.mail.internet.InternetAddress;
import jakarta.mail.internet.MimeBodyPart;
import jakarta.mail.internet.MimeMessage;
import jakarta.mail.internet.MimeMultipart;

@RestController
public class EmailController {
   @GetMapping(value = "/sendemail")
   public String sendEmail() throws AddressException, MessagingException, IOException {
      sendmail();
      return "Email sent successfully";
   }

   private void sendmail() throws AddressException, MessagingException, IOException {
      Properties props = new Properties();
      props.put("mail.smtp.auth", "true");
      props.put("mail.smtp.starttls.enable", "true");
      props.put("mail.smtp.host", "smtp.gmail.com");
      props.put("mail.smtp.port", "587");

      Session session = Session.getInstance(props, new Authenticator() {
         protected PasswordAuthentication getPasswordAuthentication() {
            return new PasswordAuthentication("tutorialspoint@gmail.com", "<your password>");
         }
      });
      Message msg = new MimeMessage(session);
      msg.setFrom(new InternetAddress("tutorialspoint@gmail.com", false));

      msg.setRecipients(Message.RecipientType.TO, InternetAddress.parse("tutorialspoint@gmail.com"));
      msg.setSubject("Tutorials point email");
      msg.setContent("Tutorials point email", "text/html");
      msg.setSentDate(new Date());

      MimeBodyPart messageBodyPart = new MimeBodyPart();
      messageBodyPart.setContent("Tutorials point email", "text/html");

      Multipart multipart = new MimeMultipart();
      multipart.addBodyPart(messageBodyPart);
      MimeBodyPart attachPart = new MimeBodyPart();

      attachPart.attachFile("/var/tmp/image19.png");
      multipart.addBodyPart(attachPart);
      msg.setContent(multipart);
      Transport.send(msg);
   }
}
编译和执行
现在,您可以创建一个可执行的 JAR 文件,并使用下面显示的 Maven 或 Gradle 命令运行 Spring Boot 应用程序:
对于 Maven,您可以使用如下所示的命令:
mvn clean install
“BUILD SUCCESS”之后,您可以在 target 目录下找到 JAR 文件。
对于 Gradle,您可以使用如下所示的命令:
gradle clean build
“BUILD SUCCESSFUL”之后,您可以在 build/libs 目录下找到 JAR 文件。
现在,使用以下命令运行 JAR 文件:
java –jar <JARFILE>
您可以看到应用程序已在 Tomcat 端口 8080 上启动。
  .   ____          _            __ _ _
 /\\ / ___'_ __ _ _(_)_ __  __ _ \ \ \ \
( ( )\___ | '_ | '_| | '_ \/ _` | \ \ \ \
 \\/  ___)| |_)| | | | | || (_| |  ) ) ) )
  '  |____| .__|_| |_|_| |_\__, | / / / /
 =========|_|==============|___/=/_/_/_/

[32m :: Spring Boot :: [39m              [2m (v3.3.4)[0;39m

[2m2024-09-20T16:44:57.869+05:30[0;39m [32m INFO[0;39m [35m14684[0;39m [2m---[0;39m [2m[emailapp] [           main][0;39m [2m[0;39m[36mc.t.emailapp.EmailappApplication        [0;39m [2m:[0;39m Starting EmailappApplication using Java 21.0.3 with PID 14684 (E:\Dev\emailapp\target\classes started by Tutorialspoint in E:\Dev\emailapp)
[2m2024-09-20T16:44:57.872+05:30[0;39m [32m INFO[0;39m [35m14684[0;39m [2m---[0;39m [2m[emailapp] [           main][0;39m [2m[0;39m[36mc.t.emailapp.EmailappApplication        [0;39m [2m:[0;39m No active profile set, falling back to 1 default profile: "default"
[2m2024-09-20T16:44:58.799+05:30[0;39m [32m INFO[0;39m [35m14684[0;39m [2m---[0;39m [2m[emailapp] [           main][0;39m [2m[0;39m[36mo.s.b.w.embedded.tomcat.TomcatWebServer [0;39m [2m:[0;39m Tomcat initialized with port 8080 (http)
[2m2024-09-20T16:44:58.815+05:30[0;39m [32m INFO[0;39m [35m14684[0;39m [2m---[0;39m [2m[emailapp] [           main][0;39m [2m[0;39m[36mo.apache.catalina.core.StandardService  [0;39m [2m:[0;39m Starting service [Tomcat]
[2m2024-09-20T16:44:58.816+05:30[0;39m [32m INFO[0;39m [35m14684[0;39m [2m---[0;39m [2m[emailapp] [           main][0;39m [2m[0;39m[36mo.apache.catalina.core.StandardEngine   [0;39m [2m:[0;39m Starting Servlet engine: [Apache Tomcat/10.1.30]
[2m2024-09-20T16:44:58.873+05:30[0;39m [32m INFO[0;39m [35m14684[0;39m [2m---[0;39m [2m[emailapp] [           main][0;39m [2m[0;39m[36mo.a.c.c.C.[Tomcat].[localhost].[/]      [0;39m [2m:[0;39m Initializing Spring embedded WebApplicationContext
[2m2024-09-20T16:44:58.874+05:30[0;39m [32m INFO[0;39m [35m14684[0;39m [2m---[0;39m [2m[emailapp] [           main][0;39m [2m[0;39m[36mw.s.c.ServletWebServerApplicationContext[0;39m [2m:[0;39m Root WebApplicationContext: initialization completed in 948 ms
[2m2024-09-20T16:44:59.229+05:30[0;39m [32m INFO[0;39m [35m14684[0;39m [2m---[0;39m [2m[emailapp] [           main][0;39m [2m[0;39m[36mo.s.b.w.embedded.tomcat.TomcatWebServer [0;39m [2m:[0;39m Tomcat started on port 8080 (http) with context path '/'
[2m2024-09-20T16:44:59.238+05:30[0;39m [32m INFO[0;39m [35m14684[0;39m [2m---[0;39m [2m[emailapp] [           main][0;39m [2m[0;39m[36mc.t.emailapp.EmailappApplication        [0;39m [2m:[0;39m Started EmailappApplication in 1.818 seconds (process running for 2.696)
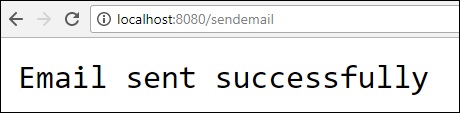
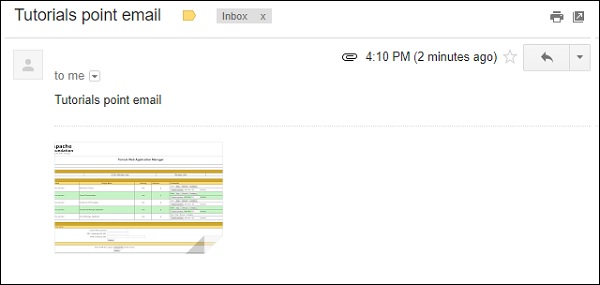
现在从您的 Web 浏览器访问以下 URL,您将收到一封电子邮件。
https://:8080/sendemail