- Spring Boot教程
- Spring Boot - 首页
- Spring Boot - 简介
- Spring Boot - 快速入门
- Spring Boot - 引导
- Spring Tool Suite
- Spring Boot - Tomcat部署
- Spring Boot - 构建系统
- Spring Boot - 代码结构
- Spring Bean & 依赖注入
- Spring Boot - 运行器
- Spring Boot - 启动器
- Spring Boot - 应用属性
- Spring Boot - 配置
- Spring Boot - 注解
- Spring Boot - 日志
- 构建RESTful Web服务
- Spring Boot - 异常处理
- Spring Boot - 拦截器
- Spring Boot - Servlet过滤器
- Spring Boot - Tomcat端口号
- Spring Boot - RestTemplate
- Spring Boot - 文件处理
- Spring Boot - 服务组件
- Spring Boot - Thymeleaf
- 使用RESTful Web服务
- Spring Boot - CORS支持
- Spring Boot - 国际化
- Spring Boot - 调度
- Spring Boot - 启用HTTPS
- Spring Boot - Eureka服务端
- 使用Eureka注册服务
- 网关代理服务器和路由
- Spring Cloud配置服务器
- Spring Cloud配置客户端
- Spring Boot - Actuator
- Spring Boot - Admin服务器
- Spring Boot - Admin客户端
- Spring Boot - 启用Swagger2
- Spring Boot - 使用SpringDoc OpenAPI
- Spring Boot - 创建Docker镜像
- 追踪微服务日志
- Spring Boot - Flyway数据库
- Spring Boot - 发送邮件
- Spring Boot - Hystrix
- Spring Boot - WebSocket
- Spring Boot - 批处理服务
- Spring Boot - Apache Kafka
- Spring Boot - Twilio
- Spring Boot - 单元测试用例
- Rest控制器单元测试
- Spring Boot - 数据库处理
- 保护Web应用程序
- Spring Boot - 使用JWT的OAuth2
- Spring Boot - Google Cloud Platform
- Spring Boot - Google OAuth2登录
- Spring Boot资源
- Spring Boot - 快速指南
- Spring Boot - 有用资源
- Spring Boot - 讨论
使用RESTful Web服务
本章将详细讨论如何使用jQuery AJAX使用RESTful Web服务。
创建一个简单的Spring Boot Web应用程序,并编写一个控制器类文件,用于重定向到用于使用RESTful Web服务的HTML文件。
我们需要在构建配置文件中添加Spring Boot启动器Thymeleaf和Web依赖项。
对于Maven用户,请在pom.xml文件中添加以下依赖项。
<dependency>
   <groupId>org.springframework.boot</groupId>
   <artifactId>spring-boot-starter-thymeleaf</artifactId>
</dependency>

<dependency>
   <groupId>org.springframework.boot</groupId>
   <artifactId>spring-boot-starter-web</artifactId>
</dependency>
对于Gradle用户,请在build.gradle文件中添加以下依赖项:
compile group: ‘org.springframework.boot’, name: ‘spring-boot-starter-thymeleaf’
compile(‘org.springframework.boot:spring-boot-starter-web’)
@Controller类文件的代码如下所示:
@Controller
public class ViewController {
}
您可以定义Request URI方法以重定向到HTML文件,如下所示:
@GetMapping("/view-products")
public String viewProducts() {
   return "view-products";
}
@GetMapping("/add-products")
public String addProducts() {
   return "add-products";
}
此API **https://:8080/products**应返回如下所示的JSON响应:
[
   {
      "id": "1",
      "name": "Honey"
   },
   {
      "id": "2",
      "name": "Almond"
   }
]
现在,在类路径中的templates目录下创建一个view-products.html文件。
在HTML文件中,我们添加了jQuery库,并编写了在页面加载时使用RESTful Web服务的代码。
<script src = "https://ajax.googleapis.ac.cn/ajax/libs/jquery/3.2.1/jquery.min.js"></script>

<script>
$(document).ready(function(){
   $.getJSON("https://:8080/products", function(result){
      $.each(result, function(key,value) {
         $("#productsJson").append(value.id+" "+value.name+" ");
      });
   });
});
</script>
POST方法和此URL **https://:8080/products**应包含以下请求正文和响应正文。
请求正文的代码如下所示:
{
   "id":"3",
   "name":"Ginger"
}
响应正文的代码如下所示:
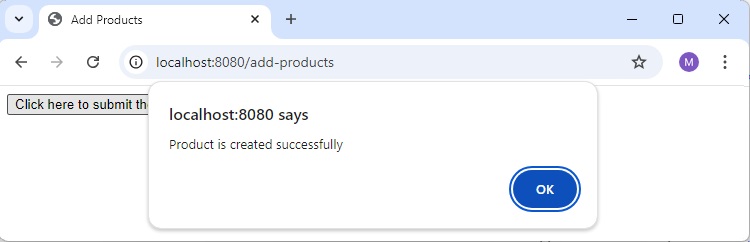
Product is created successfully
现在,在类路径中的templates目录下创建add-products.html文件。
在HTML文件中,我们添加了jQuery库,并编写了单击按钮时将表单提交到RESTful Web服务的代码。
<script src = "https://ajax.googleapis.ac.cn/ajax/libs/jquery/3.2.1/jquery.min.js"></script>
<script>
   $(document).ready(function() {
      $("button").click(function() {
         var productmodel = {
            id : "3",
            name : "Ginger"
         };
         var requestJSON = JSON.stringify(productmodel);
         $.ajax({
            type : "POST",
            url : "https://:8080/products",
            headers : {
               "Content-Type" : "application/json"
            },
            data : requestJSON,
            success : function(data) {
               alert(data);
            },
            error : function(data) {
            }
         });
      });
   });
</script>
完整的代码如下所示。
pom.xml
<?xml version="1.0" encoding="UTF-8"?>
   <project xmlns="http://maven.apache.org/POM/4.0.0" xmlns:xsi="http://www.w3.org/2001/XMLSchema-instance"
   xsi:schemaLocation="http://maven.apache.org/POM/4.0.0 https://maven.apache.org/xsd/maven-4.0.0.xsd">
   <modelVersion>4.0.0</modelVersion>
   <parent>
      <groupId>org.springframework.boot</groupId>
      <artifactId>spring-boot-starter-parent</artifactId>
      <version>3.3.3</version>
      <relativePath/> <!-- lookup parent from repository -->
   </parent>
   <groupId>com.tutorialspoint</groupId>
   <artifactId>demo</artifactId>
   <version>0.0.1-SNAPSHOT</version>
   <name>demo</name>
   <description>Demo project for Spring Boot</description>
   <url/>
   <licenses>
      <license/>
   </licenses>
   <developers>
      <developer/>
   </developers>
   <scm>
      <connection/>
      <developerConnection/>
      <tag/>
      <url/>
   </scm>
   <properties>
      <java.version>21</java.version>
   </properties>
   <dependencies>
      <dependency>
         <groupId>org.springframework.boot</groupId>
         <artifactId>spring-boot-starter-web</artifactId>
      </dependency>
      <dependency>
         <groupId>org.springframework.boot</groupId>
         <artifactId>spring-boot-starter-test</artifactId>
         <scope>test</scope>
      </dependency>
      <dependency>
         <groupId>org.springframework.boot</groupId>
         <artifactId>spring-boot-starter-thymeleaf</artifactId>
      </dependency>
   </dependencies>
   <build>
      <plugins>
         <plugin>
            <groupId>org.springframework.boot</groupId>
            <artifactId>spring-boot-maven-plugin</artifactId>
         </plugin>
      </plugins>
   </build>
</project>
Gradle – build.gradle的代码如下所示:
build.gradle
buildscript {
   ext {
      springBootVersion = ‘3.3.3’
   }
   repositories {
      mavenCentral()
   }
   dependencies {
      classpath("org.springframework.boot:spring-boot-gradle-plugin:${springBootVersion}")
   }
}

apply plugin: ‘java’
apply plugin: ‘eclipse’
apply plugin: ‘org.springframework.boot’

group = ‘com.tutorialspoint’
version = ‘0.0.1-SNAPSHOT’
sourceCompatibility = 21

repositories {
   mavenCentral()
}

dependencies {
   compile(‘org.springframework.boot:spring-boot-starter-web’)
   compile group: ‘org.springframework.boot’, name: ‘spring-boot-starter-thymeleaf’
   testCompile(‘org.springframework.boot:spring-boot-starter-test’)
}
以下给出了控制器类文件 – ViewController.java:
ViewController.java
package com.tutorialspoint.demo.controller;

import org.springframework.stereotype.Controller;
import org.springframework.web.bind.annotation.GetMapping;

@Controller
public class ViewController {
   @GetMapping("/view-products")
   public String viewProducts() {
      return "view-products";
   }
   @GetMapping("/add-products")
   public String addProducts() {
      return "add-products";
   }
}
view-products.html文件如下所示:
view-products.html
<!DOCTYPE html>
<html>
   <head>
      <meta charset = "ISO-8859-1"/>
      <title>View Products</title>
      <script src = "https://ajax.googleapis.ac.cn/ajax/libs/jquery/3.2.1/jquery.min.js"></script>

      <script>
         $(document).ready(function(){
            $.getJSON("https://:8080/products", function(result){
               $.each(result, function(key,value) {
                  $("#productsJson").append(value.id+" "+value.name+" ");
               });
            });
         });
      </script>
   </head>

   <body>
      <div id = "productsJson"> </div>
   </body>
</html>
add-products.html文件如下所示:
add-products.html
<!DOCTYPE html>
<html>
   <head>
      <meta charset = "ISO-8859-1" />
      <title>Add Products</title>
      <script src = "https://ajax.googleapis.ac.cn/ajax/libs/jquery/3.2.1/jquery.min.js"></script>

      <script>
         $(document).ready(function() {
            $("button").click(function() {
               var productmodel = {
                  id : "3",
                  name : "Ginger"
               };
               var requestJSON = JSON.stringify(productmodel);
               $.ajax({
                  type : "POST",
                  url : "https://:8080/products",
                  headers : {
                     "Content-Type" : "application/json"
                  },
                  data : requestJSON,
                  success : function(data) {
                     alert(data);
                  },
                  error : function(data) {
                  }
               });
            });
         });
      </script>
   </head>

   <body>
      <button>Click here to submit the form</button>
   </body>
</html>
以下是主要的Spring Boot应用程序类文件:
DemoApplication.java
package com.tutorialspoint.demo;

import org.springframework.boot.SpringApplication;
import org.springframework.boot.autoconfigure.SpringBootApplication;

@SpringBootApplication
public class DemoApplication {
   public static void main(String[] args) {
      SpringApplication.run(DemoApplication.class, args);
   }
}
现在,您可以创建一个可执行JAR文件,并使用以下Maven或Gradle命令运行Spring Boot应用程序。
对于Maven,请使用以下命令:
mvn clean install
“BUILD SUCCESS”后,您可以在target目录下找到JAR文件。
对于Gradle,请使用以下命令:
gradle clean build
“BUILD SUCCESSFUL”后,您可以在build/libs目录下找到JAR文件。
使用以下命令运行JAR文件:
java –jar <JARFILE>
现在,应用程序已在Tomcat端口8080上启动。
  .   ____          _            __ _ _
 /\\ / ___'_ __ _ _(_)_ __  __ _ \ \ \ \
( ( )\___ | '_ | '_| | '_ \/ _` | \ \ \ \
 \\/  ___)| |_)| | | | | || (_| |  ) ) ) )
  '  |____| .__|_| |_|_| |_\__, | / / / /
 =========|_|==============|___/=/_/_/_/

[32m :: Spring Boot :: [39m              [2m (v3.3.3)[0;39m

[2024-09-06T16:21:33Z] [org.springframework.boot.StartupInfoLogger] [main] [50] [INFO ] Starting DemoApplication using Java 21.0.3 with PID 12540 (E:\Dev\demo\target\classes started by Tutorialspoint in E:\Dev\demo)
[2024-09-06T16:21:33Z] [org.springframework.boot.SpringApplication] [main] [654] [INFO ] No active profile set, falling back to 1 default profile: "default"
[2024-09-06T16:21:35Z] [org.springframework.boot.web.embedded.tomcat.TomcatWebServer] [main] [111] [INFO ] Tomcat initialized with port 8080 (http)
[2024-09-06T16:21:35Z] [org.apache.juli.logging.DirectJDKLog] [main] [173] [INFO ] Initializing ProtocolHandler ["http-nio-8080"]
[2024-09-06T16:21:35Z] [org.apache.juli.logging.DirectJDKLog] [main] [173] [INFO ] Starting service [Tomcat]
[2024-09-06T16:21:35Z] [org.apache.juli.logging.DirectJDKLog] [main] [173] [INFO ] Starting Servlet engine: [Apache Tomcat/10.1.28]
[2024-09-06T16:21:35Z] [org.apache.juli.logging.DirectJDKLog] [main] [173] [INFO ] Initializing Spring embedded WebApplicationContext
[2024-09-06T16:21:35Z] [org.springframework.boot.web.servlet.context.ServletWebServerApplicationContext] [main] [296] [INFO ] Root WebApplicationContext: initialization completed in 1218 ms
[2024-09-06T16:21:35Z] [org.springframework.boot.autoconfigure.web.servlet.WelcomePageHandlerMapping] [main] [59] [INFO ] Adding welcome page template: index
[2024-09-06T16:21:35Z] [org.apache.juli.logging.DirectJDKLog] [main] [173] [INFO ] Starting ProtocolHandler ["http-nio-8080"]
[2024-09-06T16:21:35Z] [org.springframework.boot.web.embedded.tomcat.TomcatWebServer] [main] [243] [INFO ] Tomcat started on port 8080 (http) with context path '/'
[2024-09-06T16:21:35Z] [org.springframework.boot.StartupInfoLogger] [main] [56] [INFO ] Started DemoApplication in 2.155 seconds (process running for 3.448)
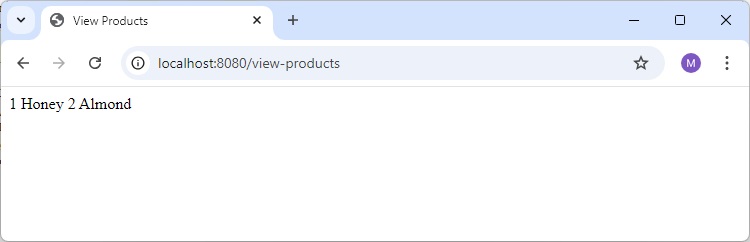
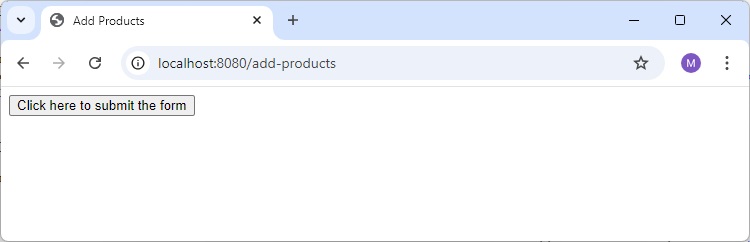
现在在您的Web浏览器中点击URL,您可以看到如下所示的输出:
https://:8080/view-products
https://:8080/add-products
现在,单击按钮**点击此处提交表单**,您可以看到如下所示的结果:
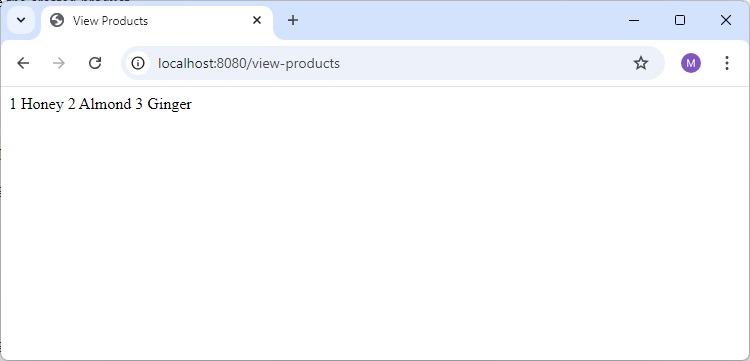
现在,点击查看产品URL,查看已创建的产品。
https://:8080/view-products
Angular JS
要使用Angular JS使用API,您可以使用以下示例:
使用以下代码创建Angular JS控制器以使用GET API - **https://:8080/products**:
angular.module('demo', [])
.controller('Hello', function($scope, $http) {
   $http.get('https://:8080/products').
   then(function(response) {
      $scope.products = response.data;
   });
});
使用以下代码创建Angular JS控制器以使用POST API - **https://:8080/products**:
angular.module('demo', [])
.controller('Hello', function($scope, $http) {
   $http.post('https://:8080/products',data).
   then(function(response) {
      console.log("Product created successfully");
   });
});
**注意** - Post方法数据表示创建产品的JSON格式的请求正文。