- Microsoft Expression Web 教程
- MS Expression Web - 首页
- MS Expression Web - 概述
- 环境设置
- MS Expression Web - 新建网站
- 空白网页
- 网页布局
- MS Expression Web - HTML 布局
- 水平导航
- 垂直导航
- MS Expression Web - 验证页面
- 动态网页模板
- MS Expression Web - 搜索页面
- MS Expression Web - 图片
- MS Expression Web - 超链接
- MS Expression Web - 视频
- SQL 数据源
- MS Expression Web - MS Word
- MS Expression Web - 网格视图
- MS Expression Web - 主页
- MS Expression Web - 数据表
- MS Expression Web - 发布
- 备份网站
- MS Expression Web - 附加组件
- MS Expression Web 资源
- MS Expression Web - 快速指南
- MS Expression Web - 资源
- MS Expression Web - 讨论
水平导航
本章我们将学习如何向网站添加水平导航或菜单项。
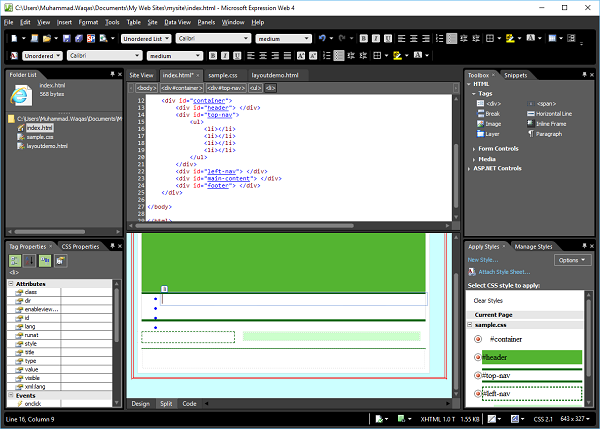
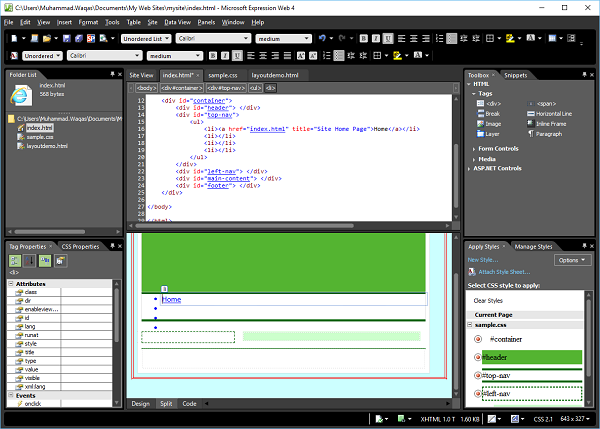
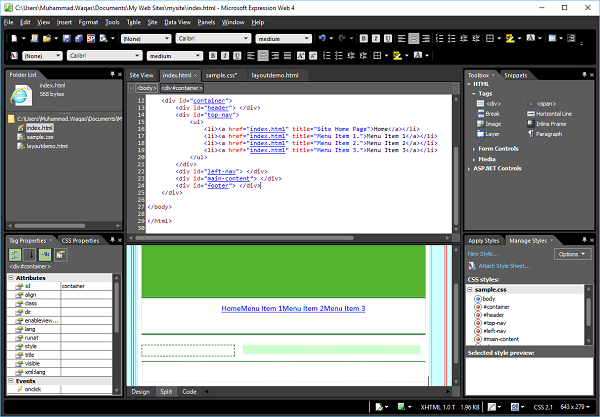
步骤 1 − 要创建菜单项或水平导航,让我们在index.html文件的<div id = “top-nav”>中添加以下代码,其中包含菜单项列表。
<div id = "top-nav">
   <ul>
      <li></li>
      <li></li>
      <li></li>
      <li></li>
   </ul>
</div>
步骤 2 − 这是一个简单的顶部菜单项目符号列表。要创建超链接,请转到设计视图或代码视图。
步骤 3 − 选择要用作超链接的项目,然后按 Ctrl + K。
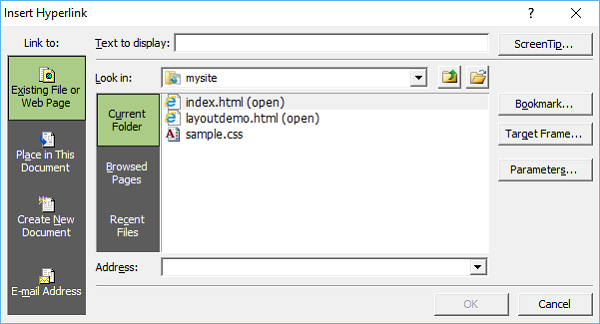
步骤 4 − 点击屏幕提示…按钮。
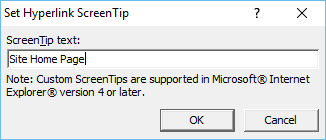
步骤 5 − 输入您想要的屏幕提示文本,然后点击确定。
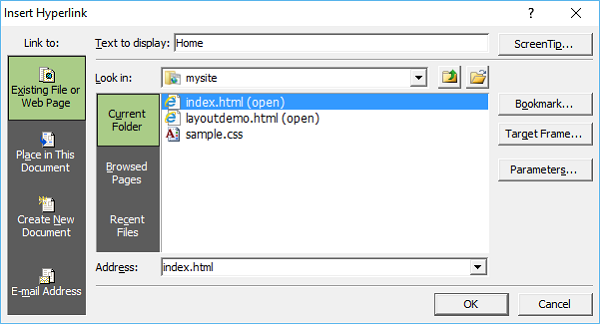
步骤 6 − 在显示文本字段中,输入首页,然后选择index.html文件,然后点击确定。
步骤 7 − 同样,为其他菜单项添加超链接,如下面的代码所示。
<!DOCTYPE html PUBLIC "-//W3C//DTD XHTML 1.0 Transitional//EN"
   "http://www.w3.org/TR/xhtml1/DTD/xhtml1-transitional.dtd">
<html xmlns = "http://www.w3.org/1999/xhtml">
   <head>
      <meta content = "text/html; charset=utf-8" http-equiv = "Content-Type" />
      <style type = "text/css"></style>
      <link href = "sample.css" rel="stylesheet" type = "text/css" />
   </head>

   <body>
      <div id = "container">
         <div id = "header"></div>
         <div id = "top-nav">
            <ul>
               <li><a href = "index.html" title = "Site Home Page">Home</a></li>
               <li><a href = "index.html" title = "Menu Item 1.">Menu Item 1</a></li>
               <li><a href = "index.html" title =  "Menu Item 2.">Menu Item 2</a></li>
               <li><a href = "index.html" title = "Menu Item 3.">Menu Item 3</a></li>
            </ul>
         </div>
         <div id = "left-nav"> </div>
         <div id = "main-content"> </div>
         <div id = "footer"> </div>
      </div>
   </body>
</html>
步骤 8 − 要设置顶部导航的样式,请转到管理样式面板。
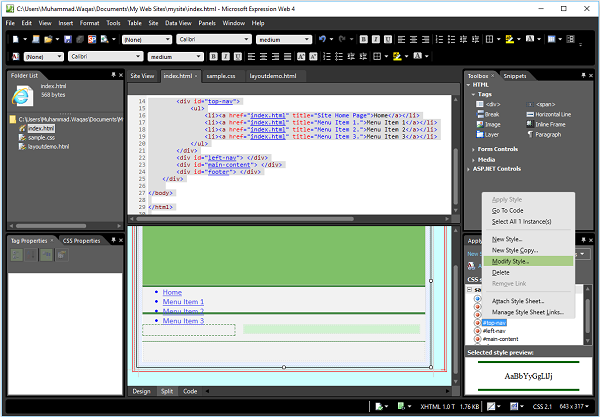
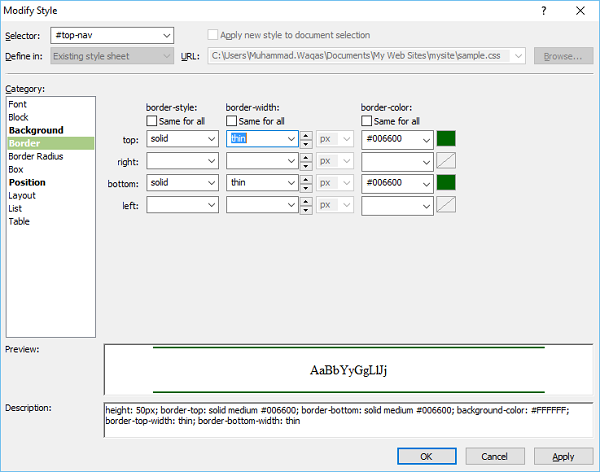
步骤 9 − 右键点击“#top-nav”并选择修改样式。选择“边框”类别并将宽度更改为细。
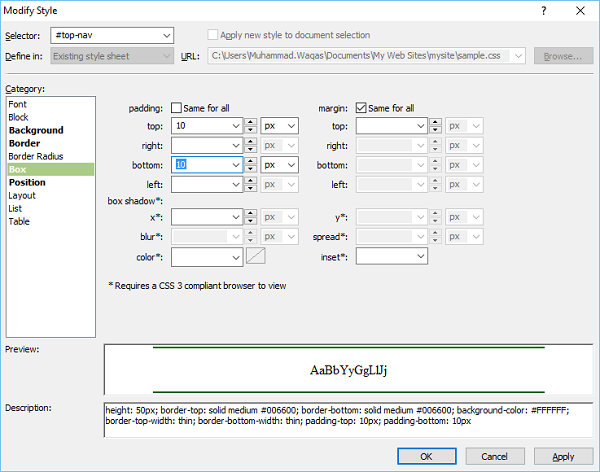
步骤 10 − 选择“边框”类别,取消选中“所有边距相同”复选框,并在顶部和底部字段中输入 10。
步骤 11 − 转到位置类别。
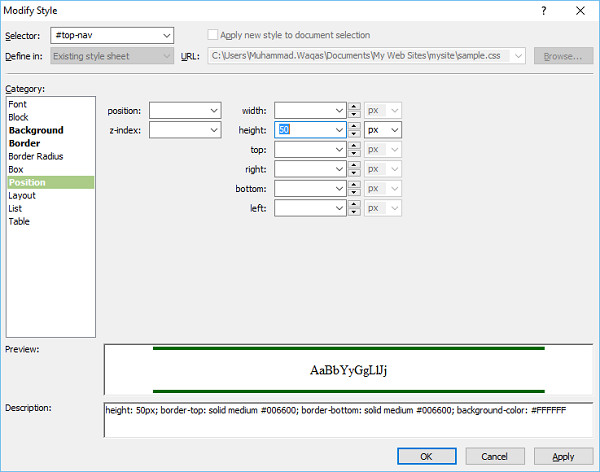
步骤 12 − 从高度字段中删除 50,然后单击确定。在“应用样式”面板中,单击“新建样式…”。
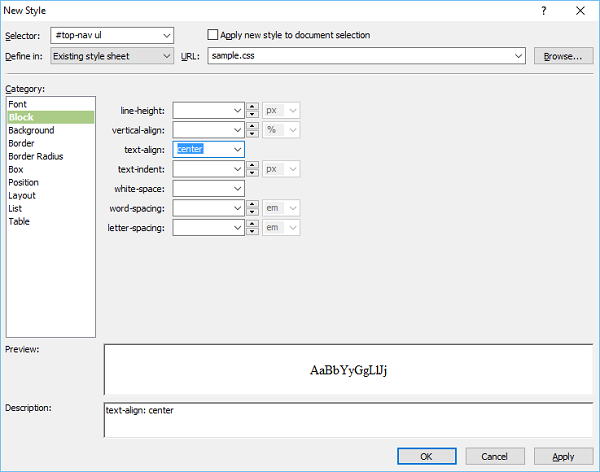
步骤 13 − 在“选择器”字段中输入#top-nav ul,并从“定义于”下拉列表中选择现有的样式表。在“块”类别中,从“文本对齐”字段中选择“居中”,然后转到“列表”类别。
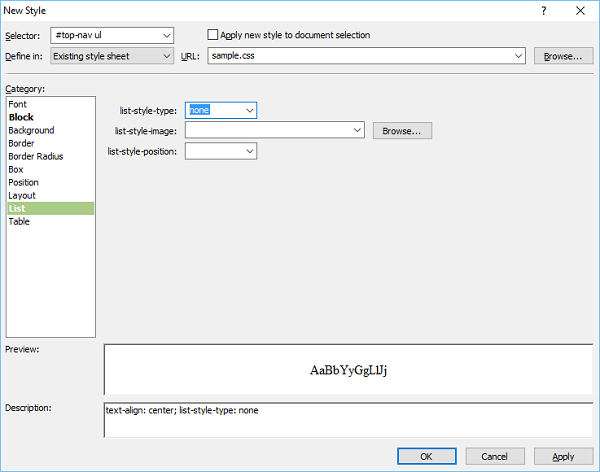
步骤 14 − 从list-style-type字段中选择无,然后单击确定。

步骤 15 − 再次从应用样式面板中,单击“新建样式…”。在“选择器”字段中输入#top-nav ul li。然后从“定义于”下拉列表中选择现有的样式表,然后转到“布局”类别。
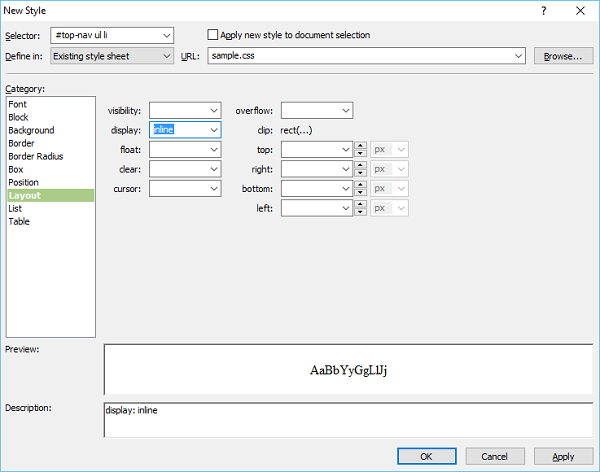
步骤 16 − 从display字段中选择inline,然后单击确定。
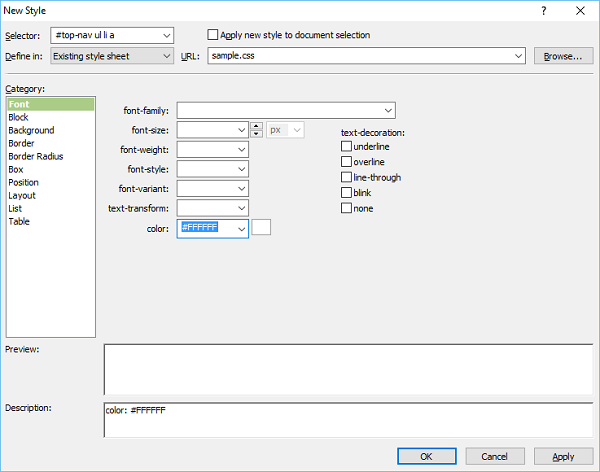
步骤 17 − 转到“应用样式”面板,单击“新建样式…”。在“选择器”字段中输入#top-nav ul li a,并从“定义于”下拉列表中选择现有的样式表,然后选择白色作为字体颜色。
步骤 18 − 转到背景类别。
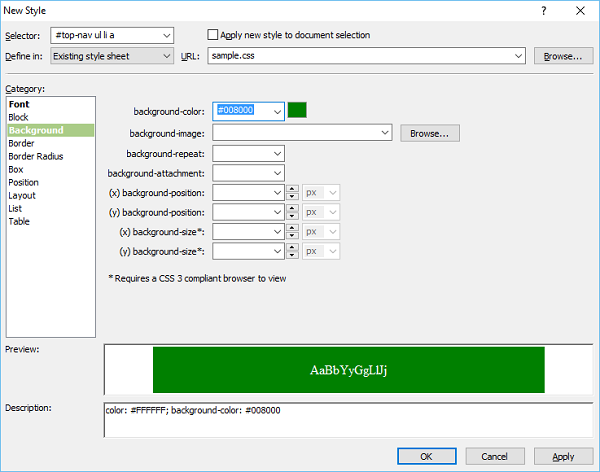
步骤 19 − 选择绿色作为背景颜色,然后转到边框类别。
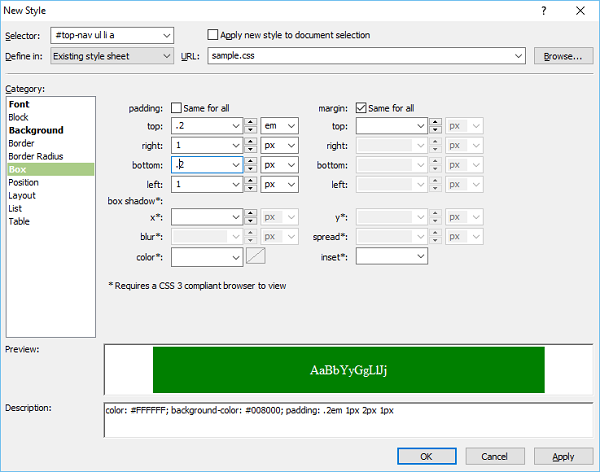
步骤 20 − 设置填充值,然后单击确定。
步骤 21 − 现在让我们再次转到“应用样式”面板,然后单击“新建样式”。在“选择器”字段中输入#topnav ul li a:hover,并从“定义于”下拉列表中选择现有的样式表,然后选择黑色作为字体颜色。
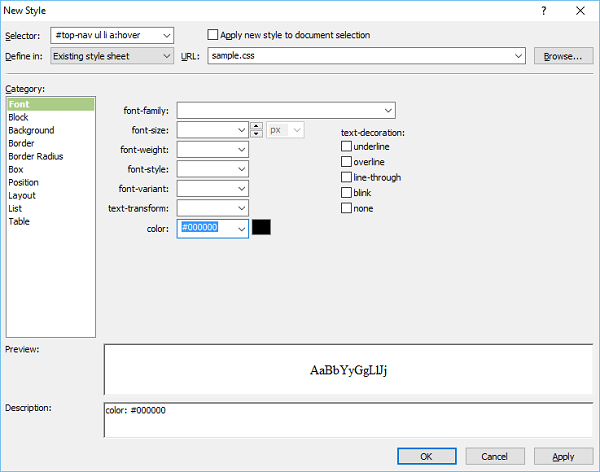
步骤 22 − 现在转到背景类别。

步骤 23 − 选择鼠标悬停在菜单项上时菜单选项的背景颜色,然后转到“边框”类别。
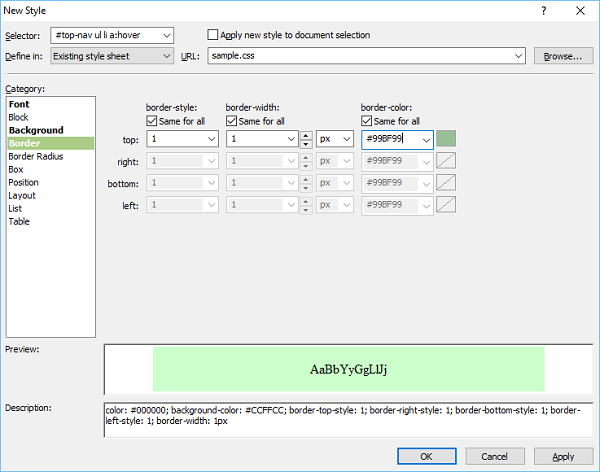
步骤 24 − 选择边框样式、宽度和颜色,然后单击确定。要检查其外观,请转到“文件”菜单并选择“在浏览器中预览”。
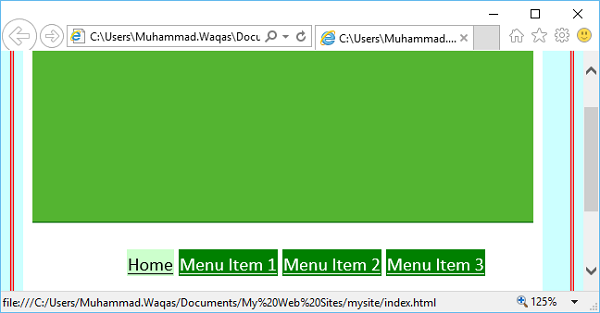
当您将鼠标悬停在任何菜单项上时,它将更改背景和字体颜色。