- Angular 教程
- Angular - 首页
- Angular - 概述
- Angular - 特性
- Angular - 优点与缺点
- Angular 基础
- Angular - 环境搭建
- Angular - 第一个应用
- Angular - MVC 架构
- Angular 组件
- Angular - 组件
- Angular - 组件生命周期
- Angular - 视图封装
- Angular - 组件交互
- Angular - 组件样式
- Angular - 嵌套组件
- Angular - 内容投影
- Angular - 动态组件
- Angular - 元素
- Angular 模板
- Angular - 模板
- Angular - 文本插值
- Angular - 模板语句
- Angular - 模板中的变量
- Angular - SVG 作为模板
- Angular 绑定
- Angular - 绑定及其类型
- Angular - 数据绑定
- Angular - 事件绑定
- Angular - 属性绑定
- Angular - 属性绑定
- Angular - 类和样式绑定
- Angular 指令
- Angular - 指令
- Angular - 内置指令
- Angular 管道
- Angular - 管道
- Angular - 使用管道转换数据
- Angular 依赖注入
- Angular - 依赖注入
- Angular HTTP 客户端编程
- Angular - 服务
- Angular - HTTP 客户端
- Angular - 请求
- Angular - 响应
- Angular - 获取
- Angular - PUT
- Angular - DELETE
- Angular - JSON-P
- Angular - 使用 HTTP 进行 CRUD 操作
- Angular 路由
- Angular - 路由
- Angular - 导航
- Angular - Angular Material
- Angular 动画
- Angular - 动画
- Angular 表单
- Angular - 表单
- Angular - 表单验证
- Angular Service Workers & PWA
- Angular - Service Workers & PWA
- Angular 测试
- Angular - 测试概述
- Angular NgModules
- Angular - 模块简介
- Angular 高级
- Angular - 身份验证与授权
- Angular - 国际化
- Angular - 可访问性
- Angular - Web Workers
- Angular - 服务器端渲染
- Angular - Ivy 编译器
- Angular - 使用 Bazel 构建
- Angular - 向后兼容性
- Angular - 响应式编程
- Angular - 在指令和组件之间共享数据
- Angular 工具
- Angular - CLI
- Angular 其他
- Angular - 第三方控件
- Angular - 配置
- Angular - 显示数据
- Angular - 装饰器和元数据
- Angular - 基本示例
- Angular - 错误处理
- Angular - 测试和构建项目
- Angular - 生命周期钩子
- Angular - 用户输入
- Angular - 有什么新变化?
- Angular 有用资源
- Angular - 快速指南
- Angular - 有用资源
- Angular - 讨论
Angular - 组件交互
组件之间的交互
在基于组件的架构中,组件之间的交互是一个重要且必要的特性。Angular 应用基本上是由组件组成的。Angular 提供了多种选项来在组件之间传递和接收数据。它还允许组件与其层次结构中的其他组件进行高级交互。让我们在本节中了解如何在代码中实现组件之间的交互。
组件交互的技术
在组件之间进行通信的技术列表如下:
父组件向子组件传递数据。
父组件从子组件接收数据。
父组件操作子组件。
父组件和子组件使用公共服务进行交互。
让我们在接下来的章节中学习这些内容。
父组件向子组件传递数据
父组件可以通过子组件的属性向子组件传递数据。子组件可以通过 @Input() 装饰器接收数据。子组件可以在其整个生命周期中(从初始化到销毁)接收数据。
Angular 的设计使得子组件可以自动拦截来自父组件的数据变化,并在子组件中进行必要的更新。Angular 还提供钩子来拦截数据变化并编写自定义处理逻辑。总的来说,子组件有三种选项可以拦截来自父组件的数据。
- 自动拦截
- Setter 拦截
- ngOnChanges 钩子
让我们在接下来的章节中详细了解所有技术。
自动拦截
自动拦截简化了从父组件接收数据。Angular 提供了一个 @Input 装饰器来接收来自父组件的数据。它会在父组件更新数据时接收数据。配置 Input 装饰器非常简单。只需将 input 装饰器附加到子组件中的一个属性上,然后通过模板中子组件的属性传递来自父组件的数据。
假设我们想要从父组件传递一个计数器到子组件。
步骤 1:在子组件中创建一个属性 counter,并用 @Input 装饰它
@Input() counter: number = 0;
这里:
- @Input() 是装饰器
- counter 是输入属性
- number 是输入属性的数据类型,它是可选的
- 0 是 counter 的初始值。如果未提供输入,则将使用此值。
步骤 2:在父组件中初始化一个变量,例如 counterValue。
counterValue: number = 10
步骤 3:使用子组件属性 (counter) 从父组件传递 counter 输入。
<app-child-component [counter]="counterValue" />
步骤 4:最后,根据需要在子组件模板中使用 counter 值。
counter: {{counter}}
让我们创建两个组件,父组件和子组件,然后尝试将数据从父组件传递到子组件并在子组件中呈现它。
步骤 1:使用 angular CLI 创建一个父组件 InOutSample,如下所示:
$ ng generate component InOutSample
CREATE src/app/in-out-sample/in-out-sample.component.css (0 bytes)
CREATE src/app/in-out-sample/in-out-sample.component.html (28 bytes)
CREATE src/app/in-out-sample/in-out-sample.component.spec.ts (596 bytes)
CREATE src/app/in-out-sample/in-out-sample.component.ts (228 bytes)
UPDATE src/app/app.module.ts (1289 bytes)
步骤 2:在组件中添加一个 counter 变量,如下所示:
import { Component } from '@angular/core';

@Component({
   selector: 'app-in-out-sample',
   templateUrl: './in-out-sample.component.html',
   styleUrls: ['./in-out-sample.component.css']
})
export class InOutSampleComponent {
   counter: number = 10;
}
步骤 3:使用 angular CLI 创建一个新的子组件 InOutChildSample,如下所示:
$ ng generate component InOutChildSample
CREATE src/app/in-out-child-sample/in-out-child-sample.component.css (0 bytes)
CREATE src/app/in-out-child-sample/in-out-child-sample.component.html (34 bytes)
CREATE src/app/in-out-child-sample/in-out-child-sample.component.spec.ts (632 bytes)
CREATE src/app/in-out-child-sample/in-out-child-sample.component.ts (251 bytes)
UPDATE src/app/app.module.ts (1417 bytes)
步骤 4:在子组件中添加一个 counter 属性,并用 @Input() 装饰器装饰它,如下所示:
import { Component, Input } from '@angular/core';

@Component({
   selector: 'app-in-out-child-sample',
   templateUrl: './in-out-child-sample.component.html',
   styleUrls: ['./in-out-child-sample.component.css']
})
export class InOutChildSampleComponent {
   @Input() counter : number = 0;
}
步骤 5:打开子组件模板 in-out-child-sample.component.html,并使用 counter 属性,如下所示:
<div>
   <p>Counter: {{counter}}</p>
</div>
步骤 6:打开父组件模板 in-out-sample.component.html,并呈现子组件以及 counter 属性,如下所示:
<app-in-out-child-sample [counter]="counter" />
步骤 7:打开 app 组件的模板,并呈现父组件,如下所示:
<app-in-out-sample />

<router-outlet></router-outlet>
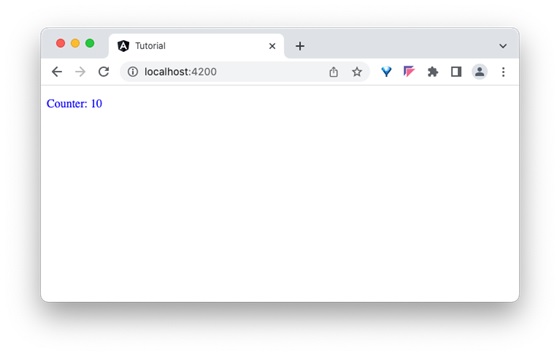
步骤 8:最后,运行应用程序并检查计数器是否显示从父组件传递的值,如下所示:
让我们尝试使用按钮和点击事件更改父组件中的 counter 变量,然后查看它是否会影响子组件。
步骤 1:在父组件中添加一个函数来增加 counter 值,如下所示:
inc() {
   this.counter++
}
步骤 2:在父组件的模板中添加一个按钮,并绑定函数,如下所示:
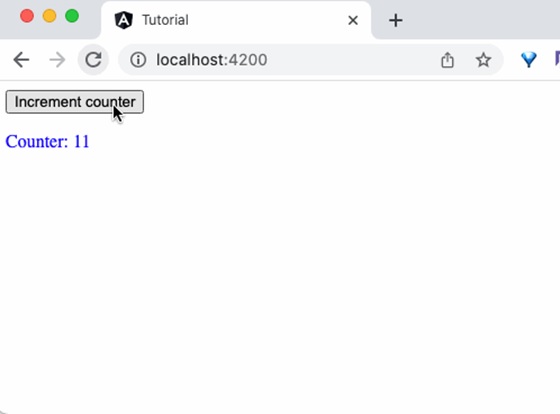
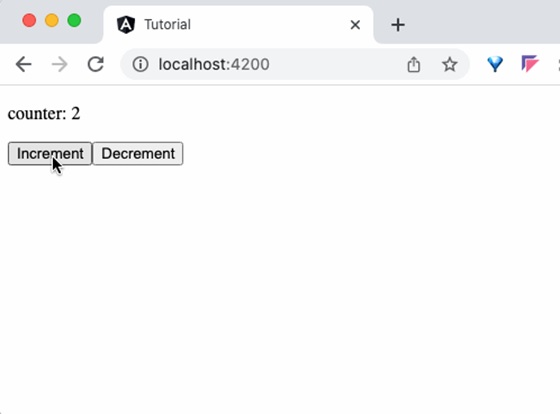
<button (click)="inc()">Increment counter</button>

<app-in-out-child-sample [counter]="counter" />
步骤 3:最后,运行应用程序并检查父组件中变量的变化是否反映在子组件中。
Setter 拦截
基于 Setter 的拦截只是先前技术的扩展。它基本上是为 @Input 装饰器中使用的属性使用 getter 和 setter。例如,counter 示例中的 counter 属性可以扩展为支持 getter 和 setter,如下所示:
@Input()
get counter(): number { return this._counter; }
set counter(val: number) {
   this._counter = val || -1;
}
private _counter: number = 0;
这里,如果未设置 counter,则将其设置为 -1。
让我们更改 counter 示例 in-out-child-sample.component.ts 以使用 setter 拦截 counter,并在 counter 值超过 25 时将其重置为零。
import { Component, Input } from '@angular/core';

@Component({
   selector: 'app-in-out-child-sample',
   templateUrl: './in-out-child-sample.component.html',
   styleUrls: ['./in-out-child-sample.component.css']
})
export class InOutChildSampleComponent {
   @Input()
   get counter(): number { return this._counter; }
   set counter(val: number) {
      this._counter = val || 0;
      if(val > 25) this._counter = val % 25;
   }
   private _counter: number = 0;
}
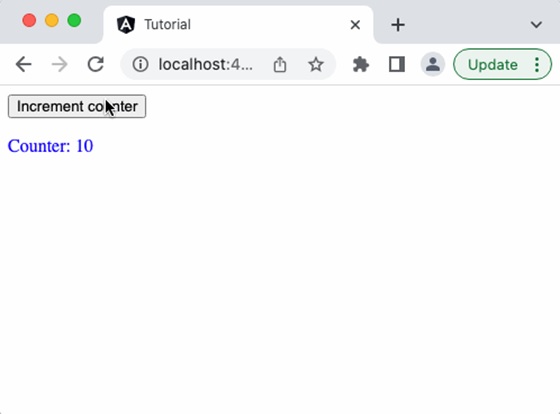
运行应用程序,您会看到一旦 counter 达到 25,它将重置为 0。
ngOnChanges 钩子拦截
正如我们在组件的生命周期及其钩子方法中学到的那样,ngOnChanges 是一个钩子方法,每当 Angular 检测到其输入发生变化时,它都会运行。
ngOnChanges 钩子接受一个 SimpleChanges 类型的对象。SimpleChanges 是一个字典,包含所有发生变化的属性。我们可以遍历所有属性并找到属性的最新值。遍历所有已更改属性的伪代码如下:
ngOnChanges(changes: SimpleChanges) {
   for (const key in changes) {
      const prop = changes[key];

      const prevVal = prop.previousValue
      const currentVal = prop.currentValue
      cont isFirstChange = pop.isFirstChange()

      if (prop.isFirstChange()) {
         console.log("The current value is ${prop.currentValue}")
      } else {
         console.log(`${key} changed from ${prop.previousValue} to
         ${prop.currentValue}`);
      }

   }
}
父组件从子组件接收数据
子组件可以通过 @Output 装饰器将数据发送到父组件。Output 装饰器与 Input 装饰器非常相似,只是输出实际上是一个事件发射器,它将数据(输出)与事件一起传递。父组件可以在子组件中的事件上订阅,并在子组件中的数据发生变化时从子组件获取发射的值。接收来自子组件的数据的步骤如下:
步骤 1:使用 Output 装饰器在子组件中创建一个事件发射器。
@Output() counterEvent = new EventEmitter<number>();
步骤 2:在子组件中的数据发生变化时发射 counter 事件
this.counterEvent.emit(changedValue)
步骤 3:在父组件中捕获事件,并从回调函数中获取数据。
<parent-component (counterEvent)="get($event)" />
步骤 4:在父组件中对捕获的值执行任何操作。
让我们在子组件 InOutChildSample 组件中编写一个 output 装饰器,并尝试从父组件 InOutSample 组件获取输出。
步骤 1:在子组件 in-out-child-sample.component.ts 中创建一个输出事件发射器,如下所示:
@Output() counterEvent = new EventEmitter<number>();
步骤 2:创建一个方法,通过在子组件 In-out-child-sample.component.ts 中发射事件并带有 counter 数据来传递 counter 的值。
passCounterToParent() {
   this.counterEvent.emit(this.counter)
}
步骤 3:子组件的完整列表如下:
import { Component, Input, Output, EventEmitter } from '@angular/core';

@Component({
   selector: 'app-in-out-child-sample',
   templateUrl: './in-out-child-sample.component.html',
   styleUrls: ['./in-out-child-sample.component.css']
})
export class InOutChildSampleComponent {
   @Input() counter : number = 0;
   @Output() counterEvent = new EventEmitter<number>();

   passCounterToParent() {
      this.counterEvent.emit(this.counter)
   }

}
步骤 4:打开子组件模板 in-out-child-sample.component.html,并添加一个按钮,以便在用户单击按钮时调用 counter 事件
<div>
  <p>Counter: {{counter}}</p>
  <button (click)="passCounterToParent()">Pass Counter to Parent</button>
</div>
这里:
click 是按钮点击事件,当它被点击时,它被配置为运行 passCounterToParent() 函数。
步骤5:在父组件中添加一个变量来保存从子组件通过事件传递的输出数据。
childCounter: number = 0;
步骤6:在父组件中添加一个函数来获取从子组件通过事件传递的输出数据。
get(val: number) {
   this.childCounter = val;
}
步骤7:父组件的完整代码如下所示:
import { Component } from '@angular/core';

@Component({
   selector: 'app-in-out-sample',
   templateUrl: './in-out-sample.component.html',
   styleUrls: ['./in-out-sample.component.css']
})
export class InOutSampleComponent {
   counter: number = 10;
   childCounter: number = 0;
   inc() {
      this.counter++
   }
   get(val: number) {
      this.childCounter = val;
   }
}
步骤8:打开父组件模板文件,in-out-sample.component.html,并订阅子组件的事件 counterEvent,并将 get 方法设置为回调函数,如下所示:
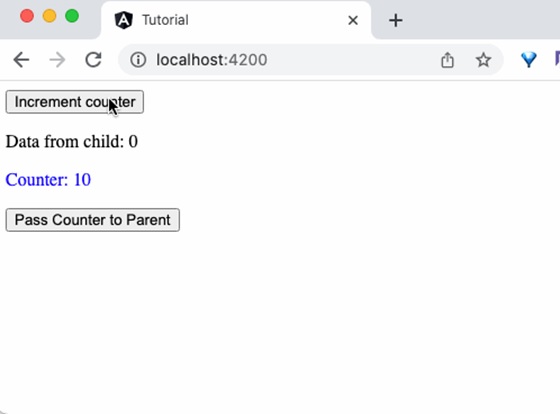
<button (click)="inc()">Increment counter</button>
<p>Data from child: {{childCounter}}</p>
<app-in-out-child-sample [counter]="counter" (counterEvent)="get($event)" />
这里:
counterEvent 是来自子组件的事件。
get($event) 是回调函数。$event 将保存当前计数器的值。
childContent 是来自子组件的数据。
步骤9:最后,运行应用程序,您将看到当单击子组件中的按钮时,子组件会将更新后的计数器值发送到父组件。
父组件操作子组件
父组件可以通过局部变量和 @ViewChild 装饰器完全访问子组件。这两种技术的关键区别在于,在局部变量的概念中,父组件仅在其模板中访问子组件。但在 @ViewChild 概念中,父组件也将在其类环境中访问子组件。这使得父组件也可以在其方法中利用子组件的功能,产生了巨大的差异。
使用局部变量
让我们创建两个组件,ParentCounterComponent 和 ChildCounterComponent,来理解这个概念。ParentCounterComponent 的目的是通过两个按钮(增加和减少按钮)提供计数器功能。增加按钮将增加计数器,减少按钮将减少计数器。父组件将从子组件获取增加和减少功能,而不是自己实现。
步骤1:使用 Angular CLI 创建父组件 ParentCounterComponent,如下所示:
$ ng generate component ParentCounter
CREATE src/app/parent-counter/parent-counter.component.css (0 bytes)
CREATE src/app/parent-counter/parent-counter.component.html (29 bytes)
CREATE src/app/parent-counter/parent-counter.component.spec.ts (609 bytes)
CREATE src/app/parent-counter/parent-counter.component.ts (233 bytes)
UPDATE src/app/app.module.ts (1701 bytes)
步骤2:使用 Angular CLI 创建子组件 ChildCounterComponent,如下所示:
ng generate component ChildCounter
CREATE src/app/child-counter/child-counter.component.css (0 bytes)
CREATE src/app/child-counter/child-counter.component.html (28 bytes)
CREATE src/app/child-counter/child-counter.component.spec.ts (602 bytes)
CREATE src/app/child-counter/child-counter.component.ts (229 bytes)
UPDATE src/app/app.module.ts (1809 bytes)
步骤3:在子组件中声明一个变量 counter。
counter: number = 0
步骤4:在子组件中实现增加功能。
inc() { this.counter++ }
这里,inc() 方法只是使用自增运算符增加计数器。
步骤5:在子组件中实现减少功能。
dec() { this.counter-- }
这里,dec() 方法只是使用自减运算符减少计数器。
步骤6:子组件的完整代码如下所示:
import { Component } from '@angular/core';

@Component({
   selector: 'app-child-counter',
   templateUrl: './child-counter.component.html',
   styleUrls: ['./child-counter.component.css']
})
export class ChildCounterComponent {
   counter: number = 0

   inc() { this.counter++ }
   dec() { this.counter-- }
}
步骤7:接下来,打开父组件的模板文件 parent-counter.component.html,并添加子组件以及一个 id(#child)来访问子组件。
<app-child-counter #child></app-child-counter>
步骤8:接下来,添加两个按钮,并将点击事件绑定到通过子标识符访问的子组件的 inc() 和 dec() 方法。此外,使用子标识符显示计数器的当前值。
<p>counter: {{child.counter}}</p>

<button (click)="child.inc()">Increment</button>
<button (click)="child.dec()">Decrement</button>

<app-child-counter #child></app-child-counter>
步骤9:接下来,将父组件包含在 app 组件的模板中。
<app-parent-counter />
<router-outlet></router-outlet>
步骤10:最后,运行应用程序并检查计数器是否正常工作。
使用 @ViewChild 装饰器
让我们通过创建一个新的组件 VcParentCounterComponent 来扩展上面的应用程序,该组件将使用 @ViewChild 概念而不是局部变量。此方法对子组件没有任何更改。
步骤1:使用 Angular CLI 创建一个新组件 VcParentCounterComponent,如下所示:
$ ng generate component VcParentCounter
CREATE src/app/vc-parent-counter/vc-parent-counter.component.css (0 bytes)
CREATE src/app/vc-parent-counter/vc-parent-counter.component.html (32 bytes)
CREATE src/app/vc-parent-counter/vc-parent-counter.component.spec.ts (624 bytes)
CREATE src/app/vc-parent-counter/vc-parent-counter.component.ts (244 bytes)
UPDATE src/app/app.module.ts (1931 bytes)
步骤2:从 @angular/core 模块导入必要的类。
import { Component, ViewChild, AfterViewInit } from '@angular/core';
步骤3:导入子组件。
import { ChildCounterComponent } from '../child-counter/child-counter.component'
步骤4:实现 AfterViewInit 生命周期钩子,如下所示。
export class VcParentCounterComponent implements AfterViewInit {
   ngAfterViewInit() {
      // ...
   }
}
步骤5:使用 @ViewChild 访问子组件,如下所示:
@ViewChild(ChildCounterComponent)
private child! : ChildCounterComponent;
这里,@ViewChild 装饰器接受子组件的类型,该类型位于组件的模板中。
步骤6:通过访问子组件来实现增加和减少功能。
inc() { this.child.inc() }
dec() { this.child.dec() }
这里,我们使用 this.child 变量来访问子组件的功能。
步骤7:实现一个计数器功能来检索当前计数器的值,如下所示:
counter() { return 0; }

ngAfterViewInit() {
   setTimeout(() => this.counter = () => this.child.counter, 0)
}
这里,我们在 ngAfterViewInit 生命周期钩子中创建了一个计数器方法。只有在这个生命周期之后,子组件才可用。因此,我们在组件初始化期间创建了一个虚拟计数器方法(需要访问子组件的计数器值),并在钩子方法中更新了计数器方法。
步骤8:组件的完整代码如下所示:
import { Component, ViewChild, AfterViewInit } from '@angular/core';

import { ChildCounterComponent } from '../child-counter/child-counter.component'

@Component({
   selector: 'app-vc-parent-counter',
   templateUrl: './vc-parent-counter.component.html',
   styleUrls: ['./vc-parent-counter.component.css']
})
export class VcParentCounterComponent implements AfterViewInit {
   @ViewChild(ChildCounterComponent)
   private child! : ChildCounterComponent;

   inc() { this.child.inc() }
   dec() { this.child.dec() }

   counter() { return 0; }

   ngAfterViewInit() {
   setTimeout(() => this.counter = () => this.child.counter, 0)
   }
}
步骤9:接下来,打开组件的模板文件 vc-parent-counter-component.html,并添加子组件以及按钮和方法绑定,如下所示:
<p>counter: {{ counter() }}</p>

<button (click)="inc()">Increment</button>
<button (click)="dec()">Decrement</button>

<app-child-counter></app-child-counter>
这里,我们没有包含标识符,而是使用了父组件的功能而不是子组件的功能(我们在前面的示例中使用局部变量的概念)。父组件将从子变量获取所需的功能,该变量是通过 @ViewChild 装饰器获取的。
步骤10:接下来,打开 app 组件的模板并呈现父组件,如下所示:
<app-vc-parent-counter />

<router-outlet></router-outlet>
步骤11:最后,运行应用程序并检查计数器是否显示从父组件传递的值,如下所示:

父组件和子组件使用公共服务进行交互
服务是 Angular 框架不可分割的一部分。我们可以创建服务来实现特定的功能,然后在任何组件中使用它。服务的最佳用例如下:
- API 调用
- 实用程序函数
- 在组件之间共享数据
在本节中,让我们学习如何使用服务在组件之间共享数据。
通过服务共享数据的常规分步过程如下:
步骤1:在服务中设置任意数量的可观察变量。
import { Subject } from 'rxjs';

export class MyCounterService {
   private source = new Subject<number>();
   public data$ = this.source.asObservable()
}
这里:
source 变量使用 Subject 类型创建,Subject 是来自 rxjs 模块的可观察对象。
调用 asObservable 方法来隐藏源序列的身份。
步骤2:在组件中注入所需的服务。
constructor(private myService: MyService) {
}
步骤3:在组件中,订阅服务中可用的共享数据。
constructor(private myService: MyService) {
   this.myService.data$.subscribe( data => {
      this.data = data;
   })
}
步骤4:使用可观察对象在服务中实现功能,以便订阅的组件可以接收更新的数据。
export class MyCounterService {
   update(val: number) { this.data.next(val) }
}
步骤5:像往常一样在组件及其模板中使用服务数据和方法。当服务数据更新时,Angular 将更新组件。
让我们通过使用服务实现我们的计数器组件来理解这个概念。
步骤1:使用 Angular CLI 创建一个服务 MyCounterService,如下所示:
$ ng generate service MyCounter
CREATE src/app/my-counter.service.spec.ts (373 bytes)
CREATE src/app/my-counter.service.ts (138 bytes)
步骤2:使用 Angular CLI 创建一个组件 MyCounterServiceComponent,如下所示:
ng generate component MyCounterService
CREATE src/app/my-counter-service/my-counter-service.component.css (0 bytes)
CREATE src/app/my-counter-service/my-counter-service.component.html (33 bytes)
CREATE src/app/my-counter-service/my-counter-service.component.spec.ts (631 bytes)
CREATE src/app/my-counter-service/my-counter-service.component.ts (248 bytes)
UPDATE src/app/app.module.ts (2057 bytes)
步骤3:在服务中创建一个可观察对象来跟踪计数器的值,如下所示:
private counterSource = new Subject<number>();
public counter$ = this.counterSource.asObservable()
这里:
counterSource 是 Subject 类型的变量。Subject 是由 rxjs 库提供的一个可观察对象。Subject 可以发射和接收值。
在 counterSource 上调用 asObservable 方法来隐藏源序列的身份。
步骤4:实现增加和减少方法,如下所示:
inc(val: number) { this.counterSource.next(val + 1) }
dec(val: number) { this.counterSource.next(val - 1) }
这里:
counterSource 的 next() 方法用于更新计数器的值。
步骤5:服务 MyCounterService 的完整代码如下所示:
import { Injectable } from '@angular/core';
import { Subject } from 'rxjs';

@Injectable({
   providedIn: 'root'
})
export class MyCounterService {
   constructor() { }

   private counterSource = new Subject<number>();
   public counter$ = this.counterSource.asObservable()

   inc(val: number) { this.counterSource.next(val + 1) }
   dec(val: number) { this.counterSource.next(val - 1) }
}
步骤6:通过构造函数在组件中注入服务。
export class MyCounterServiceComponent {
   constructor(private counterService: MyCounterService) {
   }
}
步骤7:通过组件构造函数订阅服务中可用的可观察对象,如下所示:
this.counterService.counter$.subscribe( counter => {
   this.counter = counter;
})
这里,订阅将在可观察对象发生更改时更新计数器的值。
步骤8:通过调用计数器服务方法来实现增加 (inc()) 和减少 (dec()) 方法,如下所示:
inc() { this.counterService.inc(this.counter) }
dec() { this.counterService.dec(this.counter) }
步骤9:组件 MyCounterServiceComponent 的完整代码如下所示:
import { Component } from '@angular/core';
import { MyCounterService } from '../my-counter.service'

@Component({
   selector: 'app-my-counter-service',
   templateUrl: './my-counter-service.component.html',
   styleUrls: ['./my-counter-service.component.css'],
})
export class MyCounterServiceComponent {
   counter: number = 0;

   constructor(private counterService: MyCounterService) {
      this.counterService.counter$.subscribe( counter => {
         this.counter = counter;
      })
   }
   inc() { this.counterService.inc(this.counter) }
   dec() { this.counterService.dec(this.counter) }
}
步骤10:接下来,打开组件的模板 my-counter-service.component.html 并编写模板标记以显示当前计数器的值,然后添加另外两个按钮来增加和减少计数器的值。将 inc() 和 dec() 方法分别绑定到增加和减少按钮的点击事件。
<p>counter: {{counter}}</p>

<button (click)="inc()">Increment</button>
<button (click)="dec()">Decrement</button>
步骤11:接下来,打开 app 组件的模板并将我们的组件包含在其中,如下所示:
<app-my-counter-service />
<router-outlet></router-outlet>
步骤12:运行应用程序并检查输出。
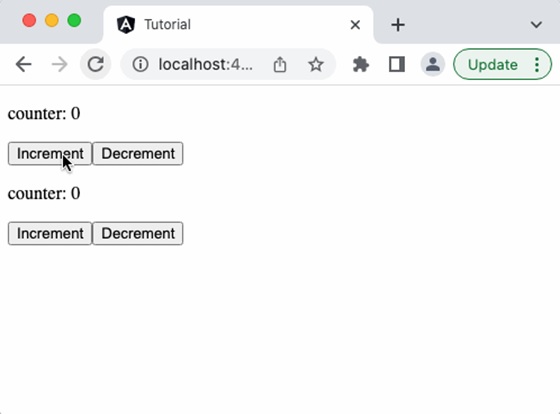
步骤13:接下来,在 app 组件的模板中添加另一个组件,如下所示:
<app-my-counter-service />
<app-my-counter-service />
<router-outlet></router-outlet>
步骤14:运行应用程序,您将看到增加一个组件也会反映在另一个组件中。这是因为它基于同一个服务。
结论
Angular 为组件在其自身内部交互提供了丰富的选项。开发人员可以根据给定的场景选择合适的方法并获得所需的输出。