- Angular 教程
- Angular - 首页
- Angular - 概述
- Angular - 功能
- Angular - 优点与缺点
- Angular 基础
- Angular - 环境搭建
- Angular - 第一个应用
- Angular - MVC 架构
- Angular 组件
- Angular - 组件
- Angular - 组件生命周期
- Angular - 视图封装
- Angular - 组件交互
- Angular - 组件样式
- Angular - 嵌套组件
- Angular - 内容投影
- Angular - 动态组件
- Angular - 元素
- Angular 模板
- Angular - 模板
- Angular - 文本插值
- Angular - 模板语句
- Angular - 模板中的变量
- Angular - SVG 作为模板
- Angular 数据绑定
- Angular - 数据绑定及其类型
- Angular - 数据绑定
- Angular - 事件绑定
- Angular - 属性绑定
- Angular - 属性绑定
- Angular - 类和样式绑定
- Angular 指令
- Angular - 指令
- Angular - 内置指令
- Angular 管道
- Angular - 管道
- Angular - 使用管道转换数据
- Angular 依赖注入
- Angular - 依赖注入
- Angular HTTP 客户端编程
- Angular - 服务
- Angular - HTTP 客户端
- Angular - 请求
- Angular - 响应
- Angular - GET 请求
- Angular - PUT 请求
- Angular - DELETE 请求
- Angular - JSON-P
- Angular - 使用 HTTP 进行 CRUD 操作
- Angular 路由
- Angular - 路由
- Angular - 导航
- Angular - Angular Material
- Angular 动画
- Angular - 动画
- Angular 表单
- Angular - 表单
- Angular - 表单验证
- Angular Service Workers & PWA
- Angular - Service Workers & PWA
- Angular 测试
- Angular - 测试概述
- Angular NgModule
- Angular - 模块介绍
- Angular 高级
- Angular - 身份验证与授权
- Angular - 国际化
- Angular - 可访问性
- Angular - Web Workers
- Angular - 服务器端渲染
- Angular - Ivy 编译器
- Angular - 使用 Bazel 构建
- Angular - 向后兼容性
- Angular - 响应式编程
- Angular - 指令和组件之间的数据共享
- Angular 工具
- Angular - CLI
- Angular 其他
- Angular - 第三方控件
- Angular - 配置
- Angular - 数据显示
- Angular - 装饰器和元数据
- Angular - 基本示例
- Angular - 错误处理
- Angular - 测试和项目构建
- Angular - 生命周期钩子
- Angular - 用户输入
- Angular - 新特性?
- Angular 有用资源
- Angular - 快速指南
- Angular - 有用资源
- Angular - 讨论
子组件与父组件之间的数据共享
Angular 提供了在父组件和子组件之间传递数据的方法。Angular 提供了两个装饰器,@Input 和 @Output。Input 装饰器使用子组件属性将值从父组件传递到子组件。Output 装饰器使用子组件发出的事件将值从子组件传递到父组件。父组件必须监听来自子组件的更改事件,捕获事件信息并使用它。
让我们在本节学习如何使用 Input 和 Output 装饰器。
@Input
配置 Input 装饰器非常简单。只需将 Input 装饰器附加到子组件中的属性,然后通过子组件属性从父组件传递数据。
假设我们想将计数器从父组件传递到子组件。
步骤1:在子组件中创建一个名为 counter 的属性,并用 @Input 装饰它。
@Input() counter: number = 0;
这里:
@Input() 是装饰器
counter 是输入属性
number 是输入属性的数据类型,它是可选的
0 是计数器的初始值。如果没有提供输入,将使用此值。
步骤2:在父组件中初始化一个变量,例如 counterValue。
counterValue: number = 10
步骤3:使用子组件属性 (counter) 从父组件传递 counter 输入。
<app-child-component [counter]="counterValue" />
步骤4:最后,根据需要在子组件模板中使用 counter 值。
counter: {{counter}}
让我们创建两个组件,父组件和子组件,然后尝试将数据从父组件传递到子组件并在子组件中渲染它。
步骤1:使用 Angular CLI 创建父组件 InOutSample,如下所示:
$ ng generate component InOutSample
CREATE src/app/in-out-sample/in-out-sample.component.css (0 bytes)
CREATE src/app/in-out-sample/in-out-sample.component.html (28 bytes)
CREATE src/app/in-out-sample/in-out-sample.component.spec.ts (596 bytes)
CREATE src/app/in-out-sample/in-out-sample.component.ts (228 bytes)
UPDATE src/app/app.module.ts (1289 bytes)
步骤2:在组件中添加一个 counter 变量,如下所示:
import { Component } from '@angular/core';

@Component({
   selector: 'app-in-out-sample',
   templateUrl: './in-out-sample.component.html',
   styleUrls: ['./in-out-sample.component.css']
})
export class InOutSampleComponent {
   counter: number = 10;
}
步骤3:使用 Angular CLI 创建一个新的子组件 InOutChildSample,如下所示:
$ ng generate component InOutChildSample
CREATE src/app/in-out-child-sample/in-out-child-sample.component.css (0 bytes)
CREATE src/app/in-out-child-sample/in-out-child-sample.component.html (34 bytes)
CREATE src/app/in-out-child-sample/in-out-child-sample.component.spec.ts (632 bytes)
CREATE src/app/in-out-child-sample/in-out-child-sample.component.ts (251 bytes)
UPDATE src/app/app.module.ts (1417 bytes)
步骤4:在子组件中添加一个 counter 属性,并用 @Input() 装饰器装饰它,如下所示:
import { Component, Input } from '@angular/core';

@Component({
   selector: 'app-in-out-child-sample',
   templateUrl: './in-out-child-sample.component.html',
   styleUrls: ['./in-out-child-sample.component.css']
})
export class InOutChildSampleComponent {
   @Input() counter : number = 0;
}
步骤5:打开子组件模板 in-out-child-sample.component.html 并使用 counter 属性,如下所示:
<div>
   <p>Counter: {{counter}}</p>
</div>
步骤6:打开父组件模板 in-out-sample.component.html 并渲染子组件以及 counter 属性,如下所示:
<app-in-out-child-sample [counter]="counter" />
步骤7:打开 app 组件的模板并渲染父组件,如下所示:
<app-in-out-sample />

<router-outlet></router-outlet>
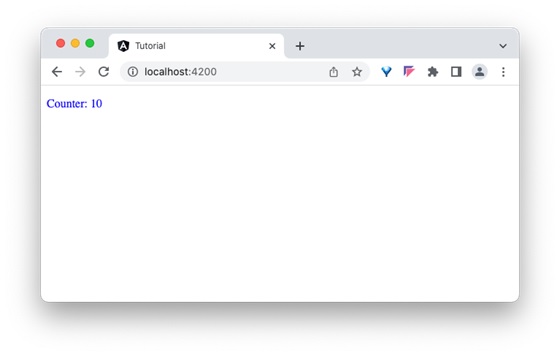
步骤8:最后,运行应用程序并检查计数器是否显示从父组件传递的值,如下所示:
让我们尝试使用按钮和点击事件更改父组件中的 counter 变量,然后查看它是否会影响子组件。
步骤1:在父组件中添加一个函数来递增 counter 值,如下所示
inc() {
   this.counter++
}
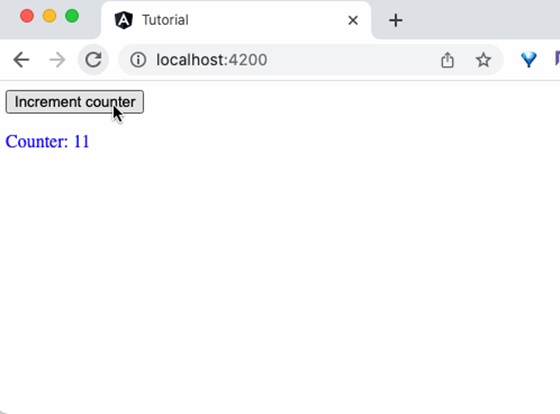
步骤2:在父组件的模板中添加一个按钮并绑定该函数,如下所示:
<button (click)="inc()">Increment counter</button>

<app-in-out-child-sample [counter]="counter" />
步骤3:最后,运行应用程序并检查父组件中变量的更改是否反映在子组件中。
@Output
Output 装饰器与 Input 装饰器非常相似,只是输出实际上是一个事件发射器,它与事件一起传递数据(输出)。父组件可以订阅子组件中的事件,并在子组件中数据更改时从子组件获取发射的值。
步骤1:通过使用 Output 装饰器创建子组件中的事件发射器。
@Output() counterEvent = new EventEmitter<number>();
步骤2:当子组件中的数据发生更改时发出 counter 事件。
this.counterEvent.emit(changedValue)
步骤3:在父组件中捕获事件并从回调函数中获取数据。
<parent-component (counterEvent)="get($event)" />
步骤4:在父组件中对捕获的值执行任何操作。
让我们在子组件 InOutChildSample 组件中编写一个 Output 装饰器,并尝试从父组件 InOutSample 组件获取输出。
步骤1:在子组件 in-out-child-sample.component.ts 中创建一个输出事件发射器,如下所示:
@Output() counterEvent = new EventEmitter<number>();
步骤2:创建一个方法,通过在子组件 in-out-child-sample.component.ts 中发射事件以及 counter 数据来传递 counter 的值
passCounterToParent() {
   this.counterEvent.emit(this.counter)
}
子组件的完整列表如下:
import { Component, Input, Output, EventEmitter } from '@angular/core';

@Component({
   selector: 'app-in-out-child-sample',
   templateUrl: './in-out-child-sample.component.html',
   styleUrls: ['./in-out-child-sample.component.css']
})
export class InOutChildSampleComponent {
   @Input() counter : number = 0;
   @Output() counterEvent = new EventEmitter<number>();

   passCounterToParent() {
      this.counterEvent.emit(this.counter)
   }

}
步骤3:打开子组件模板 in-out-child-sample.component.html 并添加一个按钮,以便在用户单击按钮时调用 counter 事件
<div>
   <p>Counter: {{counter}}</p>

   <button (click)="passCounterToParent()">Pass Counter to Parent</button>
</div>
这里:
click 是按钮点击事件,它被配置为在点击时运行 passCounterToParent() 函数。
步骤4:在父组件中添加一个变量来保存通过子组件事件传递的输出数据。
childCounter: number = 0
步骤5:在父组件中添加一个函数来获取通过子组件事件传递的输出数据。
get(val: number) {
   this.childCounter = val;
}
父组件的完整列表如下:
import { Component } from '@angular/core';
@Component({
   selector: 'app-in-out-sample',
   templateUrl: './in-out-sample.component.html',
   styleUrls: ['./in-out-sample.component.css']
})
export class InOutSampleComponent {
   counter: number = 10;
   childCounter: number = 0;

   inc() {
      this.counter++
   }
   get(val: number) {
      this.childCounter = val;
   }
}
步骤6:打开父组件模板 in-out-sample.component.html 并订阅子组件的事件 counterEvent 并将 get 方法设置为回调函数,如下所示:
<button (click)="inc()">Increment counter</button>
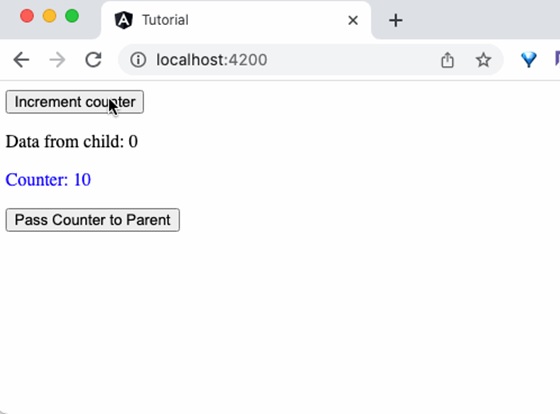
<p>Data from child: {{childCounter}}</p>
<app-in-out-child-sample [counter]="counter" (counterEvent)="get($event)" />
这里:
counterEvent 是来自子组件的事件
counterEvent 是回调函数。$event 将保存当前的 counter 值。
childContent 是来自子组件的数据
步骤7:最后,运行应用程序,您将看到当单击子组件中的按钮时,子组件会将更新的 counter 值发送到父组件。
总结
Input 和 Output 装饰器简化了在父组件和子组件之间传递数据,并提供了父组件和子组件之间丰富的交互。