- Google AMP 教程
- Google AMP - 首页
- Google AMP - 概述
- Google AMP - 简介
- Google AMP - 图片
- Google AMP - 表单
- Google AMP - 内嵌框架 (iFrames)
- Google AMP - 视频
- Google AMP - 按钮
- Google AMP - Timeago (时间显示)
- Google AMP - MathML (数学标记语言)
- Google AMP - 自动调整文本大小
- Google AMP - 日期倒计时
- Google AMP - 日期选择器
- Google AMP - 故事 (Story)
- Google AMP - 选择器
- Google AMP - 链接
- Google AMP - 字体
- Google AMP - 列表
- Google AMP - 用户通知
- Google AMP - 下一页
- Google AMP - 属性
- 样式和自定义 CSS
- Google AMP - 动态 CSS 类
- Google AMP - 操作和事件
- Google AMP - 动画
- Google AMP - 数据绑定
- Google AMP - 布局
- Google AMP - 广告
- Google AMP - 分析
- Google AMP - 社交小工具
- Google AMP - 媒体
- HTML 页面转换为 AMP 页面
- Google AMP - 基本语法
- Google AMP - 验证
- Google AMP - 缓存
- Google AMP - 自定义 JavaScript
- Google AMP - 跨域资源共享 (CORS)
- Google AMP 有用资源
- Google AMP - 快速指南
- Google AMP - 有用资源
- Google AMP - 讨论
Google AMP - 跨域资源共享 (CORS)
本章我们将尝试了解 AMP 中的 CORS。在深入细节之前,让我们先了解 CORS 的基础知识及其用途。
什么是 CORS?
CORS 代表跨域资源共享 (Cross-Origin Resource Sharing)。CORS 是一种需要额外 HTTP 头部数据的过程,用于告知浏览器是否应允许在例如 xyz.com 来源运行的网页发出的对某个 URL 的请求访问该请求 URL 的数据。我们从网页发出许多 HTTP 请求,为此我们需要 CORS 来获取所需的数据。
当我们向与主机不同的服务器发出 HTTP 请求时,我们将其称为跨域请求,这意味着域、协议和端口与主机来源不同。在这种情况下,需要请求 URL 授权访问数据;这意味着发出 GET/PUT/POST/DELETE 请求。
此附加数据可在发出的 HTTP 请求的浏览器头部中找到。此权限步骤主要是出于安全原因,这样一来,任何网页都不能在没有必要权限的情况下从另一个域获取或发送数据。
浏览器的头部应包含诸如 Access-Control-Allow-Origin 之类的详细信息,其值如下所示:
Access-Control-Allow-Origin : *
将值设置为 "*" 表示它告诉浏览器允许任何来源的请求访问资源。
Access-Control-Allow-Origin: https://www.example.com
将值设置为上述值表示告诉浏览器仅允许来自网页 www.example.com 的请求获取请求 URL 的数据。
必须考虑到共享数据的用途来进行 CORS 的服务器配置。根据此情况,必须在服务器端设置所需的头部。
现在我们知道了 CORS 是什么,让我们更进一步。在 AMP 的情况下,我们有诸如 amp-form、amp-list 之类的组件,它们使用 HTTP 端点动态加载数据。
在 AMP 页面中,即使 HTTP 请求来自同一来源,也需要启用 CORS 设置。这里出现了一个问题——即使请求和响应都来自同一来源,为什么我们还需要启用 CORS?从技术上讲,在这种情况下我们不需要启用 CORS,因为我们请求和显示的是同一域、来源等的数据。
AMP 具有缓存功能,该功能可加快向访问页面的用户提供数据的速度。如果用户已访问过该页面,则数据将缓存在 Google CDN 中,下一个用户将从缓存中获取数据。
数据存储在 AMP 端,现在它拥有不同的域。当用户点击任何按钮以获取最新数据时,将比较 AMP 缓存 URL 与网页域以获取新数据。如果此时未启用 CORS,因为它处理的是 AMP 缓存 URL 和网页域,则请求将无效,并且由于 CORS 权限问题而失败。这就是为什么即使在 AMP 页面的情况下,对于同一来源也需要启用 CORS 的原因。
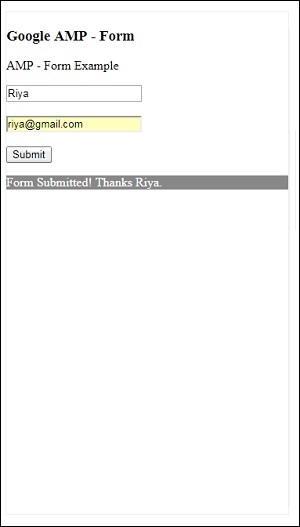
此处显示了使用启用了 CORS 的表单的工作示例:
<!doctype html>
<html amp lang = "en">
   <head>
      <meta charset = "utf-8">
      <script async src = "https://cdn.ampproject.org/v0.js">
      </script>
      <title>Google AMP - Form</title>
      <link rel = "canonical" href = "ampform.html">
      <meta name = "viewport" content = "width = device-width,
      minimum-scale = 1,initial-scale = 1">

      <style amp-boilerplate>
         body{
            -webkit-animation:
            -amp-start 8s steps(1,end) 0s 1 normal both;-moz-animation:
            -amp-start 8s steps(1,end) 0s 1 normal both;-ms-animation:
            -amp-start 8s steps(1,end) 0s 1 normal both;animation:
            -amp-start 8s steps(1,end) 0s 1 normal both
         }
         @-webkit-keyframes
         -amp-start{from{visibility:hidden}to{visibility:visible}}@-moz-keyframes
         -amp-start{from{visibility:hidden}to{visibility:visible}}@-ms-keyframes
         -amp-start{from{visibility:hidden}to{visibility:visible}}@-o-keyframes
         -amp-start{from{visibility:hidden}to{visibility:visible}}@keyframes
         -amp-start{from{visibility:hidden}to{visibility:visible}}
      </style>
      <noscript>
         <style amp-boilerplate>
            body{
               -webkit-animation:none;
               -moz-animation:none;
               -ms-animation:none;
               animation:none}
         </style>
      </noscript>
      <script async custom-element = "amp-form"
         src = "https://cdn.ampproject.org/v0/amp-form-0.1.js">
      </script>
      <script async custom-template = "amp-mustache"
         src = "https://cdn.ampproject.org/v0/amp-mustache-0.2.js">
      </script>
      <style amp-custom>
         form.amp-form-submit-success [submit-success],
         form.amp-form-submit-error [submit-error]{
            margin-top: 16px;
         }
         form.amp-form-submit-success [submit-success] {
            color: white;
            background-color:gray;
         }
         form.amp-form-submit-error [submit-error] {
            color: red;
         }
         form.amp-form-submit-success.hide-inputs > input {
            display: none;
         }
      </style>
   </head>
   <body>
      <h3>Google AMP - Form</h3>
      <form
         method = "post"
         class = "p2"
         action-xhr = "submitform.php"
         target = "_top">
            <p>AMP - Form Example</p>
            <div>
               <input
                  type = "text"
                  name = "name"
                  placeholder = "Enter Name" required>
               <br/>
               <br/>
               <input
                  type = "email"
                  name = "email"
                  placeholder = "Enter Email"
                  required>
               <br/>
               <br/>
            </div>
            <input type = "submit" value = "Submit">
            <div submit-success>
               <template type = "amp-mustache">
                  Form Submitted! Thanks {{name}}.
               </template>
            </div>
            <div submit-error>
               <template type = "amp-mustache">
                  Error! {{name}}, please try again.
               </template>
            </div>
      </form>
   </body>
</html>
submitform.php
<?php
   if(!empty($_POST)){
      $domain_url = (isset($_SERVER['HTTPS']) ? "https" : "http") .
         "://$_SERVER[HTTP_HOST]";
      header("Content-type: application/json");
      header("AMP-Access-Control-Allow-Source-Origin: " . $domain_url);
      header("Access-Control-Expose-Headers:
         AMP-Access-Control-Allow-Source-Origin");
      $myJSON = json_encode($_POST);
      echo $myJSON;
   }
?>
输出

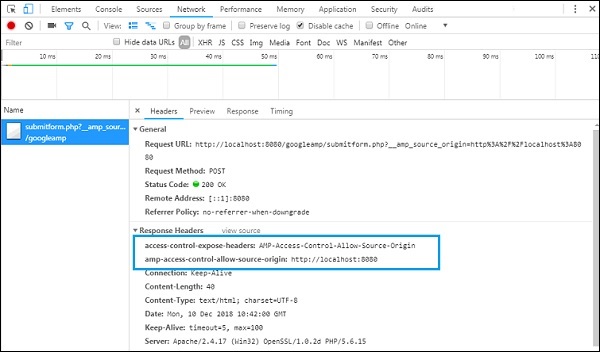
添加到 submitform.php 的响应头部详细信息:

为了使表单正常工作,我们需要添加诸如 access-control-expose-headers(值为 AMP-Access-Control-Allow-Source-Origin)和 amp-access-control-allow-source-origin 头部(值为 https://:8080)。
这里我们使用的是 php 文件,服务器是 apache。在 php 文件中,我们添加了如下所示的必需头部:
<?php
   if(!empty($_POST)){
      $domain_url = (isset($_SERVER['HTTPS']) ? "https" : "http") .
         "://$_SERVER[HTTP_HOST]";
      header("Content-type: application/json");
      header("AMP-Access-Control-Allow-Source-Origin: " . $domain_url);
      header("Access-Control-Expose-Headers:
         AMP-Access-Control-Allow-Source-Origin");
      $myJSON = json_encode($_POST);
      echo $myJSON;
   }
?>
添加了必需的头部后,将允许来源 https://:8080 进行交互并获取返回的数据。