- Python Pillow 教程
- Python Pillow - 首页
- Python Pillow - 概述
- Python Pillow - 环境设置
- 基本图像操作
- Python Pillow - 图像处理
- Python Pillow - 调整图像大小
- Python Pillow - 翻转和旋转图像
- Python Pillow - 裁剪图像
- Python Pillow - 为图像添加边框
- Python Pillow - 识别图像文件
- Python Pillow - 合并图像
- Python Pillow - 剪切和粘贴图像
- Python Pillow - 滚动图像
- Python Pillow - 在图像上写入文本
- Python Pillow - ImageDraw 模块
- Python Pillow - 连接两张图像
- Python Pillow - 创建缩略图
- Python Pillow - 创建水印
- Python Pillow - 图像序列
- Python Pillow 颜色转换
- Python Pillow - 图像上的颜色
- Python Pillow - 使用颜色创建图像
- Python Pillow - 将颜色字符串转换为 RGB 颜色值
- Python Pillow - 将颜色字符串转换为灰度值
- Python Pillow - 通过更改像素值来更改颜色
- 图像处理
- Python Pillow - 降噪
- Python Pillow - 更改图像模式
- Python Pillow - 图像合成
- Python Pillow - 使用 Alpha 通道
- Python Pillow - 应用透视变换
- 图像滤镜
- Python Pillow - 为图像添加滤镜
- Python Pillow - 卷积滤镜
- Python Pillow - 模糊图像
- Python Pillow - 边缘检测
- Python Pillow - 浮雕图像
- Python Pillow - 增强边缘
- Python Pillow - 锐化蒙版滤镜
- 图像增强和校正
- Python Pillow - 增强对比度
- Python Pillow - 增强锐度
- Python Pillow - 增强颜色
- Python Pillow - 校正色彩平衡
- Python Pillow - 去噪
- 图像分析
- Python Pillow - 提取图像元数据
- Python Pillow - 识别颜色
- 高级主题
- Python Pillow - 创建动画 GIF
- Python Pillow - 批量处理图像
- Python Pillow - 转换图像文件格式
- Python Pillow - 为图像添加填充
- Python Pillow - 颜色反转
- Python Pillow - 使用 NumPy 进行机器学习
- Python Pillow 与 Tkinter BitmapImage 和 PhotoImage 对象
- Image 模块
- Python Pillow - 图像混合
- Python Pillow 有用资源
- Python Pillow - 快速指南
- Python Pillow - 函数参考
- Python Pillow - 有用资源
- Python Pillow - 讨论
Python Pillow - ImageDraw.pieslice() 函数
ImageDraw.pieslice() 方法用于在边界框内绘制填充的扇形(圆的一部分)。与 arc() 和 chord() 方法相同,此方法绘制扇形的弧形部分以及连接弧形部分端点到边界框中心的直线。
语法
以下是函数的语法:
ImageDraw.pieslice(xy, start, end, fill=None, outline=None, width=1)
参数
以下是此函数参数的详细信息:
xy - 定义扇形边界框的两个点。可以指定为两个元组的序列 [(x0, y0), (x1, y1)] 或作为扁平列表 [x0, y0, x1, y1]。
start - 扇形的起始角度,以度为单位。角度从 3 点钟方向开始测量,顺时针方向增加。
end - 扇形的结束角度,以度为单位。
fill - 用于填充扇形的颜色。此参数指定内部颜色。
outline - 用于扇形轮廓的颜色。
width - 扇形轮廓的线宽,以像素为单位。默认值为 1。
示例
示例 1
此示例使用默认填充颜色、轮廓和宽度在指定的边界框内绘制扇形。
from PIL import Image, ImageDraw

# Create a blank image
image = Image.new("RGB", (700, 300), "black")
draw = ImageDraw.Draw(image)

# Draw a pieslice inside a bounding box [(100, 10), (350, 250)]
draw.pieslice([(100, 10), (350, 250)], start=45, end=180)

# Display the image
image.show()
print('The pieslice is drawn successfully...')
输出
The pieslice is drawn successfully...
输出图像

示例 2
此示例在指定的边界框内绘制一个扇形,填充颜色为蓝色,轮廓颜色为黑色,轮廓线宽为 2 像素。
from PIL import Image, ImageDraw

# Create a new image with a white background
image = Image.new("RGB", (700, 300), "white")
draw = ImageDraw.Draw(image)

# Draw a pieslice inside the bounding box
draw.pieslice([(100, 10), (350, 250)], start=30, end=300, fill="blue", outline="black", width=2)

# Display the image
image.show()
print('The Pieslice is drawn successfully...')
输出
The Pieslice is drawn successfully...
输出图像

示例 3
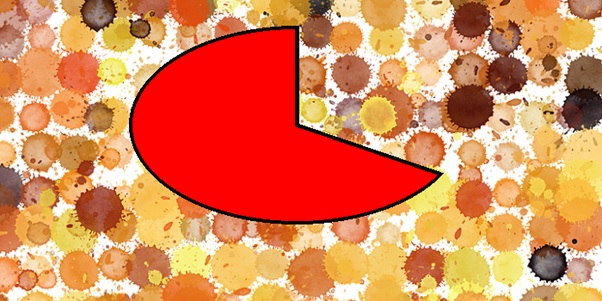
以下示例演示如何在具有不同参数的现有图像上绘制扇形。
from PIL import Image, ImageDraw

# Open an Image
image = Image.open('Images/ColorDots.png')

# Create the draw object
draw = ImageDraw.Draw(image)

# Draw a red pieslice inside a bounding box
draw.pieslice([(150, 30), (540, 260)], start=30, end=270, fill="red", outline="black", width=4)

# Display the image
image.show()
print('The pieslice is drawn successfully...')
输出
The pieslice is drawn successfully...

python_pillow_function_reference.htm
广告