
- Python基础
- Python - 首页
- Python - 概述
- Python - 历史
- Python - 特性
- Python vs C++
- Python - Hello World程序
- Python - 应用领域
- Python - 解释器
- Python - 环境搭建
- Python - 虚拟环境
- Python - 基本语法
- Python - 变量
- Python - 数据类型
- Python - 类型转换
- Python - Unicode系统
- Python - 字面量
- Python - 运算符
- Python - 算术运算符
- Python - 比较运算符
- Python - 赋值运算符
- Python - 逻辑运算符
- Python - 位运算符
- Python - 成员运算符
- Python - 身份运算符
- Python - 运算符优先级
- Python - 注释
- Python - 用户输入
- Python - 数字
- Python - 布尔值
- Python控制语句
- Python - 控制流
- Python - 决策制定
- Python - if语句
- Python - if else
- Python - 嵌套if
- Python - match-case语句
- Python - 循环
- Python - for循环
- Python - for-else循环
- Python - while循环
- Python - break语句
- Python - continue语句
- Python - pass语句
- Python - 嵌套循环
- Python函数与模块
- Python - 函数
- Python - 默认参数
- Python - 关键字参数
- Python - 仅关键字参数
- Python - 位置参数
- Python - 仅位置参数
- Python - 可变参数
- Python - 变量作用域
- Python - 函数注解
- Python - 模块
- Python - 内置函数
- Python字符串
- Python - 字符串
- Python - 字符串切片
- Python - 修改字符串
- Python - 字符串连接
- Python - 字符串格式化
- Python - 转义字符
- Python - 字符串方法
- Python - 字符串练习
- Python列表
- Python - 列表
- Python - 访问列表元素
- Python - 修改列表元素
- Python - 添加列表元素
- Python - 删除列表元素
- Python - 循环遍历列表
- Python - 列表推导式
- Python - 排序列表
- Python - 复制列表
- Python - 合并列表
- Python - 列表方法
- Python - 列表练习
- Python元组
- Python - 元组
- Python - 访问元组元素
- Python - 更新元组
- Python - 解包元组
- Python - 循环遍历元组
- Python - 合并元组
- Python - 元组方法
- Python - 元组练习
- Python集合
- Python - 集合
- Python - 访问集合元素
- Python - 添加集合元素
- Python - 删除集合元素
- Python - 循环遍历集合
- Python - 合并集合
- Python - 复制集合
- Python - 集合运算符
- Python - 集合方法
- Python - 集合练习
- Python字典
- Python - 字典
- Python - 访问字典元素
- Python - 修改字典元素
- Python - 添加字典元素
- Python - 删除字典元素
- Python - 字典视图对象
- Python - 循环遍历字典
- Python - 复制字典
- Python - 嵌套字典
- Python - 字典方法
- Python - 字典练习
- Python数组
- Python - 数组
- Python - 访问数组元素
- Python - 添加数组元素
- Python - 删除数组元素
- Python - 循环遍历数组
- Python - 复制数组
- Python - 反转数组
- Python - 排序数组
- Python - 合并数组
- Python - 数组方法
- Python - 数组练习
- Python文件处理
- Python - 文件处理
- Python - 写入文件
- Python - 读取文件
- Python - 重命名和删除文件
- Python - 目录
- Python - 文件方法
- Python - OS文件/目录方法
- Python - OS路径方法
- 面向对象编程
- Python - OOPs概念
- Python - 类与对象
- Python - 类属性
- Python - 类方法
- Python - 静态方法
- Python - 构造函数
- Python - 访问修饰符
- Python - 继承
- Python - 多态
- Python - 方法重写
- Python - 方法重载
- Python - 动态绑定
- Python - 动态类型
- Python - 抽象
- Python - 封装
- Python - 接口
- Python - 包
- Python - 内部类
- Python - 匿名类和对象
- Python - 单例类
- Python - 包装器类
- Python - 枚举
- Python - 反射
- Python错误与异常
- Python - 语法错误
- Python - 异常
- Python - try-except块
- Python - try-finally块
- Python - 抛出异常
- Python - 异常链
- Python - 嵌套try块
- Python - 用户自定义异常
- Python - 日志记录
- Python - 断言
- Python - 内置异常
- Python多线程
- Python - 多线程
- Python - 线程生命周期
- Python - 创建线程
- Python - 启动线程
- Python - 加入线程
- Python - 线程命名
- Python - 线程调度
- Python - 线程池
- Python - 主线程
- Python - 线程优先级
- Python - 守护线程
- Python - 同步线程
- Python同步
- Python - 线程间通信
- Python - 线程死锁
- Python - 中断线程
- Python网络编程
- Python - 网络编程
- Python - 套接字编程
- Python - URL处理
- Python - 泛型
- Python库
- NumPy教程
- Pandas教程
- SciPy教程
- Matplotlib教程
- Django教程
- OpenCV教程
- Python杂项
- Python - 日期与时间
- Python - 数学
- Python - 迭代器
- Python - 生成器
- Python - 闭包
- Python - 装饰器
- Python - 递归
- Python - 正则表达式
- Python - PIP
- Python - 数据库访问
- Python - 弱引用
- Python - 序列化
- Python - 模板
- Python - 输出格式化
- Python - 性能测量
- Python - 数据压缩
- Python - CGI编程
- Python - XML处理
- Python - GUI编程
- Python - 命令行参数
- Python - 文档字符串
- Python - JSON
- Python - 发送邮件
- Python - 扩展功能
- Python - 工具/实用程序
- Python - GUIs
- Python高级概念
- Python - 抽象基类
- Python - 自定义异常
- Python - 高阶函数
- Python - 对象内部结构
- Python - 内存管理
- Python - 元类
- Python - 使用元类进行元编程
- Python - 模拟和存根
- Python - 猴子补丁
- Python - 信号处理
- Python - 类型提示
- Python - 自动化教程
- Python - Humanize包
- Python - 上下文管理器
- Python - 协程
- Python - 描述符
- Python - 诊断和修复内存泄漏
- Python - 不可变数据结构
- Python有用资源
- Python - 问答
- Python - 在线测验
- Python - 快速指南
- Python - 参考
- Python - 速查表
- Python - 项目
- Python - 有用资源
- Python - 讨论
- Python编译器
- NumPy编译器
- Matplotlib编译器
- SciPy编译器
如何用Python构建密码管理器
这个密码管理器应用程序将通过以组织的方式加密密码来实现密码的存储和保护。
这个密码管理器是用Python创建的,用户界面是用Tkinter创建的,同时使用**cryptography**库确保密码安全。应用程序的一个特性是借助强大的加密技术安全地保存和显示密码。
安装
首先按照以下安装步骤操作:
1. 安装Python
确保您已安装Python 3.11或更高版本。下载并安装它。阅读更多内容 - Python环境搭建。
2. 安装所需的库
打开终端或命令提示符,并使用pip安装库:
pip install cryptography
密码管理器组件说明
密码管理器应用程序包含几个关键组件:密码管理器应用程序包含几个关键组件:
1. 密钥生成和管理
最后一个是**generate_key()**函数,它会生成一个新的加密密钥。
此函数**load_key()**作为默认函数,如果可用,则从文件中加载现有密钥,否则创建一个新密钥。
2. 加密和解密
密码使用Fernet加密算法进行加密,这是由**encrypt_message()**函数完成的,而解密是在呈现之前使用**decrypt_message()**函数完成的。
3. 保存密码
**save_password()**函数从用户那里获取服务、用户名和密码的字符串输入,然后在将其放入JSON文件之前对其进行加密。它处理文件操作并修改已存在的数据。
4. 查看密码
**view_passwords()**函数从JSON文件中读取加密的密码,然后对其进行解密,并将其显示给用户。
5. 图形用户界面 (GUI)
Tkinter库用于实现一个基本的用户界面,其中包含用于服务、用户名和密码的输入小部件以及用于保存和显示密码的按钮。
**阅读更多**:Python GUI编程
构建密码管理器的Python代码
import tkinter as tk
from tkinter import messagebox
from cryptography.fernet import Fernet
import os
import json

# Key generation and encryption setup
def generate_key():
   return Fernet.generate_key()

def load_key():
   if os.path.exists("secret.key"):
      with open("secret.key", "rb") as key_file:
         return key_file.read()
   else:
      key = generate_key()
      with open("secret.key", "wb") as key_file:
         key_file.write(key)
      return key

def encrypt_message(message, key):
   f = Fernet(key)
   encrypted_message = f.encrypt(message.encode())
   return encrypted_message

def decrypt_message(encrypted_message, key):
   f = Fernet(key)
   decrypted_message = f.decrypt(encrypted_message).decode()
   return decrypted_message

# Initialize the key
key = load_key()

# Application functions
def save_password():
   service = service_entry.get()
   username = username_entry.get()
   password = password_entry.get()

   if not service or not username or not password:
      messagebox.showwarning("Input Error", "Please fill all fields.")
      return

   encrypted_password = encrypt_message(password, key)
   new_data = {service: {"username": username, "password": encrypted_password}}

   if os.path.exists("passwords.json"):
      with open("passwords.json", "r") as file:
         try:
            existing_data = json.load(file)
         except (json.JSONDecodeError, TypeError):
            existing_data = {}
      existing_data.update(new_data)
   else:
      existing_data = new_data

   # Ensure all values in existing_data are serializable
   for service, info in existing_data.items():
      if isinstance(info.get("password"), bytes):
         info["password"] = info["password"].decode()  # Convert bytes to string for serialization

   with open("passwords.json", "w") as file:
      try:
         json.dump(existing_data, file, indent=4)
      except TypeError as e:
         messagebox.showerror("Serialization Error", f"Error serializing data: {e}")

   service_entry.delete(0, tk.END)
   username_entry.delete(0, tk.END)
   password_entry.delete(0, tk.END)
   messagebox.showinfo("Success", "Password saved successfully!")

def view_passwords():
   if os.path.exists("passwords.json"):
      with open("passwords.json", "r") as file:
         try:
            data = json.load(file)
         except json.JSONDecodeError:
            data = {}

   result = ""
   if data:
      for service, info in data.items():
         username = info.get("username", "N/A")
         password = info.get("password", b"")
         decrypted_password = decrypt_message(password.encode(), key)
            result += f"Service: {service}\nUsername: {username}\nPassword: {decrypted_password}\n\n"
   else:
      result = "No passwords stored yet."

      messagebox.showinfo("Stored Passwords", result)
   else:
      messagebox.showinfo("No Data", "No passwords stored yet.")

# GUI setup
root = tk.Tk()
root.title("Password Manager")

tk.Label(root, text="Service").grid(row=0, column=0, padx=10, pady=10)
tk.Label(root, text="Username").grid(row=1, column=0, padx=10, pady=10)
tk.Label(root, text="Password").grid(row=2, column=0, padx=10, pady=10)

service_entry = tk.Entry(root, width=50)
service_entry.grid(row=0, column=1, padx=10, pady=10)

username_entry = tk.Entry(root, width=50)
username_entry.grid(row=1, column=1, padx=10, pady=10)

password_entry = tk.Entry(root, width=50, show="*")
password_entry.grid(row=2, column=1, padx=10, pady=10)

tk.Button(root, text="Save Password", command=save_password).grid(row=3, column=0, columnspan=2, pady=10)
tk.Button(root, text="View Passwords", command=view_passwords).grid(row=4, column=0, columnspan=2, pady=10)

root.mainloop()
输出
首先,您必须输入您的服务、用户名和密码。
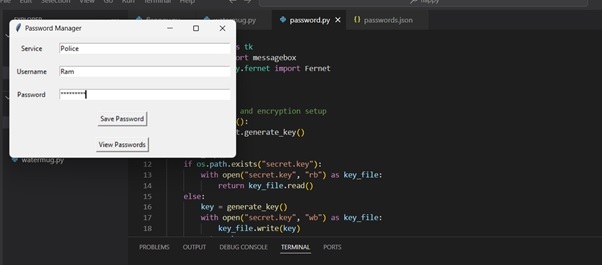
然后,您必须单击保存按钮进行保存:
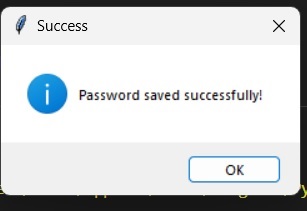
之后,您可以查看您保存的密码:
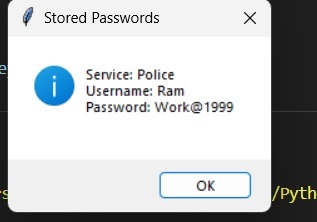
您可以再次创建密码、用户名和服务:
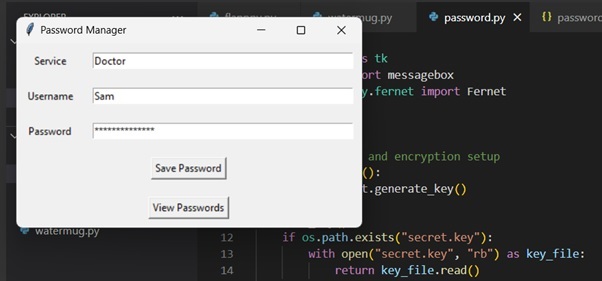
保存密码后,单击“查看密码”,您将看到之前创建的两个用户名:
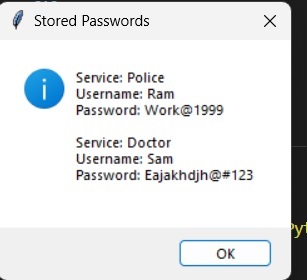
所有密码都将保存在JSON文件中:
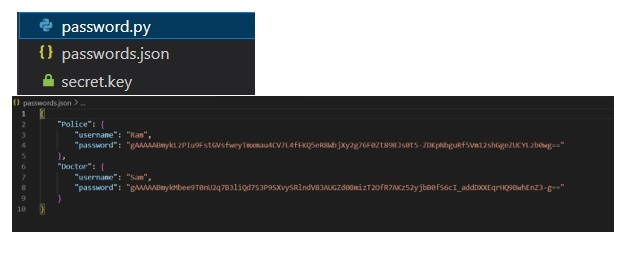
结论
这个用Python创建的密码管理器可以作为处理密码安全问题的有用工具。使用简单的加密和友好的图形用户界面,它只允许授权用户访问,同时保持数据安全。从安装说明和源代码可以看出,用户可以运行自己的密码管理器并提高他们的在线安全性。