- Python 基础
- Python - 首页
- Python - 概述
- Python - 历史
- Python - 特性
- Python 与 C++
- Python - Hello World 程序
- Python - 应用领域
- Python - 解释器
- Python - 环境搭建
- Python - 虚拟环境
- Python - 基本语法
- Python - 变量
- Python - 数据类型
- Python - 类型转换
- Python - Unicode 系统
- Python - 字面量
- Python - 运算符
- Python - 算术运算符
- Python - 比较运算符
- Python - 赋值运算符
- Python - 逻辑运算符
- Python - 位运算符
- Python - 成员运算符
- Python - 身份运算符
- Python - 运算符优先级
- Python - 注释
- Python - 用户输入
- Python - 数字
- Python - 布尔值
- Python 控制语句
- Python - 控制流
- Python - 决策
- Python - if 语句
- Python - if else
- Python - 嵌套 if
- Python - Match-Case 语句
- Python - 循环
- Python - for 循环
- Python - for-else 循环
- Python - while 循环
- Python - break 语句
- Python - continue 语句
- Python - pass 语句
- Python - 嵌套循环
- Python 函数和模块
- Python - 函数
- Python - 默认参数
- Python - 关键字参数
- Python - 仅关键字参数
- Python - 位置参数
- Python - 仅位置参数
- Python - 可变参数
- Python - 变量作用域
- Python - 函数注解
- Python - 模块
- Python - 内置函数
- Python 字符串
- Python - 字符串
- Python - 字符串切片
- Python - 修改字符串
- Python - 字符串连接
- Python - 字符串格式化
- Python - 转义字符
- Python - 字符串方法
- Python - 字符串练习
- Python 列表
- Python - 列表
- Python - 访问列表元素
- Python - 修改列表元素
- Python - 添加列表元素
- Python - 删除列表元素
- Python - 遍历列表
- Python - 列表推导式
- Python - 排序列表
- Python - 复制列表
- Python - 合并列表
- Python - 列表方法
- Python - 列表练习
- Python 元组
- Python - 元组
- Python - 访问元组元素
- Python - 更新元组
- Python - 解包元组
- Python - 遍历元组
- Python - 合并元组
- Python - 元组方法
- Python - 元组练习
- Python 集合
- Python - 集合
- Python - 访问集合元素
- Python - 添加集合元素
- Python - 删除集合元素
- Python - 遍历集合
- Python - 合并集合
- Python - 复制集合
- Python - 集合运算符
- Python - 集合方法
- Python - 集合练习
- Python 字典
- Python - 字典
- Python - 访问字典元素
- Python - 修改字典元素
- Python - 添加字典元素
- Python - 删除字典元素
- Python - 字典视图对象
- Python - 遍历字典
- Python - 复制字典
- Python - 嵌套字典
- Python - 字典方法
- Python - 字典练习
- Python 数组
- Python - 数组
- Python - 访问数组元素
- Python - 添加数组元素
- Python - 删除数组元素
- Python - 遍历数组
- Python - 复制数组
- Python - 反转数组
- Python - 排序数组
- Python - 合并数组
- Python - 数组方法
- Python - 数组练习
- Python 文件处理
- Python - 文件处理
- Python - 写入文件
- Python - 读取文件
- Python - 重命名和删除文件
- Python - 目录
- Python - 文件方法
- Python - OS 文件/目录方法
- Python - OS 路径方法
- 面向对象编程
- Python - OOPs 概念
- Python - 类和对象
- Python - 类属性
- Python - 类方法
- Python - 静态方法
- Python - 构造函数
- Python - 访问修饰符
- Python - 继承
- Python - 多态
- Python - 方法重写
- Python - 方法重载
- Python - 动态绑定
- Python - 动态类型
- Python - 抽象
- Python - 封装
- Python - 接口
- Python - 包
- Python - 内部类
- Python - 匿名类和对象
- Python - 单例类
- Python - 包装类
- Python - 枚举
- Python - 反射
- Python 错误和异常
- Python - 语法错误
- Python - 异常
- Python - try-except 块
- Python - try-finally 块
- Python - 抛出异常
- Python - 异常链
- Python - 嵌套 try 块
- Python - 用户自定义异常
- Python - 日志记录
- Python - 断言
- Python - 内置异常
- Python 多线程
- Python - 多线程
- Python - 线程生命周期
- Python - 创建线程
- Python - 启动线程
- Python - 加入线程
- Python - 线程命名
- Python - 线程调度
- Python - 线程池
- Python - 主线程
- Python - 线程优先级
- Python - 守护线程
- Python - 线程同步
- Python 同步
- Python - 线程间通信
- Python - 线程死锁
- Python - 中断线程
- Python 网络编程
- Python - 网络编程
- Python - Socket 编程
- Python - URL 处理
- Python - 泛型
- Python 库
- NumPy 教程
- Pandas 教程
- SciPy 教程
- Matplotlib 教程
- Django 教程
- OpenCV 教程
- Python 杂项
- Python - 日期和时间
- Python - 数学
- Python - 迭代器
- Python - 生成器
- Python - 闭包
- Python - 装饰器
- Python - 递归
- Python - 正则表达式
- Python - PIP
- Python - 数据库访问
- Python - 弱引用
- Python - 序列化
- Python - 模板
- Python - 输出格式化
- Python - 性能测量
- Python - 数据压缩
- Python - CGI 编程
- Python - XML 处理
- Python - GUI 编程
- Python - 命令行参数
- Python - 文档字符串
- Python - JSON
- Python - 发送电子邮件
- Python - 扩展
- Python - 工具/实用程序
- Python - GUIs
- Python 高级概念
- Python - 抽象基类
- Python - 自定义异常
- Python - 高阶函数
- Python - 对象内部
- Python - 内存管理
- Python - 元类
- Python - 使用元类进行元编程
- Python - 模拟和存根
- Python - Monkey Patching
- Python - 信号处理
- Python - 类型提示
- Python - 自动化教程
- Python - Humanize 包
- Python - 上下文管理器
- Python - 协程
- Python - 描述符
- Python - 诊断和修复内存泄漏
- Python - 不可变数据结构
- Python 有用资源
- Python - 问答
- Python - 在线测验
- Python - 快速指南
- Python - 参考
- Python - 速查表
- Python - 项目
- Python - 有用资源
- Python - 讨论
- Python 编译器
- NumPy 编译器
- Matplotlib 编译器
- SciPy 编译器
Python - 发送电子邮件
在 Python 中发送电子邮件
可以使用多个库在 Python 中发送电子邮件,但最常用的库是smtplib和email。
Python 中的“smtplib”模块定义了一个 SMTP 客户端会话对象,可用于将邮件发送到任何具有 SMTP 或 ESMTP 监听器守护程序的互联网计算机。“email”包是一个用于管理电子邮件消息的库,包括 MIME 和其他基于 RFC 2822 的消息文档。
在互联网上传递和处理电子邮件的应用程序称为“邮件服务器”。简单邮件传输协议 (SMTP) 是一种协议,用于处理发送电子邮件和在邮件服务器之间路由电子邮件。它是电子邮件传输的互联网标准。
Python smtplib.SMTP() 函数
Python smtplib.SMTP() 函数用于创建一个 SMTP 客户端会话对象,该对象建立与 SMTP 服务器的连接。此连接允许您通过服务器发送电子邮件。
设置 SMTP 服务器
在发送电子邮件之前,需要设置 SMTP 服务器。常见的 SMTP 服务器包括 Gmail、Yahoo 或其他邮件服务提供商提供的服务器。
创建 SMTP 对象
要发送电子邮件,需要使用以下函数获取 SMTP 类的对象:
import smtplib

smtpObj = smtplib.SMTP( [host [, port [, local_hostname]]] )
以下是参数的详细信息:
host - 这是运行您的 SMTP 服务器的主机。您可以指定主机的 IP 地址或域名,例如tutorialspoint.com。这是一个可选参数。
port - 如果您提供主机参数,则需要指定 SMTP 服务器正在侦听的端口。通常此端口为 25。
local_hostname - 如果您的 SMTP 服务器在本地计算机上运行,则可以只指定 localhost 作为选项。
示例
以下脚本连接到端口 25 上“smtp.example.com”处的 SMTP 服务器,可选地标识和保护连接,登录(如果需要),发送电子邮件,然后退出会话:
import smtplib

# Create an SMTP object and establish a connection to the SMTP server
smtpObj = smtplib.SMTP('smtp.example.com', 25)

# Identify yourself to an ESMTP server using EHLO
smtpObj.ehlo()

# Secure the SMTP connection
smtpObj.starttls()

# Login to the server (if required)
smtpObj.login('username', 'password')

# Send an email
from_address = 'your_email@example.com'
to_address = 'recipient@example.com'
message = """\
Subject: Test Email

This is a test email message.
"""

smtpObj.sendmail(from_address, to_address, message)

# Quit the SMTP session
smtpObj.quit()
Python smtpd 模块
Python smtpd 模块用于创建和管理简单的邮件传输协议 (SMTP) 服务器。此模块允许您设置一个 SMTP 服务器,该服务器可以接收和处理传入的电子邮件消息,这对于测试和调试应用程序中的电子邮件功能非常有用。
设置 SMTP 调试服务器
smtpd 模块预装在 Python 中,并包含一个本地 SMTP 调试服务器。此服务器用于测试电子邮件功能,而无需实际将电子邮件发送到指定的地址;而是将电子邮件内容打印到控制台。
运行此本地服务器无需处理消息加密或使用凭据登录到电子邮件服务器。
启动 SMTP 调试服务器
您可以在命令提示符或终端中使用以下命令启动本地 SMTP 调试服务器:
python -m smtpd -c DebuggingServer -n localhost:1025
示例
以下示例演示了如何使用 smtplib 功能和本地 SMTP 调试服务器发送虚拟电子邮件:
import smtplib

def prompt(prompt):
   return input(prompt).strip()

fromaddr = prompt("From: ")
toaddrs = prompt("To: ").split()
print("Enter message, end with ^D (Unix) or ^Z (Windows):")

# Add the From: and To: headers at the start!
msg = ("From: %s\r\nTo: %s\r\n\r\n"
   % (fromaddr, ", ".join(toaddrs)))
while True:
   try:
      line = input()
   except EOFError:
      break
   if not line:
      break
   msg = msg + line

print("Message length is", len(msg))
server = smtplib.SMTP('localhost', 1025)
server.set_debuglevel(1)
server.sendmail(fromaddr, toaddrs, msg)
server.quit()
在此示例中:
From - 您输入发件人的电子邮件地址 (fromaddr)。
To - 您输入收件人的电子邮件地址 (toaddrs),可以由空格分隔多个地址。
Message - 您输入消息内容,以 ^D(Unix)或 ^Z(Windows)结尾。
“smtplib”的 sendmail() 方法使用指定的发件人、收件人(s) 和消息内容将电子邮件发送到在“localhost”端口“1025”上运行的本地 SMTP 调试服务器。
输出
运行程序时,控制台输出程序和 SMTP 服务器之间的通信。同时,运行 SMTPD 服务器的终端显示传入的消息内容,帮助您调试和验证电子邮件发送过程。
python example.py
From: abc@xyz.com
To: xyz@abc.com
Enter message, end with ^D (Unix) or ^Z (Windows):
Hello World
^Z
控制台反映以下日志:
From: abc@xyz.com
reply: retcode (250); Msg: b'OK'
send: 'rcpt TO:<xyz@abc.com>\r\n'
reply: b'250 OK\r\n'
reply: retcode (250); Msg: b'OK'
send: 'data\r\n'
reply: b'354 End data with <CR><LF>.<CR><LF>\r\n'
reply: retcode (354); Msg: b'End data with <CR><LF>.<CR><LF>'
data: (354, b'End data with <CR><LF>.<CR><LF>')
send: b'From: abc@xyz.com\r\nTo: xyz@abc.com\r\n\r\nHello
World\r\n.\r\n'
reply: b'250 OK\r\n'
reply: retcode (250); Msg: b'OK'
data: (250, b'OK')
send: 'quit\r\n'
reply: b'221 Bye\r\n'
reply: retcode (221); Msg: b'Bye'
运行 SMTPD 服务器的终端显示此输出:
---------- MESSAGE FOLLOWS ----------
b'From: abc@xyz.com'
b'To: xyz@abc.com'
b'X-Peer: ::1'
b''
b'Hello World'
------------ END MESSAGE ------------
使用 Python 发送 HTML 电子邮件
要使用 Python 发送 HTML 邮件,可以使用 **smtplib** 库连接到 SMTP 服务器,并使用 **email.mime** 模块适当地构建和格式化邮件内容。
构建 HTML 邮件消息
发送 HTML 邮件时,需要指定某些标头并相应地构建邮件内容,以确保收件人的邮件客户端将其识别并呈现为 HTML。
示例
以下是使用 Python 发送 HTML 内容作为电子邮件的示例:
import smtplib
from email.mime.multipart import MIMEMultipart
from email.mime.text import MIMEText

# Email content
sender = 'from@fromdomain.com'
receivers = ['to@todomain.com']

# Create message container - the correct MIME type is multipart/alternative.
msg = MIMEMultipart('alternative')
msg['From'] = 'From Person <from@fromdomain.com>'
msg['To'] = 'To Person <to@todomain.com>'
msg['Subject'] = 'SMTP HTML e-mail test'

# HTML message content
html = """\
<html>
  <head></head>
  <body>
    <p>This is an e-mail message to be sent in <b>HTML format</b></p>
    <p><b>This is HTML message.</b></p>
    <h1>This is headline.</h1>
  </body>
</html>
"""

# Attach HTML content to the email
part2 = MIMEText(html, 'html')
msg.attach(part2)

# Connect to SMTP server and send email
try:
   smtpObj = smtplib.SMTP('localhost')
   smtpObj.sendmail(sender, receivers, msg.as_string())
   print("Successfully sent email")
except smtplib.SMTPException as e:
   print(f"Error: unable to send email. Error message: {str(e)}")
发送电子邮件附件
要在 Python 中发送电子邮件附件,可以使用 **smtplib** 库连接到 SMTP 服务器,并使用 **email.mime** 模块构建和格式化电子邮件内容,包括附件。
构建包含附件的电子邮件
发送包含附件的电子邮件时,需要使用 MIME(多用途互联网邮件扩展)正确格式化电子邮件。这涉及将 **Content-Type** 标头设置为 **multipart/mixed**,以表示电子邮件同时包含文本和附件。电子邮件的每个部分(文本和附件)都由边界分隔。
示例
以下示例发送一封电子邮件,其中包含 **`/tmp/test.txt`** 文件作为附件:
import smtplib
import base64

filename = "/tmp/test.txt"

# Read a file and encode it into base64 format
fo = open(filename, "rb")
filecontent = fo.read()
encodedcontent = base64.b64encode(filecontent)  # base64

sender = 'webmaster@tutorialpoint.com'
reciever = 'amrood.admin@gmail.com'

marker = "AUNIQUEMARKER"

body ="""
This is a test email to send an attachment.
"""
# Define the main headers.
part1 = """From: From Person <me@fromdomain.net>
To: To Person <amrood.admin@gmail.com>
Subject: Sending Attachment
MIME-Version: 1.0
Content-Type: multipart/mixed; boundary=%s
--%s
""" % (marker, marker)

# Define the message action
part2 = """Content-Type: text/plain
Content-Transfer-Encoding:8bit

%s
--%s
""" % (body,marker)

# Define the attachment section
part3 = """Content-Type: multipart/mixed; name=\"%s\"
Content-Transfer-Encoding:base64
Content-Disposition: attachment; filename=%s

%s
--%s--
""" %(filename, filename, encodedcontent, marker)
message = part1 + part2 + part3

try:
   smtpObj = smtplib.SMTP('localhost')
   smtpObj.sendmail(sender, reciever, message)
   print "Successfully sent email"
except Exception:
   print "Error: unable to send email"
使用 Gmail 的 SMTP 服务器发送电子邮件
要在 Python 中使用 Gmail 的 SMTP 服务器发送电子邮件,需要连接到端口“587”上使用“TLS”加密的 **smtp.gmail.com**,使用你的 Gmail 凭据进行身份验证,使用 Python 的 smtplib 和 email.mime 库构建电子邮件消息,并使用 sendmail() 方法发送。最后,使用 quit() 关闭 SMTP 连接。
示例
以下是一个演示如何使用 Gmail 的 SMTP 服务器发送电子邮件的示例脚本:
import smtplib

# Email content
content = "Hello World"

# Set up SMTP connection to Gmail's SMTP server
mail = smtplib.SMTP('smtp.gmail.com', 587)
# Identify yourself to the SMTP server
mail.ehlo()
# Start TLS encryption for the connection
mail.starttls()

# Gmail account credentials
sender = 'your_email@gmail.com'
password = 'your_password'

# Login to Gmail's SMTP server
mail.login(sender, password)

# Email details
recipient = 'recipient_email@example.com'
subject = 'Test Email'

# Construct email message with headers
header = f'To: {recipient}\nFrom: {sender}\nSubject: {subject}\n'
content = header + content

# Send email
mail.sendmail(sender, recipient, content)

# Close SMTP connection
mail.quit()
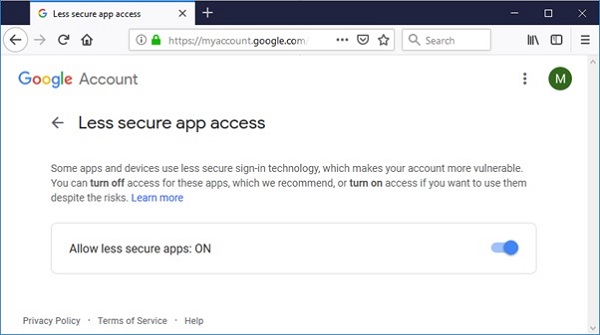
在运行上述脚本之前,必须配置发件人的 Gmail 帐户以允许访问“安全性较低的应用”。请访问以下链接。
https://myaccount.google.com/lesssecureapps 将显示的切换按钮设置为 ON。
如果一切顺利,请执行上述脚本。邮件应发送到收件人的收件箱。