- Python 基础
- Python - 首页
- Python - 概述
- Python - 历史
- Python - 特性
- Python vs C++
- Python - Hello World 程序
- Python - 应用领域
- Python - 解释器
- Python - 环境搭建
- Python - 虚拟环境
- Python - 基本语法
- Python - 变量
- Python - 数据类型
- Python - 类型转换
- Python - Unicode 系统
- Python - 字面量
- Python - 运算符
- Python - 算术运算符
- Python - 比较运算符
- Python - 赋值运算符
- Python - 逻辑运算符
- Python - 位运算符
- Python - 成员运算符
- Python - 身份运算符
- Python - 运算符优先级
- Python - 注释
- Python - 用户输入
- Python - 数字
- Python - 布尔值
- Python 控制语句
- Python - 控制流
- Python - 决策
- Python - If 语句
- Python - If else
- Python - 嵌套 If
- Python - Match-Case 语句
- Python - 循环
- Python - for 循环
- Python - for-else 循环
- Python - While 循环
- Python - break 语句
- Python - continue 语句
- Python - pass 语句
- Python - 嵌套循环
- Python 函数 & 模块
- Python - 函数
- Python - 默认参数
- Python - 关键字参数
- Python - 仅限关键字参数
- Python - 位置参数
- Python - 仅限位置参数
- Python - 可变参数
- Python - 变量作用域
- Python - 函数注解
- Python - 模块
- Python - 内置函数
- Python 字符串
- Python - 字符串
- Python - 字符串切片
- Python - 修改字符串
- Python - 字符串连接
- Python - 字符串格式化
- Python - 转义字符
- Python - 字符串方法
- Python - 字符串练习
- Python 列表
- Python - 列表
- Python - 访问列表元素
- Python - 修改列表元素
- Python - 添加列表元素
- Python - 删除列表元素
- Python - 循环遍历列表
- Python - 列表推导式
- Python - 排序列表
- Python - 复制列表
- Python - 合并列表
- Python - 列表方法
- Python - 列表练习
- Python 元组
- Python - 元组
- Python - 访问元组元素
- Python - 更新元组
- Python - 解包元组
- Python - 循环遍历元组
- Python - 合并元组
- Python - 元组方法
- Python - 元组练习
- Python 集合
- Python - 集合
- Python - 访问集合元素
- Python - 添加集合元素
- Python - 删除集合元素
- Python - 循环遍历集合
- Python - 合并集合
- Python - 复制集合
- Python - 集合运算符
- Python - 集合方法
- Python - 集合练习
- Python 字典
- Python - 字典
- Python - 访问字典元素
- Python - 修改字典元素
- Python - 添加字典元素
- Python - 删除字典元素
- Python - 字典视图对象
- Python - 循环遍历字典
- Python - 复制字典
- Python - 嵌套字典
- Python - 字典方法
- Python - 字典练习
- Python 数组
- Python - 数组
- Python - 访问数组元素
- Python - 添加数组元素
- Python - 删除数组元素
- Python - 循环遍历数组
- Python - 复制数组
- Python - 反转数组
- Python - 排序数组
- Python - 合并数组
- Python - 数组方法
- Python - 数组练习
- Python 文件处理
- Python - 文件处理
- Python - 写入文件
- Python - 读取文件
- Python - 重命名和删除文件
- Python - 目录
- Python - 文件方法
- Python - OS 文件/目录方法
- Python - OS 路径方法
- 面向对象编程
- Python - OOPs 概念
- Python - 类 & 对象
- Python - 类属性
- Python - 类方法
- Python - 静态方法
- Python - 构造函数
- Python - 访问修饰符
- Python - 继承
- Python - 多态
- Python - 方法重写
- Python - 方法重载
- Python - 动态绑定
- Python - 动态类型
- Python - 抽象
- Python - 封装
- Python - 接口
- Python - 包
- Python - 内部类
- Python - 匿名类和对象
- Python - 单例类
- Python - 包装器类
- Python - 枚举
- Python - 反射
- Python 错误 & 异常
- Python - 语法错误
- Python - 异常
- Python - try-except 块
- Python - try-finally 块
- Python - 抛出异常
- Python - 异常链
- Python - 嵌套 try 块
- Python - 用户自定义异常
- Python - 日志记录
- Python - 断言
- Python - 内置异常
- Python 多线程
- Python - 多线程
- Python - 线程生命周期
- Python - 创建线程
- Python - 启动线程
- Python - 线程连接
- Python - 线程命名
- Python - 线程调度
- Python - 线程池
- Python - 主线程
- Python - 线程优先级
- Python - 守护线程
- Python - 线程同步
- Python 同步
- Python - 线程间通信
- Python - 线程死锁
- Python - 中断线程
- Python 网络编程
- Python - 网络编程
- Python - 套接字编程
- Python - URL 处理
- Python - 泛型
- Python 库
- NumPy 教程
- Pandas 教程
- SciPy 教程
- Matplotlib 教程
- Django 教程
- OpenCV 教程
- Python 杂项
- Python - 日期 & 时间
- Python - 数学
- Python - 迭代器
- Python - 生成器
- Python - 闭包
- Python - 装饰器
- Python - 递归
- Python - 正则表达式
- Python - PIP
- Python - 数据库访问
- Python - 弱引用
- Python - 序列化
- Python - 模板
- Python - 输出格式化
- Python - 性能测量
- Python - 数据压缩
- Python - CGI 编程
- Python - XML 处理
- Python - GUI 编程
- Python - 命令行参数
- Python - 文档字符串
- Python - JSON
- Python - 发送邮件
- Python - 扩展
- Python - 工具/实用程序
- Python - GUI
- Python 高级概念
- Python - 抽象基类
- Python - 自定义异常
- Python - 高阶函数
- Python - 对象内部
- Python - 内存管理
- Python - 元类
- Python - 使用元类的元编程
- Python - 模拟和存根
- Python - 猴子补丁
- Python - 信号处理
- Python - 类型提示
- Python - 自动化教程
- Python - Humanize 包
- Python - 上下文管理器
- Python - 协程
- Python - 描述符
- Python - 诊断和修复内存泄漏
- Python - 不可变数据结构
- Python 有用资源
- Python - 问答
- Python - 在线测验
- Python - 快速指南
- Python - 参考
- Python - 速查表
- Python - 项目
- Python - 有用资源
- Python - 讨论
- Python 编译器
- NumPy 编译器
- Matplotlib 编译器
- SciPy 编译器
使用 Django 框架的投票系统项目
投票系统项目是一个使用 Django 框架创建的小型 Web 应用程序,用于组织投票。这是一个移动应用程序,允许用户浏览他们感兴趣的投票并从提供的选项中投票,以及查看投票结果。管理员界面允许创建、列出和删除投票问题和选项,而无需用户界面。此项目使开发人员非常清楚 Django 的作用,它如何管理模型,如何处理视图,甚至如何呈现模板。
安装
要启动并运行投票系统项目,请按照以下安装步骤操作:
1. 已安装 Python 和 pip
- 需要 Python 3.11 或更高版本。
- pip 是 Python 包安装程序
2. 安装 Django
打开您的终端命令以安装 Django
pip install django
3. 设置 Django 项目
- 打开 VS code 并为您的项目创建一个新文件夹
- 在您的终端中导航到此目录并运行:
- 代码:django-admin startproject voting_system
创建 Django 应用
1. 创建应用
导航到 voting_system 目录
cd voting_system
创建一个名为 polls 的新应用:
python manage.py startapp polls
2. 定义模型:polls/models.py
from django.db import models
from django.utils import timezone

class Question(models.Model):
   question_text = models.CharField(max_length=200)
   pub_date = models.DateTimeField('date published')

   def __str__(self):
      return self.question_text

class Choice(models.Model):
   question = models.ForeignKey(Question, on_delete=models.CASCADE)
   choice_text = models.CharField(max_length=200)
   votes = models.IntegerField(default=0)

   def __str__(self):
      return self.choice_text
3. 应用迁移
转到您的终端并编写以下内容:
python manage.py makemigrations
python manage.py migrate
4. 文件结构

5. 在 polls/views.py 中创建视图
from django.shortcuts import render, get_object_or_404
from .models import Question, Choice
from django.http import HttpResponse

def homepage(request):
   return HttpResponse("Welcome to the Voting System!")

def index(request):
   latest_question_list = Question.objects.order_by('-pub_date')[:5]
   context = {'latest_question_list': latest_question_list}
   return render(request, 'polls/index.html', context)

def detail(request, question_id):
   question = get_object_or_404(Question, pk=question_id)
   return render(request, 'polls/detail.html', {'question': question})

def results(request, question_id):
   question = get_object_or_404(Question, pk=question_id)
   return render(request, 'polls/results.html', {'question': question})

def vote(request, question_id):
   question = get_object_or_404(Question, pk=question_id)
   try:
      selected_choice = question.choice_set.get(pk=request.POST['choice'])
   except (KeyError, Choice.DoesNotExist):
      return render(request, 'polls/detail.html', {
         'question': question,
         'error_message': "You didn't select a choice.",
      })
   else:
      selected_choice.votes += 1
      selected_choice.save()
      return render(request, 'polls/results.html', {'question': question})
6. 在 polls/urls.py 中配置 URL
from django.urls import path
from . import views

app_name = 'polls'
urlpatterns = [
   path('', views.index, name='index'),
   path('question/<int:question_id>/', views.detail, name='detail'),
   path('question/<int:question_id>/results/', views.results, name='results'),
   path('question/<int:question_id>/vote/', views.vote, name='vote'),
   path('homepage/', views.homepage, name='homepage'),
]
7. 在 voting_system/urls.py 中更新项目 URL
from django.contrib import admin
from django.urls import include, path

urlpatterns = [
   path('admin/', admin.site.urls),
   path('', include('polls.urls')),
]
8. 创建模板
基本模板 (polls/templates/polls/base.html)
<!DOCTYPE html>
<html lang="en">
<head>
   <meta charset="UTF-8">
   <meta name="viewport" content="width=device-width, initial-scale=1.0">
   <title>{% block title %}Voting System{% endblock %}</title>
   <link rel="stylesheet" href="{% static 'polls/styles.css' %}">
</head>
<body>
<header>
<h1>Voting System</h1>
<nav>
<ul>
   <li><a href="{% url 'polls:index' %}">View Available Polls</a></li>
   <li><a href="{% url 'polls:homepage' %}">Home</a></li>
</ul>
</nav>
</header>
<main>
   {% block content %}{% endblock %}
</main>
</body>
</html>
索引模板 (polls/templates/polls/index.html)
{% extends 'polls/base.html' %}
{% block title %}Polls{% endblock %}
{% block content %}
<h2>Latest Polls</h2>
<ul>
   {% for question in latest_question_list %}
   <li>
      <a href="{% url 'polls:detail' question.id %}">{{ question.question_text }}</a>
   </li>
   {% endfor %}
</ul>
{% endblock %}
详情模板 (polls/templates/polls/detail.html)
{% extends 'polls/base.html' %}
{% block title %}Poll Details{% endblock %}
{% block content %}
<h2>{{ question.question_text }}</h2>
<form action="{% url 'polls:vote' question.id %}" method="post">
   {% csrf_token %}
   {% for choice in question.choice_set.all %}
   <input type="radio" id="choice{{ choice.id }}" name="choice" value="{{ choice.id }}">
   <label for="choice{{ choice.id }}">{{ choice.choice_text }}</label><br>
   {% endfor %}
   <input type="submit" value="Vote">
</form>
<p><a href="{% url 'polls:index' %}">Back to Polls</a></p>
{% if error_message %}
<p><strong>{{ error_message }}</strong></p>
{% endif %}
{% endblock %}
结果模板 (polls/templates/polls/results.html)
{% extends 'polls/base.html' %}
{% block title %}Poll Results{% endblock %}
{% block content %}
<h2>{{ question.question_text }}</h2>
<ul>
   {% for choice in question.choice_set.all %}
   <li>{{ choice.choice_text }}: {{ choice.votes }} votes</li>
   {% endfor %}
</ul>
<p><a href="{% url 'polls:index' %}">Back to Polls</a></p>
{% endblock %}
9. 创建静态文件
添加您的 CSS 文件 (polls/static/polls/styles.css) 以设置应用程序的样式。
示例
body {
   font-family: Arial, sans-serif;
   margin: 0;
   padding: 0;
   background-color: #f4f4f4;
}

header {
   background-color: #333;
   color: white;
   padding: 1rem;
   text-align: center;
}

nav ul {
   list-style: none;
   padding: 0;
}

nav ul li {
   display: inline;
   margin: 0 1rem;
}

nav ul li a {
   color: white;
   text-decoration: none;
}

main {
   padding: 1rem;
}

h2 {
   color: #333;
}

form {
   background-color: #fff;
   padding: 1rem;
   border-radius: 5px;
   box-shadow: 0 0 10px rgba(0, 0, 0, 0.1);
}

form input[type="submit"] {
   background-color: #333;
   color: white;
   border: none;
   padding: 0.5rem 1rem;
   border-radius: 5px;
   cursor: pointer;
}
10. admin.py 文件
from django.contrib import admin
from .models import Question, Choice, Vote

class ChoiceInline(admin.TabularInline):
   model = Choice
   extra = 2  # Number of empty choice fields to display

class QuestionAdmin(admin.ModelAdmin):
   fieldsets = [
      (None, {'fields': ['question_text']}),
      ('Date Information', {'fields': ['pub_date'], 'classes': ['collapse']}),
   ]
   inlines = [ChoiceInline]
   list_display = ('question_text', 'pub_date')
   list_filter = ['pub_date']
   search_fields = ['question_text']

class ChoiceAdmin(admin.ModelAdmin):
   list_display = ('choice_text', 'votes', 'question')
   list_filter = ['question']
   search_fields = ['choice_text']

class VoteAdmin(admin.ModelAdmin):
   list_display = ('voter_name', 'choice')
   list_filter = ['choice']
   search_fields = ['voter_name']

admin.site.register(Question, QuestionAdmin)
admin.site.register(Choice, ChoiceAdmin)
admin.site.register(Vote, VoteAdmin)
11. settings.py
Django settings for voting_system project.

Generated by 'django-admin startproject' using Django 5.1.

For more information on this file, see
https://docs.django.ac.cn/en/5.1/topics/settings/

For the full list of settings and their values, see
https://docs.django.ac.cn/en/5.1/ref/settings/
"""

from pathlib import Path

# Build paths inside the project like this: BASE_DIR / 'subdir'.
BASE_DIR = Path(__file__).resolve().parent.parent

# Quick-start development settings - unsuitable for production
# See https://docs.django.ac.cn/en/5.1/howto/deployment/checklist/

# SECURITY WARNING: keep the secret key used in production secret!
SECRET_KEY = 'django-insecure-ahjvi2=3zf5j8+%71b6hpn+5!m0+hggf4+343(i8yp%qw^^d20'

# SECURITY WARNING: don't run with debug turned on in production!
DEBUG = True

ALLOWED_HOSTS = []

# Application definition

INSTALLED_APPS = [
   'django.contrib.admin',
   'django.contrib.auth',
   'django.contrib.contenttypes',
   'django.contrib.sessions',
   'django.contrib.messages',
   'django.contrib.staticfiles',
   'polls',
]

MIDDLEWARE = [
   'django.middleware.security.SecurityMiddleware',
   'django.contrib.sessions.middleware.SessionMiddleware',
   'django.middleware.common.CommonMiddleware',
   'django.middleware.csrf.CsrfViewMiddleware',
   'django.contrib.auth.middleware.AuthenticationMiddleware',
   'django.contrib.messages.middleware.MessageMiddleware',
   'django.middleware.clickjacking.XFrameOptionsMiddleware',
]

ROOT_URLCONF = 'voting_system.urls'

TEMPLATES = [
   {
      'BACKEND': 'django.template.backends.django.DjangoTemplates',
      'DIRS': [],
      'APP_DIRS': True,
      'OPTIONS': {
         'context_processors': [
            'django.template.context_processors.debug',
            'django.template.context_processors.request',
            'django.contrib.auth.context_processors.auth',
            'django.contrib.messages.context_processors.messages',
          ],
      },
   },
]

WSGI_APPLICATION = 'voting_system.wsgi.application'

# Database
# https://docs.django.ac.cn/en/5.1/ref/settings/#databases

DATABASES = {
   'default': {
      'ENGINE': 'django.db.backends.sqlite3',
      'NAME': BASE_DIR / 'db.sqlite3',
   }
}

# Password validation
# https://docs.django.ac.cn/en/5.1/ref/settings/#auth-password-validators

AUTH_PASSWORD_VALIDATORS = [
   {
      'NAME': 'django.contrib.auth.password_validation.UserAttributeSimilarityValidator',
   },
   {
      'NAME': 'django.contrib.auth.password_validation.MinimumLengthValidator',
   },
   {
      'NAME': 'django.contrib.auth.password_validation.CommonPasswordValidator',
   },
   {
      'NAME': 'django.contrib.auth.password_validation.NumericPasswordValidator',
   },
]

# Internationalization
# https://docs.django.ac.cn/en/5.1/topics/i18n/

LANGUAGE_CODE = 'en-us'

TIME_ZONE = 'UTC'

USE_I18N = True

USE_TZ = True

# Static files (CSS, JavaScript, Images)
# https://docs.django.ac.cn/en/5.1/howto/static-files/

STATIC_URL = '/static/'

# Default primary key field type
# https://docs.django.ac.cn/en/5.1/ref/settings/#default-auto-field

DEFAULT_AUTO_FIELD = 'django.db.models.BigAutoField'
12. 创建超级用户
现在打开您的终端并编写以下代码:
python manage.py createsuperuser
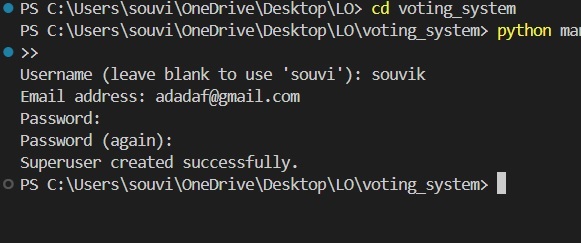
输出
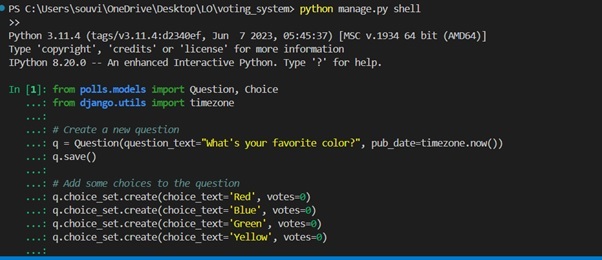
在运行 runserver 之前,您可以编写此 **Python Shell**
您还可以使用 Django shell 与模型进行交互。以下是一个示例:
打开 Django Shell
python manage.py shell
创建问题和选项
from polls.models import Question, Choice
from django.utils import timezone

# Create a new question
q = Question(question_text="What's your favorite color?", pub_date=timezone.now())
q.save()

# Add some choices to the question
q.choice_set.create(choice_text='Red', votes=0)
q.choice_set.create(choice_text='Blue', votes=0)
q.choice_set.create(choice_text='Green', votes=0)
q.choice_set.create(choice_text='Yellow', votes=0)
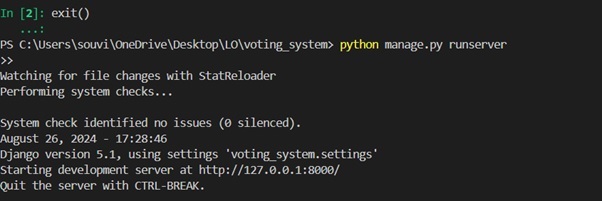
退出 Shell
exit()
查看输出:
完成设置和代码实现后,您可以在您的窗口中编写此代码以运行服务器:
python manage.py runserver
服务器运行后,在您的 Web 浏览器中以隐身标签访问 http://127.0.0.1:8000/,您将看到投票系统的登录页面,您可以在其中查看可用的投票、投票和检查结果。
搜索后,此页面将显示在您的屏幕上:
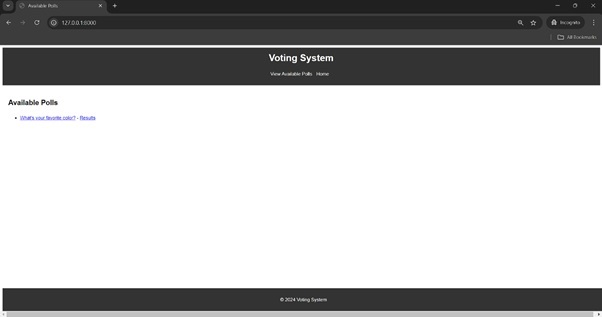
您可以添加更多问题,我们只添加了一个问题,点击问题:
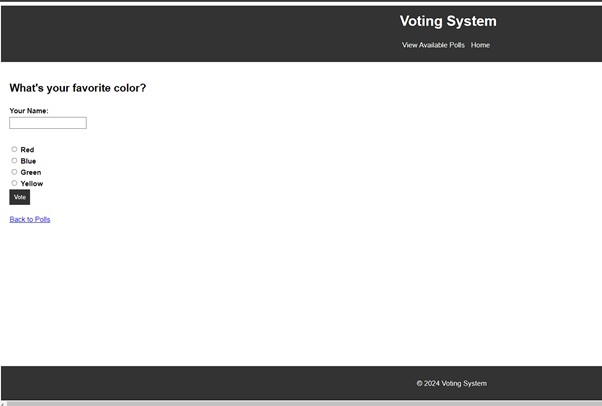
您必须填写您的姓名,否则它将无法工作,您无法投票:
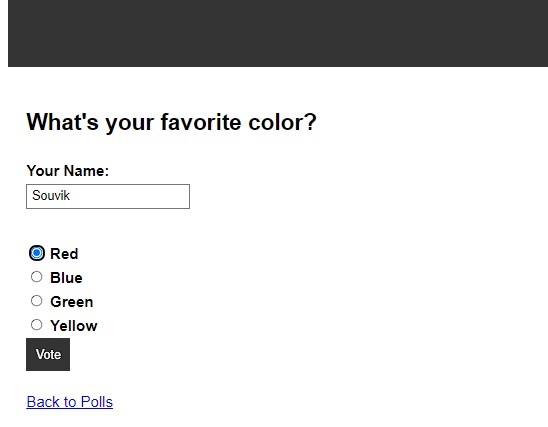
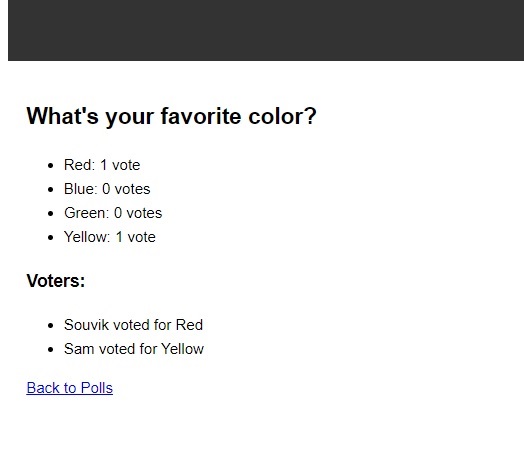
然后点击投票选项,您将看到谁投了哪种颜色:
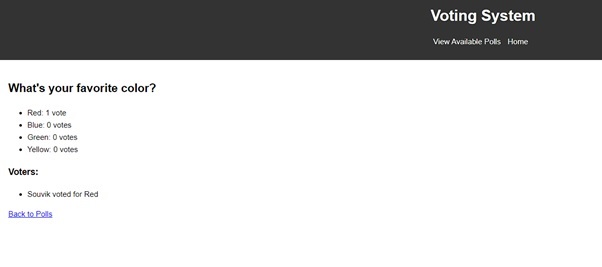
您可以再次使用不同的用户投票:
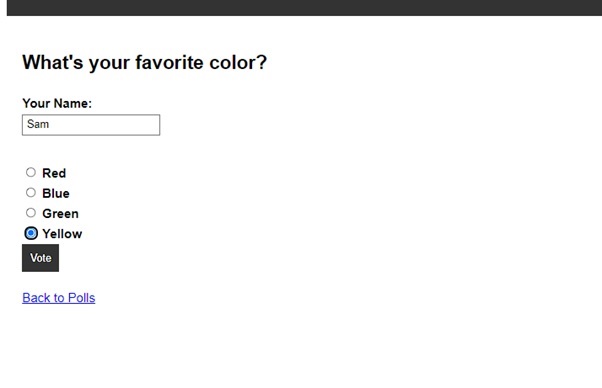
现在的最终结果:
总结
投票系统项目对于如何利用Django框架设计投票应用程序非常有用。它展示了如何应用Django的模型-视图-模板(MVT)模式来开发一个基于互联网的应用程序,用于查看投票、投票和查看结果。在这个项目中,可以学习Django的基础知识,例如定义模型、映射URL、视图函数和渲染模板。
结论
尽管如此,这个项目对于从零开始学习Django非常重要,尤其适合那些使用Django进行Web开发的新手。通过这个过程,可以学习建立Django项目的过程,以及在项目中创建和管理模型以构建成功的Web应用程序。投票系统项目是其他应用程序的良好基础,并且在Django中进一步尝试它很有趣。