- Cypress 教程
- Cypress - 首页
- Cypress - 简介
- Cypress - 架构和环境设置
- Cypress - 测试运行器
- Cypress - 构建第一个测试
- Cypress - 支持的浏览器
- Cypress - 基本命令
- Cypress - 变量
- Cypress - 别名
- Cypress - 定位器
- Cypress - 断言
- Cypress - 文本验证
- Cypress - 异步行为
- Cypress - 使用 XHR
- Cypress - jQuery
- Cypress - 复选框
- Cypress - 标签页
- Cypress - 下拉列表
- Cypress - 警报
- Cypress - 子窗口
- Cypress - 隐藏元素
- Cypress - 框架
- Cypress - 网页表格
- Cypress - 鼠标操作
- Cypress - Cookie
- Cypress - GET 和 POST
- Cypress - 文件上传
- Cypress - 数据驱动测试
- Cypress - 提示弹出窗口
- Cypress - 仪表盘
- Cypress - 屏幕截图和视频
- Cypress - 调试
- Cypress - 自定义命令
- Cypress - Fixture
- Cypress - 环境变量
- Cypress - Hook
- Cypress - JSON 文件配置
- Cypress - 报告
- Cypress - 插件
- Cypress - GitHub
- Cypress 有用资源
- Cypress - 快速指南
- Cypress - 有用资源
- Cypress - 讨论
Cypress - 文件上传
为了在 Cypress 中执行文件上传任务,我们首先需要使用下面提到的命令安装一个插件:
npm install –dev cypress-file-upload
您的计算机上将出现以下屏幕:

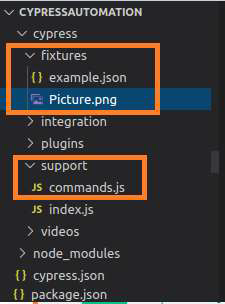
安装完成后,我们需要在 command.js 文件中添加语句 import 'cypress-file-upload'。此文件位于 Cypress 项目的 support 文件夹内。
此外,我们将把要上传的文件添加到 fixtures 文件夹(Picture.png 文件)。将显示以下屏幕:

要上传文件,我们需要使用 Cypress 命令 attachFile 并将要上传的文件路径作为参数传递给它。
实现
在 Cypress 中上传文件的命令实现如下:
describe('Tutorialspoint Test', function () {
   // test case
   it('Test Case6', function (){
      //file to be uploaded path in project folder
      const p = 'Picture.png'
      // launch URL
      cy.visit("https://the-internet.herokuapp.com/upload")
      //upload file with attachFile
      cy.get('#file-upload').attachFile(p)
      //click on upload
      cy.get('#file-submit').click()
      //verify uploaded file
      cy.get('#uploaded-files').contains('Picture')
   });
});
执行结果
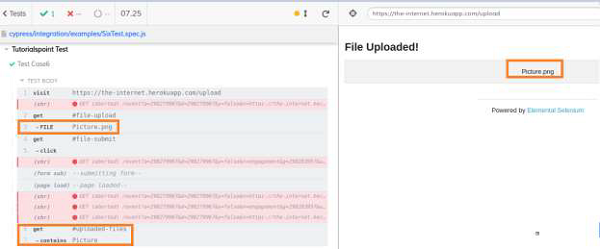
输出如下:

执行日志显示文件 Picture.png 已上传,并且文件名已反映在页面上。
广告