- Android 基础
- Android - 首页
- Android - 概述
- Android - 环境搭建
- Android - 架构
- Android - 应用组件
- Android - Hello World 示例
- Android - 资源
- Android - 活动(Activity)
- Android - 服务(Service)
- Android - 广播接收器(Broadcast Receiver)
- Android - 内容提供器(Content Provider)
- Android - 碎片(Fragment)
- Android - 意图/过滤器(Intents/Filters)
- Android - 用户界面
- Android - UI 布局
- Android - UI 控件
- Android - 事件处理
- Android - 样式和主题
- Android - 自定义组件
- Android 高级概念
- Android - 拖放
- Android - 通知
- 基于位置的服务
- Android - 发送邮件
- Android - 发送短信
- Android - 电话呼叫
- 发布 Android 应用
- Android 实用示例
- Android - 警报对话框
- Android - 动画
- Android - 音频捕获
- Android - AudioManager
- Android - 自动完成
- Android - 最佳实践
- Android - 蓝牙
- Android - 相机
- Android - 剪贴板
- Android - 自定义字体
- Android - 数据备份
- Android - 开发者工具
- Android - 模拟器
- Android - Facebook 集成
- Android - 手势
- Android - Google 地图
- Android - 图片特效
- Android - ImageSwitcher
- Android - 内部存储
- Android - JetPlayer
- Android - JSON 解析器
- Android - LinkedIn 集成
- Android - 加载 Spinner
- Android - 本地化
- Android - 登录屏幕
- Android - MediaPlayer
- Android - 多点触控
- Android - 导航
- Android - 网络连接
- Android - NFC 指南
- Android - PHP/MySQL
- Android - 进度圆圈
- Android - 进度条
- Android - 推送通知
- Android - RenderScript
- Android - RSS 阅读器
- Android - 屏幕录制
- Android - SDK 管理器
- Android - 传感器
- Android - 会话管理
- Android - 共享首选项
- Android - SIP 协议
- Android - 拼写检查器
- Android - SQLite 数据库
- Android - 支持库
- Android - 测试
- Android - 文字转语音
- Android - TextureView
- Android - Twitter 集成
- Android - UI 设计
- Android - UI 模式
- Android - UI 测试
- Android - WebView 布局
- Android - Wi-Fi
- Android - 小部件
- Android - XML 解析器
- Android 实用资源
- Android - 问答
- Android - 实用资源
- Android - 讨论
Android - Google 地图
Android 允许我们在我们的应用程序中集成 Google 地图。您可以在地图上显示任何位置,或在地图上显示不同的路线等等。您还可以根据您的选择自定义地图。
Google 地图 - 布局文件
现在您需要将地图片段添加到 xml 布局文件中。其语法如下所示:
<fragment
   android:id="@+id/map"
   android:name="com.google.android.gms.maps.MapFragment"
   android:layout_width="match_parent"
   android:layout_height="match_parent"/>
Google 地图 - AndroidManifest 文件
接下来您需要做的是在 AndroidManifest.XML 文件中添加一些权限以及 Google 地图 API 密钥。其语法如下所示:
<!--Permissions-->

<uses-permission android:name="android.permission.ACCESS_NETWORK_STATE" />
<uses-permission android:name="android.permission.INTERNET" />
<uses-permission android:name="com.google.android.providers.gsf.permission.
   READ_GSERVICES" />
<uses-permission android:name="android.permission.WRITE_EXTERNAL_STORAGE" />

<!--Google MAP API key-->

<meta-data
   android:name="com.google.android.maps.v2.API_KEY"
   android:value="AIzaSyDKymeBXNeiFWY5jRUejv6zItpmr2MVyQ0" />
自定义 Google 地图
您可以轻松地从其默认视图自定义 Google 地图,并根据您的需求进行更改。
添加标记
您可以在地图上放置一个带有某些文本的标记,以显示您的位置。这可以通过 **addMarker()** 方法完成。其语法如下所示:
final LatLng TutorialsPoint = new LatLng(21 , 57);
Marker TP = googleMap.addMarker(new MarkerOptions()
   .position(TutorialsPoint).title("TutorialsPoint"));
更改地图类型
您还可以更改地图的类型。有四种不同的地图类型,每种类型都提供地图的不同视图。这些类型是普通、混合、卫星和地形。您可以按如下方式使用它们:
googleMap.setMapType(GoogleMap.MAP_TYPE_NORMAL);
googleMap.setMapType(GoogleMap.MAP_TYPE_HYBRID);
googleMap.setMapType(GoogleMap.MAP_TYPE_SATELLITE);
googleMap.setMapType(GoogleMap.MAP_TYPE_TERRAIN);
启用/禁用缩放
您还可以通过调用 **setZoomControlsEnabled(boolean)** 方法启用或禁用地图中的缩放手势。其语法如下所示:
googleMap.getUiSettings().setZoomGesturesEnabled(true);
除了这些自定义之外,GoogleMap 类中还有其他方法可帮助您进一步自定义地图。它们列在下面:
| 序号 | 方法和描述 |
|---|---|
| 1 |
addCircle(CircleOptions options) 此方法在地图上添加一个圆圈。 |
| 2 |
addPolygon(PolygonOptions options) 此方法在地图上添加一个多边形。 |
| 3 |
addTileOverlay(TileOverlayOptions options) 此方法在地图上添加瓦片覆盖层。 |
| 4 |
animateCamera(CameraUpdate update) 此方法根据更新使用动画移动地图。 |
| 5 |
clear() 此方法从地图中删除所有内容。 |
| 6 |
getMyLocation() 此方法返回当前显示的用户位置。 |
| 7 |
moveCamera(CameraUpdate update) 此方法根据更新中定义的指令重新定位相机。 |
| 8 |
setTrafficEnabled(boolean enabled) 此方法切换交通图层是否开启。 |
| 9 |
snapshot(GoogleMap.SnapshotReadyCallback callback) 此方法截取地图的快照。 |
| 10 | stopAnimation() 如果正在进行相机动画,此方法会停止该动画。 |
示例
这是一个演示 GoogleMap 类用法的示例。它创建了一个基本的 M 应用程序,允许您在地图中导航。
要试验此示例,您可以在实际设备或模拟器上运行它。
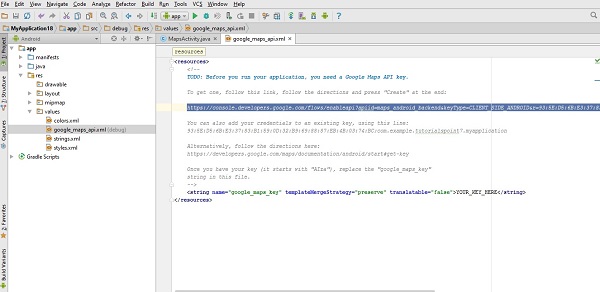
创建一个项目,其中包含如下所示的 Google 地图活动:

它将打开以下屏幕,并复制 API 密钥的控制台 URL,如下所示:
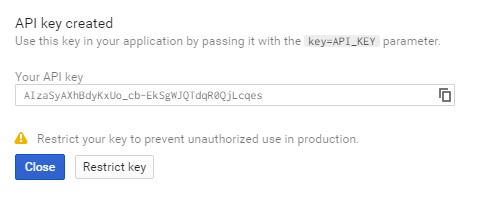
复制并将其粘贴到您的浏览器中。它将显示以下屏幕:

点击继续并点击创建 API 密钥,然后它将显示以下屏幕:
以下是 **activity_main.xml** 的内容。
<fragment xmlns:android="http://schemas.android.com/apk/res/android"
   xmlns:map="http://schemas.android.com/apk/res-auto"
   xmlns:tools="http://schemas.android.com/tools"
   android:id="@+id/map"
   android:name="com.google.android.gms.maps.SupportMapFragment"
   android:layout_width="match_parent"
   android:layout_height="match_parent"
   tools:context="com.example.tutorialspoint7.myapplication.MapsActivity" />
以下是 **MapActivity.java** 的内容。
在下面的代码中,我们给出了示例纬度和经度详细信息。
package com.example.tutorialspoint7.myapplication;

import android.support.v4.app.FragmentActivity;
import android.os.Bundle;

import com.google.android.gms.maps.CameraUpdateFactory;
import com.google.android.gms.maps.GoogleMap;
import com.google.android.gms.maps.OnMapReadyCallback;
import com.google.android.gms.maps.SupportMapFragment;
import com.google.android.gms.maps.model.LatLng;
import com.google.android.gms.maps.model.MarkerOptions;

public class MapsActivity extends FragmentActivity implements OnMapReadyCallback {

   private GoogleMap mMap;

   @Override
   protected void onCreate(Bundle savedInstanceState) {
      super.onCreate(savedInstanceState);
      setContentView(R.layout.activity_maps);
      // Obtain the SupportMapFragment and get notified when the map is ready to be used.
      SupportMapFragment mapFragment = (SupportMapFragment) getSupportFragmentManager()
         .findFragmentById(R.id.map);
      mapFragment.getMapAsync(this);
   }

   /**
      * Manipulates the map once available.
      * This callback is triggered when the map is ready to be used.
      * This is where we can add markers or lines, add listeners or move the camera.
      * In this case, we just add a marker near Sydney, Australia.
      * If Google Play services is not installed on the device.
      * This method will only be triggered once the user has installed
         Google Play services and returned to the app.
   */

   @Override
   public void onMapReady(GoogleMap googleMap) {
      mMap = googleMap;
      // Add a marker in Sydney and move the camera
      LatLng TutorialsPoint = new LatLng(21, 57);
      mMap.addMarker(new
         MarkerOptions().position(TutorialsPoint).title("Tutorialspoint.com"));
      mMap.moveCamera(CameraUpdateFactory.newLatLng(TutorialsPoint));
   }
}
以下是 **AndroidManifest.xml** 文件的内容。
<?xml version="1.0" encoding="utf-8"?>
<manifest xmlns:android="http://schemas.android.com/apk/res/android"
    package="com.example.tutorialspoint7.myapplication">

   <!--
      The ACCESS_COARSE/FINE_LOCATION permissions are not required to use
      Google Maps Android API v2, but you must specify either coarse or fine
      location permissions for the 'MyLocation' functionality.
   -->

   <uses-permission android:name="android.permission.ACCESS_FINE_LOCATION" />
   <uses-permission android:name="android.permission.ACCESS_COARSE_LOCATION" />
   <uses-permission android:name="android.permission.INTERNET" />
   <application
      android:allowBackup="true"
      android:icon="@mipmap/ic_launcher"
      android:label="@string/app_name"
      android:supportsRtl="true"
      android:theme="@style/AppTheme">

      <!--
         The API key for Google Maps-based APIs is defined as a string resource.
         (See the file "res/values/google_maps_api.xml").
         Note that the API key is linked to the encryption key used to sign the APK.
         You need a different API key for each encryption key, including the release key
         that is used to sign the APK for publishing.
         You can define the keys for the debug and
            release targets in src/debug/ and src/release/.
      -->

      <meta-data
         android:name="com.google.android.geo.API_KEY"
         android:value="AIzaSyAXhBdyKxUo_cb-EkSgWJQTdqR0QjLcqes" />

      <activity
         android:name=".MapsActivity"
         android:label="@string/title_activity_maps">
         <intent-filter>
            <action android:name="android.intent.action.MAIN" />
            <category android:name="android.intent.category.LAUNCHER" />
         </intent-filter>
      </activity>
   </application>

</manifest>
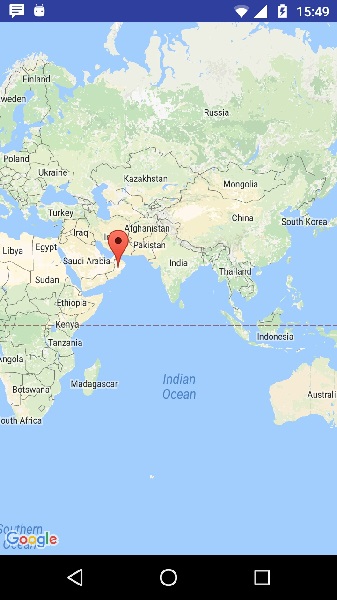
输出应如下所示: