- Android 基础
- Android - 首页
- Android - 概述
- Android - 环境设置
- Android - 架构
- Android - 应用组件
- Android - Hello World 示例
- Android - 资源
- Android - 活动 (Activities)
- Android - 服务 (Services)
- Android - 广播接收器 (Broadcast Receivers)
- Android - 内容提供商 (Content Providers)
- Android - 碎片 (Fragments)
- Android - 意图/过滤器 (Intents/Filters)
- Android - 用户界面
- Android - UI 布局
- Android - UI 控件
- Android - 事件处理
- Android - 风格和主题
- Android - 自定义组件
- Android 高级概念
- Android - 拖放
- Android - 通知
- 基于位置的服务
- Android - 发送电子邮件
- Android - 发送短信
- Android - 打电话
- 发布 Android 应用
- Android 实用示例
- Android - 警报对话框
- Android - 动画
- Android - 音频捕获
- Android - AudioManager
- Android - 自动完成
- Android - 最佳实践
- Android - 蓝牙
- Android - 相机
- Android - 剪贴板
- Android - 自定义字体
- Android - 数据备份
- Android - 开发者工具
- Android - 模拟器
- Android - Facebook 集成
- Android - 手势
- Android - 谷歌地图
- Android - 图片特效
- Android - ImageSwitcher
- Android - 内部存储
- Android - JetPlayer
- Android - JSON 解析器
- Android - LinkedIn 集成
- Android - 加载微调器
- Android - 本地化
- Android - 登录屏幕
- Android - MediaPlayer
- Android - 多点触控
- Android - 导航
- Android - 网络连接
- Android - NFC 指南
- Android - PHP/MySQL
- Android - 进度圆圈
- Android - ProgressBar
- Android - 推送通知
- Android - RenderScript
- Android - RSS 阅读器
- Android - 屏幕录制
- Android - SDK 管理器
- Android - 传感器
- Android - 会话管理
- Android - 共享首选项
- Android - SIP 协议
- Android - 拼写检查器
- Android - SQLite 数据库
- Android - 支持库
- Android - 测试
- Android - 文字转语音
- Android - TextureView
- Android - Twitter 集成
- Android - UI 设计
- Android - UI 模式
- Android - UI 测试
- Android - WebView 布局
- Android - Wi-Fi
- Android - 小部件
- Android - XML 解析器
- Android 实用资源
- Android - 问答
- Android - 实用资源
- Android - 讨论
Android - 发送电子邮件
电子邮件 是通过网络从一个系统用户以电子方式分发给一个或多个收件人的消息。
在开始电子邮件活动之前,您必须了解使用 Intent 的电子邮件功能,Intent 用于在应用程序内或应用程序外将数据从一个组件传输到另一个组件。
要从您的应用程序发送电子邮件,您不必从头开始实现电子邮件客户端,而是可以使用现有的客户端,例如 Android 提供的默认电子邮件应用程序、Gmail、Outlook、K-9 Mail 等。为此,我们需要编写一个使用隐式 Intent(具有正确的操作和数据)启动电子邮件客户端的 Activity。在此示例中,我们将使用启动现有电子邮件客户端的 Intent 对象从我们的应用程序发送电子邮件。
以下部分解释了发送电子邮件所需的 Intent 对象的不同部分。
Intent 对象 - 发送电子邮件的操作
您将使用ACTION_SEND操作来启动安装在 Android 设备上的电子邮件客户端。以下是使用 ACTION_SEND 操作创建 Intent 的简单语法。
Intent emailIntent = new Intent(Intent.ACTION_SEND);
Intent 对象 - 发送电子邮件的数据/类型
要发送电子邮件,您需要使用 setData() 方法指定mailto:作为 URI,并将数据类型设置为text/plain,如下所示:
emailIntent.setData(Uri.parse("mailto:"));
emailIntent.setType("text/plain");
Intent 对象 - 发送电子邮件的额外数据
Android 内置支持添加 TO、SUBJECT、CC、TEXT 等字段,这些字段可以在将 Intent 发送到目标电子邮件客户端之前附加到 Intent。您可以在您的电子邮件中使用以下额外字段:
| 序号 | 额外数据和描述 |
|---|---|
| 1 |
EXTRA_BCC 包含应密送的电子邮件地址的 String[]。 |
| 2 |
EXTRA_CC 包含应抄送的电子邮件地址的 String[]。 |
| 3 |
EXTRA_EMAIL 包含应发送到的电子邮件地址的 String[]。 |
| 4 |
EXTRA_HTML_TEXT 与 Intent 关联的常量字符串,与 ACTION_SEND 一起使用,用于提供作为 HTML 格式文本的 EXTRA_TEXT 的替代项。 |
| 5 |
EXTRA_SUBJECT 包含所需邮件主题行的常量字符串。 |
| 6 |
EXTRA_TEXT 与 Intent 关联的常量 CharSequence,与 ACTION_SEND 一起使用,用于提供要发送的文字数据。 |
| 7 |
EXTRA_TITLE 与 ACTION_CHOOSER 一起使用时,提供给用户的 CharSequence 对话框标题。 |
以下是一个示例,向您展示如何将额外数据分配到您的 Intent:
emailIntent.putExtra(Intent.EXTRA_EMAIL  , new String[]{"Recipient"});
emailIntent.putExtra(Intent.EXTRA_SUBJECT, "subject");
emailIntent.putExtra(Intent.EXTRA_TEXT   , "Message Body");
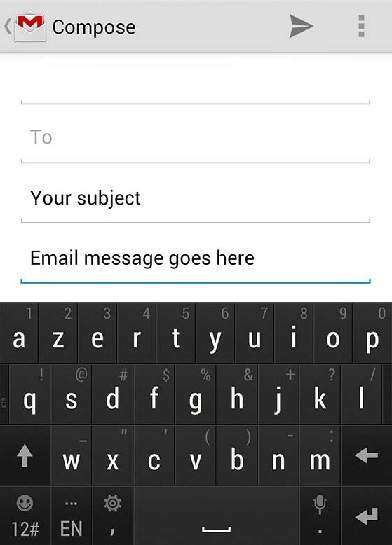
以上代码的输出如下图所示

电子邮件示例
示例
以下示例将向您展示如何在实践中使用 Intent 对象启动电子邮件客户端以将电子邮件发送给指定的收件人。
要使用此示例进行电子邮件实验,您需要配备最新 Android 操作系统的实际移动设备,否则您可能会难以使用模拟器,模拟器可能无法正常工作。其次,您需要在设备上安装电子邮件客户端,例如 Gmail(默认情况下,每个 Android 版本都带有 Gmail 客户端应用程序)或 K9mail。
| 步骤 | 描述 |
|---|---|
| 1 | 您将使用 Android Studio 创建一个 Android 应用程序,并将其命名为Tutorialspoint,包名为com.example.tutorialspoint。 |
| 2 | 修改src/MainActivity.java文件并添加所需代码以处理发送电子邮件。 |
| 3 | 修改布局 XML 文件res/layout/activity_main.xml,如果需要,添加任何 GUI 组件。我添加了一个简单的按钮来启动电子邮件客户端。 |
| 4 | 修改res/values/strings.xml以定义所需的常量值 |
| 5 | 修改AndroidManifest.xml,如下所示 |
| 6 | 运行应用程序以启动 Android 模拟器并验证对应用程序所做更改的结果。 |
以下是修改后的主活动文件src/com.example.Tutorialspoint/MainActivity.java的内容。
package com.example.tutorialspoint;

import android.net.Uri;
import android.os.Bundle;
import android.app.Activity;
import android.content.Intent;
import android.util.Log;
import android.view.Menu;
import android.view.View;
import android.widget.Button;
import android.widget.Toast;

public class MainActivity extends Activity {
   @Override
   protected void onCreate(Bundle savedInstanceState) {
      super.onCreate(savedInstanceState);
      setContentView(R.layout.activity_main);

      Button startBtn = (Button) findViewById(R.id.sendEmail);
      startBtn.setOnClickListener(new View.OnClickListener() {
         public void onClick(View view) {
            sendEmail();
         }
      });
   }

   protected void sendEmail() {
      Log.i("Send email", "");
      String[] TO = {""};
      String[] CC = {""};
      Intent emailIntent = new Intent(Intent.ACTION_SEND);

      emailIntent.setData(Uri.parse("mailto:"));
      emailIntent.setType("text/plain");
      emailIntent.putExtra(Intent.EXTRA_EMAIL, TO);
      emailIntent.putExtra(Intent.EXTRA_CC, CC);
      emailIntent.putExtra(Intent.EXTRA_SUBJECT, "Your subject");
      emailIntent.putExtra(Intent.EXTRA_TEXT, "Email message goes here");

      try {
         startActivity(Intent.createChooser(emailIntent, "Send mail..."));
         finish();
         Log.i("Finished sending email...", "");
      } catch (android.content.ActivityNotFoundException ex) {
         Toast.makeText(MainActivity.this, "There is no email client installed.", Toast.LENGTH_SHORT).show();
      }
   }
}
res/layout/activity_main.xml文件的内容将如下所示:
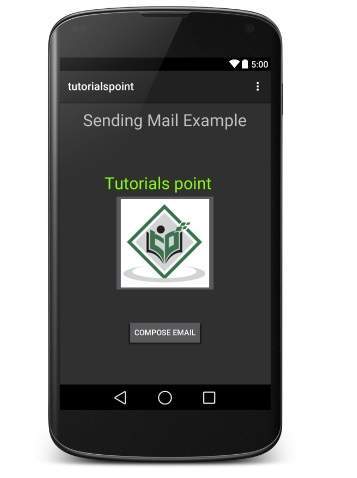
此处 abc 指示 tutorialspoint 徽标
<LinearLayout xmlns:android="http://schemas.android.com/apk/res/android"
   android:layout_width="fill_parent"
   android:layout_height="fill_parent"
   android:orientation="vertical" >

   <TextView
      android:id="@+id/textView1"
      android:layout_width="wrap_content"
      android:layout_height="wrap_content"
      android:text="Sending Mail Example"
      android:layout_alignParentTop="true"
      android:layout_centerHorizontal="true"
      android:textSize="30dp" />

   <TextView
      android:id="@+id/textView2"
      android:layout_width="wrap_content"
      android:layout_height="wrap_content"
      android:text="Tutorials point "
      android:textColor="#ff87ff09"
      android:textSize="30dp"
      android:layout_above="@+id/imageButton"
      android:layout_alignRight="@+id/imageButton"
      android:layout_alignEnd="@+id/imageButton" />

   <ImageButton
      android:layout_width="wrap_content"
      android:layout_height="wrap_content"
      android:id="@+id/imageButton"
      android:src="@drawable/abc"
      android:layout_centerVertical="true"
      android:layout_centerHorizontal="true" />

   <Button
      android:id="@+id/sendEmail"
      android:layout_width="fill_parent"
      android:layout_height="wrap_content"
      android:text="@string/compose_email"/>

</LinearLayout>
res/values/strings.xml的内容将如下所示,以定义两个新的常量:
<?xml version="1.0" encoding="utf-8"?>
<resources>
   <string name="app_name">Tutorialspoint</string>
   <string name="compose_email">Compose Email</string>
</resources>
以下是AndroidManifest.xml的默认内容:
<?xml version="1.0" encoding="utf-8"?>
<manifest xmlns:android="http://schemas.android.com/apk/res/android"
   package="com.example.Tutorialspoint" >

   <application
      android:allowBackup="true"
      android:icon="@drawable/ic_launcher"
      android:label="@string/app_name"
      android:theme="@style/AppTheme" >

      <activity
         android:name="com.example.tutorialspoint.MainActivity"
         android:label="@string/app_name" >

         <intent-filter>
            <action android:name="android.intent.action.MAIN" />
            <category android:name="android.intent.category.LAUNCHER" />
         </intent-filter>

      </activity>

   </application>
</manifest>
让我们尝试运行您的tutorialspoint应用程序。我假设您已将实际的 Android 移动设备连接到您的计算机。要从 Android Studio 运行应用程序,请打开项目的活动文件之一,然后单击工具栏中的运行 图标。在启动应用程序之前,Android Studio 安装程序将显示以下窗口,让您选择要在其中运行 Android 应用程序的选项。选择您的移动设备作为选项,然后检查您的移动设备,它将显示以下屏幕:

现在使用撰写邮件按钮列出所有已安装的电子邮件客户端。您可以从列表中选择一个电子邮件客户端来发送您的电子邮件。我将使用 Gmail 客户端发送我的电子邮件,它将具有所有提供的默认字段,如下所示。此处发件人:将是您为 Android 设备注册的默认电子邮件 ID。

您可以修改任何给定的默认字段,最后使用发送电子邮件按钮将您的电子邮件发送给提到的收件人。
