- SwiftUI 教程
- SwiftUI - 首页
- SwiftUI - 概述
- SwiftUI vs UIKit
- SwiftUI 环境
- SwiftUI - 环境设置
- SwiftUI - 基本组件
- SwiftUI - 构建第一个应用程序
- SwiftUI 视图
- SwiftUI - 视图
- SwiftUI - 自定义文本视图
- SwiftUI - 自定义图像视图
- SwiftUI - 堆叠
- SwiftUI 绘制形状
- SwiftUI - 形状
- SwiftUI - 绘制线条
- SwiftUI - 绘制矩形
- SwiftUI - 绘制圆角矩形
- SwiftUI - 绘制三角形
- SwiftUI - 绘制圆形
- SwiftUI - 绘制星形
- SwiftUI - 绘制多边形
- SwiftUI - 绘制饼图
- SwiftUI - 使用内置形状
- SwiftUI - 文本
- SwiftUI - 文本视图
- SwiftUI - 文本输入和输出
- SwiftUI - 颜色
- SwiftUI - 颜色
- SwiftUI - 颜色选择器
- SwiftUI - 渐变
- SwiftUI - 调整颜色
- SwiftUI - 效果
- SwiftUI - 效果
- SwiftUI - 混合效果
- SwiftUI - 模糊效果
- SwiftUI - 阴影效果
- SwiftUI - 悬停效果
- SwiftUI - 动画
- SwiftUI - 动画
- SwiftUI - 创建动画
- SwiftUI - 创建显式动画
- SwiftUI - 多个动画
- SwiftUI - 转场
- SwiftUI - 非对称转场
- SwiftUI - 自定义转场
- SwiftUI - 图片
- SwiftUI - 图片
- SwiftUI - 图片作为背景
- SwiftUI - 旋转图片
- SwiftUI - 媒体
- SwiftUI - 视图布局
- SwiftUI - 视图布局
- SwiftUI - 视图大小
- SwiftUI - 视图间距
- SwiftUI - 视图填充
- SwiftUI - 列表和表格
- SwiftUI - 列表
- SwiftUI - 静态列表
- SwiftUI - 动态列表
- SwiftUI - 自定义列表
- SwiftUI - 表格
- SwiftUI - 表单
- SwiftUI - 表单
- SwiftUI - 将表单分解成多个部分
- SwiftUI 有用资源
- SwiftUI - 有用资源
- SwiftUI - 讨论
SwiftUI - 渐变
渐变是指通过混合两种或多种颜色创建的视觉效果。或者说,渐变效果是从一种颜色到另一种颜色的平滑颜色过渡。它用于填充形状,使其颜色平滑过渡,例如从浅到深或从深到浅。
它通常用于背景、按钮、图标和其他 UI 组件,以增强组件的视觉外观。SwiftUI 支持三种类型的渐变:线性、径向和角度。
渐变使用各种组件,例如将要显示的颜色数组、大小和方向以及渐变类型。SwiftUI 提供以下四种应用渐变效果的方法:
- 渐变
- 线性渐变
- 径向渐变
- 角度渐变
- 椭圆渐变
渐变
.gradient: 修饰符用于将渐变效果应用于指定的组件。
它通常与 background 或 fill 修饰符一起使用。您可以将此修饰符与任何您想要的颜色一起使用。这是应用线性渐变效果的最简单方法。
语法
以下是语法:
@State private var userData: String = ""
示例
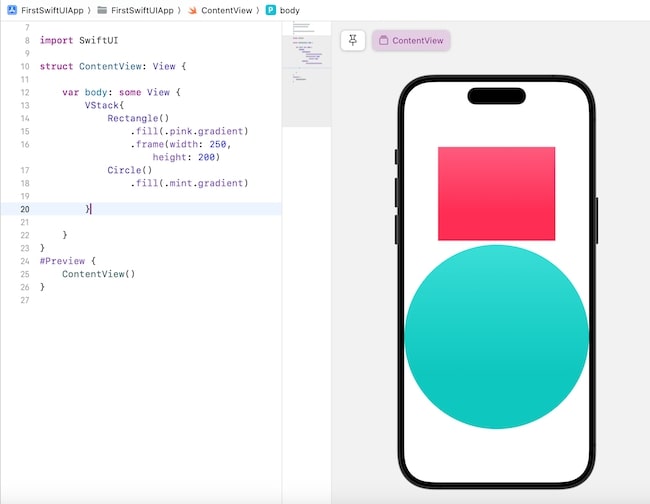
下面的 SwiftUI 程序使用渐变修饰符创建并应用于指定形状的渐变。
import SwiftUI
struct ContentView: View {
   var body: some View {
      VStack{
         Rectangle().fill(.pink.gradient).frame(width: 250, height: 200)
         Circle().fill(.mint.gradient)
      }
   }
}
#Preview {
   ContentView()
}
输出
线性渐变
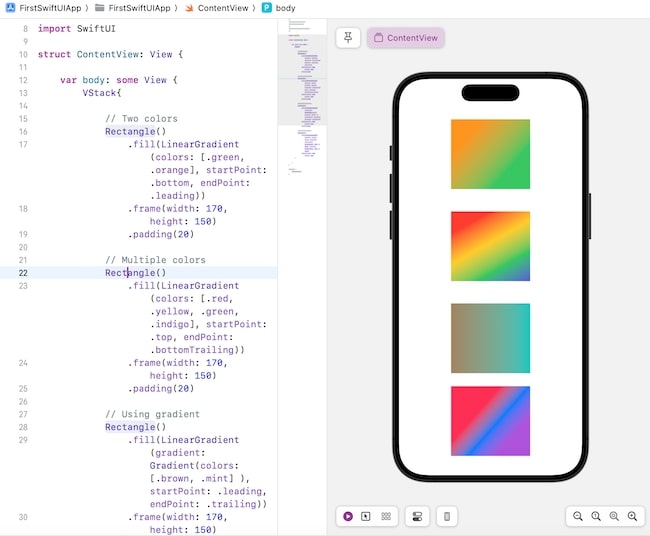
在线性渐变中,颜色的过渡以直线形式进行。SwiftUI 提供了一个内置的 LinearGradient() 函数,我们可以使用它通过混合两种或多种颜色来创建渐变颜色效果。
此函数使用线性颜色过渡填充区域或组件,从一点到另一点以直线形式进行。过渡可以是水平的、垂直的、对角线的等等。
语法
以下是语法:
LinearGradient(_gradient:AnyGradient, startPoint: UnitPoint, endPoint: UnitPoint)
参数
此方法采用以下参数:
- gradient: 它是一个 Gradient 对象,包含一个 Color 对象数组。
- startPoint: 它表示渐变的起始点。其值可以是:.top、.topLeading、.topTrailing、.bottom、.bottomLeading、.bottomTrailing、.leading、.trailing、.topleading 等。
- endPoint: 它表示渐变的结束点。其值可以是:.top、.topLeading、.topTrailing、.bottom、.bottomLeading、.bottomTrailing、.leading、.trailing、.topleading 等。
示例
下面的 SwiftUI 程序用于创建线性渐变。
import SwiftUI
struct ContentView: View {
   var body: some View {
      VStack{

         // Two colors
         Rectangle()
            .fill(LinearGradient(colors: [.green, .orange], startPoint: .bottom, endPoint: .leading))
            .frame(width: 170, height: 150)
            .padding(20)

         // Multiple colors
         Rectangle()
            .fill(LinearGradient(colors: [.red, .yellow, .green, .indigo], startPoint: .top, endPoint: .bottomTrailing))
            .frame(width: 170, height: 150)
            .padding(20)

         // Using gradient
         Rectangle()
            .fill(LinearGradient(gradient: Gradient(colors:[.brown, .mint] ), startPoint: .leading, endPoint: .trailing))
            .frame(width: 170, height: 150)
            .padding(20)

         // Setting the coordinates of start and end point
         Rectangle()
            .fill(LinearGradient(colors: [.pink, .blue, .purple], startPoint: UnitPoint(x: 0.4, y: 0.3), endPoint: UnitPoint(x: 0.8, y: 0.7)))
            .frame(width: 170, height: 150)
      }

   }
}
#Preview {
   ContentView()
}
输出
径向渐变
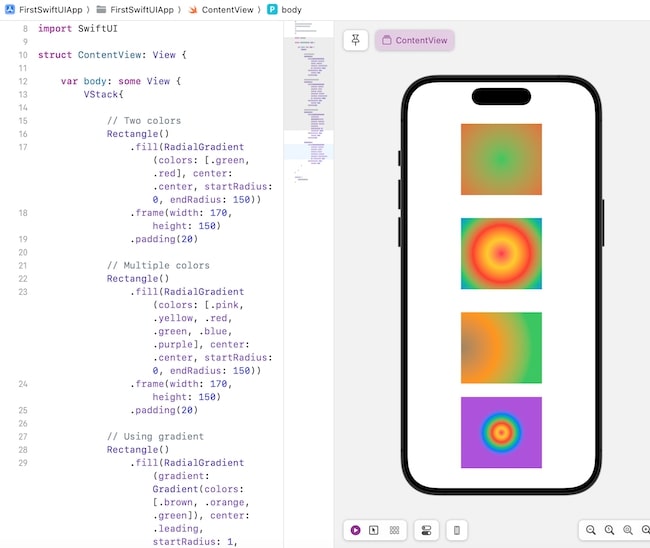
径向渐变用于创建两种或多种颜色的过渡,其中颜色随着与中心点的距离增加而变化。过渡发生在向外的方向,颜色按比例缩放以适应起始和结束半径之间。
SwiftUI 提供了一个名为 RadialGradient() 的内置函数。此函数用于填充给定区域的渐变颜色过渡,这意味着它创建一个圆形渐变,其中初始颜色位于中心,最终颜色位于圆的边缘。
如果给定形状的区域大小增加,则 SwiftUI 会自动调整渐变。通过调整 RadialGradient() 的 center、startRadius 和 endRadius 参数的值,我们可以创建不同的效果。
语法
以下是语法:
RadialGradient(colors:[Color], center: UnitPoint, startRadius: CGFloat, endRadius: CGFloat)
参数
此方法采用以下参数:
- colors: 它是一个 Color 对象数组。
- center: 它表示中心点。
- startRadius: 它表示渐变的起始半径。
- endRadius: 它表示渐变的结束半径。
示例
下面的 SwiftUI 程序用于应用径向渐变。
import SwiftUI

struct ContentView: View {
   var body: some View {
      VStack{
         // Two colors
         Rectangle()
            .fill(RadialGradient(colors: [.green, .red], center: .center, startRadius: 0, endRadius: 150))
            .frame(width: 170, height: 150)
            .padding(20)

         // Multiple colors
         Rectangle()
            .fill(RadialGradient(colors: [.pink, .yellow, .red, .green, .blue, .purple], center: .center, startRadius: 0, endRadius: 150))
            .frame(width: 170, height: 150)
            .padding(20)

         // Using gradient
         Rectangle()
            .fill(RadialGradient(gradient: Gradient(colors: [.brown, .orange, .green]), center: .leading, startRadius: 1, endRadius: 150))
            .frame(width: 170, height: 150)
            .padding(20)

         Rectangle()
            .fill(RadialGradient(colors: [.pink, .yellow, .red, .green, .blue, .purple], center: .center, startRadius: 0, endRadius: 50))
            .frame(width: 170, height: 150)
      }
   }
}

#Preview {
   ContentView()
}
输出
角度渐变
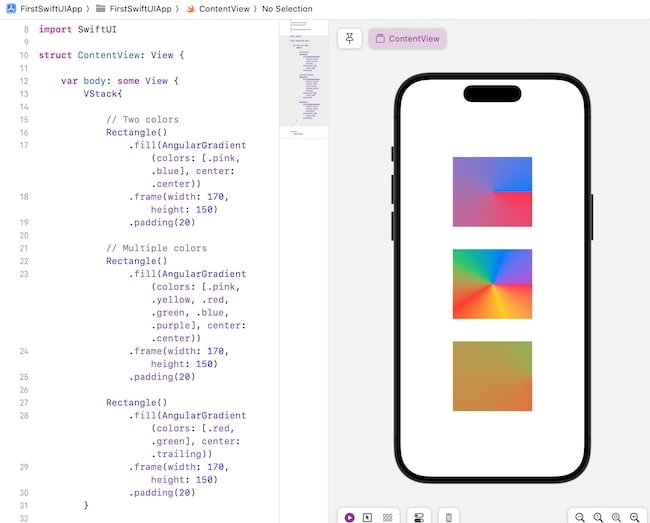
角度渐变用于创建两种或多种颜色的过渡,其中颜色根据角度而变化。它也称为圆锥渐变。SwiftUI 提供了一个名为 AngularGradient() 的内置函数。此函数用于填充给定区域的角度颜色过渡。
与径向渐变一样,角度渐变也以圆形形式显示颜色渐变,但此处颜色围绕中心点辐射。如果给定区域的大小增加,则 SwiftUI 将自动调整渐变中的颜色。
通过调整 AngularGradient() 的 center、startAngle 和 endAngle 参数的值,我们可以创建不同的效果。
语法
以下是语法:
AngularGradient(colors:[Color], center: UnitPoint, angle: Angle)
参数
此方法采用以下参数:
- colors: 它是一个 Color 对象数组。
- center: 它表示中心点。
- angle: 它表示渐变的起始角度。
示例
下面的 SwiftUI 程序用于应用角度渐变。
import SwiftUI
struct ContentView: View {
   var body: some View {
      VStack{

         // Two colors
         Rectangle()
            .fill(AngularGradient(colors: [.pink, .blue], center: .center))
            .frame(width: 170, height: 150)
            .padding(20)

         // Multiple colors
         Rectangle()
            .fill(AngularGradient(colors: [.pink, .yellow, .red, .green, .blue, .purple], center: .center))
            .frame(width: 170, height: 150)
            .padding(20)

         Rectangle()
            .fill(AngularGradient(colors: [.red, .green], center: .trailing))
            .frame(width: 170, height: 150)
            .padding(20)
      }
   }
}

#Preview {
   ContentView()
}
输出
椭圆渐变
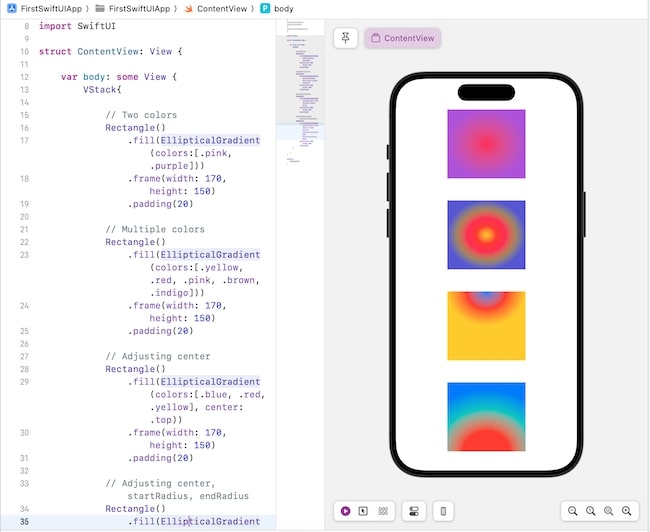
椭圆渐变用于创建两种或多种颜色的过渡,渐变将以椭圆形状显示。我们可以借助 SwiftUI 支持的 EllipticalGradient() 函数创建椭圆渐变。
此函数从中心到给定区域的边缘创建椭圆渐变,此处初始颜色将出现在中心,最终颜色将出现在给定形状的边缘。
通过更改 center、startRadiusFraction 和 endRadiusFraction 参数的值,我们可以创建椭圆渐变的不同变化。
语法
以下是语法:
EllipticalGradient(colors:[Color], center: UnitPoint, startRadiusFraction: CGFloat, endRadiusFraction:CGFloat)
参数
此方法采用以下参数:
- colors: 它是一个 Color 对象数组。
- center: 它表示中心点。
- startRadiusFraction: 它表示半径的起始值。此处的数值介于 0 和 1 之间。0 值映射到中心点,而 1 值映射到圆的直径。
- endRadiusFraction: 它表示半径的结束值。此处的数值介于 0 和 1 之间。0 值映射到中心点,而 1 值映射到圆的直径。
示例
下面的 SwiftUI 程序用于应用椭圆渐变。
import SwiftUI
struct ContentView: View {
   var body: some View {
      VStack{
         Rectangle().fill(.pink.gradient).frame(width: 250, height: 200)
         Circle().fill(.mint.gradient)
      }
   }
}
#Preview {
   ContentView()
}
输出
