- Mahotas 教程
- Mahotas - 首页
- Mahotas - 简介
- Mahotas - 计算机视觉
- Mahotas - 历史
- Mahotas - 特性
- Mahotas - 安装
- Mahotas 图像处理
- Mahotas - 图像处理
- Mahotas - 加载图像
- Mahotas - 加载灰度图像
- Mahotas - 显示图像
- Mahotas - 显示图像形状
- Mahotas - 保存图像
- Mahotas - 图像质心
- Mahotas - 图像卷积
- Mahotas - 创建RGB图像
- Mahotas - 图像欧拉数
- Mahotas - 图像中零的比例
- Mahotas - 获取图像矩
- Mahotas - 图像局部最大值
- Mahotas - 图像椭圆轴
- Mahotas - 图像RGB拉伸
- Mahotas 颜色空间转换
- Mahotas - 颜色空间转换
- Mahotas - RGB到灰度转换
- Mahotas - RGB到LAB转换
- Mahotas - RGB到褐色转换
- Mahotas - RGB到XYZ转换
- Mahotas - XYZ到LAB转换
- Mahotas - XYZ到RGB转换
- Mahotas - 增加伽马校正
- Mahotas - 拉伸伽马校正
- Mahotas 标签图像函数
- Mahotas - 标签图像函数
- Mahotas - 图像标记
- Mahotas - 过滤区域
- Mahotas - 边界像素
- Mahotas - 形态学运算
- Mahotas - 形态学算子
- Mahotas - 查找图像平均值
- Mahotas - 裁剪图像
- Mahotas - 图像离心率
- Mahotas - 图像叠加
- Mahotas - 图像圆度
- Mahotas - 图像缩放
- Mahotas - 图像直方图
- Mahotas - 图像膨胀
- Mahotas - 图像腐蚀
- Mahotas - 分水岭算法
- Mahotas - 图像开运算
- Mahotas - 图像闭运算
- Mahotas - 填充图像空洞
- Mahotas - 条件膨胀图像
- Mahotas - 条件腐蚀图像
- Mahotas - 图像条件分水岭算法
- Mahotas - 图像局部最小值
- Mahotas - 图像区域最大值
- Mahotas - 图像区域最小值
- Mahotas - 高级概念
- Mahotas - 图像阈值化
- Mahotas - 设置阈值
- Mahotas - 软阈值
- Mahotas - Bernsen局部阈值化
- Mahotas - 小波变换
- 制作图像小波中心
- Mahotas - 距离变换
- Mahotas - 多边形工具
- Mahotas - 局部二值模式
- 阈值邻域统计
- Mahotas - Haralic 特征
- 标记区域的权重
- Mahotas - Zernike 特征
- Mahotas - Zernike 矩
- Mahotas - 排序滤波器
- Mahotas - 二维拉普拉斯滤波器
- Mahotas - 多数滤波器
- Mahotas - 均值滤波器
- Mahotas - 中值滤波器
- Mahotas - Otsu 方法
- Mahotas - 高斯滤波
- Mahotas - Hit & Miss 变换
- Mahotas - 标记最大值数组
- Mahotas - 图像平均值
- Mahotas - SURF 密集点
- Mahotas - SURF 积分图像
- Mahotas - Haar 变换
- 突出显示图像最大值
- 计算线性二值模式
- 获取标签边界
- 反转 Haar 变换
- Riddler-Calvard 方法
- 标记区域的大小
- Mahotas - 模板匹配
- 加速鲁棒特征
- 去除带边界的标记
- Mahotas - Daubechies 小波
- Mahotas - Sobel 边缘检测
Mahotas - 模板匹配
模板匹配是一种用于在较大图像中定位特定图像(模板)的技术。简单来说,目标是在较大的图像中找到与较小图像匹配的位置。
模板匹配涉及将模板图像与较大图像的不同区域进行比较。在比较过程中,模板图像的不同属性,例如大小、形状、颜色和强度值,都会与较大图像进行匹配。
比较会持续进行,直到找到模板图像与较大图像之间最佳匹配的区域。
Mahotas中的模板匹配
在 Mahotas 中,我们可以使用 **mahotas.template_match()** 函数执行模板匹配。该函数将模板图像与较大图像中所有与模板图像大小相同的区域进行比较。
该函数使用平方差之和 (SSD) 方法执行模板匹配。SSD 方法的工作方式如下:
第一步是计算模板图像和较大图像的像素值之间的差异。
下一步是将差异平方。
最后,将较大图像中所有像素的平方差相加。
最终的 SSD 值决定了模板图像和较大图像之间的相似性。值越小,模板图像和较大图像之间的匹配度越高。
mahotas.template_match() 函数
mahotas.template_match() 函数接受图像和模板图像作为输入。
它返回较大图像中与输入模板图像最佳匹配的区域。
最佳匹配是 SSD 值最低的区域。
语法
以下是 Mahotas 中 template_match() 函数的基本语法:
mahotas.template_match(f, template, mode='reflect', cval=0.0, out=None)
其中:
**f** - 输入图像。
**template** - 将与输入图像匹配的模式。
**mode (可选)** - 确定在模板应用于其边界附近时如何扩展输入图像(默认值为“reflect”)。
**cval (可选)** - 当 mode 为“constant”时使用的填充常数值(默认为 0.0)。
**out (可选)** - 定义存储输出图像的数组(默认为 None)。
示例
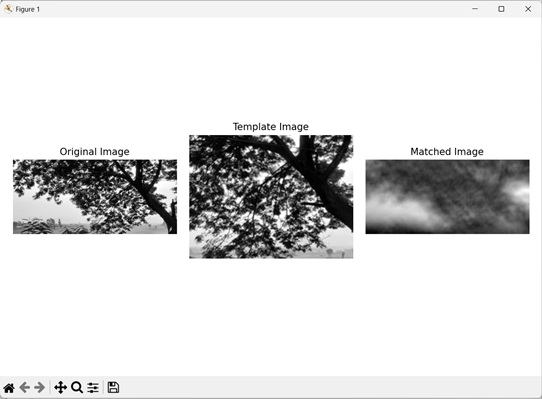
在下面的示例中,我们使用 mh.template_match() 函数执行模板匹配。
import mahotas as mh
import numpy as np
import matplotlib.pyplot as mtplt
# Loading the images
image = mh.imread('tree.tiff', as_grey=True)
template = mh.imread('cropped tree.tiff', as_grey=True)
# Applying template matching algorithm
template_matching = mh.template_match(image, template)
# Creating a figure and axes for subplots
fig, axes = mtplt.subplots(1, 3)
# Displaying the original image
axes[0].imshow(image, cmap='gray')
axes[0].set_title('Original Image')
axes[0].set_axis_off()
# Displaying the template image
axes[1].imshow(template, cmap='gray')
axes[1].set_title('Template Image')
axes[1].set_axis_off()
# Displaying the matched image
axes[2].imshow(template_matching, cmap='gray')
axes[2].set_title('Matched Image')
axes[2].set_axis_off()
# Adjusting spacing between subplots
mtplt.tight_layout()
# Showing the figures
mtplt.show()
输出
以下是上述代码的输出:

通过包裹边界进行匹配
在 Mahotas 中执行模板匹配时,我们可以包裹图像的边界。包裹边界是指将图像边界折叠到图像的另一侧。
因此,边界之外的像素会在图像的另一侧重复。
这有助于我们在模板匹配过程中处理图像边界之外的像素。
在 mahotas 中,我们可以通过将值“wrap”指定给 template_match() 函数的 **mode** 参数来包裹图像的边界,从而执行模板匹配。
示例
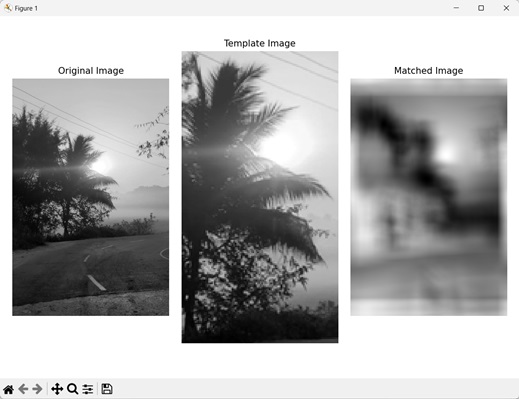
在下面提到的示例中,我们通过包裹图像的边界来执行模板匹配。
import mahotas as mh
import numpy as np
import matplotlib.pyplot as mtplt
# Loading the images
image = mh.imread('sun.png', as_grey=True)
template = mh.imread('cropped sun.png', as_grey=True)
# Applying template matching algorithm
template_matching = mh.template_match(image, template, mode='wrap')
# Creating a figure and axes for subplots
fig, axes = mtplt.subplots(1, 3)
# Displaying the original image
axes[0].imshow(image, cmap='gray')
axes[0].set_title('Original Image')
axes[0].set_axis_off()
# Displaying the template image
axes[1].imshow(template, cmap='gray')
axes[1].set_title('Template Image')
axes[1].set_axis_off()
# Displaying the matched image
axes[2].imshow(template_matching, cmap='gray')
axes[2].set_title('Matched Image')
axes[2].set_axis_off()
# Adjusting spacing between subplots
mtplt.tight_layout()
# Showing the figures
mtplt.show()
输出
上述代码的输出如下:

通过忽略边界进行匹配
我们还可以通过忽略图像的边界来执行模板匹配。在通过忽略边界执行模板匹配时,超出图像边界的像素将被排除。
在 mahotas 中,我们通过将值“ignore”指定给 template_match() 函数的 **mode** 参数来忽略图像的边界,从而执行模板匹配。
示例
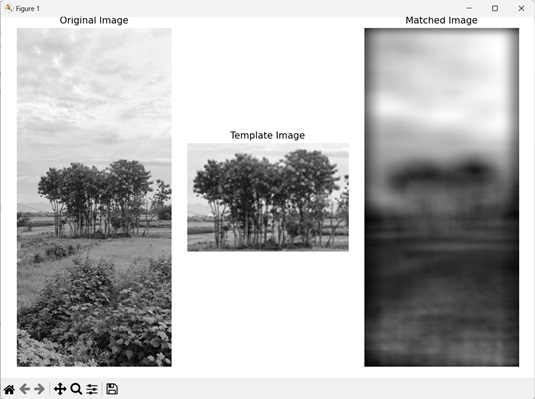
在这里,我们在执行模板匹配时忽略图像的边界。
import mahotas as mh
import numpy as np
import matplotlib.pyplot as mtplt
# Loading the images
image = mh.imread('nature.jpeg', as_grey=True)
template = mh.imread('cropped nature.jpeg', as_grey=True)
# Applying template matching algorithm
template_matching = mh.template_match(image, template, mode='ignore')
# Creating a figure and axes for subplots
fig, axes = mtplt.subplots(1, 3)
# Displaying the original image
axes[0].imshow(image, cmap='gray')
axes[0].set_title('Original Image')
axes[0].set_axis_off()
# Displaying the template image
axes[1].imshow(template, cmap='gray')
axes[1].set_title('Template Image')
axes[1].set_axis_off()
# Displaying the matched image
axes[2].imshow(template_matching, cmap='gray')
axes[2].set_title('Matched Image')
axes[2].set_axis_off()
# Adjusting spacing between subplots
mtplt.tight_layout()
# Showing the figures
mtplt.show()
输出
执行上述代码后,我们将得到以下输出:
