- 密码学教程
- 密码学 - 首页
- 密码学 - 起源
- 密码学 - 历史
- 密码学 - 原理
- 密码学 - 应用
- 密码学 - 优点与缺点
- 密码学 - 现代
- 密码学 - 传统密码
- 密码学 - 加密需求
- 密码学 - 双重强度加密
- 密码系统
- 密码系统
- 密码系统 - 组成部分
- 密码系统攻击
- 密码系统 - 彩虹表攻击
- 密码系统 - 字典攻击
- 密码系统 - 暴力破解攻击
- 密码系统 - 密码分析技术
- 密码学类型
- 密码系统 - 类型
- 公钥加密
- 现代对称密钥加密
- 密码学散列函数
- 密钥管理
- 密码系统 - 密钥生成
- 密码系统 - 密钥存储
- 密码系统 - 密钥分发
- 密码系统 - 密钥撤销
- 分组密码
- 密码系统 - 流密码
- 密码学 - 分组密码
- 密码学 - Feistel 分组密码
- 分组密码操作模式
- 分组密码操作模式
- 电子密码本 (ECB) 模式
- 密码分组链接 (CBC) 模式
- 密码反馈 (CFB) 模式
- 输出反馈 (OFB) 模式
- 计数器 (CTR) 模式
- 经典密码
- 密码学 - 反向密码
- 密码学 - 凯撒密码
- 密码学 - ROT13 算法
- 密码学 - 换位密码
- 密码学 - 加密换位密码
- 密码学 - 解密换位密码
- 密码学 - 乘法密码
- 密码学 - 仿射密码
- 密码学 - 简单替换密码
- 密码学 - 简单替换密码加密
- 密码学 - 简单替换密码解密
- 密码学 - 维吉尼亚密码
- 密码学 - 实现维吉尼亚密码
- 现代密码
- Base64 编码和解码
- 密码学 - XOR 加密
- 替换技术
- 密码学 - 单字母替换密码
- 密码学 - 破解单字母替换密码
- 密码学 - 多字母替换密码
- 密码学 - Playfair 密码
- 密码学 - 希尔密码
- 多字母替换密码
- 密码学 - 一次性密码本密码
- 一次性密码本密码的实现
- 密码学 - 换位技术
- 密码学 - 栅栏密码
- 密码学 - 列置换
- 密码学 - 密码隐写术
- 对称算法
- 密码学 - 数据加密
- 密码学 - 加密算法
- 密码学 - 数据加密标准
- 密码学 - 三重DES
- 密码学 - 双重DES
- 高级加密标准
- 密码学 - AES 结构
- 密码学 - AES 变换函数
- 密码学 - 字节替换变换
- 密码学 - 行移位变换
- 密码学 - 列混合变换
- 密码学 - 轮密钥加变换
- 密码学 - AES 密钥扩展算法
- 密码学 - Blowfish 算法
- 密码学 - SHA 算法
- 密码学 - RC4 算法
- 密码学 - Camellia 加密算法
- 密码学 - ChaCha20 加密算法
- 密码学 - CAST5 加密算法
- 密码学 - SEED 加密算法
- 密码学 - SM4 加密算法
- IDEA - 国际数据加密算法
- 公钥(非对称)密码学算法
- 密码学 - RSA 算法
- 密码学 - RSA 加密
- 密码学 - RSA 解密
- 密码学 - 创建 RSA 密钥
- 密码学 - 破解 RSA 密码
- 密码学 - ECDSA 算法
- 密码学 - DSA 算法
- 密码学 - Diffie-Hellman 算法
- 密码学中的数据完整性
- 密码学中的数据完整性
- 消息认证
- 密码学数字签名
- 公钥基础设施
- 散列
- MD5(消息摘要算法 5)
- SHA-1(安全散列算法 1)
- SHA-256(安全散列算法 256 位)
- SHA-512(安全散列算法 512 位)
- SHA-3(安全散列算法 3)
- 散列密码
- Bcrypt 散列模块
- 现代密码学
- 量子密码学
- 后量子密码学
- 密码学协议
- 密码学 - SSL/TLS 协议
- 密码学 - SSH 协议
- 密码学 - IPsec 协议
- 密码学 - PGP 协议
- 图像和文件加密
- 密码学 - 图像
- 密码学 - 文件
- 密码隐写术 - 图像
- 文件加密和解密
- 密码学 - 文件加密
- 密码学 - 文件解密
- 物联网中的密码学
- 物联网安全挑战、威胁和攻击
- 物联网安全中的加密技术
- 物联网设备的通信协议
- 常用的加密技术
- 自定义构建加密算法(混合加密)
- 云加密
- 量子密码学
- 密码学中的图像隐写术
- DNA 密码学
- 密码学中的一次性密码 (OTP) 算法
- 区别
- 密码学 - MD5 与 SHA1
- 密码学 - RSA 与 DSA
- 密码学 - RSA 与 Diffie-Hellman
- 密码学与密码学
- 密码学 - 密码学与密码分析
- 密码学 - 经典与量子
- 密码学与隐写术
- 密码学与加密
- 密码学与网络安全
- 密码学 - 流密码与分组密码
- 密码学 - AES 与 DES 密码
- 密码学 - 对称与非对称
- 密码学有用资源
- 密码学 - 快速指南
- 密码学 - 讨论
密码学 - 文件加密
文件加密是一种加密方法,它将您的文件转换为密文或不可读数据。使用此方法可确保即使未经授权的人员访问您的数据,也无法在没有解密密钥的情况下读取内容。
简单来说,加密文件为保护敏感信息免受外部人员侵害增加了额外的安全层。
在本章中,我们将了解不同的加密技术来加密文件数据。所以让我们深入探讨一下。
文件加密的基本方法
任何加密方法都有其自身的一套特征和优势。因此,选择最适合公司的加密方法非常重要。这些方法包括:
对称加密
对称加密是一种流行的加密方法,它使用相同的密钥来加密和解密数据。虽然使用单个密钥来加密和解密信息看起来已经过时,但如果执行得当,它非常高效。
对称加密的密钥在发送方和预期接收方之间共享并保密。当文件被加密时,加密密钥将明文转换为密文。接收方使用相同的密钥来反转解密文件的过程并恢复原始明文。
非对称加密
非对称加密,也称为公钥加密,是在加密文件时对称加密的替代方案。非对称加密使用两个独立但数学相关的密钥。公钥被分发,但私钥被隐藏,只有所有者知道。在加密文件时,发送方使用接收方的公钥将明文转换为密文。然后,接收方使用其私钥解密密文以获取原始明文。
混合加密
对于希望获得对称和非对称加密优势的公司来说,混合加密是一个完美的选择。该技术首先为每个文件或会话创建一个唯一的对称密钥。然后使用对称密钥加密文件,这提供了快速有效的加密。数据不是使用对称密钥而是使用接收方的非对称加密公钥进行加密。然后传输加密文件以及加密的对称密钥。如果接收方拥有正确的私钥,他们可以使用对称密钥来解密文件。
实现(加密文件)
现在我们将尝试使用不同的编程语言(如 Python、Java、C++ 等)来实现文件加密。因此,借助不同的编程语言来加密文件是学习加密和练习编码技能的最佳方法。以下是如何使用 Python、Java 和 C++ 加密文件的简单示例:
使用 Python
此代码展示了如何在 Python 中使用 cryptography 库中提供的 Fernet 对称加密方法进行文件加密。在此代码中,我们将提供一个作为输入的文本文件,我们需要对其进行加密。加密后,我们将获得一个加密文件,其中内容使用对称加密进行加密。
因此,请参阅以下使用 Python 的 Fernet 方法的实现
from cryptography.fernet import Fernet

# Generate a key
key = Fernet.generate_key()
cipher_suite = Fernet(key)

# Read the file
with open('plain_text.txt', 'rb') as f:
   plaintext = f.read()

# Encrypt the file
encrypted_text = cipher_suite.encrypt(plaintext)

# Write the encrypted file
with open('encrypted_file.txt', 'wb') as f:
   f.write(encrypted_text)

# Print message after file is encrypted
print("File encrypted successfully.")
输出
File encrypted successfully.
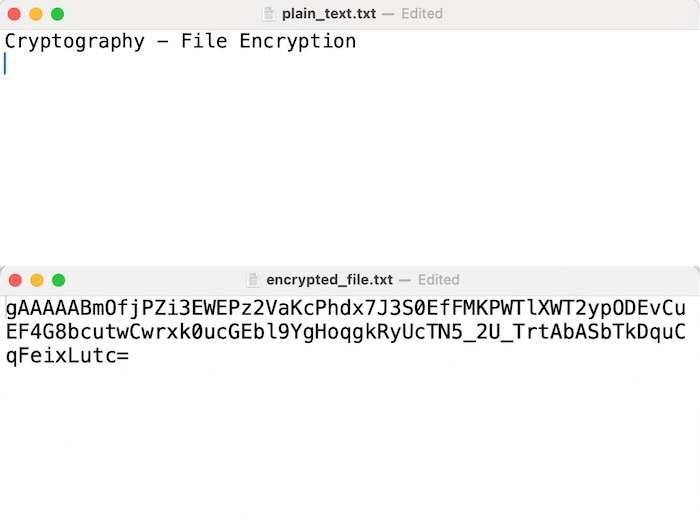
请参阅下面的输出图像,其中显示了 plain_text.txt 和 encrypted_file.txt 文件。

使用 Java
在此 Java 代码中,我们将使用 AES 加密算法在 ECB 模式下执行文件加密。因此,基本上我们需要加密给定的文本文件。并且代码将使用 Files.readAllBytes() 方法将名为“plain_text.txt”的文件的内容读入字节数组。并且从加密步骤获得的加密字节数组将使用 Files.write() 方法写入名为“encrypted_file.txt”的新文件。
因此,请参阅以下 Java 中的实现:
import javax.crypto.Cipher;
import javax.crypto.SecretKey;
import javax.crypto.SecretKeyFactory;
import javax.crypto.spec.PBEKeySpec;
import javax.crypto.spec.SecretKeySpec;
import java.nio.file.Files;
import java.nio.file.Paths;
import java.security.spec.KeySpec;
import java.util.Base64;

public class Program {

   public static void main(String[] args) throws Exception {
      // Read the file
      byte[] plaintext = Files.readAllBytes(Paths.get("plain_text.txt"));

      // Generate a key
      String password = "your_password";
      byte[] salt = "your_salt".getBytes();
      SecretKeyFactory factory = SecretKeyFactory.getInstance("PBKDF2WithHmacSHA256");
      KeySpec spec = new PBEKeySpec(password.toCharArray(), salt, 65536, 256);
      SecretKey tmp = factory.generateSecret(spec);
      SecretKey secret = new SecretKeySpec(tmp.getEncoded(), "AES");

      // Encrypt the file
      Cipher cipher = Cipher.getInstance("AES/ECB/PKCS5Padding");
      cipher.init(Cipher.ENCRYPT_MODE, secret);
      byte[] encryptedText = cipher.doFinal(plaintext);

      // Write the encrypted file
      Files.write(Paths.get("encrypted_file.txt"), encryptedText);
      System.out.println("File is encrypted successfully!");
   }
}
输入/输出
File is encrypted successfully!
使用 Javascript
在 JavaScript 中,您可以使用 Web Crypto API 在浏览器环境中执行文件加密。下面是一个使用 JavaScript 加密文件的示例:
<!DOCTYPE html>
<html lang="en">
<head>
<meta charset="UTF-8">
<meta name="viewport" content="width=device-width, initial-scale=1.0">
<title>File Encryption</title>
<style>
   body {
      font-family: Arial, sans-serif;
      margin: 0;
      padding: 0;
      display: flex;
      justify-content: center;
      align-items: center;
      height: 100vh;
      background-color: #f4f4f4;
   }

   #container {
      text-align: center;
   }

   #fileLabel {
      padding: 10px 20px;
      background-color: #007bff;
      color: #fff;
      border: none;
      border-radius: 5px;
      cursor: pointer;
      transition: background-color 0.3s;
   }

   #fileLabel:hover {
      background-color: #0056b3;
   }

   #fileInput {
      display: none;
   }

   #fileName {
      margin-top: 10px;
   }

   #encryptButton {
      margin-top: 20px;
      padding: 10px 20px;
      background-color: #28a745;
      color: #fff;
      border: none;
      border-radius: 5px;
      cursor: pointer;
      transition: background-color 0.3s;
   }

   #encryptButton:hover {
      background-color: #218838;
   }
</style>
</head>
<body>
<div id="container">
   <label for="fileInput" id="fileLabel">Choose File</label>
   <input type="file" id="fileInput" onchange="displayFileName()">
   <div id="fileName"></div>
   <button id="encryptButton" onclick="encryptFile()">Encrypt File</button>
</div>
<script>
function displayFileName() {
   const fileInput = document.getElementById('fileInput');
   const fileName = document.getElementById('fileName');
   fileName.textContent = fileInput.files[0].name;
}

async function encryptFile() {
   const fileInput = document.getElementById('fileInput');
   const file = fileInput.files[0];
   if (!file) {
      alert('Please select a file.');
      return;
   }

   const reader = new FileReader();
   reader.onload = async function(event) {
      const data = event.target.result;
      const password = 'your_password';

      const encodedData = new TextEncoder().encode(data);
      const encodedPassword = new TextEncoder().encode(password);

      const key = await crypto.subtle.importKey(
         'raw',
         encodedPassword,
         { name: 'PBKDF2' },
         false,
         ['deriveKey']
      );

      const derivedKey = await crypto.subtle.deriveKey(
         { name: 'PBKDF2', salt: new Uint8Array(16), iterations: 1000, hash: 'SHA-256' },
         key,
         { name: 'AES-GCM', length: 256 },
         true,
         ['encrypt', 'decrypt']
      );

      const iv = crypto.getRandomValues(new Uint8Array(12));
      const encryptedData = await crypto.subtle.encrypt(
         { name: 'AES-GCM', iv: iv },
         derivedKey,
         encodedData
      );

      const encryptedBlob = new Blob([iv, new Uint8Array(encryptedData)]);
      const encryptedFile = new File([encryptedBlob], 'encrypted_file.txt', { type: 'text/plain' });

      const downloadLink = document.createElement('a');
      downloadLink.href = URL.createObjectURL(encryptedFile);
      downloadLink.download = 'encrypted_file.txt';
      downloadLink.click();
   };

   reader.readAsBinaryString(file);
}
</script>
</body>
</html>
输入/输出
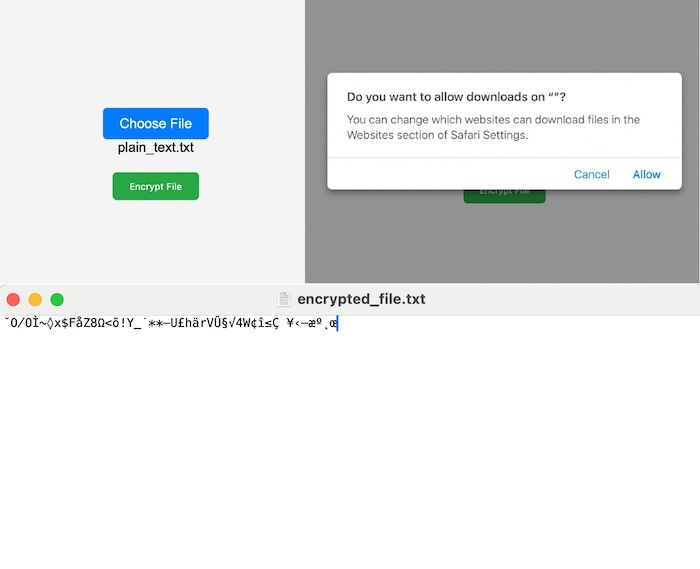
运行上述代码后,我们将看到以下页面,其中将有两个按钮,第一个按钮是“选择文件”,我们可以通过它选择要加密的文件。第二个按钮是加密上传的文件,因此它将要求将加密文件下载到我们的系统中。因此,我们可以看到加密文件,如下面的输出所示。
