- Unix Commands Reference
- Unix Commands - Home
autofs Command in Linux
autofs, short for automount filesystem, is a command-line tool that provides on-demand mounting and automatic unmounting of various filesystems on Linux. autofs ensures that the filesystems are mounted only when needed, rather than mounting everything at the boot time.
The autofs waits until a user or specific application accesses a specific directory. When this happens, the autofs will come into business and mount your relevant filesystem on demand. This approach improves and simplifies the management of network file systems like NFS or removable media.
Table of Contents
Here is a comprehensive guide to the options available with the autofs command −
- How to Install autofs in Linux?
- How to Run autofs Service in Linux?
- How to Configure autofs in Linux?
- Example: Auto-Mounting an NFS Share in Linux
How to Install autofs in Linux ?
The autofs utility is not preinstalled on most Linux systems, however you can install it from your official Linux repository using the default package manager. The command to install autofs is different for different Linux distributions. For example, if you are using Debian-based operating systems like Ubuntu, Kali Linux, or Linux Mint, you can install it from the apt package manager −
sudo apt install autofs

For other systems like REHL, you can use the yum package manager to install autofs command line utility −
sudo yum install autofs
The CentOS and Fedora users can use the dnf package manager to install autofs on their systems −
sudo dnf install autofs
How to Run autofs Service in Linux ?
Once, you installed the autofs utility on your specific Linux systems, ensure the autofs service is running on your system. For that purpose, you can use the systemctl command provided below −
sudo systemctl status autofs
Ensure the autofs.service is active and running without any issue. In case, you encounter any problem working with the autofs.service, like if the service is disabled, start it using the following command −
sudo systemctl start autofs
Or,
/etc/init.d/autofs start
You can also restart the autofs service on your Linux system any time by running the below-given command −
sudo systemctl restart autofs
Or,
/etc/init.d/autofs restart
To automatically start the autofs service on system boot, you can use the following command −
sudo systemctl enable autofs
How to Configure autofs in Linux ?
For configuring autofs on Linux, the two main system files are used: /etc/auto.master (the master map) and the map files it references called /etc/auto.misc. Let’s discuss how you can use both these files.
auto.master
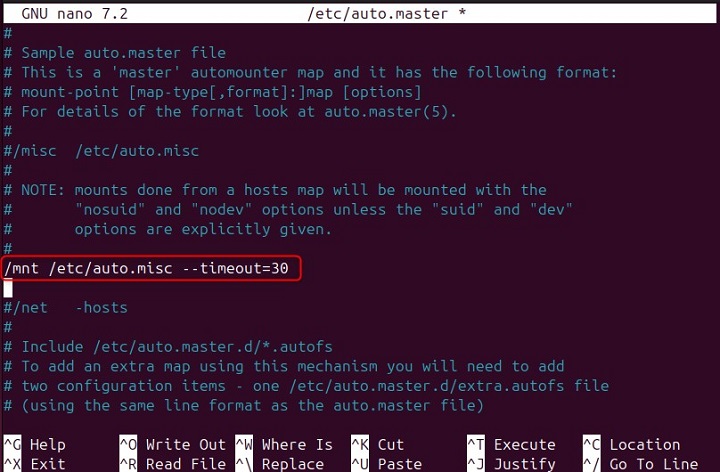
The main configuration file for the autofs service is /etc/auto.master, often called the master map. This file contains a list of mount points managed by autofs on your system, along with the associated configuration files or network sources, which are referred to as automount maps.
The master map file follows a specific format where each line represents a mount point. The lines typically contain the mount point path, the path to the map file that contains detailed mount options, and optional mount options.
mount-point map-name options

By using the specified line in the /etc/auto.master file, we set /mnt as the default mount point and instruct it to look into the /etc/auto.misc file for additional details on the network shares and server information to mount at /mnt. Additionally, we have also included an option to automatically unmount the share after 30 seconds of inactivity.
/mnt /etc/auto.misc --timeout=30

auto.misc
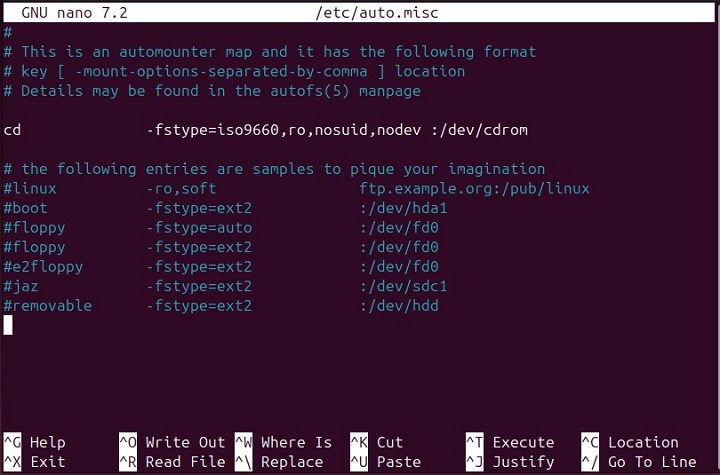
In map files used by autofs, the format is similar to master map, however, with a small change: the “options” for how to mount come between the place where we want to mount the files (mount-point) and where those files are actually coming from (location). So it looks like this:
mount-point [options] location
Using this syntax, we can edit the file /etc/auto.misc. You will find the sample of contents from a map file inside the auto.misc file, and can edit them accordingly.

For example, to create a mount-point named mypoint for NFS share at /dev/hda3 location, you can use the following command −
mypoint -fstype=nfs personnel:/dev/hda3
In a map file for autofs, the first part tells us the specific place on our system where we will see the files. The second part gives special instructions for connecting to those files, and the third part tells us where those files are actually located (like on the personnel server).
Here, in our example, mypoint -fstype=nfs personnel:/dev/hda3, mypoint is where we will access the files, -fstype=nfs are our special instructions, and personnel:/dev/hda3 is where the files are coming from.
Note − For the above process to work, you must ensure that you have created a NFS share on your Linux system.
Once this is done, save your auto.misc file and the automounter will create the directories if they don’t exist in the system.
After you are done, you can reload the changes to ensure it is successfully applied. You can do this by running the systemctl command again −
sudo systemctl restart autofs
Indirect and Direct Maps in autofs
The indirect and direct maps are the terms used in the autofs to define how mount points are organized and connected to network shares. In indirect maps, you organize your map points like a folder within a folder, creating subdirectories under the main mount point. For example, if you define /smb as an indirect map, autofs will create subfolders under /smb for different network shares.
Direct maps, on the other hand, are straightforward and direct, as they directly create a mount point at a specified point. The main mount point entry in /etc/auto.master is always /-. With direct maps, you explicitly specify the exact location where files are available. For example, if you configure /etc/auto.data as a direct map, it directly connects to the specified location without any subfolders.
Example: Auto-Mounting an NFS Share in Linux
Let’s configure autofs to auto-mount an NFS share using a set of configuration files −
1. On the NFS Server
First, you must create an NFS share accessible by the client. As an example, let's consider /work as the nfs share created. After that, edit the /etc/exports file to allow access from the client.
2. On the NFS Client
Now, edit the /etc/auto.master by first open it on the terminal using the below-given command −
sudo nano /etc/auto.master
Then inside the file, add the following line −
/mnt /etc/auto.nfs
Save your file using CTRL+X, add Y and press the Enter button. Once done, the autofs will look in /etc/auto.nfs for details.
3. Create /etc/auto.nfs
Now, create a auto.nfs file using the nano editor and add the following line inside the file −
myshare -fstype=nfs nfs server:/work
Here,
- myshare is the mount point.
- -fstype=nfs specifies NFS.
- nfs server:/work is the location.
Now, whenever you access /mnt/myshare, autofs will seamlessly mount the NFS share.
That’s how you can use the autofs service on your Linux system.
Conclusion
autofs is a useful tool on Linux that streamlines the management of network file systems like NFS or removable media. You can install it directly from your Linux repository using the default package manager.
This tutorial covered the basics of autofs, such as how to manage services and configure autofs on your Linux system. Apart from that, a simple example is also provided to help users understand the working behind the use of autofs. By dynamically mounting filesystems only when needed, autofs improves the efficiency and simplifies the process.