- Unix Commands Reference
- Unix Commands - Home
autoscan Command in Linux
The autoscan command is a lesser-known but incredibly useful tool in the Linux environment. It serves as a preliminary step in the creation of the configure.in or configure.ac files, which are crucial for building and installing software from source. The autoscan command simplifies the process by scanning the source code for common portability issues and generating a configure.scan file. This file contains a list of macros that are likely needed for the configure script.
Here is a simplified guide to explain how you can install and use the "Autoscan" tool in Linux.
Table of Contents
- Understanding autoscan in Linux
- Prerequisite: Installing the autosconf Tool in Linux
- How to use autoscan Command in Linux?
- Alternatives of autoscan Command in Linux
Understanding autoscan in Linux
Linux, known for its robustness and flexibility, is a favorite among developers and system administrators. One of the tools that exemplify this flexibility is the autoscan tool, which streamlines the process of generating preliminary "configure.in" files, essential for building software from the source.
For those who are new to compiling software from source, the "configure" script is a vital component that tailors the software package to the system on which it will run. It checks for necessary libraries, compiler options, and other dependencies that the software requires. The "configure.in" or "configure.ac" files are used by the "autoconf" tool to generate this script.
Prerequisite: Installing the autoconf Tool in Linux
The autoscan is a valuable tool for network administrators and IT professionals, providing the ability to scan and profile devices on a local network segment. This guide will walk you through the process of installing the autoscan tool on a Linux system.
Before installing, you can verify if autoconf is already present on your Linux system by running −
which autoconf
If it outputs the path to the autoconf executable, it's already installed. If not, proceed with the installation steps below.
Installing autoconf in Linux
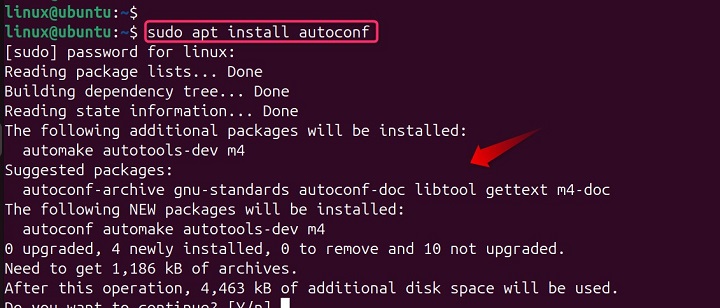
Before you can use autoscan, ensure that you have the necessary packages installed on your system. These include "autoconf" and "automake", which can be installed using your distribution's package manager. For instance, on Ubuntu, you would use −
sudo apt install autoconf

Additionally, if you don't have a C compiler installed, you can install it using −
sudo apt install gcc
For other distributions, the command may vary. For example, on Arch Linux, you would use −
pacman -S autoconf
Red Hat Enterprise Linux (RHEL), CentOS, Fedora −
Use yum for RHEL/CentOS or dnf for Fedora −
sudo yum install autoconf
Fedora −
sudo dnf install autoconf
Refer to your distribution's package manager and documentation for the exact command.
Running the Installation Script
Now, you can run the installation script included with the autoscan package on Linux using the following command −
autoscan

Verifying the autoscan Installation in Linux
To ensure that autoscan has been installed correctly, you can run the "autoscan --version" command in the terminal. If the installation was successful, you should see the autoscan interface or a help message displaying the usage options.
autoscan --version
By following these steps, you should have a working installation of the autoscan tool on your Linux system.
How to use autoscan Command in Linux?
The autoscan tool can significantly aid in network management and security assessments, making it a must-have for professionals in the field.
Syntax and Options
The basic syntax of the "autoscan" command is quite straightforward −
autoscan [OPTION]... [SRCDIR]
Here, "[OPTION]" represents various flags that can be used to modify the behavior of "autoscan", and "[SRCDIR]" is the source directory containing the code to be scanned.
Some of the most commonly used options include −
- -h or --help − Displays a help message and exits
- -V or --version − Shows the version number and exits
- -v or --verbose − Provides a verbose output during processing
- -d or --debug − Retains temporary files that are usually deleted
- -B or --prepend-include=DIR − Prepend a directory to the search path
- -I or --include=DIR − Appends a directory to the end of the search path
-h, --help
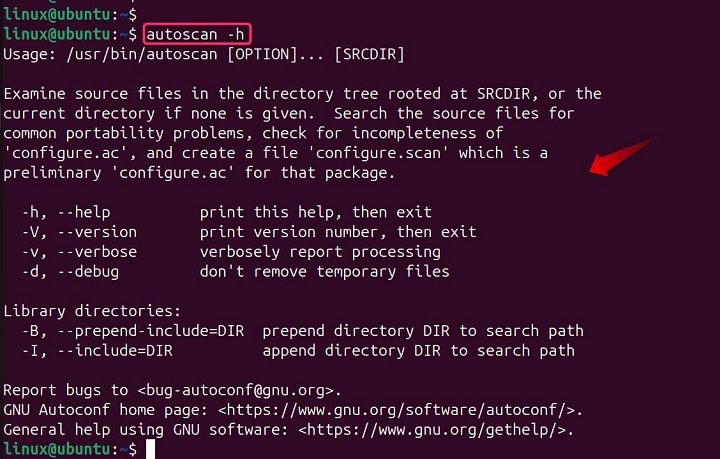
The "-h" or "--help" flag displays a help message, providing a brief overview of the command's usage and available options −
autoscan -h or autoscan --help

-V, --version
The "-V" or "--version" flag shows the version number of the autoscan tool and then exits.
autoscan -V or autoscan --version

-v, --verbose
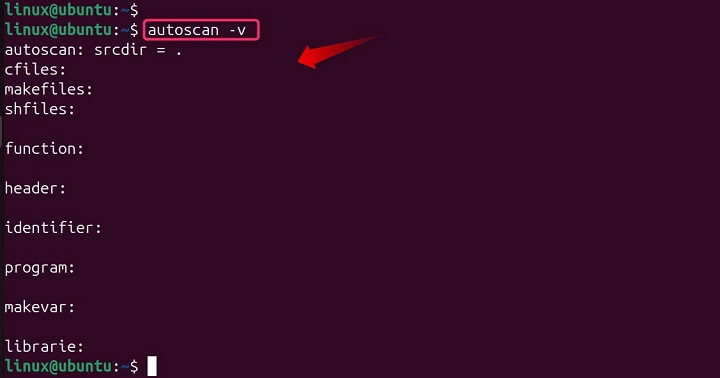
The -v or --verbose flag provides verbose reporting during the processing, offering more detailed output −
autoscan -v

-d, --debug
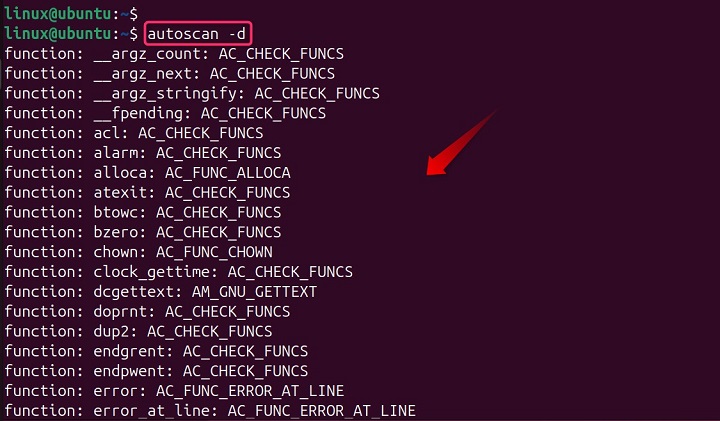
The -d or --debug flag retains temporary files created during the scanning process, which can be useful for debugging purposes −
autoscan -d

-B, --prepend-include=DIR
The "-B" or "--prepend-include" flag allows you to prepend a directory to the search path for library directories, which can be helpful if your libraries are in a non-standard location −
autoscan -B /path/to/lib
-I, --include=DIR
Conversely, the "-I" or "--include" flag appends a directory to the end of the search path for library directories −
autoscan -I /path/to/include
Using "autoscan" in Linux
To use "autoscan" on Linux, navigate to the root directory of the source code and simply execute the following command −
autoscan

This will generate the "configure.scan" file in the same directory.
You can then review this file, remove any unnecessary macros, and add any additional ones that might be required. Once you're satisfied with the "configure.scan" file, rename it to "configure.ac" −
mv configure.scan configure.ac

Finally, generate the "configure" script using the "autoconf" command. With the "configure.ac" file ready, you can now use "autoconf" to generate the "configure" script −
autoconf

This will create the "configure" script in the root directory, which can then be used to configure the software package for installation.
Note − Understanding and effectively utilizing the "autoscan" command can significantly enhance the efficiency of your Linux workflow.
Alternatives of autoscan Command in Linux
If you're looking for alternatives to "autoscan" on Linux, you might consider using tools like "autoconf" and "automake", which offer more features and flexibility. The "autoconf" tool, for instance, can be used to create scripts for configuring software before compilation, making it adaptable to many kinds of Unix-like systems.
Another option is the "alternatives" command, which manages symbolic links to select default commands, providing a way to maintain different versions of a program within the system. It's important to choose the right tool based on the specific requirements of your project and the level of control you need over the configuration process. Each tool has its own set of features and benefits, so understanding your workflow and the needs of your software will guide you to the best choice.
Conclusion
The "autoscan" command is a powerful ally in the Linux developer's toolkit. It streamlines the initial steps of software compilation and can significantly reduce the time spent on configuring software for different systems. By understanding and utilizing the "autoscan" command effectively, developers can improve the efficiency and portability of their software across various Linux distributions.
For a more comprehensive guide on the "autoscan" command, including detailed examples and advanced options, you can refer to the official site. These platforms provide in-depth tutorials that can help both beginners and experienced users alike to master the use of "autoscan" in their development workflow.