- Unix Commands Reference
- Unix Commands - Home
djpeg Command in Linux
The Linux djpeg command decompresses the JPEG file to an uncompressed image file such as PPM, PGM, BMP, or TARGA. The JPEG format uses the lossy compression method to compress images. This technique reduces the size of the image by discarding some of the image data. This format makes the image files more suitable for websites.
It's important to note that once an image file is compressed, it cannot be fully uncompressed. However, the compressed format can be converted to an uncompressed format, but the lost quality cannot be recovered. This process is useful for editing the image without further losing the quality.
Table of Contents
Here is a comprehensive guide to the options available with the djpeg command −
- Prerequisites of Using djpeg Command
- Syntax of djpeg Command
- djpeg Command Options
- Examples of djpeg Command in Linux
Prerequisites of Using djpeg Command
To use the djpeg command in Linux, it must be installed. It is a part of the libjpeg library, which is used to manipulate JPEG files.
To install it on Ubuntu, Debian, or Debian-based distributions, run −
sudo apt install libjpeg-progs
To install it in Arch Linux −
sudo pacman -S libjpeg-turbo
For CentOS −
sudo yum install libjpeg-turbo
To get it on Fedora, run −
sudo dnf install libjpeg-turbo-utils
To verify, check the djpeg command binary file −
which djpeg

Syntax of djpeg Command
The syntax of the Linux djpeg command is as follows −
djpeg [options] [filename]
The [options] field is used to specify the options to modify the behavior of the output. While [filename] indicates the input file name.
djpeg Command Options
The options used with the djpeg command are listed in the following table −
| Options | Description |
|---|---|
| -colors N | It reduces the number of colors in an image to N |
| -quantize N | It is similar to the -colors option but is used for backward compatibility |
| -fast | It sets the processing option to fast (low quality) |
| -grayscale | It is used to get the grayscale output (to view images on monochrome displays) |
| -scale M/N | To scale the image by M/N factor (must be 1/1, 1/2, 1/3, 1/4 or 1/8) |
| -bmp | It selects the Bitmap (BMP) as output format (Windows Flavor) (8-bit file will be emitted if -colors or -grayscale options are used, otherwise 24-bit) |
| -gif | It selects the GIF as the output format. |
| -os2 | It selects the BMP as output format (OS/2 1.x Flavor) |
| -pnm | It selects Portable Anymap (Portable Pixmap (PPM)/ Portable Gray (PGM)) as the output format, (8-bit color mapped file (PGM) will be emitted if -colors or -grayscale options are used, otherwise PPM) |
| -rle | It selects RLE (Run Length Encoding) as the output format |
| -targa | It selects Targa as the output format |
| -dct | It is used to specify the DCT (Discrete Cosine Transform) methods (int, fast, float) |
| -dither | It is used to specify the dithering method (fs, ordered, none) |
| -map file | It is used to specify the color map file |
| -nosmooth | It is used for a faster and lower-quality upsampling routine |
| -onepass | It specifies to use one-pass instead of two-pass for color quantization (it is faster and needs fewer resources) |
| -maxmemory N | It is used to specify the maximum memory to process large images (e.g., 2m is equal to 2000000 bytes) |
| -outfile file | It saves the output image by the specified file name instead of sending it to the standard output |
| -verbose | It enables debug printouts |
| -debug | It is similar to -verbose option |
| -help | It displays help related to the command |
Examples of djpeg Command in Linux
This section demonstrates the use of the djpeg command on Linux using various examples −
- Decompressing JPEG Files to Various Uncompressed Formats
- Reducing the Colors
- Converting to Grayscale
- Scaling the Image Size
- Using DCT Methods
- Decompressing using Multiple Options
Decompressing JPEG Files to Various Uncompressed Formats
To decompress the JPEG files to different formats, the djpeg utility comes with various options. djpeg supports various uncompressed image formats such as BMP, Targa, PNM, RLE, GIF, and OS2.
To save the JPEG or JPG image to an uncompressed format BMP (Bitmap), use the following command −
djpeg -bmp image.jpg > output_image.bmp

To verify whether the image has been uncompressed or not, its size can be checked −
ls -lh

As can be seen, the decompressed file is significantly larger than the compressed JPG.
To get detailed information use ImageMagick’s identify tool. It even tells whether the images are compressed or uncompressed −
identify -verbose output_image.bmp | grep Compression
If the image is not compressed the output shows None, if it is compressed then it will show the compression type.

Similarly, to decompress the JPEG image to TARGA format, use −
djpeg -targa image.jpg > output_image.tga
To decompress in PPM format −
djpeg -pnm image.jpg > output_image.ppm
Reducing the Colors
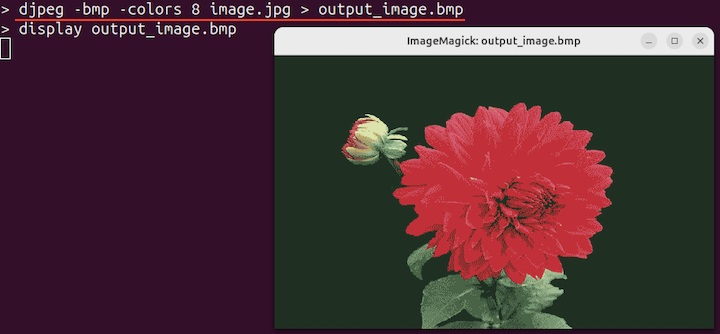
Reducing the colors in the image helps display the image on specific displays. It also reduces the size of the image. Using djpeg the -colors option is used to reduce the colors.
In the following example, a JPG file is uncompressed to BMP format with only 8 colors.
djpeg -bmp -colors 8 image.jpg > output_image.bmp

Note that the image cannot be quantized in less than 8 colors.
Converting to Grayscale
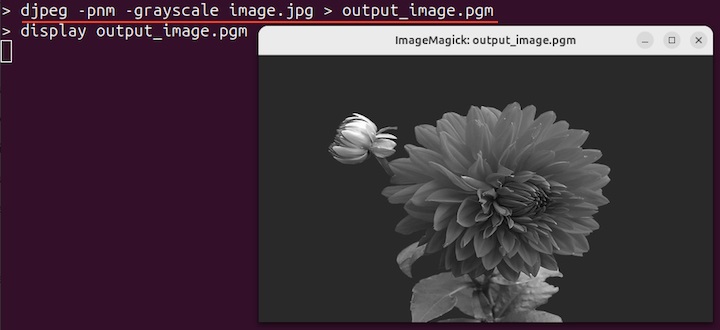
To decompress the JPEG or JPG files to grayscale images, use the -grayscale option. The PGM file extension is recommended to save the grayscale image. This format is specifically designed for grayscale images.
djpeg -pnm -grayscale image.jpg > output_image.pgm

Using a PGM file will take up less storage because PPM keeps three values (R, G, B) per pixel, while PGM keeps only 1 value per pixel. For instance, a grayscale image of 200x200 will use 120,000 (3x200x200) values in PPM format, while in PGM, it will only use 40000 (1x200x200).
Scaling the Image Size
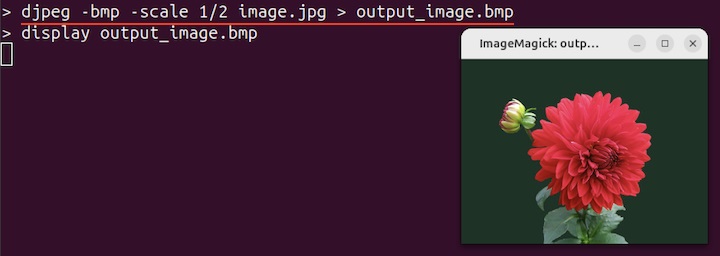
The -scale option is used with a scaling factor to scale the image while decompressing it. For example, to decompress the JPEG image to BMP format and scale it to half of its original size, then use −
djpeg -bmp -scale 1/2 image.jpg > output_image.bmp

Similarly, other sizes are 1/4 and 1/8.
Using DCT Methods
The Discrete Cosine Transform or DCT is a mathematical algorithm also used in image processing. It is largely used to compress the images to JPEG by converting the spatial data to the frequency domain. It can also be used to decompress the image.
For decompression, IDCT methods are applied also known as Inverse Discrete Cosine Transform. The IDCT converts the frequency domain data back to spatial data.
Three options can be applied to decompress the JPEG images −
- Integer DCT
- Fast DCT
- Float DCT
The Integer DCT is the default method. Fast DCT is good but less accurate, while Float DCT is accurate but slower. In the following example, the fast DCT is applied for decompression −
djpeg -bmp -dct fast image.jpg > output_image.bmp
To use float DCT, run −
djpeg -bmp -dct float image.jpg > output_image.bmp
Decompressing using Multiple Options
The image decompression can also be done with multiple djpeg options. In the following command, the image is scaled down to 1 fourth of the original size, the decompression format is TARGA, while colors are reduced to 128.
djpeg -targa -scale 1/4 -colors 128 -onepass -nosmooth image.jpg > output_image.tga

In the same manner, multiple options can be used to achieve the desired output.
Conclusion
The djpeg command on Linux decompresses the JPEG file to uncompressed formats. It does not improve the quality of the image; it simply converts the image to an uncompressed format for further manipulation.
The djpeg supports various file formats to convert JPEG files. This tutorial discussed the djpeg command, its installation, syntax, and usage using different examples.