- Unix Commands Reference
- Unix Commands - Home
bounce Command in Linux
The bounce daemon operates automatically as part of the Postfix mail processing workflow. It maintains per-message log files in a directory named after the queue file and handles bounce notifications automatically.
You cannot manually run the bounce daemon; instead, you can interact with it through Postfix’s mail queue management and monitoring tools, such as postqueue, postfix and postsuper.
Each log file is named after the queue file it corresponds to. These log files are stored in a queue subdirectory named after the service name defined in the master.cf configuration file. The service names can be either bounce, defer, or trace.
The bounce daemon handles two types of service requests −
| Tag | Description |
|---|---|
| 0 | Append a recipient (non-)delivery status record to a per-message log file. |
| 0 | Enqueue a bounce message, including a copy of the per-message log file and the corresponding original message. When the bounce message is successfully enqueued, the per-message log file is deleted. |
Even if the log file or original message cannot be read, the daemon makes a best effort to send non-delivery notifications.
Clients (such as bounce, defer, or trace clients) can request log file deletion when an operation fails. This feature is useful for clients that cannot retry transactions on their own and rely on retry logic in their own client.
Standards
The following are RFCs (Request for Comments), which collectively define the structure, encoding, and reporting of email messages, ensuring clarity in email communication.
- RFC 822 (ARPA Internet Text Messages)
- RFC 2045 (Format of Internet Message Bodies)
- RFC 2822 (ARPA Internet Text Messages)
- RFC 3462 (Delivery Status Notifications)
- RFC 3464 (Delivery Status Notifications)
- RFC 3834 (Auto-Submitted: message header)
Table of Contents
Here is a comprehensive guide to the options available with the bounce command −
Configuration Parameter for the bounce Command
The changes to main.cf can be picked up automatically by Postfix, as bounce(8) processes run for only a limited amount of time. You can use the postfix reload command, which is the standard way to ensure that your changes are applied immediately.
The following are configuration parameters you can set using the bounce command −
| Tag | Description |
|---|---|
| 2bounce_notice_recipient (postmaster) | This parameter specifies the recipient (usually the postmaster) who will receive notifications about undeliverable mail that cannot be returned to the sender. |
| backwards_bounce_logfile_compatibility (yes) | When set to “yes,” Postfix produces additional bounce(8) logfile records that can be read by older Postfix versions (before version 2.0). |
| bounce_notice_recipient (postmaster) | This parameter designates the recipient (typically the postmaster) for notifications containing message headers of mail that Postfix did not deliver and SMTP conversation transcripts of mail that Postfix did not receive. |
| bounce_size_limit (50000) | Specifies the maximum amount of original message text that is sent in a non-delivery notification (bounce message). |
| bounce_template_file (empty) | If configured, this parameter points to a file containing bounce message templates. These templates are used when generating bounce messages. |
| config_directory (see ’postconf -d’ output) | This parameter indicates the default location of the Postfix main.cf and master.cf configuration files. The actual path depends on your system’s configuration. |
| daemon_timeout (18000s) | Sets the maximum time a Postfix daemon process can take to handle a request before it is terminated by a built-in watchdog timer (18,000 seconds in this case). |
| delay_notice_recipient (postmaster) | This parameter specifies the recipient of postmaster notifications with the message headers of mail that cannot be delivered within $delay_warning_time time units. |
| deliver_lock_attempts (20) | Determines the maximum number of attempts to acquire an exclusive lock on a mailbox file or bounce(8) logfile during mail delivery. |
| deliver_lock_delay (1s) | Specifies the time delay between attempts to acquire an exclusive lock on a mailbox file or bounce(8) logfile during mail delivery. |
| ipc_timeout (3600s) | Sets the time limit for sending or receiving information over an internal communication channel. |
| internal_mail_filter_classes (empty) | This parameter defines the categories of Postfix-generated mail that are subject to before-queue content inspection by non-SMTPD milters, header checks, and body checks. When empty, it means no specific classes are targeted for filtering. |
| mail_name (Postfix) | The mail_name parameter specifies the mail system name that appears in various places, such as the “Received:” headers, the SMTP greeting banner, and bounced mail notifications. |
| max_idle (100s) | Determines the maximum amount of time an idle Postfix daemon process waits for the next service request before exiting. |
| max_use (100) | Sets the maximum number of connection requests a Postfix daemon process can handle before terminating. |
| notify_classes (resource, software) | Specifies the error classes that are reported to the postmaster. |
| process_id (read-only) | Indicates the process ID (PID) of a Postfix command or daemon process. |
| queue_directory (see ’postconf -d’ output) | Refers to the location of the Postfix top-level queue directory. |
| syslog_facility (mail) | The syslog facility of Postfix logging. |
| syslog_name (postfix) | The mail system name that is prepended to the process name in syslog records, so that "smtpd" becomes, for example, "postfix/smtpd". |
Examples of Postfix’s Mail Queue Management
In this section, we’ll explore various examples of Postfix’s mail queue management.
- Appending a Recipient (non-)delivery Status Record
- Enqueuing a Bounce Message
- Specify a Custom Bounce Notice Recipient in Postfix
- Set bounce_queue_lifetime
- Set default_process_timeout
- Set queue_run_delay
- Set minimal_backoff_time
- Enable Compatibility with Older Postfix Versions for Additional Log File Records
- Specify a Different Recipient for Delay Notifications
- List Bounce Logs with Default Parameters
Appending a Recipient (non-)delivery Status Record
To append a recipient (non-delivery) status record to a per-message log file, you can use the following syntax −
sudo echo "Recipient: [email protected] Status: Delivered at 2024-08-05 12:34:56" >> /var/log/maillog

Now, verify that your message has been appended to the log file by viewing its contents −
cat /var/log/maillog

Enqueuing a Bounce Message
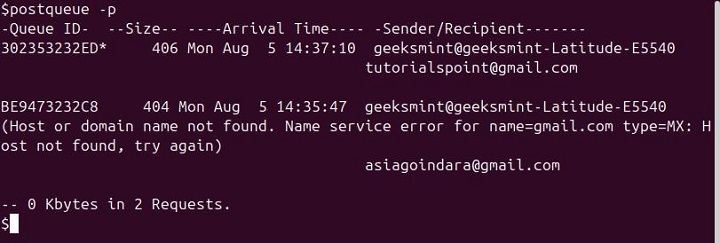
To enqueue a bounce message, you can use the postqueue command. First, find the queue ID of the original message using the following command −
postqueue -p

Then, enqueue the bounce message with the following command −
postqueue -i 302353232ED
Replace 302353232ED with your actual queue ID.

Specify a Custom Bounce Notice Recipient in Postfix
When you send an email, the Return-Path (also known as the envelope FROM) address designates where bounced messages and other feedback are sent.
To specify a custom bounce notice recipient in Postfix, first edit your Postfix configuration file (/etc/postfix/main.cf).
Add or modify the bounce_notice_recipient parameter to set the desired email address. For instance −
bounce_notice_recipient = [email protected]
Save the changes and reload Postfix with Service with the postfix reload command.
To verify that the new setting is in place, you can use the postconf command to check the current configuration −
postconf bounce_notice_recipient
Now, when you send a bounce mail, you’ll receive notifications at [email protected].

Set bounce_queue_lifetime
To adjust how long Postfix will hold undeliverable mail in its queue, you can modify the bounce_queue_lifetime parameter. By default, this limit is set to 5 days. To change it to 3 days, you can use the following command −
sudo postconf -e 'bounce_queue_lifetime = 2d'

To verify if the configuration is correctly configured, use the following command −
postconf bounce_queue_lifetime

Make sure to reload Postfix to apply the changes.
Set default_process_timeout
To adjust the maximum idle time for Postfix processes, modify the default_process_timeout parameter. By default, this value is unlimited (0 seconds). To set it to 5 minutes, you can simply use the following command −
sudo postconf -e 'default_process_timeout = 5m'

To confirm that the parameter has been correctly configured, use the postconf command to check its current value −
postconf default_process_timeout

Make sure to reload Postfix to apply the changes.
Set queue_run_delay
To adjust the interval between queue scans for deferred messages in Postfix, modify the queue_run_delay parameter. By default, this value is set to 1000 seconds (1000s). To change it to 300 seconds, run the following command −
sudo postconf -e 'queue_run_delay = 300s'

To check if the queue_run_delay parameter has been set correctly, use the postconf command to query its value −
postconf queue_run_delay

Set minimal_backoff_time
To adjust the interval between attempts to deliver deferred messages in Postfix, modify the minimal_backoff_time parameter. By default, this value is set to 1000 seconds (1000s). To change it to 500 seconds, run the following command −
sudo postconf -e 'minimal_backoff_time = 500s'

To check if minimal_backoff_time has been set correctly, use the postconf command to query its value −
postconf minimal_backoff_time

To ensure that Postfix applies the new configuration, reload Postfix.
Enable Compatibility with Older Postfix Versions for Additional Log File Records
Older versions of Postfix may have different logging formats or requirements. To ensure compatibility, you can adjust the logging settings via the command line using the postconf utility −
To set the smtpd_verbose_loglevel, you can simply use the following command −
sudo postconf -e 'smtpd_verbose_loglevel = 5'
This parameter controls the verbosity of logging for SMTP daemon operations. Increasing its value will produce more detailed logs, which can improve compatibility with older versions.

To check if the smtpd_verbose_loglevel parameter has been set correctly, use the postconf command to query its value −
postconf smtpd_verbose_loglevel

To apply the new configuration, you need to reload Postfix.
To also adjust the level of detail in Postfix logs for specific peers, you can modify the debug_peer_level parameter.
By default, this value is set to 2, which provides basic logging information. To increase the verbosity, you can use the following syntax −
sudo postconf -e 'debug_peer_level = 6'

To check if debug_peer_level has been set correctly, use the postconf command to query its value −
postconf debug_peer_level

Make sure to reload Postfix to apply the new configuration.
Specify a Different Recipient for Delay Notifications
To specify a different recipient for delay notifications in Postfix, you need to configure Postfix's delay_notice_recipient parameter in its configuration file.
To get started, open the main.cf file using your preferred text editor −
sudo nano /etc/postfix/main.cf
Add or modify the parameter to specify the email address that should receive delay notifications.
delay_notice_recipient = [email protected]
Save the changes and exit the text editor.
After making changes to the configuration file, you need to reload or restart Postfix to apply the new settings.
To verify that the delay_notice_recipient parameter is correctly configured, you can use the following command −
postconf delay_notice_recipient
This means that delay notifications will be sent to [email protected].

List Bounce Logs with Default Parameters
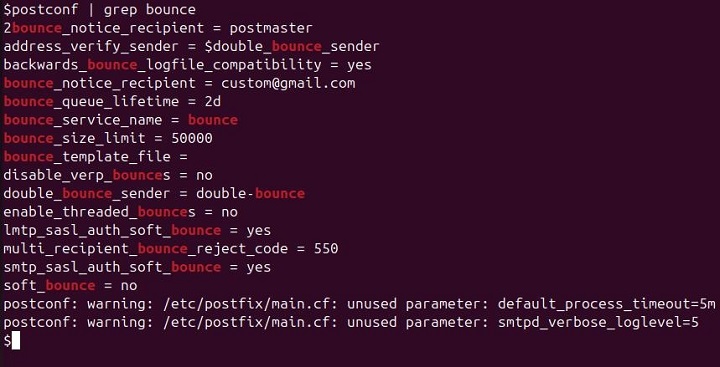
To view the bounce-related configuration parameters, you can use the following command −
postconf | grep bounce
This command will display the default parameters from your main.cf.

Conclusion
Configuring Postfix to handle bounce and delay notifications involves setting specific parameters in the main.cf file. The bounce_notice_recipient parameter controls where bounce notifications are sent for undelivered emails, while the delay_notice_recipient parameter manages where delay notifications are directed.
For monitoring and adjusting settings, use commands like postconf to view current parameters and ensure proper logging. This setup helps manage email delivery notifications efficiently, directing them to the correct recipients for prompt action and oversight.