- Unix Commands Reference
- Unix Commands - Home
badblocks Command in Linux
The badblocks command is a powerful command-line utility used in Linux to scan for bad blocks (corrupted memory areas that are damaged or faulty), usually a disk partition on storage devices such as a hard disk drive or a solid-state drive.
These bad blocks might be a sign of deteriorating storage media or hardware problems.
Table of Contents
- Syntax of badblocks command
- Different options available for the badblocks command
- Examples of badblocks Command
Syntax of the badblocks Command
The following is the basic syntax for the badblock command −
badblocks [options] device [last_block [first_block]]
You can use different flags in place of [options] to change the working of the badblocks command.
- device is the corresponding name of your system (e.g /dev/sda1).
- last-block is the last block to be checked.
- start-block is an optional line indicating the starting block number for the test. It enables the testing to begin in the middle of the disk.
Different Options Available for the badblocks Command
The following options will help you perform more operations using the badblocks command.
| Tag | Description |
|---|---|
| -b block-size | Specifies the block size (default is 1024 bytes). |
| -c number of blocks | Determines the number of blocks tested at a time (default is 64 blocks). |
| -f | Forces the test even if the device is mounted (not recommended). |
| -i input_file | Provides a list of already existing known bad blocks. Badblocks will skip testing these blocks since they are known to be bad. |
| -o output_file | Writes the list of bad blocks to a file. |
| -p num_passes | Repeat scanning the disk until there are no new blocks discovered in num_passes consecutive scans of the disk. The default value is 0, which means that badblocks will exit after the first pass. |
| t test_pattern | Specify a test pattern to be read (and written) to disk blocks. The test_pattern may either be a numeric value between 0 and ULONG_MAX-1 inclusive, or the word "random", which specifies that the block should be filled with a random bit pattern. |
| -n | Performs a non-destructive read-write test (does not erase data) |
| -s | Show the progress of the scan by writing out the block numbers as they are checked. |
| -v | Verbose mode. |
| -w | Performs a read-write test by writing patterns to every block (erases data) |
Examples of badblock Command
Now, let’s explore a few examples to help you understand how badblocks command operates.
- Display the Progress
- Specify the Block Size
- Specify the number of Blocks
- Force a Test
- Perform a Non-destructive Read-Write Test
- Erase Data
- Write a List of Bad Blocks to a File
- Write an Input File that includes Known Badblocks
- Specify Blocks to Test
Display the Progress
To display the current progress of the test, we’ll use the "-s" flag as shown below −

Specify the Block Size
In the following example, we’re going to specify the block size with the "-b" flag. Open your terminal, and run −

Specify the number of Blocks
To specify the number of blocks to be tested at a time, we'll use the "-c" flag −

Force a Test
To force a test even if the device is mounted, we'll run the badblocks command with the "-f" flag −

Note − This option is not recommended because badblocks does not run tests on a device if it is mounted. Even if the device is mounted, the "-f" option will force it to perform the test, which may damage the file system.
Perform a Non-destructive Read-Write Test
To perform a non-destructive read-write test on a device, we'll use the "-n" flag −

This option does not erase data on the device.
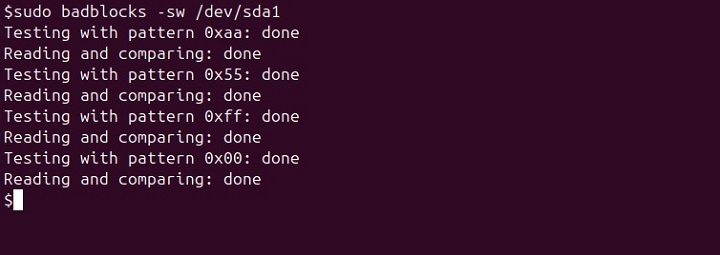
Erase Data
To erase data on a device and perform test processing at a faster rate as compared to the "-n" option, we'll use the "-w" flag −

Write a List of Bad Blocks to a File
To write a list of bad blocks to a file, we'll use the "-o" flag −

Write an Input File that includes Known Badblocks
To write an input file that includes a list of known bad blocks on a device, we'll use the "-i" flag −

Specify Blocks to Test
last block − we'll specify it by passing the last block as an option after the device name.

first block − we'll specify it by passing the starting block number to test as an option after the last block.
sudo badblocks -s /dev/sda1 300 100

Conclusion
The badblocks command is a flexible tool you can use to identify and monitor the health of disk drives by detecting any faulty or damaged blocks. It's crucial to utilize it carefully, as it may result in data loss, especially when using it in write mode.
That's it, hope this guide will help you gain a solid understanding of the Linux badblocks command.