- Unix Commands Reference
- Unix Commands - Home
dump Command in Linux
The Linux dump command backs up the filesystem to a storage device. The storage device can be a tape or any disk. It examines the filesystem and determines which file needs to be backed up. Moreover, it can perform both full backup and incremental backup.
To prevent data loss due to hardware failure, data backup is crucial. Various command line utilities can backup data on Linux and the dump is one of them. It is one of the most efficient and reliable command line utilities for filesystem backup. It is important to note that it is designed for ext2/ext3 filesystems and will not work with FAT or other filesystems.
Table of Contents
Here is a comprehensive guide to the options available with the dump command −
- Prerequisites to Use the dump Command
- Syntax of dump Command
- dump Command Options
- Understanding the Dump Levels
- Examples of dump Command in Linux
Prerequisites to Use the dump Command
By default, the dump command may not be installed in Linux, you need to install it.
To install the dump command line utility in Ubuntu, Debian, and Debian-based distributions, use the following command −
sudo apt install dump
To install it on RHEL or distributions based on it, enable EPEL −
sudo dnf install epel-release
sudo dnf config-manager --set-enabled epel
To install dump, use the following command −
sudo dnf install dump
To verify the installation of the dump utility, check its version by executing the dump command without any option −

Syntax of dump Command
The syntax of the Linux dump command is as follows −
dump [options] -f [file] [filesystem]
The [options] field is used to specify the options to change the behavior of the command.
The -f flag is used to specify the [file] to write the backup. While the [filesystem] option is used to specify the filesystem to be backed up.
dump Command Options
The options of the dump command are listed in the following table −
| Flag | Description |
|---|---|
| -level# | It is used to specify the dump level integer 0-9 (0 for full backup, 1-9 for incremental backup) |
| -a | It is used to bypass tape length calculation; also known as auto-size |
| -A file | It is used to archive the dump table of contents specified in a file |
| -b blocksize | It is used to specify the block size; number of KBs per dump record |
| -d density | It is used to set the tape density; the default is 1600 BPI |
| -D file | It is used to set the path of the file storing information about dumps |
| -e inodes | It is used to exclude inodes from the dump |
| -E file | It is used to read the list of inodes in a file that needs to be excluded |
| -f file | It writes a backup to the specified file; the file can be a device, tape device, or any other |
| -F script | It is used to run the script at the end of each tape |
| -h level | It is used to set the honor level at which nodump flag should be honored; the default honor level is 1 |
| -I nr errors | To change the number of read errors to be ignored |
| -j compression level | It is used to specify the compression level to compress every block written on a tape using bzlib library |
| -M | It is used to enable multi-volume feature |
| -q | It is used to abort the dump immediately |
| -S | It is used to determine the space needed to perform the backup |
| -T date | It is used to specify the date before starting the dump instead of looking at the /etc/dumpdates file |
| -u | It updates the file /etc/dumpdates after the dump |
| -v | It is used to get the verbose output |
| -W | It is used to display the filesystem that needs to be dumped |
| -w | It is equivalent to -W; but it only displays the recognized filesystem from /etc/mtab and /etc/fstab |
| -y | It is used to compress every block using lzo library |
| -z compression level | It is used to compress every block using zlib library (default compression level is 2) |
Understanding the Dump Levels
To create a backup using the dump command, it is crucial to understand the dump levels.
- Level 0 − It is used to create a full backup. It backs up the entire specified filesystem.
- Level 1-9 − These levels are used for incremental backups to back up the new or modified files only. Note that the -9 level is used for differential backup with respect to the last full backup.
Examples of dump Command in Linux
This section demonstrates the usage of the dump command in Linux with examples −
- Creating a Full Backup
- Creating an Incremental Backup
- Listing the Filesystem to be Dumped
- Setting Block Size for Backup
- Setting Automatic Block Size
- Setting Compression Level
- Identifying the Dump Space before Performing Dump
- Modifying the Read Error Number
- Archiving the Dump Table of Contents
Creating a Full Backup
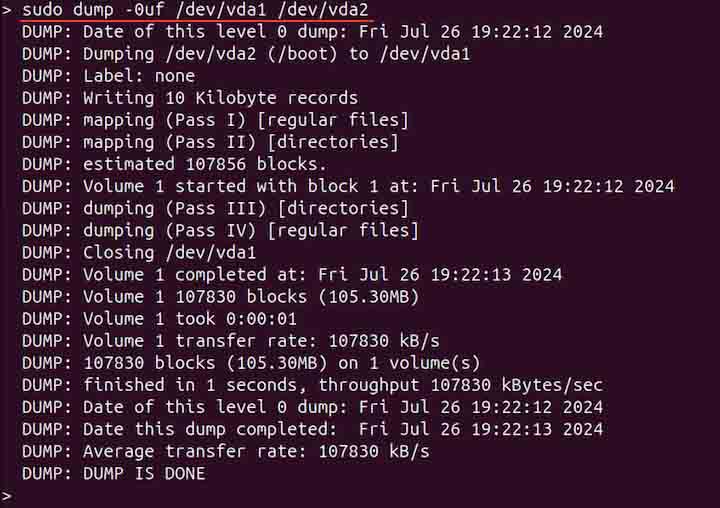
To create a full backup of a filesystem, use level 0. For example, to back partition /dev/vda2 to /dev/vda1, use −
sudo dump -0uf /dev/vda1 /dev/vda2

In the above command, -0 shows the dump level, the -u flag updates the /etc/dumpdates after the backup, while -f is used to specify the output filesystem (dev/vda1).
Creating an Incremental Backup
To create an incremental filesystem backup, change the dump level from 0 to 1. It backs up the changes since the last backup which is 0.
sudo dump -1uf /dev/vda1 /dev/vda1
If it is 2, then it backs up the changes and modifications since level 1 instead of 0.
Listing the Filesystem to be Dumped
To determine which filesystem to be dumped, use the -W option −
sudo dump -W

Setting Block Size for Backup
To set the block size for backup, use the -b option. The block size indicates the number of kilobytes per dump record. The default block size is 10. To set it to 64, use −
sudo dump -b 64 -0uf /dev/vda1 /dev/vda2
Setting Automatic Block Size
To bypass the tape length calculations, use the -a option which stands for auto-size.
sudo dump -0uaf /dev/vda1 /dev/vda2
This option is recommended when appending to an existing tape.
Setting Compression Level
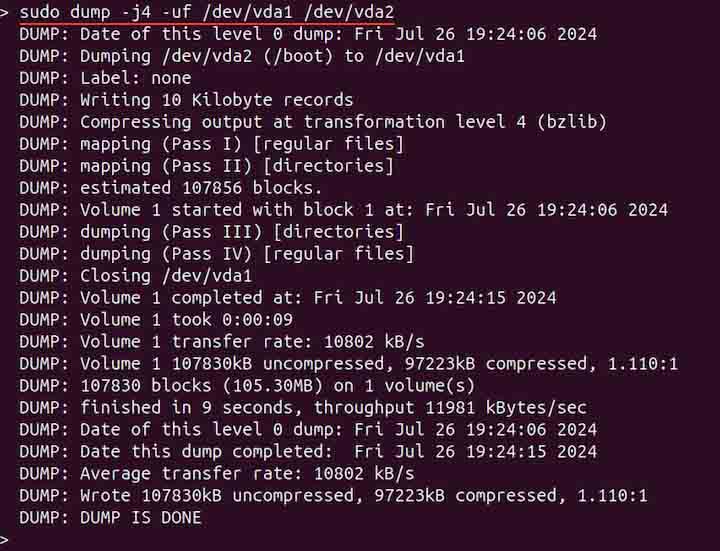
The dump command offers various compression libraries, such as lzo, bzlib, and zlib. To compress every block using bzlip library, use the -j option −
sudo dump -j4 -uf /dev/vda1 /dev/vda2

The 4 with -j option indicates the compression level.
Similarly, to use the zlib library at compression level 4, use the -z option −
sudo dump -z4 -uf /dev/vda1 /dev/vda2
To compress the blocks using the lzo library, use the -y option −
sudo dump -y -uf /dev/vda1 /dev/vda2
Identifying the Dump Space before Performing Dump
To determine the dump space before performing it, use the -S option. For instance, to estimate the amount of space required to backup /dev/vda2 filesystem, execute −
sudo dump -S /dev/vda2

Modifying the Read Error Number
By default, the dump command ignores the 32 read errors before reporting. To modify it, use the -I option −
sudo dump -I 40 -0uf /dev/vda1 /dev/vda2

The dump now ignores the first 40 read errors before reporting to the operator.
Archiving the Dump Table of Contents
To archive the dump table of contents to a file, use the -A option with the file name −
sudo dump -A file.txt -0uf /dev/vda1 /dev/vda2

This file is used to restore the backup using the restore command to check if specific files are included in the backup being restored.
Conclusion
The dump command on Linux is used to back up the filesystem. It is designed for ext2 and ext3 filesystems. It is a handy command line utility that offers both full and incremental backups. It also comes with various options to change the block size, identify the filesystem to be backed up, and specify the block compression level.
In this tutorial, we covered the Linux dump command, its installation, syntax, options, and usage through various examples.