- Kivy 教程
- Kivy - 首页
- Kivy 基础
- Kivy - 快速入门
- Kivy - 安装
- Kivy - 架构
- Kivy - 文件语法
- Kivy - 应用
- Kivy - Hello World
- Kivy - 应用生命周期
- Kivy - 事件
- Kivy - 属性
- Kivy - 输入
- Kivy - 行为
- Kivy 按钮
- Kivy - 按钮
- Kivy - 按钮事件
- Kivy - 按钮颜色
- Kivy - 按钮大小
- Kivy - 按钮位置
- Kivy - 圆形按钮
- Kivy - 禁用按钮
- Kivy - 图片按钮
- Kivy 组件
- Kivy - 组件
- Kivy - 标签
- Kivy - 文本输入
- Kivy - 画布
- Kivy - 直线
- Kivy - 复选框
- Kivy - 下拉列表
- Kivy - 窗口
- Kivy - 滚动视图
- Kivy - 轮播图
- Kivy - 滑块
- Kivy - 图片
- Kivy - 弹出框
- Kivy - 开关
- Kivy - 微调器
- Kivy - 分隔器
- Kivy - 进度条
- Kivy - 气泡
- Kivy - 标签面板
- Kivy - 散点图
- Kivy - 手风琴
- Kivy - 文件选择器
- Kivy - 颜色选择器
- Kivy - 代码输入
- Kivy - 模态视图
- Kivy - 切换按钮
- Kivy - 相机
- Kivy - 树视图
- Kivy - reStructuredText
- Kivy - 动作栏
- Kivy - 播放器
- Kivy - 模板视图
- Kivy - 虚拟键盘
- Kivy - 触摸涟漪
- Kivy - 音频
- Kivy - 视频
- Kivy - 拼写检查
- Kivy - 效果
- Kivy - 输入记录器
- Kivy - OpenGL
- Kivy - 文本
- Kivy - 文本标记
- Kivy - 设置
- Kivy 布局
- Kivy - 布局
- Kivy - 浮动布局
- Kivy - 网格布局
- Kivy - 箱式布局
- Kivy - 堆叠布局
- Kivy - 锚点布局
- Kivy - 相对布局
- Kivy - 页面布局
- Kivy - 循环布局
- Kivy - 布局嵌套
- Kivy 高级概念
- Kivy - 配置对象
- Kivy - 图集
- Kivy - 数据加载器
- Kivy - 缓存管理器
- Kivy - 控制台
- Kivy - 动画
- Kivy - 多笔画
- Kivy - 时钟
- Kivy - SVG
- Kivy - UrlRequest
- Kivy - 剪贴板
- Kivy - 工厂
- Kivy - 手势
- Kivy - 语言
- Kivy - 图形
- Kivy - 绘制
- Kivy - 打包
- Kivy - Garden
- Kivy - 存储
- Kivy - 向量
- Kivy - 工具函数
- Kivy - 检查器
- Kivy - 工具
- Kivy - 日志记录器
- Kivy - 帧缓冲区
- Kivy 应用和项目
- Kivy - 绘图应用
- Kivy - 计算器应用
- Kivy - 计时器应用
- Kivy - 相机处理
- Kivy - 图片查看器
- Kivy - 贝塞尔曲线
- Kivy - 画布压力测试
- Kivy - 圆形绘制
- Kivy - 组件动画
- Kivy - 其他
- Kivy 有用资源
- Kivy - 快速指南
- Kivy - 有用资源
- Kivy - 讨论
Kivy - 按钮事件
按钮,就像 Kivy 中大多数 GUI 组件一样,被编程为响应特定类型的事件。按钮处理以下事件类型:
on_press - 按钮按下时触发。
on_release - 按钮释放时触发。
on_touch_down - 触摸事件在按钮上开始时触发。
on_touch_up - 触摸事件在按钮上结束时触发。
Kivy 的 EventDispatcher 类提供了一个 bind() 方法,该方法负责将事件委托给某个回调函数进行处理。
EventDispatcher.bind(self, **kwargs)
按钮(以及每个 Kivy 小部件)都继承了此方法。因此,我们可以将按钮对象绑定到任何回调事件处理函数。您还可以将属性绑定到回调。
绑定事件
下面是一种将按钮的 on_press 事件绑定到函数的典型方法:
def callback(instance):
   print('The button is being pressed')

btn1 = Button(text='Hello world')
btn1.bind(on_press=callback)
示例
在下面的示例中,我们将两个按钮放在 FloatLayout 中。每个按钮的“on_press”事件都绑定到 callback() 方法。
发生“on_press”事件的按钮的引用被传递到 callback() 方法,以便我们可以识别按下的按钮的标题。
from kivy.app import App
from kivy.uix.button import Button
from kivy.config import Config
from kivy.uix.floatlayout import FloatLayout

# Configuration
Config.set('graphics', 'width', '720')
Config.set('graphics', 'height', '400')
Config.set('graphics', 'resizable', '1')

class ButtonApp(App):
   def on_button_press(self, instance):
      print("{} Button pressed!".format(instance.text))

   def build(self):
      flo = FloatLayout()
      btn1 = Button(text= 'Hello World',
         background_color= [1,0,0,1],
         font_size= 20, underline= True,
         size_hint= (.4, .25),
         pos_hint= {'center_x':.5, 'center_y':.8})
      btn1.bind(on_press = self.on_button_press)

      btn2 = Button(text= 'Hello Python',
         color= [0,0,1,1], font_size= 20,
         size_hint= (.4, .25),
         pos_hint= {'center_x':.5, 'center_y':.2})
      flo.add_widget(btn1)
      btn2.bind(on_press = self.on_button_press)
      flo.add_widget(btn2)
      return flo

if __name__ == '__main__':
   ButtonApp().run()
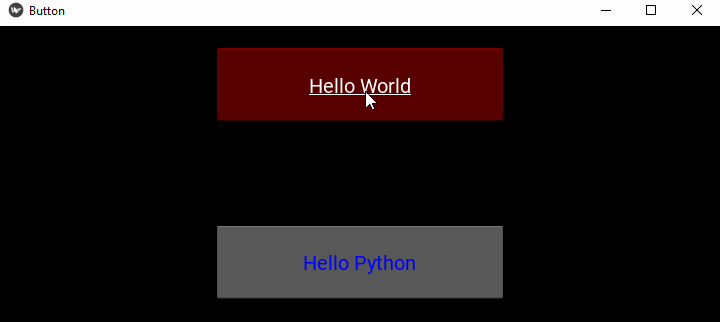
输出
运行以上代码并按下按钮:
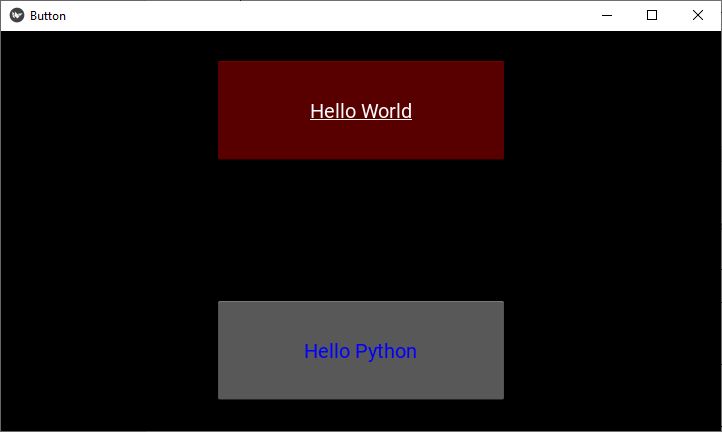
每次按下时,都会调用 callback() 方法:
Hello World Button pressed!
Hello Python Button pressed!
绑定属性
如前所述,我们可以将回调绑定到小部件的属性。每次属性值更改时,都会调用回调以通知更改。
btn1.bind(property=callback)
让我们在 App 类中定义另一个方法“on_textchanged()”,并将其与btn2的 text 属性绑定。btn1 上的 on_press 事件更改了btn2的标题,并且更改立即调用 on_textchanged() 方法。
示例
将ButtonApp类的代码更改如下:
from kivy.app import App
from kivy.uix.button import Button
from kivy.config import Config
from kivy.uix.floatlayout import FloatLayout

# Configuration
Config.set('graphics', 'width', '720')
Config.set('graphics', 'height', '400')
Config.set('graphics', 'resizable', '1')

class ButtonApp(App):
   def on_button_press(self, instance):
      print("{} Button pressed!".format(instance.text))
      self.btn2.text="Hello Tutorialspoint"

   def on_textchanged(self, instance, value):
      print ("Text property changed to", instance.text)

   def build(self):
      flo = FloatLayout()
      self.btn1 = Button(text= 'Hello World',
         background_color= [1,0,0,1],
         font_size= 20, underline= True,
         size_hint= (.4, .25),
         pos_hint= {'center_x':.5, 'center_y':.8})

      self.btn1.bind(on_press = self.on_button_press)
      self.btn2 = Button(text= 'Hello Python', color= [0,0,1,1],
         font_size= 20, size_hint= (.4, .25),
         pos_hint= {'center_x':.5, 'center_y':.2})
      flo.add_widget(self.btn1)
      self.btn2.bind(text = self.on_textchanged)
      flo.add_widget(self.btn2)
      return flo

if __name__ == '__main__':
   ButtonApp().run()
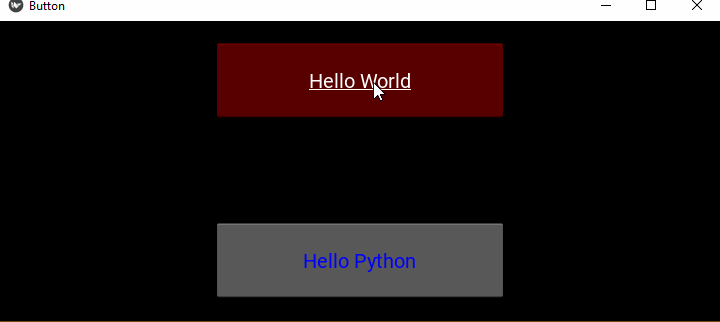
输出
运行代码,先按下btn1。它更改了btn2的标题,进而调用“on_textchanged()”方法。
Hello World Button pressed!
Text property changed to Hello Tutorialspoint
这是输出窗口:
通常,属性回调使用两个参数(对象和属性的新值)调用,而“事件回调”使用一个参数(对象)调用。
使用 Lambda 函数绑定
另一种绑定方法是使用 lambda(或匿名)函数。它们的优点是可以避免声明新函数,即它们提供了一种简洁的“重定向”回调的方法。
将绑定btn1的“on_press”事件的语句更改为:
self.btn1.bind(on_press = lambda btn1: self.on_button_press(btn1))
使用偏函数
在 Python 中,偏函数允许我们将具有 x 个参数的函数导出为具有较少参数的函数,并为较有限的函数设置常量值。它使函数可重用。partial() 函数定义在 Python 标准库的functools模块中。
示例
我们可以将事件绑定到偏方法。在下面的示例中,传递了 Button 对象bt1和btn2。该函数交换两者的 text 属性。
from kivy.app import App
from kivy.uix.button import Button
from kivy.config import Config
from kivy.uix.floatlayout import FloatLayout
from functools import partial

# Configuration
Config.set('graphics', 'width', '720')
Config.set('graphics', 'height', '300')
Config.set('graphics', 'resizable', '1')

class ButtonApp(App):
   def on_textchanged(self, instance, value):
      print ("Text property changed to", instance.text)

   def a_function(self, *args):
      args[0].text, args[1].text = args[1].text, args[0].text

   def build(self):
      flo = FloatLayout()

      self.btn1 = Button(text= 'Hello World',
         background_color= [1,0,0,1],
         font_size= 20, underline= True,
         size_hint= (.4, .25),
         pos_hint= {'center_x':.5, 'center_y':.8})

      self.btn2 = Button(text= 'Hello Python',
         color= [0,0,1,1],
         font_size= 20,
         size_hint= (.4, .25),
         pos_hint= {'center_x':.5, 'center_y':.2})
      flo.add_widget(self.btn1)
      self.btn1.bind(on_press = partial(self.a_function, self.btn1, self.btn2))
      self.btn2.bind(text = self.on_textchanged)
      flo.add_widget(self.btn2)
      return flo

if __name__ == '__main__':
   ButtonApp().run()
输出
查看以下输出窗口,并观察按下第一个按钮如何交换两个按钮的文本: