- Kivy 教程
- Kivy - 首页
- Kivy 基础
- Kivy - 入门
- Kivy - 安装
- Kivy - 架构
- Kivy - 文件语法
- Kivy - 应用程序
- Kivy - Hello World
- Kivy - 应用生命周期
- Kivy - 事件
- Kivy - 属性
- Kivy - 输入
- Kivy - 行为
- Kivy 按钮
- Kivy - 按钮
- Kivy - 按钮事件
- Kivy - 按钮颜色
- Kivy - 按钮大小
- Kivy - 按钮位置
- Kivy - 圆形按钮
- Kivy - 禁用按钮
- Kivy - 图片按钮
- Kivy 组件
- Kivy - 组件
- Kivy - 标签
- Kivy - 文本输入
- Kivy - 画布
- Kivy - 线
- Kivy - 复选框
- Kivy - 下拉列表
- Kivy - 窗口
- Kivy - 滚动视图
- Kivy - 走马灯
- Kivy - 滑块
- Kivy - 图片
- Kivy - 弹出窗口
- Kivy - 开关
- Kivy - 旋转器
- Kivy - 分隔器
- Kivy - 进度条
- Kivy - 气泡
- Kivy - 选项卡面板
- Kivy - 散点图
- Kivy - 手风琴
- Kivy - 文件选择器
- Kivy - 颜色选择器
- Kivy - 代码输入
- Kivy - 模态视图
- Kivy - 切换按钮
- Kivy - 相机
- Kivy - 树形视图
- Kivy - reStructuredText
- Kivy - 操作栏
- Kivy - 媒体播放器
- Kivy - 模板视图
- Kivy - 虚拟键盘
- Kivy - 触摸涟漪
- Kivy - 音频
- Kivy - 视频
- Kivy - 拼写检查
- Kivy - 效果
- Kivy - 输入记录器
- Kivy - OpenGL
- Kivy - 文本
- Kivy - 文本标记
- Kivy - 设置
- Kivy 布局
- Kivy - 布局
- Kivy - 浮动布局
- Kivy - 网格布局
- Kivy - 箱式布局
- Kivy - 堆叠布局
- Kivy - 锚点布局
- Kivy - 相对布局
- Kivy - 页面布局
- Kivy - 回收布局
- Kivy - 布局嵌套
- Kivy 高级概念
- Kivy - 配置对象
- Kivy - 图集
- Kivy - 数据加载器
- Kivy - 缓存管理器
- Kivy - 控制台
- Kivy - 动画
- Kivy - 多笔画
- Kivy - 时钟
- Kivy - SVG
- Kivy - UrlRequest
- Kivy - 剪贴板
- Kivy - 工厂
- Kivy - 手势
- Kivy - 语言
- Kivy - 图形
- Kivy - 绘制
- Kivy - 打包
- Kivy - Garden
- Kivy - 存储
- Kivy - 矢量
- Kivy - 工具
- Kivy - 检查器
- Kivy - 工具
- Kivy - 日志记录器
- Kivy - 帧缓冲区
- Kivy 应用程序和项目
- Kivy - 绘图应用程序
- Kivy - 计算器应用程序
- Kivy - 计时器应用程序
- Kivy - 相机处理
- Kivy - 图片查看器
- Kivy - 贝塞尔曲线
- Kivy - 画布压力测试
- Kivy - 圆形绘制
- Kivy - 组件动画
- Kivy - 其他
- Kivy 有用资源
- Kivy - 快速指南
- Kivy - 有用资源
- Kivy - 讨论
Kivy - 页面布局
Kivy 中的 PageLayout 类与 Kivy 中的其他容器组件略有不同。使用 PageLayout,您可以创建一个简单的多页面布局,以便可以通过边框轻松地在页面之间翻转。
页面之间的过渡是通过从右侧或左侧的边框区域向内滑动完成的。由于 PageLayout 不支持 size_hint、size_hint_min、size_hint_max 或 pos_hint 属性,因此每个页面只能显示一个组件。但是,您可以通过将复合布局对象(如箱式布局、网格布局或浮动布局)放在单个页面中,在页面中放置多个组件。
PageLayout 类在“kivy.uix.pagelayout”模块中定义。
from kivy.uix.pagelayout import PageLayout
pg = PageLayout(**kwargs)
您可以将以下属性作为关键字参数定义为 PageLayout 构造函数 -
anim_kwargs - 用于构造动画的动画 kwargs。它是一个 DictProperty,默认为 {'d': .5, 't': 'in_quad'}。
border - 当前页面周围边框的宽度,用于在需要时显示前一个/下一个页面的滑动区域。它是一个 NumericProperty,默认为 50dp。
page - 当前显示的页面,它是一个 NumericProperty,默认为 0。
swipe_threshold - 用于触发滑动的阈值,以组件大小的比率表示。swipe_threshold 是一个 NumericProperty,默认为 0.5。
PageLayout 识别触摸事件,您可以覆盖以下事件处理程序 -
on_touch_down(touch) - 接收一个触摸按下事件,触摸参数为 MotionEvent 类。它返回一个布尔值。如果为 True,则触摸事件的调度将停止。如果为 False,则事件将继续调度到其余的组件树。
on_touch_move(touch) - 接收一个触摸移动事件。触摸位于父坐标系中。
n_touch_up(touch) - 接收一个触摸抬起事件。触摸位于父坐标系中。
这是一个简单的 PageLayout 示例。我们将三个按钮分别放置在不同的页面上。
class PageApp(App):
   def build(self):
      pg = PageLayout()
      btn1 = Button(text ='Page 1')
      btn2 = Button(text ='Page 2')
      btn3 = Button(text ='Page 3')
      pg.add_widget(btn1)
      pg.add_widget(btn2)
      pg.add_widget(btn3)
      return pg
运行时,显示标题为“page 1”的按钮。按住鼠标并从右向左滑动,以显示第二个和第三个页面。从左向右滑动将使前一个页面聚焦。

示例
在以下示例中,我们在 PageLayout 中添加了两个浮动布局。“kv”文件用于设计 UI。
首先,运行 PageLayout 应用程序的 Python 代码 -
from kivy.app import App
from kivy.uix.label import Label
from kivy.uix.button import Button
from kivy.uix.textinput import TextInput
from kivy.uix.floatlayout import FloatLayout
from kivy.uix.pagelayout import PageLayout
from kivy.config import Config

Config.set('graphics', 'width', '720')
Config.set('graphics', 'height', '400')
Config.set('graphics', 'resizable', '1')

class PageDemoApp(App):
   def build(self):
      pass

if __name__ == '__main__':
   PageDemoApp().run()
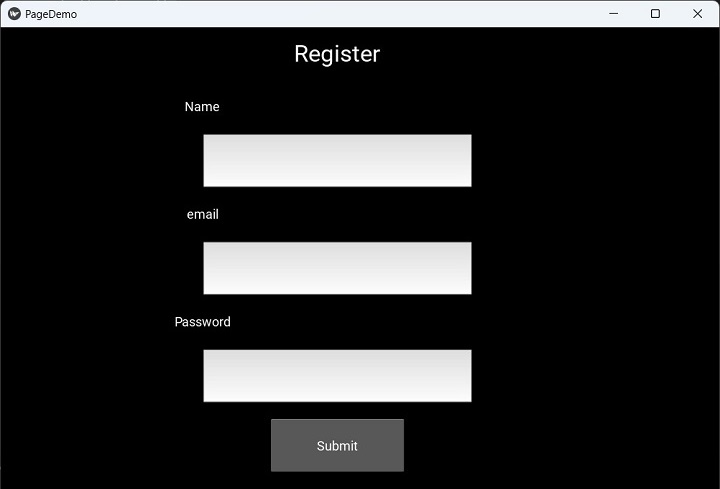
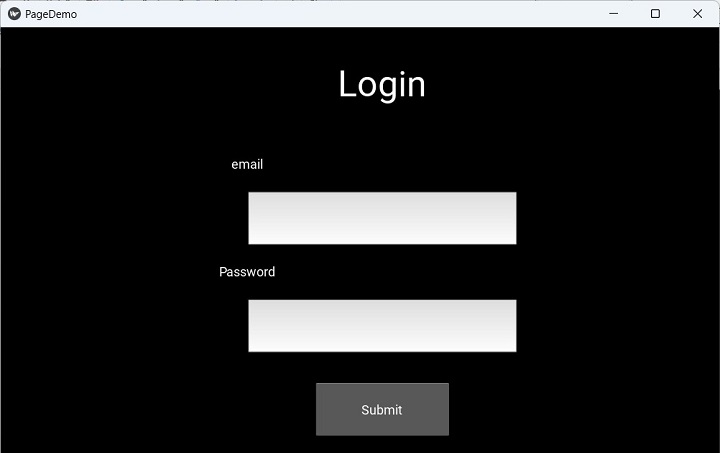
以下是“PageDemo.kv”文件脚本。PageLayout 嵌入了两个 FloatLayout 对象。上方的浮动布局是注册页面的设计,下方的浮动布局是第二个页面,包含登录屏幕。
PageLayout:
   FloatLayout:
      orientation:'vertical'
      Label:
         text:'Register'
         font_size:'20pt'
         pos_hint:{'center_x': .5, 'center_y': .9}
      Label:
         text:"Name"
         size_hint:(.2, .1)
         pos_hint:{'x':.2, 'y':.75}

      TextInput:
         size_hint:(.4, .1)
         pos_hint:{'x':.3, 'y':.65}

      Label:
         text:"email"
         size_hint:(.2, .1)
         pos_hint:{'x':.2, 'y':.55}

      TextInput:
         size_hint:(.4, .1)
         pos_hint:{'x':.3, 'y':.45}

      Label:
         text:"Password"
         size_hint:(.2, .1)
         pos_hint:{'x':.2, 'y':.35}

      TextInput:
         password:True
         size_hint:(.4, .1)
         pos:(400, 150)
         pos_hint:{'x':.3, 'y':.25}

      Button:
         text:'Submit'
         size_hint : (.2, .1)
         pos_hint : {'center_x':.5, 'center_y':.09}

   FloatLayout:
      orientation:'vertical'
      size:(720,400)
      canvas.before:
         Color:
            rgba: 0,0,0, 1
         Rectangle:
            pos: self.pos
            size: self.size

      Label:
         text:"Login"
         font_size: '30pt'
         pos_hint:{'center_x': .5, 'center_y': .75}
      Label:
      text:"email"
      size_hint:(.2, .1)
      pos_hint:{'x':.2, 'y':.55}

      TextInput:
         size_hint:(.4, .1)
         pos_hint:{'x':.3, 'y':.45}

      Label:
         text:"Password"
         size_hint:(.2, .1)
         pos_hint:{'x':.2, 'y':.35}

      TextInput:
         password:True
         size_hint:(.4, .1)
         pos:(400, 150)
         pos_hint:{'x':.3, 'y':.25}

      Button:
         text:'Submit'
         size_hint : (.2, .1)
         pos_hint : {'center_x':.5, 'center_y':.09}
输出
保存“PageDemoApp.py”和“PageDemo.kv”这两个文件,然后运行 Python 脚本。您应该首先看到注册页面。

现在,在应用程序窗口中从右向左滑动屏幕,使登录页面显示 -
