- Matplotlib 基础
- Matplotlib - 首页
- Matplotlib - 简介
- Matplotlib - 与 Seaborn 的比较
- Matplotlib - 环境搭建
- Matplotlib - Anaconda 发行版
- Matplotlib - Jupyter Notebook
- Matplotlib - Pyplot API
- Matplotlib - 简单绘图
- Matplotlib - 保存图形
- Matplotlib - 标记
- Matplotlib - 图形
- Matplotlib - 样式
- Matplotlib - 图例
- Matplotlib - 颜色
- Matplotlib - 颜色图
- Matplotlib - 颜色图归一化
- Matplotlib - 选择颜色图
- Matplotlib - 颜色条
- Matplotlib - 文本
- Matplotlib - 文本属性
- Matplotlib - 子图标题
- Matplotlib - 图片
- Matplotlib - 图片蒙版
- Matplotlib - 注释
- Matplotlib - 箭头
- Matplotlib - 字体
- Matplotlib - 什么是字体?
- 全局设置字体属性
- Matplotlib - 字体索引
- Matplotlib - 字体属性
- Matplotlib - 刻度
- Matplotlib - 线性和对数刻度
- Matplotlib - 对称对数和 Logit 刻度
- Matplotlib - LaTeX
- Matplotlib - 什么是 LaTeX?
- Matplotlib - 用于数学表达式的 LaTeX
- Matplotlib - 注释中的 LaTeX 文本格式
- Matplotlib - PostScript
- 启用注释中的 LaTeX 渲染
- Matplotlib - 数学表达式
- Matplotlib - 动画
- Matplotlib - 图形对象
- Matplotlib - 使用 Cycler 进行样式设置
- Matplotlib - 路径
- Matplotlib - 路径效果
- Matplotlib - 变换
- Matplotlib - 刻度和刻度标签
- Matplotlib - 弧度刻度
- Matplotlib - 日期刻度
- Matplotlib - 刻度格式化器
- Matplotlib - 刻度定位器
- Matplotlib - 基本单位
- Matplotlib - 自动缩放
- Matplotlib - 反转坐标轴
- Matplotlib - 对数坐标轴
- Matplotlib - Symlog
- Matplotlib - 单位处理
- Matplotlib - 带单位的椭圆
- Matplotlib - 脊柱
- Matplotlib - 坐标轴范围
- Matplotlib - 坐标轴刻度
- Matplotlib - 坐标轴刻度
- Matplotlib - 格式化坐标轴
- Matplotlib - Axes 类
- Matplotlib - 双坐标轴
- Matplotlib - Figure 类
- Matplotlib - 多图
- Matplotlib - 网格
- Matplotlib - 面向对象接口
- Matplotlib - PyLab 模块
- Matplotlib - Subplots() 函数
- Matplotlib - Subplot2grid() 函数
- Matplotlib - 固定位置的图形对象
- Matplotlib - 手动等高线
- Matplotlib - 坐标报告
- Matplotlib - AGG 滤镜
- Matplotlib - 带状框
- Matplotlib - 填充螺旋线
- Matplotlib - Findobj 演示
- Matplotlib - 超链接
- Matplotlib - 图片缩略图
- Matplotlib - 使用关键字绘图
- Matplotlib - 创建 Logo
- Matplotlib - 多页 PDF
- Matplotlib - 多进程
- Matplotlib - 打印标准输出
- Matplotlib - 复合路径
- Matplotlib - Sankey 类
- Matplotlib - MRI 与 EEG
- Matplotlib - 样式表
- Matplotlib - 背景颜色
- Matplotlib - Basemap
- Matplotlib 事件处理
- Matplotlib - 事件处理
- Matplotlib - 关闭事件
- Matplotlib - 鼠标移动
- Matplotlib - 点击事件
- Matplotlib - 滚动事件
- Matplotlib - 按键事件
- Matplotlib - 选择事件
- Matplotlib - 透视镜
- Matplotlib - 路径编辑器
- Matplotlib - 多边形编辑器
- Matplotlib - 定时器
- Matplotlib - Viewlims
- Matplotlib - 缩放窗口
- Matplotlib 小部件
- Matplotlib - 光标小部件
- Matplotlib - 带注释的光标
- Matplotlib - 按钮小部件
- Matplotlib - 复选框
- Matplotlib - 套索选择器
- Matplotlib - 菜单小部件
- Matplotlib - 鼠标光标
- Matplotlib - 多光标
- Matplotlib - 多边形选择器
- Matplotlib - 单选按钮
- Matplotlib - 范围滑块
- Matplotlib - 矩形选择器
- Matplotlib - 椭圆选择器
- Matplotlib - 滑块小部件
- Matplotlib - 跨度选择器
- Matplotlib - 文本框
- Matplotlib 绘图
- Matplotlib - 条形图
- Matplotlib - 直方图
- Matplotlib - 饼图
- Matplotlib - 散点图
- Matplotlib - 箱线图
- Matplotlib - 小提琴图
- Matplotlib - 等高线图
- Matplotlib - 3D 绘图
- Matplotlib - 3D 等高线
- Matplotlib - 3D 线框图
- Matplotlib - 3D 曲面图
- Matplotlib - 矢羽图
- Matplotlib 有用资源
- Matplotlib - 快速指南
- Matplotlib - 有用资源
- Matplotlib - 讨论
Matplotlib - AGG 滤镜
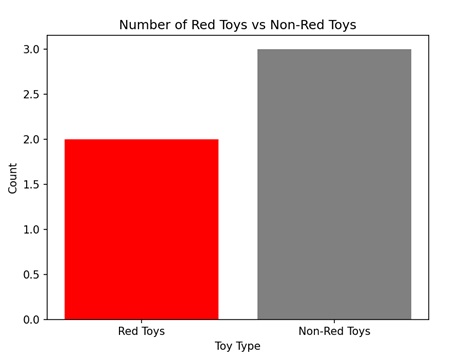
AGG 滤镜,即“聚合滤镜”,用于筛选大量数据,仅显示满足特定条件的信息。想象一下,你有一个大盒子装着玩具,你只想看到红色的玩具。AGG 滤镜可以帮助你快速找到并挑选出盒子里的所有红色玩具,而忽略其他的玩具。

Matplotlib 中的 AGG 滤镜
在 Matplotlib 中,AGG 滤镜,或抗锯齿几何滤镜,用于在图形元素(如线条、标记或文本)显示在绘图上之前对其应用某些变换。AGG 滤镜允许我们修改绘图中元素的外观,例如调整其透明度、模糊它们或应用其他视觉效果。
可以使用 "FigureCanvasAgg()" 函数在 Matplotlib 中创建 AGG 滤镜。此函数创建一个带有 AGG 滤镜的画布,允许你显示具有改进的质量和清晰度的绘图和图像。
使用 AGG 滤镜进行图像平滑
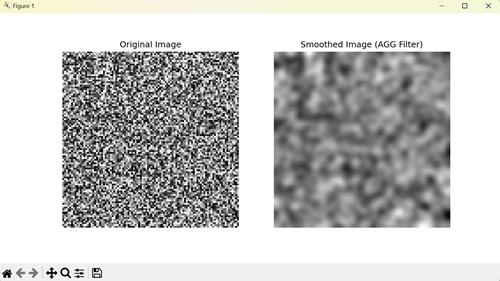
在 Matplotlib 中,使用 AGG 滤镜进行图像平滑是一种用于模糊或软化图像以减少噪声的技术。AGG 滤镜是用于图像平滑的可用选项之一,它将数学算法应用于图像像素,对相邻像素进行平均以创建更平滑的外观。此过程有助于去除不均匀的边缘并创建更具视觉吸引力的图像。
示例
在下面的示例中,我们使用 AGG 滤镜进行图像平滑。我们首先生成一个随机噪声图像,然后使用 gaussian_filter() 函数应用高斯平滑。之后,我们创建一个 Matplotlib 图形,其中包含两个子图,用于并排显示原始图像和平滑后的图像。
import matplotlib.pyplot as plt
from matplotlib.backends.backend_agg import FigureCanvasAgg
import numpy as np
from scipy.ndimage import gaussian_filter

# Generating random noisy image
np.random.seed(0)
image = np.random.rand(100, 100)

# Applying Gaussian smoothing to the image
smoothed_image = gaussian_filter(image, sigma=2)

# Creating a figure and plot the original and smoothed images
fig, axs = plt.subplots(1, 2, figsize=(10, 5))

axs[0].imshow(image, cmap='gray')
axs[0].set_title('Original Image')

axs[1].imshow(smoothed_image, cmap='gray')
axs[1].set_title('Smoothed Image (AGG Filter)')

# Hiding the axes
for ax in axs:
   ax.axis('off')

# Saving the figure as an image file
canvas = FigureCanvasAgg(fig)
canvas.print_png('smoothed_image.png')

plt.show()
输出
以下是上述代码的输出:

使用 AGG 滤镜锐化图像
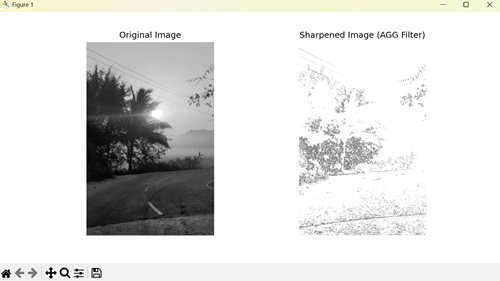
在 Matplotlib 中,使用 AGG 滤镜锐化图像通过增加边缘的对比度来增强图像的清晰度和细节。它涉及使用锐化核卷积图像,锐化核通常在中心具有正值,周围环绕着负值。
示例
在这里,我们使用 AGG 滤镜进行图像锐化。我们首先加载图像,然后应用锐化滤镜以增强图像的边缘。这涉及定义锐化核并使用 scipy.ndimage.convolve() 函数将其与图像进行卷积。最后,我们显示图像。
import matplotlib.pyplot as plt
from matplotlib.backends.backend_agg import FigureCanvasAgg
import numpy as np
from scipy.ndimage import convolve

# Loading an example image
image = plt.imread('sun.jpg')

# Converting to grayscale if image has multiple channels
if len(image.shape) > 2:
   image = image.mean(axis=2)

# Defining a sharpening kernel
kernel = np.array([[-1, -1, -1],
   [-1,  9, -1],
   [-1, -1, -1]])

# Applying the kernel to the image
sharpened_image = np.clip(convolve(image, kernel, mode='constant', cval=0.0), 0, 1)

# Creating a figure and plot the original and sharpened images
fig, axs = plt.subplots(1, 2, figsize=(10, 5))

axs[0].imshow(image, cmap='gray')
axs[0].set_title('Original Image')

axs[1].imshow(sharpened_image, cmap='gray')
axs[1].set_title('Sharpened Image (AGG Filter)')

# Hiding the axes
for ax in axs:
   ax.axis('off')

# Saving the figure as an image file
canvas = FigureCanvasAgg(fig)
canvas.print_png('sharpened_image.png')

plt.show()
输出
执行上述代码后,我们将得到以下输出:

使用 AGG 滤镜压印图像
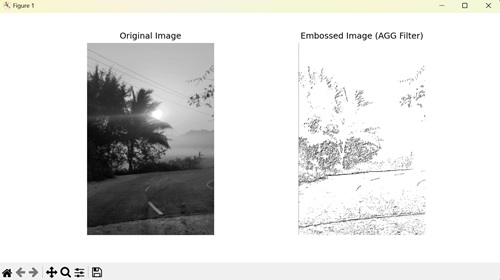
在 Matplotlib 中,使用 AGG 滤镜压印图像通过增强相邻像素之间的对比度来突出图像中的边缘,从而使其具有三维外观。它通过使用压印核卷积图像来实现此效果,压印核通常包含负值和正值。压印图像通常具有凸起或凹陷的外观,模拟冲压或雕刻的效果。
示例
在下面的示例中,我们使用 AGG 滤镜来压印图像。我们首先加载一个示例图像,然后定义一个压印核,这是一个旨在突出边缘的特定矩阵。使用卷积将此核应用于图像会生成压印图像。
import matplotlib.pyplot as plt
from matplotlib.backends.backend_agg import FigureCanvasAgg
import numpy as np
from scipy.ndimage import convolve

# Loading an example image
image = plt.imread('sun.jpg')

# Converting to grayscale if image has multiple channels
if len(image.shape) > 2:
   image = image.mean(axis=2)

# Defining an embossing kernel
kernel = np.array([[-2, -1, 0],
   [-1,  1, 1],
   [0, 1, 2]])

# Applying the kernel to the image
embossed_image = np.clip(convolve(image, kernel, mode='constant', cval=0.0), 0, 1)

# Creating a figure and plot the original and embossed images
fig, axs = plt.subplots(1, 2, figsize=(10, 5))

axs[0].imshow(image, cmap='gray')
axs[0].set_title('Original Image')

axs[1].imshow(embossed_image, cmap='gray')
axs[1].set_title('Embossed Image (AGG Filter)')

# Hiding the axes
for ax in axs:
   ax.axis('off')

# Saving the figure as an image file
canvas = FigureCanvasAgg(fig)
canvas.print_png('embossed_image.png')

plt.show()
输出
执行上述代码后,我们将得到以下输出:
