- Matplotlib 基础
- Matplotlib - 首页
- Matplotlib - 简介
- Matplotlib - 与 Seaborn 的比较
- Matplotlib - 环境设置
- Matplotlib - Anaconda 发行版
- Matplotlib - Jupyter Notebook
- Matplotlib - Pyplot API
- Matplotlib - 简单绘图
- Matplotlib - 保存图片
- Matplotlib - 标记
- Matplotlib - 图形
- Matplotlib - 风格
- Matplotlib - 图例
- Matplotlib - 颜色
- Matplotlib - 颜色图
- Matplotlib - 颜色图归一化
- Matplotlib - 选择颜色图
- Matplotlib - 颜色条
- Matplotlib - 文本
- Matplotlib - 文本属性
- Matplotlib - 子图标题
- Matplotlib - 图片
- Matplotlib - 图片蒙版
- Matplotlib - 注释
- Matplotlib - 箭头
- Matplotlib - 字体
- Matplotlib - 什么是字体?
- 全局设置字体属性
- Matplotlib - 字体索引
- Matplotlib - 字体属性
- Matplotlib - 比例尺
- Matplotlib - 线性与对数比例尺
- Matplotlib - 对称对数与Logit比例尺
- Matplotlib - LaTeX
- Matplotlib - 什么是LaTeX?
- Matplotlib - 用于数学表达式的LaTeX
- Matplotlib - 注释中的LaTeX文本格式
- Matplotlib - PostScript
- 启用注释中的LaTex渲染
- Matplotlib - 数学表达式
- Matplotlib - 动画
- Matplotlib - 图形元素
- Matplotlib - 使用Cycler进行样式设置
- Matplotlib - 路径
- Matplotlib - 路径效果
- Matplotlib - 变换
- Matplotlib - 刻度和刻度标签
- Matplotlib - 弧度刻度
- Matplotlib - 日期刻度
- Matplotlib - 刻度格式化器
- Matplotlib - 刻度定位器
- Matplotlib - 基本单位
- Matplotlib - 自动缩放
- Matplotlib - 反转坐标轴
- Matplotlib - 对数坐标轴
- Matplotlib - Symlog
- Matplotlib - 单位处理
- Matplotlib - 带单位的椭圆
- Matplotlib - 脊柱
- Matplotlib - 坐标轴范围
- Matplotlib - 坐标轴比例尺
- Matplotlib - 坐标轴刻度
- Matplotlib - 格式化坐标轴
- Matplotlib - Axes 类
- Matplotlib - 双坐标轴
- Matplotlib - Figure 类
- Matplotlib - 多图
- Matplotlib - 网格
- Matplotlib - 面向对象接口
- Matplotlib - PyLab 模块
- Matplotlib - Subplots() 函数
- Matplotlib - Subplot2grid() 函数
- Matplotlib - 锚定图形元素
- Matplotlib - 手动等高线
- Matplotlib - 坐标报告
- Matplotlib - AGG 过滤器
- Matplotlib - 带状盒图
- Matplotlib - 填充螺旋线
- Matplotlib - Findobj 演示
- Matplotlib - 超链接
- Matplotlib - 图片缩略图
- Matplotlib - 使用关键字绘图
- Matplotlib - 创建Logo
- Matplotlib - 多页PDF
- Matplotlib - 多进程
- Matplotlib - 打印标准输出
- Matplotlib - 复合路径
- Matplotlib - Sankey 类
- Matplotlib - MRI 与 EEG
- Matplotlib - 样式表
- Matplotlib - 背景颜色
- Matplotlib - Basemap
- Matplotlib 事件处理
- Matplotlib - 事件处理
- Matplotlib - 关闭事件
- Matplotlib - 鼠标移动
- Matplotlib - 点击事件
- Matplotlib - 滚动事件
- Matplotlib - 按键事件
- Matplotlib - 选择事件
- Matplotlib - 透镜
- Matplotlib - 路径编辑器
- Matplotlib - 多边形编辑器
- Matplotlib - 定时器
- Matplotlib - Viewlims
- Matplotlib - 缩放窗口
- Matplotlib 小部件
- Matplotlib - 光标小部件
- Matplotlib - 带注释的光标
- Matplotlib - 按钮小部件
- Matplotlib - 复选框
- Matplotlib - 套索选择器
- Matplotlib - 菜单小部件
- Matplotlib - 鼠标光标
- Matplotlib - 多光标
- Matplotlib - 多边形选择器
- Matplotlib - 单选按钮
- Matplotlib - 范围滑块
- Matplotlib - 矩形选择器
- Matplotlib - 椭圆选择器
- Matplotlib - 滑块小部件
- Matplotlib - 跨度选择器
- Matplotlib - 文本框
- Matplotlib 绘图
- Matplotlib - 条形图
- Matplotlib - 直方图
- Matplotlib - 饼图
- Matplotlib - 散点图
- Matplotlib - 箱线图
- Matplotlib - 小提琴图
- Matplotlib - 等高线图
- Matplotlib - 3D 绘图
- Matplotlib - 3D 等高线
- Matplotlib - 3D 线框图
- Matplotlib - 3D 曲面图
- Matplotlib - 矢羽图
- Matplotlib 有用资源
- Matplotlib - 快速指南
- Matplotlib - 有用资源
- Matplotlib - 讨论
Matplotlib - 带单位的椭圆
椭圆是一种几何形状,看起来像一个拉长的圆形。它由两个关键属性定义:长轴(最长直径)和短轴(最短直径)。这些轴在椭圆的中心相交,椭圆的形状由这些轴的长度决定。长轴中心到边缘的距离和短轴中心到边缘的距离都很重要。
从单位的角度来看,你会使用某种单位来测量这些距离,例如英寸、厘米或你选择的任何其他测量单位。因此,当我们说带单位的椭圆时,我们的意思是我们使用具体的测量值(单位)来描述椭圆的大小,同时考虑长轴和短轴的长度。
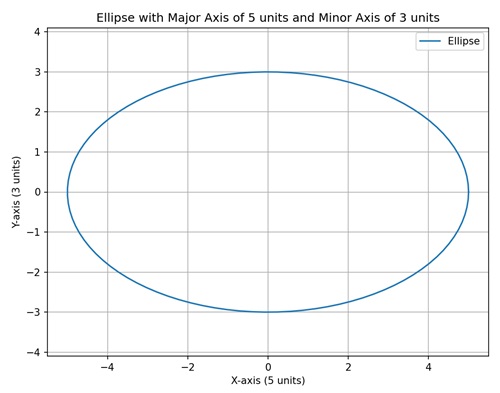
Matplotlib 中带单位的椭圆
我们可以使用 "matplotlib.patches" 模块中的 "Ellipse" 类在 Matplotlib 中创建带单位的椭圆。"Ellipse" 类允许你定义椭圆的中心、宽度和高度(长轴和短轴)、旋转角度以及其他属性,例如其旋转角度。
轴的测量单位取决于你使用的坐标系。例如,如果你使用英寸单位的绘图,则长轴和短轴的长度将以英寸为单位。
数据坐标系中固定大小的椭圆
在 Matplotlib 中,在数据坐标系中创建固定大小的椭圆涉及在绘图上绘制一个特定大小和位置由数据坐标确定的椭圆。这意味着椭圆的尺寸以与你的实际数据相同的单位指定。
例如,如果你有一个包含 x 和 y 值的数据集,你可以绘制一个椭圆,其中心位于特定的 (x, y) 点,并且椭圆的宽度和高度以数据坐标定义。
示例
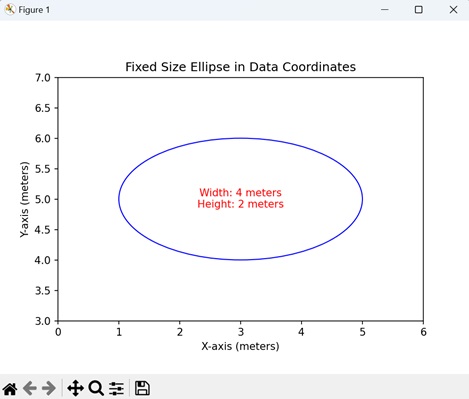
我们正在绘制一个简单的椭圆,其固定大小以数据坐标指定。椭圆的中心位于绘图上的 (3, 5) 位置,宽度设置为米为单位的“4”个单位,高度设置为“2”个单位。
import matplotlib.pyplot as plt
from matplotlib.patches import Ellipse

# Creating a plot
fig, ax = plt.subplots()

# Ellipse in data coordinates (units: meters)
ellipse = Ellipse((3, 5), width=4, height=2, edgecolor='b', facecolor='none')
ax.add_patch(ellipse)

# Setting plot title and labels
ax.set_title('Fixed Size Ellipse in Data Coordinates')
ax.set_xlabel('X-axis (meters)')
ax.set_ylabel('Y-axis (meters)')

# Setting aspect ratio to 'equal'
ax.set_aspect('equal')

# Adjusting axis limits
ax.set_xlim(0, 6)
ax.set_ylim(3, 7)

# Displaying dimensions
plt.text(3, 5, f'Width: 4 meters\nHeight: 2 meters', ha='center', va='center', color='red', fontsize=10)
plt.show()
输出
以下是上述代码的输出:
坐标轴坐标系中可变大小的椭圆
在 Matplotlib 中创建在坐标轴坐标系中具有可变大小的椭圆涉及绘制一个绘图上的椭圆,其中尺寸以坐标轴而不是实际数据来指定。换句话说,椭圆的宽度和高度分别作为 x 轴和 y 轴总长度的百分比给出。
例如,如果你想可视化一个始终覆盖 x 轴的 60% 和 y 轴的 30% 的椭圆,而不管具体数据值如何,你可以使用坐标轴坐标。当你想让椭圆的大小相对于绘图的整体尺寸时,这尤其有用。
示例
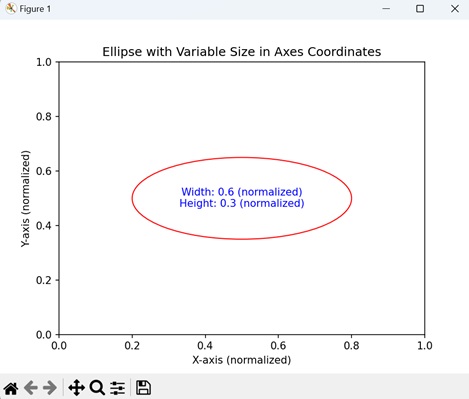
在这里,我们正在绘制一个以坐标轴坐标指定可变大小的椭圆。椭圆的中心位于 (0.5, 0.5),对应于绘图的中心。宽度和高度分别设置为相应轴长度的 60% 和 30%,允许椭圆随着坐标轴的变化而缩放。
import matplotlib.pyplot as plt
from matplotlib.patches import Ellipse

# Creating a plot
fig, ax = plt.subplots()

# Ellipse in axes coordinates
ellipse = Ellipse((0.5, 0.5), width=0.6, height=0.3, edgecolor='r', facecolor='none', transform=ax.transAxes)
ax.add_patch(ellipse)

# Setting plot title and labels
ax.set_title('Ellipse with Variable Size in Axes Coordinates')
ax.set_xlabel('X-axis (normalized)')
ax.set_ylabel('Y-axis (normalized)')

# Displaying dimensions in the output
plt.text(0.5, 0.5, f'Width: 0.6 (normalized)\nHeight: 0.3 (normalized)', ha='center', va='center', color='blue', fontsize=10, transform=ax.transAxes)
plt.show()
输出
执行上述代码后,我们将获得以下输出:
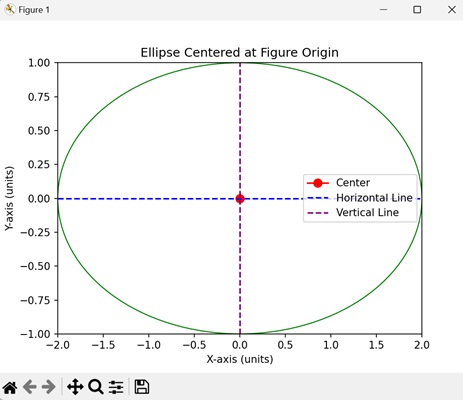
以图形原点为中心的椭圆
在 Matplotlib 中创建以图形原点为中心的椭圆涉及在绘图上绘制一个椭圆,其中心位于整个图形的原点。原点是图形坐标系中的 (0, 0) 点。在这种情况下,椭圆的宽度和高度以图形的单位指定,椭圆的中心正好位于原点。
这演示了如何相对于整个图形而不是单个坐标轴来定位椭圆。
示例
在下面的示例中,我们正在创建一个以图形原点 (0, 0) 为中心的椭圆。宽度设置为 4 个单位,高度设置为 2 个单位。
import matplotlib.pyplot as plt
from matplotlib.patches import Ellipse
import numpy as np

# Creating a plot
fig, ax = plt.subplots()

# Ellipse centered at figure origin
ellipse = Ellipse((0, 0), width=4, height=2, edgecolor='g', facecolor='none', transform=ax.transData)
ax.add_patch(ellipse)

# Marking the center with a marker
center_x, center_y = 0, 0
ax.plot(center_x, center_y, marker='o', markersize=8, color='red', label='Center')

# Dotted line to represent the center
ax.plot([center_x, center_x], [center_y, center_y], 'r--')

# Horizontal and vertical lines passing through the center
ax.axhline(center_y, color='blue', linestyle='--', label='Horizontal Line')
ax.axvline(center_x, color='purple', linestyle='--', label='Vertical Line')

# Setting plot title and labels
ax.set_title('Ellipse Centered at Figure Origin')
ax.set_xlabel('X-axis (units)')
ax.set_ylabel('Y-axis (units)')

# Adjusting axis limits to make the ellipse and lines visible
ax.set_xlim(-2, 2)
ax.set_ylim(-1, 1)

# Adding legend
ax.legend()
plt.show()
输出
执行上述代码后,我们将获得以下输出:
带自定义角度的旋转椭圆
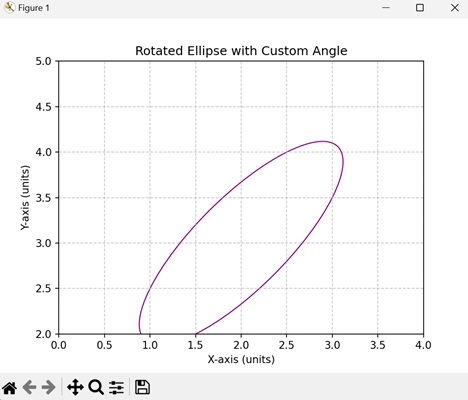
在 Matplotlib 中创建带自定义角度的旋转椭圆涉及在绘图上绘制一个椭圆并指定一个自定义角度来旋转它。旋转角度决定了椭圆在绘图中的倾斜或旋转方式。当你想突出显示特定方向的特征时,这很有用。
示例
现在,我们正在创建一个旋转角度为“45”度的旋转椭圆,从而得到一个倾斜的椭圆。椭圆的中心位于 (2, 3),宽度和高度以数据坐标指定。
import matplotlib.pyplot as plt
from matplotlib.patches import Ellipse

# Creating a plot
fig, ax = plt.subplots()

# Rotated ellipse with custom angle
ellipse = Ellipse((2, 3), width=3, height=1, angle=45, edgecolor='purple', facecolor='none', transform=ax.transData)
ax.add_patch(ellipse)

# Setting plot title and labels
ax.set_title('Rotated Ellipse with Custom Angle')
ax.set_xlabel('X-axis (units)')
ax.set_ylabel('Y-axis (units)')

# Setting aspect ratio to 'equal'
ax.set_aspect('equal')

# Adjusting axis limits
ax.set_xlim(0, 4)
ax.set_ylim(2, 5)

# Adding grid for better visualization
ax.grid(True, linestyle='--', alpha=0.7)
plt.show()
输出
执行上述代码后,我们将获得以下输出:
