
- Selenium 教程
- Selenium - 首页
- Selenium - 概述
- Selenium - 组件
- Selenium - 自动化测试
- Selenium - 环境搭建
- Selenium - 远程控制
- Selenium IDE 教程
- Selenium - IDE 简介
- Selenium - 特性
- Selenium - 限制
- Selenium - 安装
- Selenium - 创建测试
- Selenium - 创建脚本
- Selenium - 控制流
- Selenium - 存储变量
- Selenium - 警报和弹出窗口
- Selenium - Selenese 命令
- Selenium - Actions 命令
- Selenium - Accessors 命令
- Selenium - Assertions 命令
- Selenium - Assert/Verify 方法
- Selenium - 定位策略
- Selenium - 脚本调试
- Selenium - 验证点
- Selenium - 模式匹配
- Selenium - JSON 数据文件
- Selenium - 浏览器执行
- Selenium - 用户扩展
- Selenium - 代码导出
- Selenium - 代码输出
- Selenium - JavaScript 函数
- Selenium - 插件
- Selenium WebDriver 教程
- Selenium - 简介
- Selenium WebDriver vs RC
- Selenium - 安装
- Selenium - 第一个测试脚本
- Selenium - 驱动程序会话
- Selenium - 浏览器选项
- Selenium - Chrome 选项
- Selenium - Edge 选项
- Selenium - Firefox 选项
- Selenium - Safari 选项
- Selenium - 双击
- Selenium - 右键单击
- Python 中的 HTML 报告
- 处理编辑框
- Selenium - 单个元素
- Selenium - 多个元素
- Selenium Web 元素
- Selenium - 文件上传
- Selenium - 定位器策略
- Selenium - 相对定位器
- Selenium - 查找器
- Selenium - 查找所有链接
- Selenium - 用户交互
- Selenium - WebElement 命令
- Selenium - 浏览器交互
- Selenium - 浏览器命令
- Selenium - 浏览器导航
- Selenium - 警报和弹出窗口
- Selenium - 处理表单
- Selenium - 窗口和标签页
- Selenium - 处理链接
- Selenium - 输入框
- Selenium - 单选按钮
- Selenium - 复选框
- Selenium - 下拉框
- Selenium - 处理 IFrame
- Selenium - 处理 Cookie
- Selenium - 日期时间选择器
- Selenium - 动态 Web 表格
- Selenium - Actions 类
- Selenium - Action 类
- Selenium - 键盘事件
- Selenium - 键上/下
- Selenium - 复制和粘贴
- Selenium - 处理特殊键
- Selenium - 鼠标事件
- Selenium - 拖放
- Selenium - 笔事件
- Selenium - 滚动操作
- Selenium - 等待策略
- Selenium - 显式/隐式等待
- Selenium - 支持特性
- Selenium - 多选
- Selenium - 等待支持
- Selenium - 选择支持
- Selenium - 颜色支持
- Selenium - ThreadGuard
- Selenium - 错误和日志记录
- Selenium - 异常处理
- Selenium - 其他
- Selenium - 处理 Ajax 调用
- Selenium - JSON 数据文件
- Selenium - CSV 数据文件
- Selenium - Excel 数据文件
- Selenium - 跨浏览器测试
- Selenium - 多浏览器测试
- Selenium - 多窗口测试
- Selenium - JavaScript 执行器
- Selenium - 无头执行
- Selenium - 捕获屏幕截图
- Selenium - 捕获视频
- Selenium - 页面对象模型
- Selenium - 页面工厂
- Selenium - 记录和回放
- Selenium - 框架
- Selenium - 浏览上下文
- Selenium - DevTools
- Selenium Grid 教程
- Selenium - 概述
- Selenium - 架构
- Selenium - 组件
- Selenium - 配置
- Selenium - 创建测试脚本
- Selenium - 测试执行
- Selenium - 端点
- Selenium - 自定义节点
- Selenium 报告工具
- Selenium - 报告工具
- Selenium - TestNG
- Selenium - JUnit
- Selenium - Allure
- Selenium & 其他技术
- Selenium - Java 教程
- Selenium - Python 教程
- Selenium - C# 教程
- Selenium - Javascript 教程
- Selenium - Kotlin 教程
- Selenium - Ruby 教程
- Selenium - Maven & Jenkins
- Selenium - 数据库测试
- Selenium - LogExpert 日志记录
- Selenium - Log4j 日志记录
- Selenium - Robot Framework
- Selenium - AutoIT
- Selenium - Flash 测试
- Selenium - Apache Ant
- Selenium - Github 教程
- Selenium - SoapUI
- Selenium - Cucumber
- Selenium - IntelliJ
- Selenium - XPath
- Selenium 其他概念
- Selenium - IE 驱动程序
- Selenium - 自动化框架
- Selenium - 关键字驱动框架
- Selenium - 数据驱动框架
- Selenium - 混合驱动框架
- Selenium - SSL 证书错误
- Selenium - 替代方案
- Selenium 有用资源
- Selenium - 问答
- Selenium - 快速指南
- Selenium - 有用资源
- Selenium - 自动化实践
- Selenium - 讨论
Selenium - Allure
Allure 可用于创建详细的自动化测试报告。它是一个开源框架,可以与 Selenium 测试集成并用于报告目的。
创建 Allure 报告的先决条件
在系统中安装 Java(版本高于 8)并使用命令检查它是否存在:java -version。如果安装成功完成,则将显示已安装的 Java 版本。可以使用链接 Java 下载 下载和安装 Java。
要了解更多关于 Java 设置的知识,请参阅以下链接 -
https://www.youtube.com/watch?v=bxIZ1GVWYkQ.
在系统中安装 Maven 并使用命令检查它是否存在:mvn -version。如果安装成功完成,则将显示已安装的 Maven 版本。可以使用链接 Apache Maven 下载和安装 Maven。
要了解更多关于 Maven 设置的知识,请参阅链接 Maven 环境搭建。
安装 IntelliJ。要了解更多关于 IntelliJ 设置的知识,请参阅链接 Selenium IntelliJ。
创建 Allure 报告的步骤
步骤 1 - 创建一个 Maven 项目,并将以下项目的依赖项添加到 pom.xml 文件中 -
从链接 TestNG 添加 TestNG 依赖项。
从链接 Selenium Java 添加 Selenium Java 依赖项
从链接 Allure TestNG 添加 Allure TestNG 依赖项
保存包含所有依赖项的 pom.xml 并更新 Maven 项目。
步骤 2 - 在系统中下载 Allure。对于 Mac 和 Linux,运行命令:brew install allure。如果系统中安装了 Homebrew,则此命令应该可以工作。对于 Windows,运行命令:scoop install allure。如果系统中安装了 Scoop,则此命令应该可以工作。使用命令检查 Allure 是否存在:allure –version。如果安装成功完成,则将显示已安装的 Allure 版本。
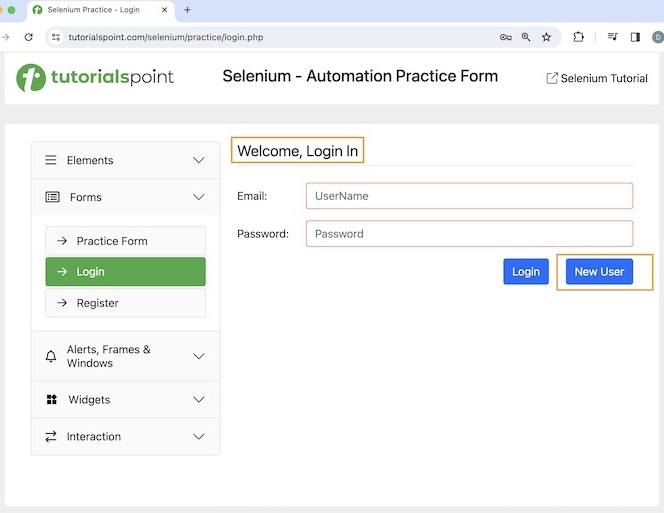
步骤 3 - 创建一个 TestNG 测试类,并注意以下示例。在欢迎页面上点击新建用户按钮。
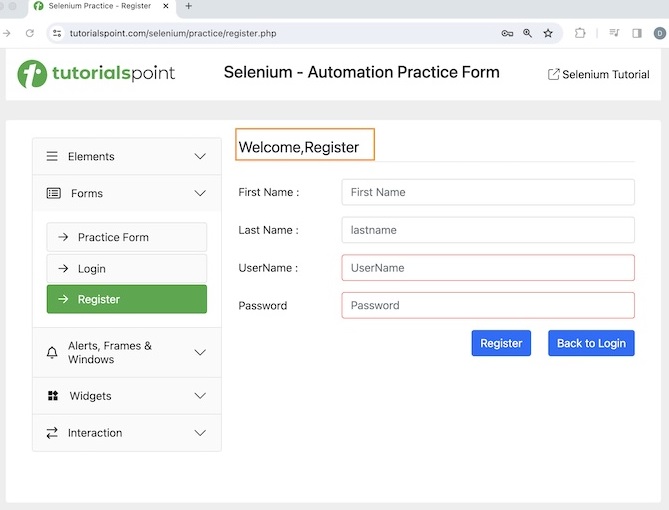
点击新建用户后,我们将进入注册页面,页面上显示欢迎,注册文本,如下面的图片所示。
代码实现
package Report;

import org.openqa.selenium.By;
import org.openqa.selenium.WebDriver;
import org.openqa.selenium.WebElement;
import org.openqa.selenium.chrome.ChromeDriver;
import org.testng.annotations.*;
import java.util.concurrent.TimeUnit;
import static org.testng.Assert.assertEquals;

public class AllureTest {

   WebDriver driver;
   @BeforeTest
   public void setup(@Optional String browser) throws Exception{

      // Initiate browser driver
      driver = new ChromeDriver();

      // adding implicit wait of 12 secs
      driver.manage().timeouts().implicitlyWait(10, TimeUnit.SECONDS);

      // Opening the webpage
      driver.get("https://tutorialspoint.com/selenium/practice/login.php");
   }
   @Test(priority = 1)
   public void verifyWelcomePageHeading() {

      // identify header then get text
      WebElement header = driver.findElement
         (By.xpath("//*[@id='signInForm']/h1"));
      String text = header.getText();

      // assertion to verify login page header
      assertEquals("Welcome, Login In", text);
   }
   @Test(priority = 2)
   public void moveToRegisterPage() {

      // identify button then click
      WebElement btn = driver.findElement
         (By.xpath("//*[@id='signInForm']/div[3]/a"));
      btn.click();
   }
   @Test(priority = 3)
   public void verifyRegisterPageHeading() {

      // identify header then get text
      WebElement heder = driver.findElement
         (By.xpath("//*[@id='signupForm']/h1"));
      String text = heder.getText();

      // assertion to verify register page header
      assertEquals("Welcome,Register", text);
   }

   @AfterTest
   public void teardown() {

      // quitting browser
      driver.quit();
   }
}
testng.xml 文件中的配置。
<?xml version="1.0" encoding="UTF-8"?>
<!DOCTYPE suite SYSTEM "http://testng.org/testng-1.0.dtd">
<suite name="All Test Suite">
   <test verbose="2" preserve-order="true" name="AllureTest.java">
      <classes>
         <class name="Report.AllureTest">
            <methods>
               <include name="verifyWelcomePageHeading"/>
               <include name="moveToRegisterPage"/>
               <include name="verifyRegisterPageHeading"/>
            </methods>
         </class>
      </classes>
   </test>
</suite>
pom.xml 文件中的依赖项。
<?xml version="1.0" encoding="UTF-8"?>
<project xmlns="http://maven.apache.org/POM/4.0.0"
   xmlns:xsi="http://www.w3.org/2001/XMLSchema-instance"
   xsi:schemaLocation="http://maven.apache.org/POM/4.0.0
   http://maven.apache.org/xsd/maven-4.0.0.xsd">

   <modelVersion>4.0.0</modelVersion>
   <groupId>org.example</groupId>
   <artifactId>SeleniumJava</artifactId>
   <version>1.0-SNAPSHOT</version>

   <properties>
      <maven.compiler.source>16</maven.compiler.source>
      <maven.compiler.target>16</maven.compiler.target>
      <project.build.sourceEncoding>UTF-8</project.build.sourceEncoding>
   </properties>

   <!-- https://mvnrepository.com/artifact/org.seleniumhq.selenium/selenium-java -->
   <dependencies>
      <dependency>
         <groupId>org.seleniumhq.selenium</groupId>
         <artifactId>selenium-java</artifactId>
         <version>4.11.0</version>
      </dependency>

      <!-- https://mvnrepository.com/artifact/org.testng/testng -->
      <dependency>
         <groupId>org.testng</groupId>
         <artifactId>testng</artifactId>
         <version>7.9.0</version>
         <scope>test</scope>
      </dependency>

      <!-- https://mvnrepository.com/artifact/io.qameta.allure/allure-testng -->
      <dependency>
         <groupId>io.qameta.allure</groupId>
         <artifactId>allure-testng</artifactId>
         <version>2.25.0</version>
      </dependency>
   </dependencies>
</project>
以上实现的项目结构如下图所示 -
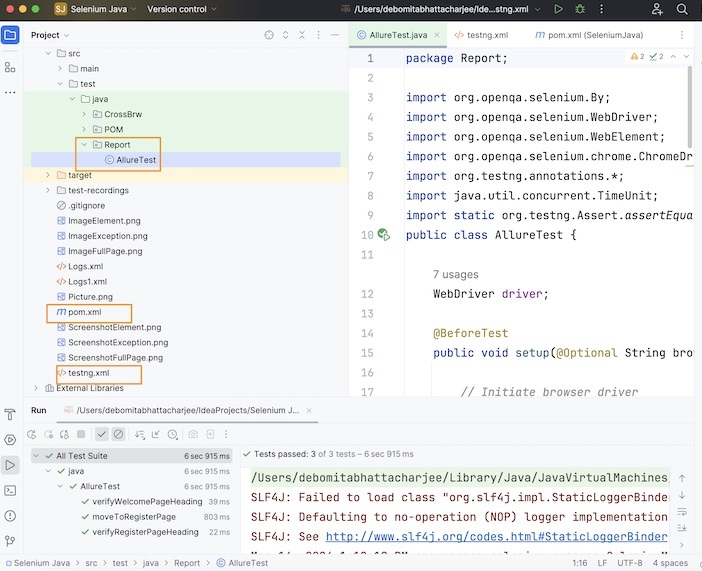
步骤 4 - 使用 testng.xml 运行测试。
它将显示以下输出 -
===============================================
All Test Suite
Total tests run: 3, Passes: 3, Failures: 0, Skips: 0
===============================================
Process finished with exit code 0
我们使用了 TestNG 框架来设计测试并获取页面标题,最后对其进行验证。
控制台中的结果显示总共运行的测试:3,因为有三个带有 @Test 注解的方法 - verifyWelcomePageHeading()、moveToRegisterPage() 和 verifyRegisterPageHeading()。
最后,收到消息通过:3和进程已完成,退出代码为 0,表示代码执行成功。
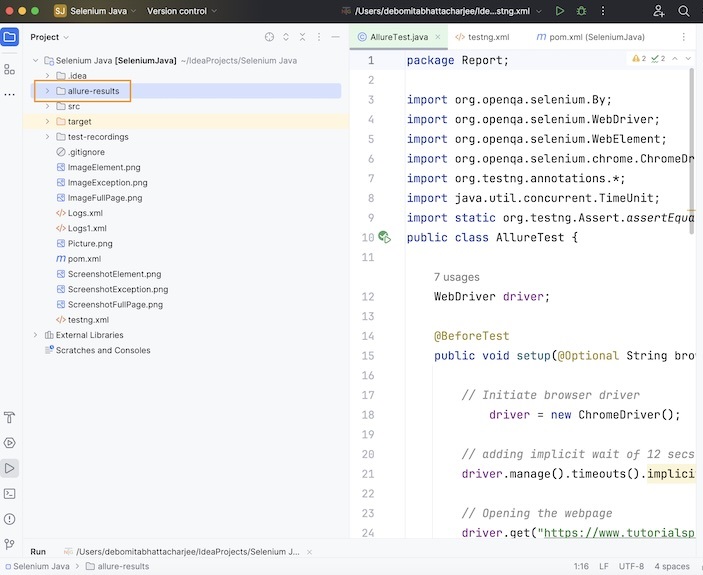
步骤 5 - 刷新项目文件夹,一个名为allure-results的新文件夹应该会生成。
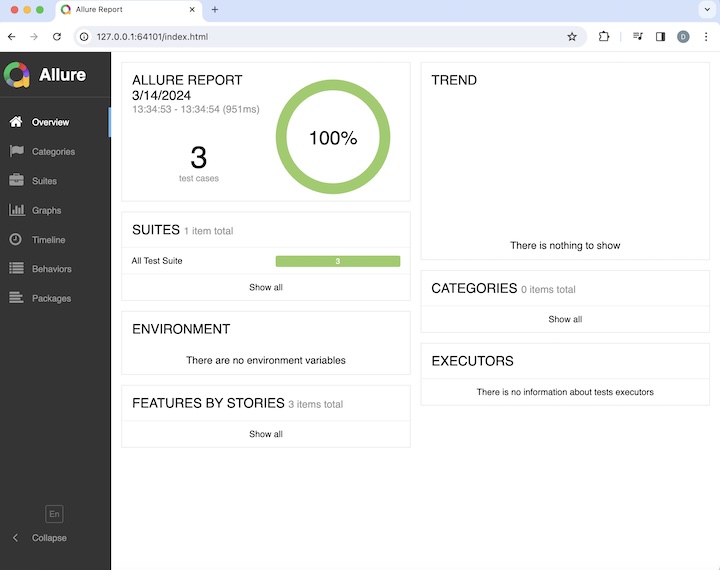
步骤 6 - 从项目文件夹位置运行命令:allure serve。这里,项目文件夹名称为 Selenium Java。运行命令后,服务器启动,同时 Allure 报告将在浏览器中打开,总测试方法(或用例)数为 3,通过率为 100%。
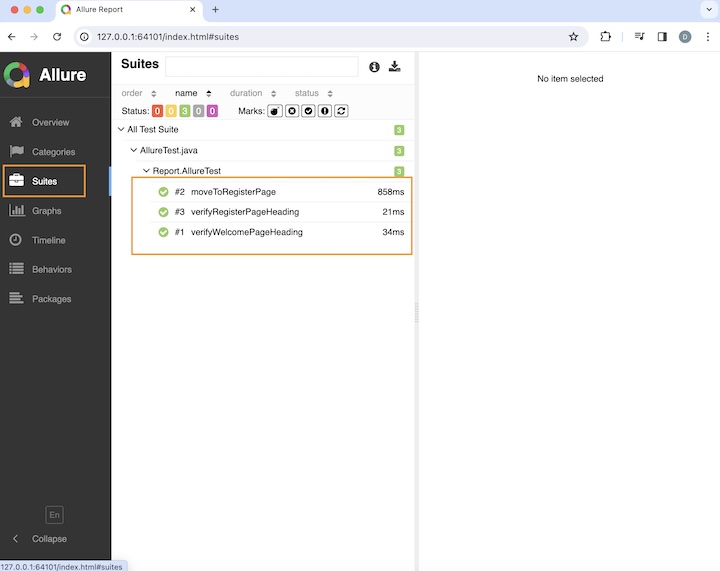
点击左侧的套件选项卡,我们将获得有关测试方法 moveToRegisterPage()、verifyPageHeading() 和 verifyWelcomePageHeading() 的执行持续时间及其结果的信息。
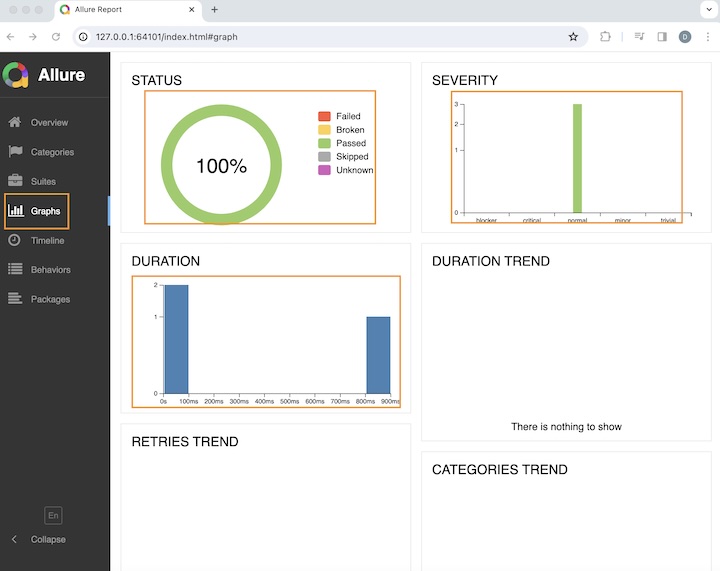
切换到左侧的图表选项卡,我们将获得有关状态、严重性、持续时间等的所有信息。
结论
这总结了我们对 Selenium Allure 教程的全面介绍。我们从描述 Allure 报告、设置 Allure 报告的先决条件开始,并逐步演示了如何使用示例创建 Allure 报告,说明了如何将其与 Selenium 一起使用。这使您能够深入了解 Allure。明智的做法是不断练习您所学到的知识,并探索与 Selenium 相关的其他内容,以加深您的理解并扩展您的视野。
