- Selenium 教程
- Selenium - 首页
- Selenium - 概述
- Selenium - 组件
- Selenium - 自动化测试
- Selenium - 环境设置
- Selenium - 远程控制
- Selenium IDE 教程
- Selenium - IDE 简介
- Selenium - 特性
- Selenium - 限制
- Selenium - 安装
- Selenium - 创建测试
- Selenium - 创建脚本
- Selenium - 控制流
- Selenium - 存储变量
- Selenium - 警报和弹出窗口
- Selenium - Selenese 命令
- Selenium - 操作命令
- Selenium - 访问器命令
- Selenium - 断言命令
- Selenium - Assert/Verify 方法
- Selenium - 定位策略
- Selenium - 脚本调试
- Selenium - 验证点
- Selenium - 模式匹配
- Selenium - JSON 数据文件
- Selenium - 浏览器执行
- Selenium - 用户扩展
- Selenium - 代码导出
- Selenium - 发射代码
- Selenium - JavaScript 函数
- Selenium - 插件
- Selenium WebDriver 教程
- Selenium - 简介
- Selenium WebDriver vs RC
- Selenium - 安装
- Selenium - 第一个测试脚本
- Selenium - 驱动程序会话
- Selenium - 浏览器选项
- Selenium - Chrome 选项
- Selenium - Edge 选项
- Selenium - Firefox 选项
- Selenium - Safari 选项
- Selenium - 双击
- Selenium - 右键单击
- Python 中的 HTML 报告
- 处理编辑框
- Selenium - 单个元素
- Selenium - 多个元素
- Selenium Web 元素
- Selenium - 文件上传
- Selenium - 定位器策略
- Selenium - 相对定位器
- Selenium - 查找器
- Selenium - 查找所有链接
- Selenium - 用户交互
- Selenium - WebElement 命令
- Selenium - 浏览器交互
- Selenium - 浏览器命令
- Selenium - 浏览器导航
- Selenium - 警报和弹出窗口
- Selenium - 处理表单
- Selenium - 窗口和标签页
- Selenium - 处理链接
- Selenium - 输入框
- Selenium - 单选按钮
- Selenium - 复选框
- Selenium - 下拉框
- Selenium - 处理 IFrame
- Selenium - 处理 Cookie
- Selenium - 日期时间选择器
- Selenium - 动态 Web 表格
- Selenium - Actions 类
- Selenium - Action 类
- Selenium - 键盘事件
- Selenium - 键上/下
- Selenium - 复制和粘贴
- Selenium - 处理特殊键
- Selenium - 鼠标事件
- Selenium - 拖放
- Selenium - 笔事件
- Selenium - 滚动操作
- Selenium - 等待策略
- Selenium - 显式/隐式等待
- Selenium - 支持功能
- Selenium - 多选
- Selenium - 等待支持
- Selenium - 选择支持
- Selenium - 颜色支持
- Selenium - ThreadGuard
- Selenium - 错误和日志记录
- Selenium - 异常处理
- Selenium - 杂项
- Selenium - 处理 Ajax 调用
- Selenium - JSON 数据文件
- Selenium - CSV 数据文件
- Selenium - Excel 数据文件
- Selenium - 跨浏览器测试
- Selenium - 多浏览器测试
- Selenium - 多窗口测试
- Selenium - JavaScript 执行器
- Selenium - 无头执行
- Selenium - 捕获屏幕截图
- Selenium - 捕获视频
- Selenium - 页面对象模型
- Selenium - 页面工厂
- Selenium - 记录和回放
- Selenium - 框架
- Selenium - 浏览上下文
- Selenium - DevTools
- Selenium Grid 教程
- Selenium - 概述
- Selenium - 架构
- Selenium - 组件
- Selenium - 配置
- Selenium - 创建测试脚本
- Selenium - 测试执行
- Selenium - 端点
- Selenium - 自定义节点
- Selenium 报告工具
- Selenium - 报告工具
- Selenium - TestNG
- Selenium - JUnit
- Selenium - Allure
- Selenium & 其他技术
- Selenium - Java 教程
- Selenium - Python 教程
- Selenium - C# 教程
- Selenium - Javascript 教程
- Selenium - Kotlin 教程
- Selenium - Ruby 教程
- Selenium - Maven 和 Jenkins
- Selenium - 数据库测试
- Selenium - LogExpert 日志记录
- Selenium - Log4j 日志记录
- Selenium - Robot Framework
- Selenium - AutoIT
- Selenium - Flash 测试
- Selenium - Apache Ant
- Selenium - Github 教程
- Selenium - SoapUI
- Selenium - Cucumber
- Selenium - IntelliJ
- Selenium - XPath
- Selenium 杂项概念
- Selenium - IE 驱动程序
- Selenium - 自动化框架
- Selenium - 关键字驱动框架
- Selenium - 数据驱动框架
- Selenium - 混合驱动框架
- Selenium - SSL 证书错误
- Selenium - 替代方案
- Selenium 有用资源
- Selenium - 问答
- Selenium - 快速指南
- Selenium - 有用资源
- Selenium - 自动化实践
- Selenium - 讨论
Selenium WebDriver - DevTools
Selenium Webdriver 的最新版本是 4.x 版本。Selenium 4 带来了许多改进,包括 Chrome DevTools (CDP) 上的新 API。它提供了对要执行测试的浏览器的更多控制。
什么是 Chrome DevTools?
Chrome DevTools 是一套用于 Chromium 浏览器(即 Chrome、Edge 和 Opera)的工具。它们有助于启用调试并获取有关被测应用程序的更多信息。CDP 的优势如下所示:
- 获取控制台日志
- 运行和调试 JavaScript
- 模拟地理位置
- 在文档对象模型 (DOM) 中检查 Web 元素
- 模拟网络流量
- 监控网络流量
- 更新 Web 元素及其 CSS
Selenium 4 中的 Chrome DevTool API
Selenium 4 提供了新的 Chrome DevTool API,这些 API 能够实现以下功能:
- 获取并监视网络流量。
- 模拟地理位置以进行本地化测试。
- 更新设备模式以检查 Web 应用程序的响应能力。
ChromiumDriver 类是从 Selenium 4 版本开始引入的。此类包含 getDevTools() 和 executeCdpCommand() 方法。它们有助于访问 CDP。getDevTools() 方法返回新的 DevTools 对象,该对象允许我们使用 send() 方法(CDP 的默认 Selenium 命令)。
这些命令主要是包装方法,有助于调用 CDP 函数。另一方面,executeCdpCommand() 方法有助于在参数的帮助下运行 CDP 方法。它没有任何包装器 API。
ChromeDriver 和 EdgeDriver 类继承自 ChromiumDriver 类。因此,也可以从这些驱动程序访问 Selenium CDP API。
使用 CDP 更新设备模式
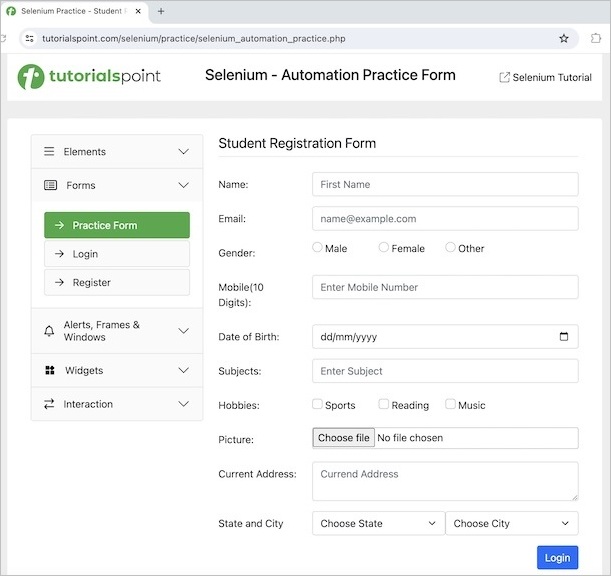
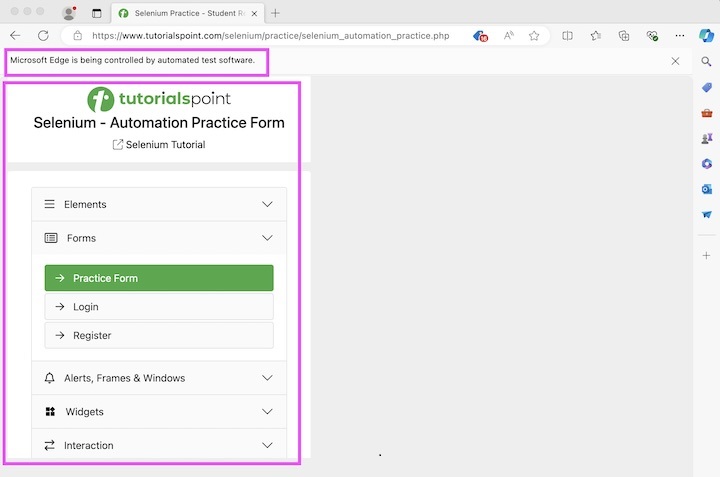
让我们举一个在其他设备中访问以下应用程序的例子。可以将应用程序配置为各种尺寸,以验证其响应能力。用于实现此目的的 CDP 命令是 **Emulation.setDeviceMetricsOverride** 命令。此命令中要传递的最小参数是高度、宽度、移动和 deviceScaleFactor。
或者,我们可以使用 **DevTools::send()** 方法,借助 **setDeviceMetricsOverride()** 方法。但是,**setDeviceMetricsOverride()** 将十二个参数作为参数。在十二个参数中,四个参数是必须的,八个参数是可选的。对于可选参数,我们必须使用 **Optional.empty()** 方法。

示例
package org.example;

import org.openqa.selenium.WebDriver;
import org.openqa.selenium.chromium.HasCdp;
import org.openqa.selenium.devtools.DevTools;
import org.openqa.selenium.devtools.HasDevTools;
import org.openqa.selenium.edge.EdgeDriver;
import java.util.HashMap;
import java.util.Map;
import java.util.concurrent.TimeUnit;

public class UpdateDeviceCDP {
   public static void main(String[] args) throws InterruptedException {

      //Initiate the Webdriver
      WebDriver driver = new EdgeDriver();

      //adding implicit wait of 15 secs
      driver.manage().timeouts().implicitlyWait(15, TimeUnit.SECONDS);

      // instance of DevTools
      DevTools d = ((HasDevTools) driver).getDevTools();

      // create a session
      d.createSession();

      // device configurations
      Map dM = new HashMap(){
         {
            put("width", 500);
            put("height", 600);
            put("mobile", true);
            put("deviceScaleFactor", 50);
         }
      };
      ((HasCdp) driver).executeCdpCommand("Emulation.setDeviceMetricsOverride", dM);

      // open application url
      driver.get("https://tutorialspoint.com/selenium/practice/selenium_automation_practice.php");
   }
}
它将显示以下输出:

在上面的示例中,我们观察到屏幕尺寸变小了,其规格在代码中传递。
使用 CDP 模拟网络速度
让我们举一个检查当互联网连接处于 2G 状态时应用程序行为的例子。CDP 命令 **Network.emulateNetworkConditions** 用于实现此目的。此命令中需要传递的最小五个参数是脱机、延迟、下载吞吐量、上传吞吐量和 CONNECTIONTYPE。CONNECTIONTYPE 可以具有 3G、2G、4G、BLUETOOTH、WIFI、ETHERNET 和 NONE 等值。对于其余参数,我们必须使用 **Optional.empty()** 方法。
示例
package org.example;

import org.openqa.selenium.WebDriver;
import org.openqa.selenium.devtools.DevTools;
import org.openqa.selenium.devtools.HasDevTools;
import org.openqa.selenium.devtools.v124.network.model.ConnectionType;
import org.openqa.selenium.edge.EdgeDriver;
import org.openqa.selenium.devtools.v124.network.Network;
import java.util.Optional;
import java.util.concurrent.TimeUnit;

public class UpdateNetworkCDP {
   public static void main(String[] args) throws InterruptedException {

      //Initiate the Webdriver
      WebDriver driver = new EdgeDriver();

      //adding implicit wait of 15 secs
      driver.manage().timeouts().implicitlyWait(15, TimeUnit.SECONDS);

      // instance of DevTools
      DevTools d = ((HasDevTools) driver).getDevTools();

      // create a session
      d.createSession();

      // network 2G configurations
      d.send(Network.enable(Optional.empty(),Optional.empty(), Optional.empty()));
      d.send(Network.emulateNetworkConditions(
         false,
         50,
         30,
         40,
         Optional.of(ConnectionType.CELLULAR2G),
         Optional.empty(),
         Optional.empty(),
         Optional.empty()
      ));

      // open application url
      driver.get("https://tutorialspoint.com/selenium/practice/selenium_automation_practice.php");
   }
}
在上面的示例中,我们使用模拟的 2G 网络连接打开了应用程序。
使用 CDP 模拟地理位置
让我们举一个使用 **Emulation.setGeolocationOverride** 命令模拟地理位置的例子。
示例
package org.example;

import org.openqa.selenium.WebDriver;
import org.openqa.selenium.devtools.DevTools;
import org.openqa.selenium.devtools.HasDevTools;
import org.openqa.selenium.devtools.v124.emulation.Emulation;
import org.openqa.selenium.edge.EdgeDriver;
import java.util.Optional;
import java.util.concurrent.TimeUnit;

public class UpdateGeolocations {
   public static void main(String[] args) throws InterruptedException {

      //Initiate the Webdriver
      WebDriver driver = new EdgeDriver();

      //adding implicit wait of 15 secs
      driver.manage().timeouts().implicitlyWait(15, TimeUnit.SECONDS);

      // instance of DevTools
      DevTools d = ((HasDevTools) driver).getDevTools();

      // create a session
      d.createSession();

      // update geolocations latitude and longitude
      d.send(Emulation.setGeolocationOverride(
         Optional.of(48.78232),
         Optional.of(9.17702),
         Optional.of(80)
      ));

      // open application url
      driver.get("https://where-am-i.org/");
   }
}
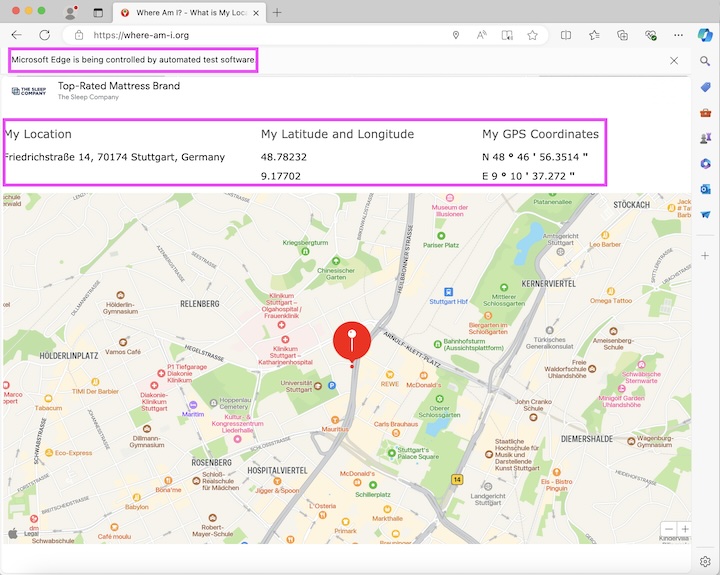
它将显示以下输出:

在上面的示例中,我们已将地理位置覆盖到德国。
使用 CDP 获取 HTTP 请求
让我们举一个在应用程序启动时获取 HTTP 请求及其响应、数据、标头等的例子。要开始捕获网络流量,我们将设置 **Network.enable**,它与 send() 方法一起使用。此外,我们将分别使用 **getRequest().getUrl()** 和 **getRequest().getMethod()** 方法获取 URL 和方法名称。
示例
package org.example;

import org.openqa.selenium.WebDriver;
import org.openqa.selenium.devtools.DevTools;
import org.openqa.selenium.devtools.HasDevTools;
import org.openqa.selenium.devtools.v124.network.Network;
import org.openqa.selenium.edge.EdgeDriver;
import java.util.Optional;
import java.util.concurrent.TimeUnit;

public class ObtainHttpReq {
   public static void main(String[] args) throws InterruptedException {

      //Initiate the Webdriver
      WebDriver driver = new EdgeDriver();

      //adding implicit wait of 15 secs
      driver.manage().timeouts().implicitlyWait(15, TimeUnit.SECONDS);

      // instance of DevTools
      DevTools d = ((HasDevTools) driver).getDevTools();

      // create a session
      d.createSession();

      // get network traffic
      d.send(Network.enable(Optional.empty(),
      Optional.empty(), Optional.empty()));
      d.addListener(Network.requestWillBeSent(),
      e -> {
         System.out.println("Get Request URI: " + e.getRequest().getUrl()+ "\n"
            + "along with method: "+ e.getRequest().getMethod() + "\n");
         e.getRequest().getMethod();
      });

      // open application url
      driver.get("https://tutorialspoint.com/selenium/practice/login.php");

      // quit browser
      driver.quit();
   }
}
它将显示以下输出:
Get Request URI:
https://tutorialspoint.com/selenium/practice/login.php

along with method: GET
使用 CDP 获取控制台日志
让我们举一个获取控制台日志的例子。这有助于调试和对测试失败进行根本原因分析。要开始捕获控制台日志,我们将设置 **Log.enable**,它与 send() 方法一起使用。此外,我们将分别使用 **getText()** 和 **getLevel()** 方法获取日志文本和日志级别。
示例
package org.example;

import org.openqa.selenium.WebDriver;
import org.openqa.selenium.devtools.DevTools;
import org.openqa.selenium.devtools.HasDevTools;
import org.openqa.selenium.devtools.v124.log.Log;
import org.openqa.selenium.edge.EdgeDriver;
import java.util.concurrent.TimeUnit;

public class LogLevelCdp {
   public static void main(String[] args) throws InterruptedException {

      // Initiate the Webdriver
      WebDriver driver = new EdgeDriver();

      //adding implicit wait of 15 secs
      driver.manage().timeouts().implicitlyWait(15, TimeUnit.SECONDS);

      // instance of DevTools
      DevTools d = ((HasDevTools) driver).getDevTools();

      // create a session
      d.createSession();

      // enable logging
      d.send(Log.enable());

      // get log levels and text
      d.addListener(Log.entryAdded(),
         logEntry -> {
            System.out.println("Log text: "+logEntry.getText());
            System.out.println("Log level: "+logEntry.getLevel());
         });

      // open application url
      driver.get("https://tutorialspoint.com/selenium/practice/login.php");

      // quit browser
      driver.quit();
   }
}
它将显示以下输出:
Log text: [DOM] Input elements should have autocomplete attributes
(suggested: "current-password"):
(More info: https://www.chromium.org/developers/design-documents/create-amazing-password-forms) %o

Log level: verbose
使用 CDP 获取性能指标
让我们举一个获取应用程序性能指标的例子。要开始捕获指标,我们将设置 **Performance.enable**,它与 send() 方法一起使用。此外,我们将使用 **Performance.getMetrics()** 方法获取所有指标。
示例 1
package org.example;

import org.openqa.selenium.WebDriver;
import org.openqa.selenium.devtools.DevTools;
import org.openqa.selenium.devtools.HasDevTools;
import org.openqa.selenium.devtools.v124.performance.Performance;
import org.openqa.selenium.devtools.v124.performance.model.Metric;
import org.openqa.selenium.edge.EdgeDriver;
import java.util.Arrays;
import java.util.List;
import java.util.Optional;
import java.util.concurrent.TimeUnit;
import java.util.stream.Collectors;

public class PerformanceMonitoringCdp {
   public static void main(String[] args) throws InterruptedException {

      //Initiate the Webdriver
      WebDriver driver = new EdgeDriver();

      //adding implicit wait of 15 secs
      driver.manage().timeouts().implicitlyWait(15, TimeUnit.SECONDS);

      // instance of DevTools
      DevTools d = ((HasDevTools) driver).getDevTools();

      // create a session
      d.createSession();

      // enable performance monitoring
      d.send(Performance.enable(Optional.empty()));

      // open application url
      driver.get("https://tutorialspoint.com/selenium/practice/text-box.php");

      // get performance
      List<Metric> m = d.send(Performance.getMetrics());
      List<String> mN = m.stream()
         .map(o -> o.getName())
         .collect(Collectors.toList());

      d.send(Performance.disable());

      List<String> metricsToCheck = Arrays.asList(
         "Timestamp", "Documents", "Frames", "JSEventListeners",
         "LayoutObjects", "MediaKeySessions", "Nodes",
         "Resources", "DomContentLoaded", "NavigationStart"
      );

      metricsToCheck.forEach( metric -> System.out.println(metric +
         " is : " + m.get(mN.indexOf(metric)).getValue()));

      // open application url
      driver.get("https://tutorialspoint.com/selenium/practice/login.php");

      // quit browser
      driver.quit();
   }
}
它将显示以下输出:
Timestamp is : 15204.440213
Documents is : 7
Frames is : 4
JSEventListeners is : 30
LayoutObjects is : 170
MediaKeySessions is : 0
Nodes is : 528
Resources is : 10
DomContentLoaded is : 15204.419683
NavigationStart is : 15203.25931

Process finished with exit code 0
示例 2
让我们举一个使用 CDP 命令 **Network.setExtraHTTPHeaders** 执行基本身份验证的例子,该命令与 send() 方法一起使用,并带有标头数据。它将有助于进行身份验证并绕过任何弹出窗口。
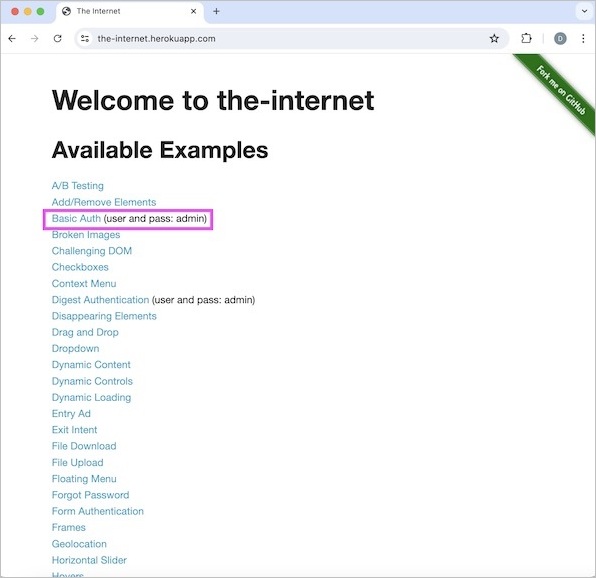
让我们以以下页面的示例为例,单击“基本身份验证”链接后,我们将收到一个弹出窗口,要求输入凭据。

在“用户名”和“密码”字段中都传递凭据 admin,然后单击“登录”按钮继续。

最后,成功身份验证后,我们将获得一个包含以下文本的页面:**恭喜!您必须拥有正确的凭据**。

代码实现
package org.example;

import com.google.common.collect.ImmutableMap;
import org.openqa.selenium.By;
import org.openqa.selenium.WebDriver;
import org.openqa.selenium.WebElement;
import org.openqa.selenium.devtools.DevTools;
import org.openqa.selenium.devtools.HasDevTools;
import org.openqa.selenium.devtools.v124.network.Network;
import org.openqa.selenium.devtools.v124.network.model.Headers;
import org.openqa.selenium.edge.EdgeDriver;
import java.util.*;
import java.util.concurrent.TimeUnit;

public class BasicAuthCdp {
   public static void main(String[] args) throws InterruptedException {

      //Initiate the Webdriver
      WebDriver driver = new EdgeDriver();

      //adding implicit wait of 15 secs
      driver.manage().timeouts().implicitlyWait(15, TimeUnit.SECONDS);

      // instance of DevTools
      DevTools d = ((HasDevTools) driver).getDevTools();

      // create a session
      d.createSession();
      d.send(Network.enable(Optional.empty(),Optional.empty(), Optional.empty()));

      String encodedAuth = Base64.getEncoder().encodeToString("admin:admin".getBytes());
      Map<String, Object> headers = ImmutableMap.of("Authorization", "Basic " + encodedAuth);

      d.send(Network.setExtraHTTPHeaders(new Headers(headers)));

      // open application
      driver.get("https://the-internet.herokuapp.com/basic_auth");

      WebElement e = driver.findElement(By.tagName("p"));
      System.out.println("Text is: " + e.getText());

      // quit browser
      driver.quit();
   }
}
它将显示以下输出:
Text is: Congratulations! You must have the proper credentials.

Process finished with exit code 0
在上面的示例中,我们在标头中传递了身份验证,因此在触发测试时没有遇到弹出窗口。
