
- Selenium 教程
- Selenium - 首页
- Selenium - 概述
- Selenium - 组件
- Selenium - 自动化测试
- Selenium - 环境搭建
- Selenium - 远程控制
- Selenium IDE 教程
- Selenium - IDE 简介
- Selenium - 特性
- Selenium - 限制
- Selenium - 安装
- Selenium - 创建测试
- Selenium - 创建脚本
- Selenium - 控制流
- Selenium - 存储变量
- Selenium - 警报和弹出窗口
- Selenium - Selenese 命令
- Selenium - 操作命令
- Selenium - 访问器命令
- Selenium - 断言命令
- Selenium - Assert/Verify 方法
- Selenium - 定位策略
- Selenium - 脚本调试
- Selenium - 验证点
- Selenium - 模式匹配
- Selenium - JSON 数据文件
- Selenium - 浏览器执行
- Selenium - 用户扩展
- Selenium - 代码导出
- Selenium - 代码输出
- Selenium - JavaScript 函数
- Selenium - 插件
- Selenium WebDriver 教程
- Selenium - 简介
- Selenium WebDriver vs RC
- Selenium - 安装
- Selenium - 第一个测试脚本
- Selenium - 驱动程序会话
- Selenium - 浏览器选项
- Selenium - Chrome 选项
- Selenium - Edge 选项
- Selenium - Firefox 选项
- Selenium - Safari 选项
- Selenium - 双击
- Selenium - 右键单击
- Python 中的 HTML 报告
- 处理编辑框
- Selenium - 单个元素
- Selenium - 多个元素
- Selenium Web 元素
- Selenium - 文件上传
- Selenium - 定位器策略
- Selenium - 相对定位器
- Selenium - 查找器
- Selenium - 查找所有链接
- Selenium - 用户交互
- Selenium - WebElement 命令
- Selenium - 浏览器交互
- Selenium - 浏览器命令
- Selenium - 浏览器导航
- Selenium - 警报和弹出窗口
- Selenium - 处理表单
- Selenium - 窗口和选项卡
- Selenium - 处理链接
- Selenium - 输入框
- Selenium - 单选按钮
- Selenium - 复选框
- Selenium - 下拉框
- Selenium - 处理 IFrame
- Selenium - 处理 Cookie
- Selenium - 日期时间选择器
- Selenium - 动态 Web 表格
- Selenium - Actions 类
- Selenium - Action 类
- Selenium - 键盘事件
- Selenium - 键上/下
- Selenium - 复制和粘贴
- Selenium - 处理特殊键
- Selenium - 鼠标事件
- Selenium - 拖放
- Selenium - 笔事件
- Selenium - 滚动操作
- Selenium - 等待策略
- Selenium - 显式/隐式等待
- Selenium - 支持功能
- Selenium - 多选
- Selenium - 等待支持
- Selenium - 选择支持
- Selenium - 颜色支持
- Selenium - ThreadGuard
- Selenium - 错误和日志记录
- Selenium - 异常处理
- Selenium - 其他
- Selenium - 处理 Ajax 调用
- Selenium - JSON 数据文件
- Selenium - CSV 数据文件
- Selenium - Excel 数据文件
- Selenium - 跨浏览器测试
- Selenium - 多浏览器测试
- Selenium - 多窗口测试
- Selenium - JavaScript 执行器
- Selenium - 无头执行
- Selenium - 捕获屏幕截图
- Selenium - 捕获视频
- Selenium - 页面对象模型
- Selenium - 页面工厂
- Selenium - 记录和回放
- Selenium - 框架
- Selenium - 浏览上下文
- Selenium - DevTools
- Selenium Grid 教程
- Selenium - 概述
- Selenium - 架构
- Selenium - 组件
- Selenium - 配置
- Selenium - 创建测试脚本
- Selenium - 测试执行
- Selenium - 端点
- Selenium - 自定义节点
- Selenium 报告工具
- Selenium - 报告工具
- Selenium - TestNG
- Selenium - JUnit
- Selenium - Allure
- Selenium 和其他技术
- Selenium - Java 教程
- Selenium - Python 教程
- Selenium - C# 教程
- Selenium - Javascript 教程
- Selenium - Kotlin 教程
- Selenium - Ruby 教程
- Selenium - Maven 和 Jenkins
- Selenium - 数据库测试
- Selenium - LogExpert 日志记录
- Selenium - Log4j 日志记录
- Selenium - Robot Framework
- Selenium - AutoIT
- Selenium - Flash 测试
- Selenium - Apache Ant
- Selenium - Github 教程
- Selenium - SoapUI
- Selenium - Cucumber
- Selenium - IntelliJ
- Selenium - XPath
- Selenium 其他概念
- Selenium - IE 驱动程序
- Selenium - 自动化框架
- Selenium - 关键字驱动框架
- Selenium - 数据驱动框架
- Selenium - 混合驱动框架
- Selenium - SSL 证书错误
- Selenium - 替代方案
- Selenium 有用资源
- Selenium - 问答
- Selenium - 快速指南
- Selenium - 有用资源
- Selenium - 自动化实践
- Selenium - 讨论
Selenium WebDriver - CSV 数据文件
Selenium Webdriver 可用于与 csv 数据文件交互。在自动化测试中,通常会通过 csv 文件传递大量数据以支持数据驱动框架。csv 文件看起来类似于 Excel 文件,并且扩展名为 .csv。
Java 提供了一些类和方法,可以使用 OpenCSV 库对 csv 文件执行读写数据操作。OpenCSV 拥有两个最重要的类 - CSVReader 和 CSVWriter,用于对 csv 文件执行读写操作。
如何安装 OpenCSV?
步骤 1 - 从链接 OpenCSV 将 OpenCSV 依赖项添加到 pom.xml 文件中。
步骤 2 - 保存包含所有依赖项的 pom.xml 并更新 Maven 项目。
读取 CSV 中的所有值
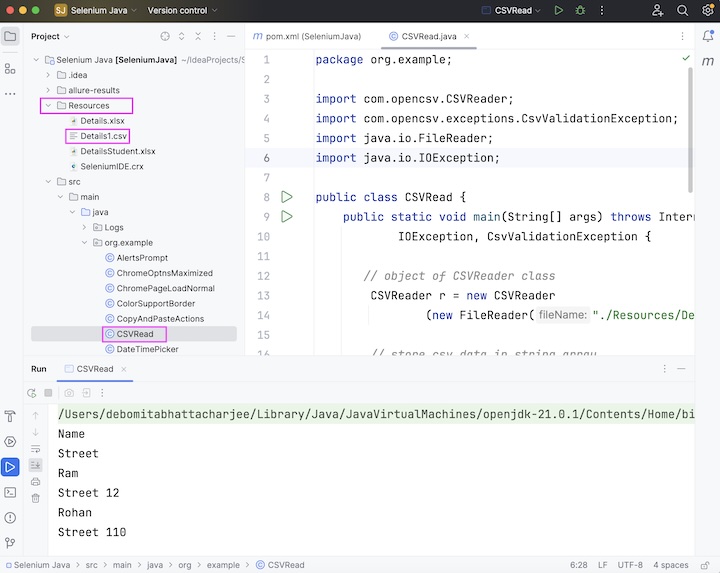
让我们以下面名为 Details1.csv 的 csv 文件为例,我们将读取整个 csv 文件并使用 CSVReader 类及其方法 readNext() 检索其所有值。
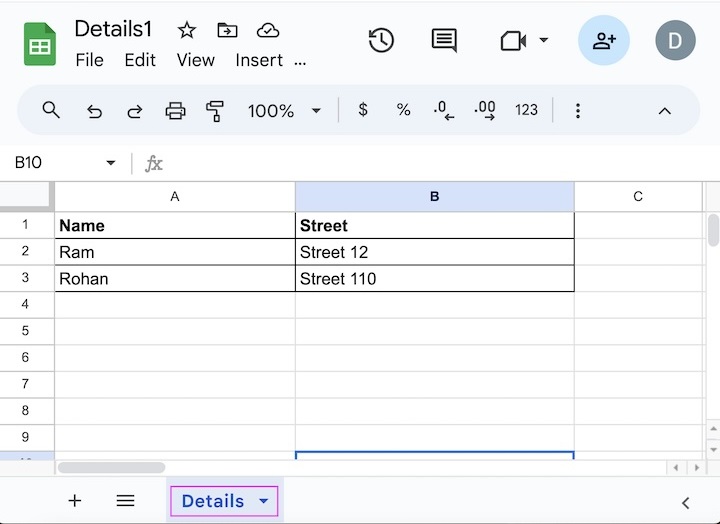
请注意 - Details1.csv 文件放置在项目下的 Resources 文件夹中,如下面的图像所示。
示例
package org.example;

import com.opencsv.CSVReader;
import com.opencsv.exceptions.CsvValidationException;
import java.io.FileReader;
import java.io.IOException;

public class CSVRead {
   public static void main(String[] args) throws InterruptedException,
   IOException, CsvValidationException {

      // object of CSVReader class
      CSVReader r = new CSVReader(new FileReader("./Resources/Details1.CSV"));

      // store csv data in string array
      String [] csvValues;

      // iterate through csv till the end of the values
      while ((csvValues = r.readNext())!= null){

         // iterate through rows
         for (String csvValue : csvValues){
            System.out.println(csvValue);
         }
      }
   }
}
添加到 pom.xml 的依赖项。
<?xml version="1.0" encoding="UTF-8"?>
<project xmlns="http://maven.apache.org/POM/4.0.0"
   xmlns:xsi="http://www.w3.org/2001/XMLSchema-instance"
   xsi:schemaLocation="http://maven.apache.org/POM/4.0.0
   http://maven.apache.org/xsd/maven-4.0.0.xsd">

   <modelVersion>4.0.0</modelVersion>
   <groupId>org.example</groupId>
   <artifactId>SeleniumJava</artifactId>
   <version>1.0-SNAPSHOT</version>

   <properties>
      <maven.compiler.source>16</maven.compiler.source>
      <maven.compiler.target>16</maven.compiler.target>
      <project.build.sourceEncoding>UTF-8</project.build.sourceEncoding>
   </properties>

   <!-- https://mvnrepository.com/artifact/org.seleniumhq.selenium/selenium-java -->
   <dependencies>
      <dependency>
         <groupId>org.seleniumhq.selenium</groupId>
         <artifactId>selenium-java</artifactId>
         <version>4.11.0</version>
      </dependency>

      <!-- https://mvnrepository.com/artifact/com.opencsv/opencsv -->
      <dependency>
         <groupId>com.opencsv</groupId>
         <artifactId>opencsv</artifactId>
         <version>5.9</version>
      </dependency>
   </dependencies>
</project>
输出
Name
Street
Ram
Street 12
Rohan
Street 110

Process finished with exit code 0
在上面的示例中,我们读取了整个 csv 文件并在控制台中获取了其所有值。
最后,收到消息 Process finished with exit code 0,表示代码已成功执行。
Explore our latest online courses and learn new skills at your own pace. Enroll and become a certified expert to boost your career.
在 CSV 中写入和读取值
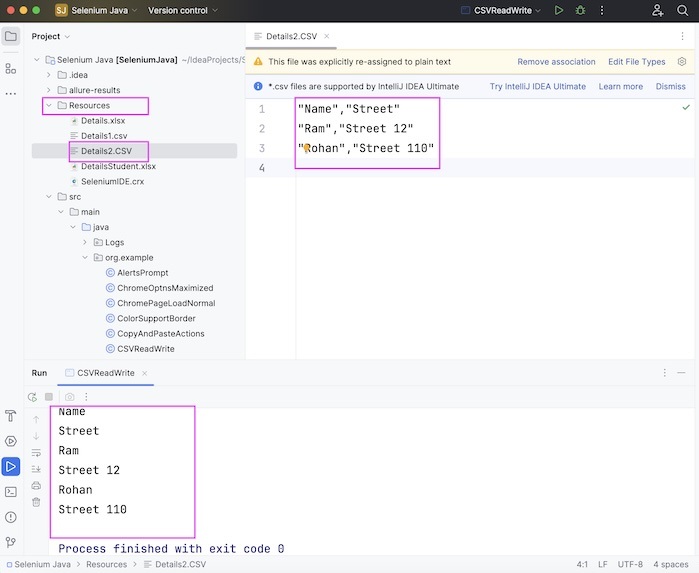
让我们再举一个例子,我们将创建一个名为 Details2.csv 的 csv 文件,该文件位于项目中的 Resources 文件夹下,并使用 CSVWriter 类及其方法:writeNext() 或 writeAll() 以及 flush() 写入一些值。最后,使用 CSVReader 类及其方法 readNext() 读取这些值。
示例
package org.example;

import com.opencsv.CSVReader;
import com.opencsv.CSVWriter;
import com.opencsv.exceptions.CsvValidationException;
import java.io.FileReader;
import java.io.FileWriter;
import java.io.IOException;
import java.util.ArrayList;
import java.util.List;

public class CSVReadWrite {
   public static void main(String[] args) throws InterruptedException,
   IOException, CsvValidationException {

      // object of CSVWriter class
      CSVWriter w = new CSVWriter(new FileWriter("./Resources/Details2.CSV"));

      // stores values in csv
      String [] rows1 = {"Name", "Street"};
      String [] rows2 = {"Ram", "Street 12"};
      String [] rows3 = {"Rohan", "Street 110"};

      // add values to be written to list
      List<String[]> write = new ArrayList<>();
      write.add(rows1);
      write.add(rows2);
      write.add(rows3);

      // write and flush all values
      w.writeAll(write);
      w.flush();

      CSVReader r = new CSVReader(new FileReader("./Resources/Details2.CSV"));

      // store csv data in string array
      String [] csvValues;

      // iterate through csv till the end of the values
      while ((csvValues = r.readNext())!= null){
         // iterate through rows
         for (String csvValue : csvValues){
            System.out.println(csvValue);
         }
      }
   }
}
添加到 pom.xml 的依赖项。
<?xml version="1.0" encoding="UTF-8"?>
<project xmlns="http://maven.apache.org/POM/4.0.0"
   xmlns:xsi="http://www.w3.org/2001/XMLSchema-instance"
   xsi:schemaLocation="http://maven.apache.org/POM/4.0.0
   http://maven.apache.org/xsd/maven-4.0.0.xsd">

   <modelVersion>4.0.0</modelVersion>
   <groupId>org.example</groupId>
   <artifactId>SeleniumJava</artifactId>
   <version>1.0-SNAPSHOT</version>

   <properties>
      <maven.compiler.source>16</maven.compiler.source>
      <maven.compiler.target>16</maven.compiler.target>
      <project.build.sourceEncoding>UTF-8</project.build.sourceEncoding>
   </properties>

   <!-- https://mvnrepository.com/artifact/org.seleniumhq.selenium/selenium-java -->
   <dependencies>
      <dependency>
         <groupId>org.seleniumhq.selenium</groupId>
         <artifactId>selenium-java</artifactId>
         <version>4.11.0</version>
      </dependency>

      <!-- https://mvnrepository.com/artifact/com.opencsv/opencsv -->
      <dependency>
         <groupId>com.opencsv</groupId>
         <artifactId>opencsv</artifactId>
         <version>5.9</version>
      </dependency>
   </dependencies>
</project>
输出
Name
Street
Ram
Street 12
Rohan
Street 110

Process finished with exit code 0
在上面的示例中,我们在项目内的 Resources 文件夹下创建了一个名为 Details2.csv 的 csv 文件,并在其中写入了一些值。然后我们读取所有这些值,最后在控制台中获取它们。
最后,收到消息 Process finished with exit code 0,表示代码已成功执行。
此外,名为 Details2.csv 的 csv 文件已在项目目录中创建。单击它,我们将获得通过上述代码写入的值。
结论
这总结了我们关于 Selenium Webdriver CSV 数据文件的教程的全面内容。我们首先描述了什么是 OpenCSV 库,如何安装 OpenCSV,并逐步演示了如何在 csv 中读取和写入值,借助 OpenCSV 以及 Selenium Webdriver。这使您能够深入了解 Selenium Webdriver 中的 CSV 数据文件。明智的做法是继续练习您所学的内容,并探索与 Selenium 相关的其他内容,以加深您的理解并扩展您的视野。