
- Selenium 教程
- Selenium - 首页
- Selenium - 概述
- Selenium - 组件
- Selenium - 自动化测试
- Selenium - 环境设置
- Selenium - 远程控制
- Selenium IDE 教程
- Selenium - IDE 简介
- Selenium - 特性
- Selenium - 限制
- Selenium - 安装
- Selenium - 创建测试
- Selenium - 创建脚本
- Selenium - 控制流
- Selenium - 存储变量
- Selenium - 警报和弹出窗口
- Selenium - Selenese 命令
- Selenium - 操作命令
- Selenium - 访问器命令
- Selenium - 断言命令
- Selenium - 断言/验证方法
- Selenium - 定位策略
- Selenium - 脚本调试
- Selenium - 验证点
- Selenium - 模式匹配
- Selenium - JSON 数据文件
- Selenium - 浏览器执行
- Selenium - 用户扩展
- Selenium - 代码导出
- Selenium - 代码发射
- Selenium - JavaScript 函数
- Selenium - 插件
- Selenium WebDriver 教程
- Selenium - 简介
- Selenium WebDriver 与 RC
- Selenium - 安装
- Selenium - 第一个测试脚本
- Selenium - 驱动程序会话
- Selenium - 浏览器选项
- Selenium - Chrome 选项
- Selenium - Edge 选项
- Selenium - Firefox 选项
- Selenium - Safari 选项
- Selenium - 双击
- Selenium - 右键单击
- Python 中的 HTML 报告
- 处理编辑框
- Selenium - 单个元素
- Selenium - 多个元素
- Selenium Web 元素
- Selenium - 文件上传
- Selenium - 定位器策略
- Selenium - 相对定位器
- Selenium - 查找器
- Selenium - 查找所有链接
- Selenium - 用户交互
- Selenium - WebElement 命令
- Selenium - 浏览器交互
- Selenium - 浏览器命令
- Selenium - 浏览器导航
- Selenium - 警报和弹出窗口
- Selenium - 处理表单
- Selenium - 窗口和选项卡
- Selenium - 处理链接
- Selenium - 输入框
- Selenium - 单选按钮
- Selenium - 复选框
- Selenium - 下拉框
- Selenium - 处理 Iframe
- Selenium - 处理 Cookie
- Selenium - 日期时间选择器
- Selenium - 动态 Web 表格
- Selenium - Actions 类
- Selenium - Action 类
- Selenium - 键盘事件
- Selenium - 向上/向下键
- Selenium - 复制和粘贴
- Selenium - 处理特殊键
- Selenium - 鼠标事件
- Selenium - 拖放
- Selenium - 笔事件
- Selenium - 滚动操作
- Selenium - 等待策略
- Selenium - 显式/隐式等待
- Selenium - 支持特性
- Selenium - 多选
- Selenium - 等待支持
- Selenium - 选择支持
- Selenium - 颜色支持
- Selenium - ThreadGuard
- Selenium - 错误和日志记录
- Selenium - 异常处理
- Selenium - 其他
- Selenium - 处理 Ajax 调用
- Selenium - JSON 数据文件
- Selenium - CSV 数据文件
- Selenium - Excel 数据文件
- Selenium - 跨浏览器测试
- Selenium - 多浏览器测试
- Selenium - 多窗口测试
- Selenium - JavaScript 执行器
- Selenium - 无头执行
- Selenium - 捕获屏幕截图
- Selenium - 捕获视频
- Selenium - 页面对象模型
- Selenium - 页面工厂
- Selenium - 记录和回放
- Selenium - 框架
- Selenium - 浏览上下文
- Selenium - DevTools
- Selenium Grid 教程
- Selenium - 概述
- Selenium - 架构
- Selenium - 组件
- Selenium - 配置
- Selenium - 创建测试脚本
- Selenium - 测试执行
- Selenium - 端点
- Selenium - 自定义节点
- Selenium 报告工具
- Selenium - 报告工具
- Selenium - TestNG
- Selenium - JUnit
- Selenium - Allure
- Selenium 与其他技术
- Selenium - Java 教程
- Selenium - Python 教程
- Selenium - C# 教程
- Selenium - Javascript 教程
- Selenium - Kotlin 教程
- Selenium - Ruby 教程
- Selenium - Maven 和 Jenkins
- Selenium - 数据库测试
- Selenium - LogExpert 日志记录
- Selenium - Log4j 日志记录
- Selenium - Robot Framework
- Selenium - AutoIT
- Selenium - Flash 测试
- Selenium - Apache Ant
- Selenium - Github 教程
- Selenium - SoapUI
- Selenium - Cucumber
- Selenium - IntelliJ
- Selenium - XPath
Selenium - 混合驱动框架
Selenium Webdriver 可用于开发基于混合驱动框架的测试脚本。混合驱动框架是关键字驱动框架和数据驱动框架的组合。因此,在混合框架中,我们结合了关键字驱动框架和数据驱动框架的优点。
为什么使用混合框架?
采用混合框架是为了利用关键字驱动框架和数据驱动框架的基本功能。它有助于使测试用例更具灵活性,并且各个功能可以独立存在而不影响其他功能。使用混合框架创建的测试用例更易于维护,并且向此类框架添加新的测试用例所需的时间更少。
混合框架的优点
混合框架的优点如下所示:
- 它是免费和开源的。
- 可用于多个平台、浏览器和设备。
- 易于维护和扩展。
混合框架的缺点
混合框架的缺点如下所示:
- 创建混合框架需要技术专业知识。
- 难以将使用混合框架创建的测试用例移植到另一个应用程序。
- 测试脚本的可读性可能会变得具有挑战性。
混合框架的基本组件
混合框架的基本组件在下面的图表中进行了描述:
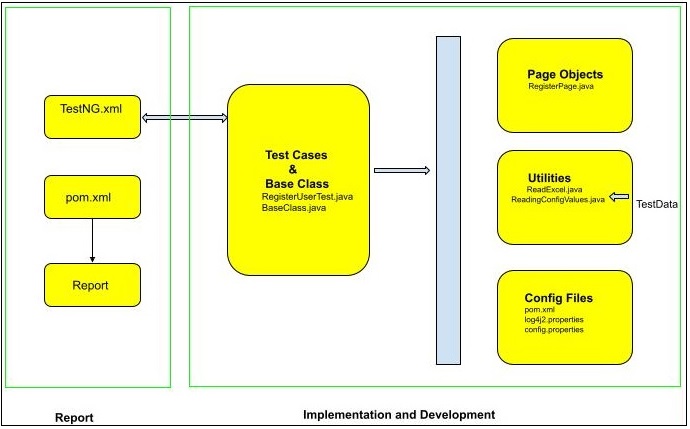
如上图所示,混合框架分为两个阶段 - 实现和开发阶段,以及报告生成阶段。报告生成阶段可以进一步扩展以包含持续集成阶段。对于持续集成阶段,我们可以借助 Jenkins 和其他工具以及 Git(用于代码的版本控制)。
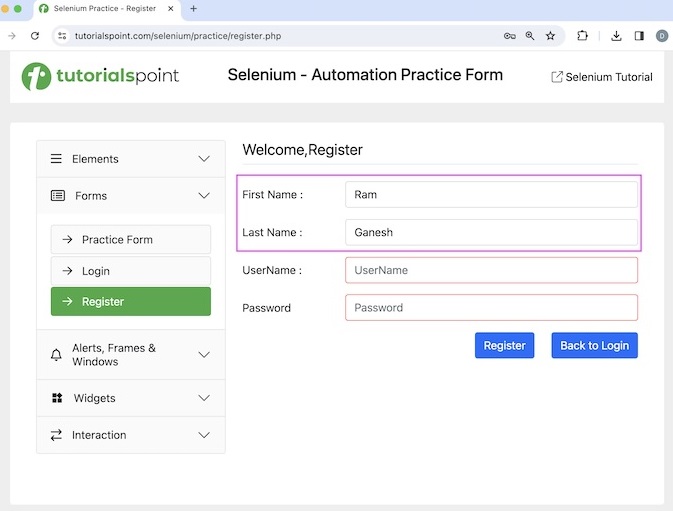
示例
让我们以以下页面为例,在此页面中,我们将名字输入为Ram,姓氏输入为Ganesh,然后使用混合框架验证注册页面中输入的值。
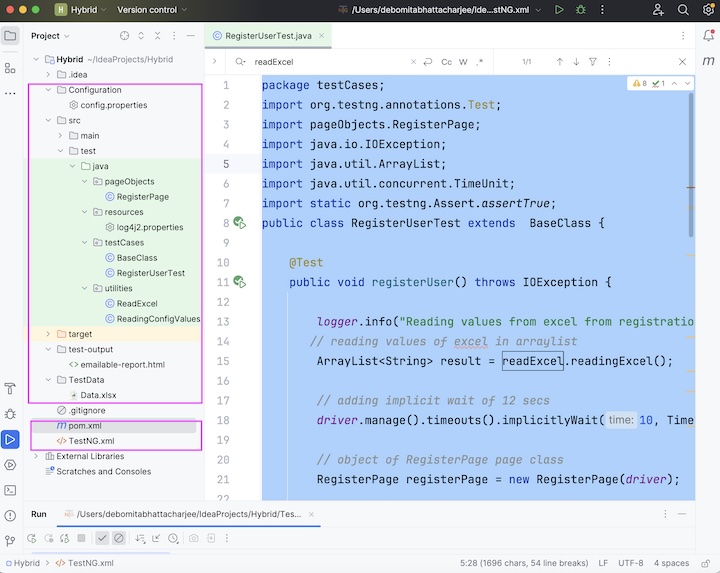
根据之前显示的图表,我们将创建一个名为Hybrid的项目,该项目将开发用于创建混合框架的文件夹和包。
先决条件
- 在系统中安装 Java(版本高于 8),并使用命令检查它是否存在:java -version。如果安装已成功完成,则将显示已安装的 Java 版本。
- 在系统中安装 Maven,并使用命令检查它是否存在:mvn -version。如果安装已成功完成,则将显示已安装的 Maven 版本。
- 安装任何 IDE,例如 Eclipse、IntelliJ 等。
- 从链接 TestNG 添加 TestNG 依赖项。
- 从链接 Selenium Java 添加 Selenium Java 依赖项。
- 从链接 Maven Artifacts 添加 Log4j 依赖项。
- 从链接 Apache POI Common 添加 Apache POI Common 依赖项。
- 从链接 Apache POI API Based 添加基于 OPC 和 OOXML 架构的 Apache POI API 依赖项。
- 保存包含所有依赖项的 pom.xml 并更新 Maven 项目
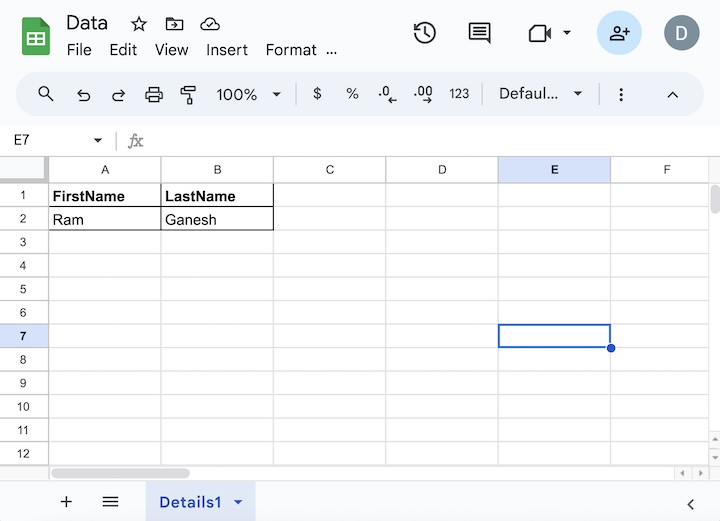
步骤 1 - 首先,准备一个名为Data.xlsx的 Excel 表格,如下面的图片所示,其中包含名字和姓氏字段的Ram和Ganesh数据。将此文件放在项目中的TestData文件夹下。
步骤 2 - 将环境值(如应用程序 URL)存储在config.properties文件中,该文件包含Configuration文件夹下键值对中的数据。
baseUrl=https://tutorialspoint.com/selenium/practice/register.php
步骤 3 - 创建配置文件 - log4j2.properties 文件。在这里,我们将提供设置。在resources文件夹下创建了一个名为log4j2.properties的文件。
log4j2.properties 文件中的配置。
name=PropertiesConfig
property.filename = logs
appenders = console, file

appender.console.type = Console
appender.console.name = STDOUT
appender.console.layout.type = PatternLayout
appender.console.layout.pattern = [%-5level] %d{yyyy-MM-dd HH:mm:ss.SSS} [%t] %c{1} - %msg%n

appender.file.type = File
appender.file.name = LOGFILE
appender.file.fileName=${filename}/LogsGenerated.log
appender.file.layout.type=PatternLayout
appender.file.layout.pattern=[%-5level] %d{yyyy-MM-dd HH:mm:ss.SSS} [%t] %c{1} - %msg%n

loggers=file
logger.file.name=Logs
logger.file.level = debug
logger.file.appenderRefs = file
logger.file.appenderRef.file.ref = LOGFILE

rootLogger.level = debug
rootLogger.appenderRefs = stdout
rootLogger.appenderRef.stdout.ref = STDOUT
步骤 4 - 创建实用程序文件以访问测试用例中config.properties文件和Data.xlsx Excel 文件中的数据。我们将有ReadingConfigValues.java类文件访问config.properties文件中的配置值,以及ReadExcel.java类文件访问Data.xlsx Excel 文件中的测试数据。这两个类文件都放置在utilities包下。
代码实现
package utilities;

import java.io.File;
import java.io.FileInputStream;
import java.util.Properties;

public class ReadingConfigValues {
   Properties p;
   public ReadingConfigValues(){

      // loading properties file with file location
      File s = new File("./Configuration/config.properties");

      try {

         // getting the key value pair
         FileInputStream fileInputStream = new FileInputStream(s);
         p = new Properties();
         p.load(fileInputStream);
      } catch (Exception e){
         System.out.println("Exception encountered: " + e);
      }
   }
   public String getURL() {

      // get URL from .properties file
      String url = p.getProperty("baseUrl");
      return url;
   }
}
代码实现
package utilities;

import org.apache.poi.ss.usermodel.Cell;
import org.apache.poi.ss.usermodel.Row;
import org.apache.poi.xssf.usermodel.XSSFSheet;
import org.apache.poi.xssf.usermodel.XSSFWorkbook;
import java.io.File;
import java.io.FileInputStream;
import java.io.IOException;
import java.util.ArrayList;

public class ReadExcel {
   public ArrayList<String> readingExcel() throws IOException {
      int k;
      int l;

      // identify location of .xlsx file
      File f = new File("./TestData/Data.xlsx");
      FileInputStream i = new FileInputStream(f);

      // instance of XSSFWorkbook
      XSSFWorkbook w = new XSSFWorkbook(i);

      // create sheet in XSSFWorkbook with name Details1
      XSSFSheet s = w.getSheet("Details1");

      // get row and column numbers
      int r = s.getLastRowNum() + 1;
      int c = s.getRow(0).getLastCellNum();

      ArrayList<String> names = new ArrayList<>();

      // iterating through rows
      for (k = 1; k < r; k++) {
         Row rw = s.getRow(k);
         String name = "";

         // iterating through columns
         for (l = 0; l < c; l++) {
            Cell cell = rw.getCell(l);
            if("" != name){
               name += "," + cell.getStringCellValue();
            } else {
               name += cell.getStringCellValue();
            }
         }

         // storing excel values read to arraylist
         names.add(name);
      }

      // closing excel file
      w.close();
      return names;
   }
}
步骤 5 - 在pageObject包下创建一个页面类RegisterPage.java,其中我们将包含 Web 元素 - 输入框以输入数据以及要对这些元素执行的操作。
package pageObjects;

import org.openqa.selenium.WebDriver;
import org.openqa.selenium.WebElement;
import org.openqa.selenium.support.FindBy;
import org.openqa.selenium.support.PageFactory;

public class RegisterPage {
   WebDriver driver;
   @FindBy(xpath = "//*[@id='firstname']")
   WebElement txtFname;

   @FindBy(xpath = "//*[@id='lastname']")
   WebElement txtLname;
   @FindBy(xpath = "//*[@id='signupForm']/div[5]/input")
   WebElement btnRegister;
   public RegisterPage(WebDriver driver) {
      this.driver=driver;

      // initializing all page objects
      PageFactory.initElements(driver, this);
   }
   public void inputFirstname(String fname) {
      txtFname.sendKeys(fname);
   }
   public void inputLastname(String lname) {
      txtLname.sendKeys(lname);
   }
   public void clickRegister() {
      btnRegister.click();
   }
   public String getFirstName(){
      return txtFname.getAttribute("value");
   }
   public String getLastName(){
      return txtLname.getAttribute("value");
   }
}
步骤 6 - 在TestNG.xml中添加以下配置,并具有在 Chrome 和 Edge 浏览器中执行测试用例的功能。
<?xml version="1.0" encoding="UTF-8"?>
<!DOCTYPE suite SYSTEM "http://testng.org/testng-1.0.dtd">
<suite name="All Test Suite">
   <test verbose="2" preserve-order="true" name="RegisterUser.java">
      <parameter name="browser" value="Chrome"></parameter>
      <classes>
         <class name="testCases.RegisterUserTest"></class>
      </classes>
   </test>
</suite>
步骤 7 - 在testCases包下创建测试类 - BaseClass.java和RegisterUserTest.java,我们将在这里编写实际的测试用例。
代码实现
package testCases;

import org.apache.logging.log4j.LogManager;
import org.apache.logging.log4j.Logger;
import org.openqa.selenium.WebDriver;
import org.openqa.selenium.chrome.ChromeDriver;
import org.openqa.selenium.edge.EdgeDriver;
import org.testng.annotations.AfterClass;
import org.testng.annotations.BeforeClass;
import org.testng.annotations.Parameters;
import utilities.ReadingConfigValues;
import utilities.ReadExcel;

public class BaseClass {

   // reading values from external files
   ReadingConfigValues readingConfigValues = new ReadingConfigValues();
   ReadExcel readExcel = new ReadExcel();
   public String baseUrl = readingConfigValues.getURL();
   public static WebDriver driver;
   public static Logger logger;

   @BeforeClass
   @Parameters("browser")
   public void setup(String browser){
      logger = LogManager.getLogger(BaseClass.class);
      logger.info("Application Launched");

      // Initiate browser driver as per browser value
      if (browser.equalsIgnoreCase("Chrome")) {
         driver = new ChromeDriver();
         System.out.println("Browser opened in Chrome");
      } else if (browser.equalsIgnoreCase("Edge")) {
         driver = new EdgeDriver();
         System.out.println("Browser opened in Edge");
      }

      // launch application
      driver.get(baseUrl);
   }
   @AfterClass
   public void tearDown(){

      // quitting browser
      driver.quit();
   }
}
代码实现
package testCases;

import org.testng.annotations.Test;
import pageObjects.RegisterPage;
import java.io.IOException;
import java.util.ArrayList;
import java.util.concurrent.TimeUnit;
import static org.testng.Assert.assertTrue;

public class RegisterUserTest extends  BaseClass {
   @Test
   public void registerUser() throws IOException {
      logger.info("Reading values from excel from registration");

      // reading values of excel in arraylist
      ArrayList<String> result = readExcel.readingExcel();

      // adding implicit wait of 12 secs
      driver.manage().timeouts().implicitlyWait(10, TimeUnit.SECONDS);

      // object of RegisterPage page class
      RegisterPage registerPage = new RegisterPage(driver);
      logger.info("Starting registration");

      // input first and last name
      for (int i = 0; i <result.size(); i++) {
         String[] names = result.get(i).split(",");
         registerPage.inputFirstname(names[0]);
         registerPage.inputLastname(names[1]);
      }

      // click register button
      registerPage.clickRegister();
      logger.info("Verification of entered values");

      // verify value input in the first name
      if (registerPage.getFirstName().equalsIgnoreCase("Ram")){

         // assertions to test case
         assertTrue(true);
      } else {
         assertTrue(false);
      }

      // verify value input in the last name
      if (registerPage.getLastName().equalsIgnoreCase("Ganesh")){

         // assertions to test case
         assertTrue(true);
      } else {
         assertTrue(false);
      }
   }
}
步骤 8 - 将以下依赖项添加到pom.xml。
<?xml version="1.0" encoding="UTF-8"?>
<project xmlns="http://maven.apache.org/POM/4.0.0"
   xmlns:xsi="http://www.w3.org/2001/XMLSchema-instance"
   xsi:schemaLocation="http://maven.apache.org/POM/4.0.0
   http://maven.apache.org/xsd/maven-4.0.0.xsd">

   <modelVersion>4.0.0</modelVersion>
   <groupId>org.example</groupId>
   <artifactId>SeleniumJava</artifactId>
   <version>1.0-SNAPSHOT</version>

   <properties>
      <maven.compiler.source>16</maven.compiler.source>
      <maven.compiler.target>16</maven.compiler.target>
      <project.build.sourceEncoding>UTF-8</project.build.sourceEncoding>
   </properties>

   <!-- https://mvnrepository.com/artifact/org.seleniumhq.selenium/selenium-java -->
   <dependencies>
      <dependency>
         <groupId>org.seleniumhq.selenium</groupId>
         <artifactId>selenium-java</artifactId>
         <version>4.11.0</version>
      </dependency>

      <!-- https://mvnrepository.com/artifact/org.apache.poi/poi -->
      <dependency>
         <groupId>org.apache.poi</groupId>
         <artifactId>poi</artifactId>
         <version>5.2.5</version>
      </dependency>

      <!-- https://mvnrepository.com/artifact/org.apache.poi/poi-ooxml -->
      <dependency>
         <groupId>org.apache.poi</groupId>
         <artifactId>poi-ooxml</artifactId>
         <version>5.2.5</version>
      </dependency>

      <!-- https://mvnrepository.com/artifact/org.testng/testng -->
      <dependency>
         <groupId>org.testng</groupId>
         <artifactId>testng</artifactId>
         <version>7.9.0</version>
         <scope>test</scope>
      </dependency>
      <dependency>
         <groupId>org.apache.logging.log4j</groupId>
         <artifactId>log4j-api</artifactId>
         <version>2.23.1</version>
      </dependency>
      <dependency>
         <groupId>org.apache.logging.log4j</groupId>
         <artifactId>log4j-core</artifactId>
         <version>2.23.1</version>
      </dependency>

      <!-- https://mvnrepository.com/artifact/com.aventstack/extentreports -->
      <dependency>
         <groupId>com.aventstack</groupId>
         <artifactId>extentreports</artifactId>
         <version>5.1.1</version>
      </dependency>
   </dependencies>
</project>
步骤 9 - 通过右键单击TestNG.xml文件并选择“运行 TestNG.xml”选项来运行测试。
输出
Browser opened in Chrome
===============================================
All Test Suite
Total tests run: 1, Passes: 1, Failures: 0, Skips: 0
===============================================

Process finished with exit code 0
在上述示例中,我们借助 TestNG 测试框架和页面对象模型设计模式创建了一个测试,并根据从TestNG.xml 文件传递的Chrome 参数在 Chrome 浏览器中启动了应用程序。然后从Data.xlsx 文件获取测试数据,并将其输入注册页面中的“名”和“姓”字段。
控制台中的结果显示总测试运行次数:1,因为只有一个带有 @Test 注解的方法 registerUser()。
最后,收到消息通过:1和进程已完成,退出代码为 0,表示代码已成功执行。
步骤 10 - 刷新项目,项目结构中应该会生成一个名为test-output的新文件夹。
步骤 11 - 右键单击emailable-report.html,然后选择在浏览器中打开的选项。
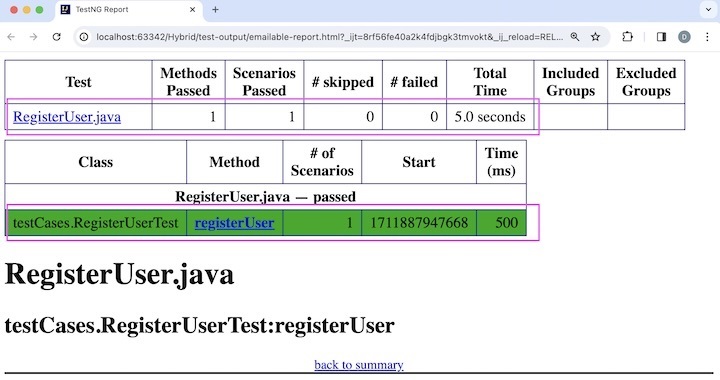
报告在浏览器中打开,显示测试类名称 - RegisterUser.java,以及通过、跳过、失败的总数、测试持续时间等。此外,测试方法名称 registerUser 也包含在报告中。
结论
本教程到此结束,我们全面介绍了 Selenium Webdriver 混合驱动框架。我们首先描述了为什么使用混合驱动框架,以及混合驱动框架的优点、缺点和基本组件,并通过一个示例演示了如何结合 Selenium Webdriver 实现混合驱动框架。
这使您深入了解 Selenium Webdriver 中的混合驱动框架。明智的做法是不断练习您所学到的知识,并探索与 Selenium 相关的其他内容,以加深您的理解并扩展您的视野。