
- Selenium教程
- Selenium - 首页
- Selenium - 概述
- Selenium - 组件
- Selenium - 自动化测试
- Selenium - 环境设置
- Selenium - 远程控制
- Selenium IDE 教程
- Selenium - IDE 介绍
- Selenium - 特性
- Selenium - 限制
- Selenium - 安装
- Selenium - 创建测试
- Selenium - 创建脚本
- Selenium - 控制流
- Selenium - 存储变量
- Selenium - 警报和弹出窗口
- Selenium - Selenese 命令
- Selenium - Actions 命令
- Selenium - Accessors 命令
- Selenium - Assertions 命令
- Selenium - Assert/Verify 方法
- Selenium - 定位策略
- Selenium - 脚本调试
- Selenium - 验证点
- Selenium - 模式匹配
- Selenium - JSON 数据文件
- Selenium - 浏览器执行
- Selenium - 用户扩展
- Selenium - 代码导出
- Selenium - 代码输出
- Selenium - JavaScript 函数
- Selenium - 插件
- Selenium WebDriver 教程
- Selenium - 介绍
- Selenium WebDriver vs RC
- Selenium - 安装
- Selenium - 第一个测试脚本
- Selenium - 驱动程序会话
- Selenium - 浏览器选项
- Selenium - Chrome 选项
- Selenium - Edge 选项
- Selenium - Firefox 选项
- Selenium - Safari 选项
- Selenium - 双击
- Selenium - 右击
- Python 中的 HTML 报告
- 处理编辑框
- Selenium - 单个元素
- Selenium - 多个元素
- Selenium Web 元素
- Selenium - 文件上传
- Selenium - 定位器策略
- Selenium - 相对定位器
- Selenium - 查找器
- Selenium - 查找所有链接
- Selenium - 用户交互
- Selenium - WebElement 命令
- Selenium - 浏览器交互
- Selenium - 浏览器命令
- Selenium - 浏览器导航
- Selenium - 警报和弹出窗口
- Selenium - 处理表单
- Selenium - 窗口和标签页
- Selenium - 处理链接
- Selenium - 输入框
- Selenium - 单选按钮
- Selenium - 复选框
- Selenium - 下拉框
- Selenium - 处理IFrames
- Selenium - 处理Cookie
- Selenium - 日期时间选择器
- Selenium - 动态Web表格
- Selenium - Actions 类
- Selenium - Action 类
- Selenium - 键盘事件
- Selenium - 键上/下
- Selenium - 复制和粘贴
- Selenium - 处理特殊键
- Selenium - 鼠标事件
- Selenium - 拖放
- Selenium - 笔事件
- Selenium - 滚动操作
- Selenium - 等待策略
- Selenium - 显式/隐式等待
- Selenium - 支持特性
- Selenium - 多选
- Selenium - 等待支持
- Selenium - 选择支持
- Selenium - 颜色支持
- Selenium - ThreadGuard
- Selenium - 错误和日志记录
- Selenium - 异常处理
- Selenium - 其他
- Selenium - 处理Ajax调用
- Selenium - JSON 数据文件
- Selenium - CSV数据文件
- Selenium - Excel数据文件
- Selenium - 跨浏览器测试
- Selenium - 多浏览器测试
- Selenium - 多窗口测试
- Selenium - JavaScript 执行器
- Selenium - 无头执行
- Selenium - 捕获屏幕截图
- Selenium - 捕获视频
- Selenium - 页面对象模型
- Selenium - 页面工厂
- Selenium - 记录和回放
- Selenium - 框架
- Selenium - 浏览上下文
- Selenium - DevTools
- Selenium Grid 教程
- Selenium - 概述
- Selenium - 架构
- Selenium - 组件
- Selenium - 配置
- Selenium - 创建测试脚本
- Selenium - 测试执行
- Selenium - 端点
- Selenium - 自定义节点
- Selenium 报告工具
- Selenium - 报告工具
- Selenium - TestNG
- Selenium - JUnit
- Selenium - Allure
- Selenium 和其他技术
- Selenium - Java 教程
- Selenium - Python 教程
- Selenium - C# 教程
- Selenium - Javascript 教程
- Selenium - Kotlin 教程
- Selenium - Ruby 教程
- Selenium - Maven 和 Jenkins
- Selenium - 数据库测试
- Selenium - LogExpert 日志记录
- Selenium - Log4j 日志记录
- Selenium - Robot Framework
- Selenium - AutoIT
- Selenium - Flash 测试
- Selenium - Apache Ant
- Selenium - Github 教程
- Selenium - SoapUI
- Selenium - Cucumber
- Selenium - IntelliJ
- Selenium - XPath
- Selenium 其他概念
- Selenium - IE 驱动程序
- Selenium - 自动化框架
- Selenium - 基于关键字的框架
- Selenium - 基于数据的框架
- Selenium - 混合驱动框架
- Selenium - SSL 证书错误
- Selenium - 替代方案
- Selenium 有用资源
- Selenium - 问答
- Selenium - 快速指南
- Selenium - 有用资源
- Selenium - 自动化实践
- Selenium - 讨论
使用C#的Selenium教程
Selenium 可以与多种语言一起使用,例如 Java、Python、JavaScript、Ruby、C#等等。Selenium 广泛用于 Web 自动化测试。Selenium 是一款开源且可移植的自动化软件测试工具,用于测试 Web 应用程序。
它能够跨不同的浏览器和操作系统运行。Selenium 不仅仅是一个单一的工具,而是一套工具,它帮助测试人员更有效地自动化基于 Web 的应用程序。C# 是 Selenium 的另一种语言绑定。
Selenium 中 Java 和 C# 语言绑定之间没有主要区别。主要区别仅在于语言本身。此外,这两种语言的变更日志也存在差异。
在 Java 中,我们使用 Webdriver、WebElement,但在 C# 中,我们称之为 IWebdriver、IWebElement。因此,C# 中遵循的约定是在声明接口时,在接口名称之前添加字母“I”。
在使用 Java 的页面工厂中,使用 @FindBy 注解来识别元素,但是,在使用 C# 的页面工厂中,它被称为属性,并用 [FindBy] 表示,用于定位元素。
使用 C# 设置 Selenium 并启动浏览器
步骤 1 - 从以下链接安装名为 Visual Studio 的 C# 代码编辑器:https://visualstudio.microsoft.com/downloads/。
使用此编辑器,我们可以开始在 C# 项目上工作以启动我们的测试自动化。
要更详细地了解如何设置 Visual Studio,请参阅以下链接:https://tutorialspoint.com/ebook/。
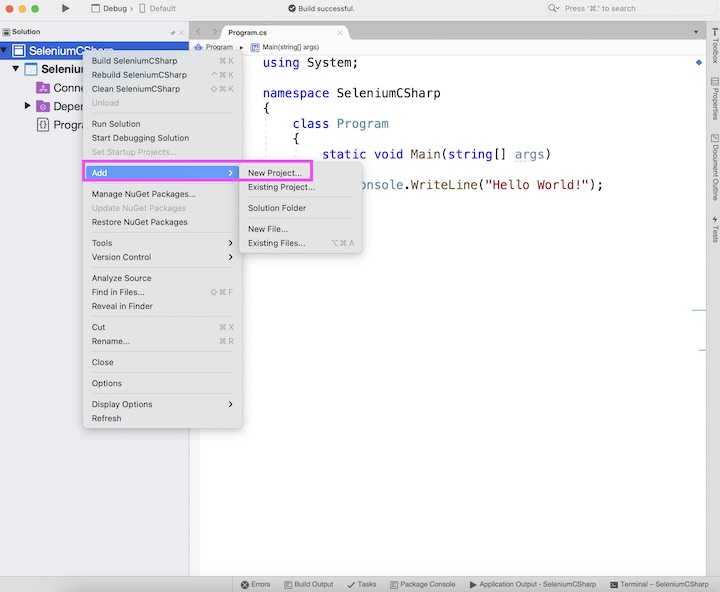
步骤 2 - 创建一个新项目,方法是右键单击现有项目,然后单击“添加”选项,然后单击“新建项目”,或者如果没有打开任何项目,请单击“文件”菜单,然后选择“新建项目”选项。
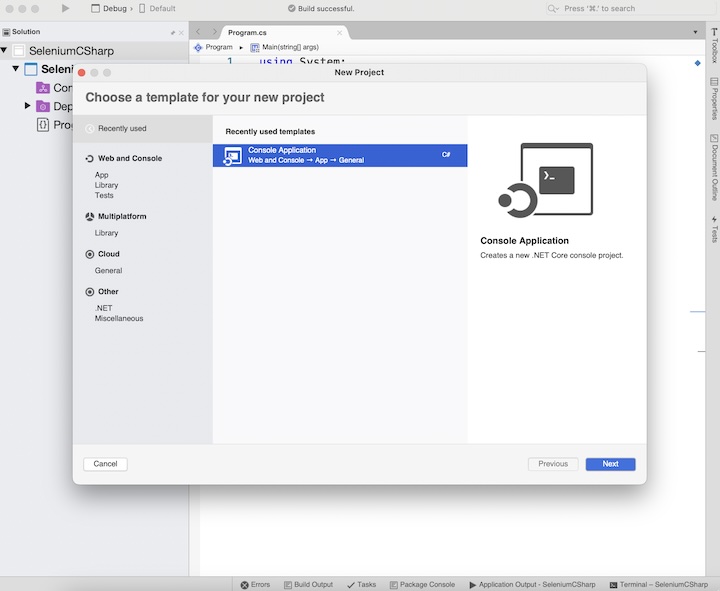
步骤 3 - 选择“控制台应用程序”选项,然后单击“下一步”按钮。
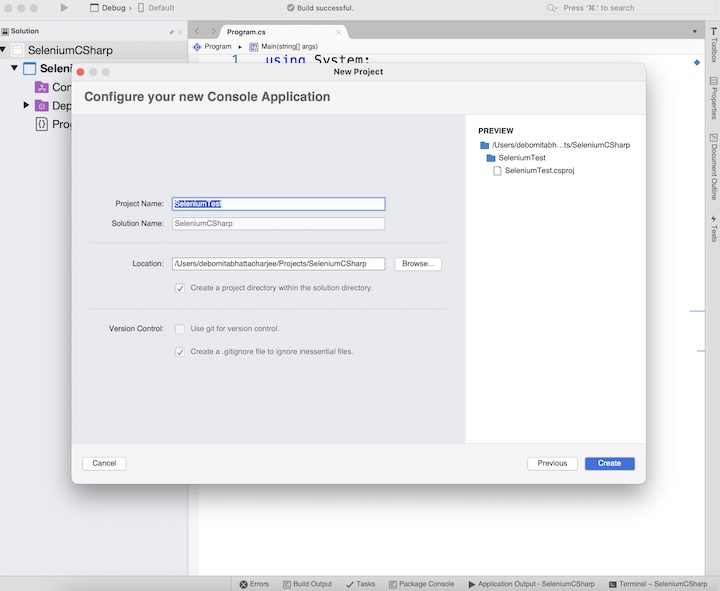
步骤 4 - 输入项目名称,例如 SeleniumTest,然后单击“创建”按钮。
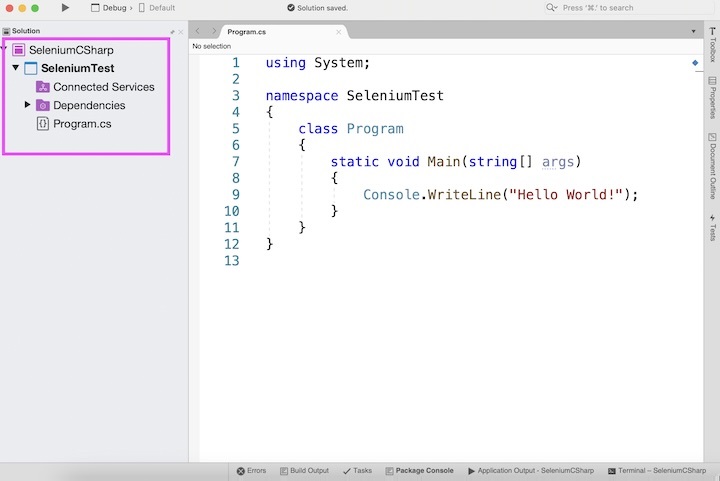
步骤 5 - 新创建的项目 SeleniumTest 应该可见。
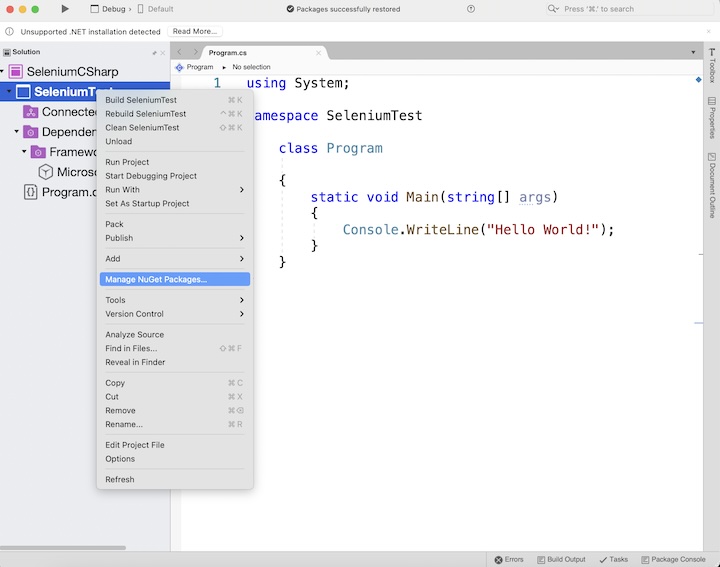
步骤 6 - 右键单击新创建的项目,然后选择“管理 NuGet 包”选项。
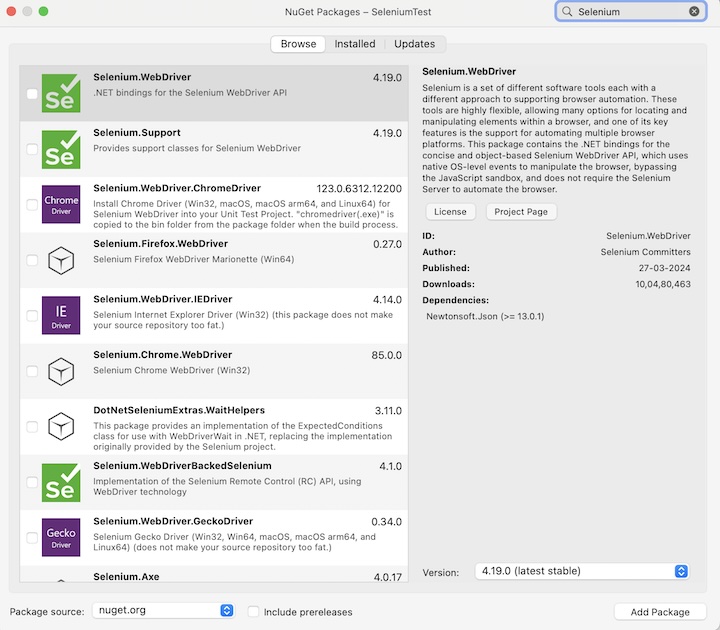
步骤 7 - 在右上角的搜索框中输入 selenium,所有基于 selenium 搜索的包都应该显示。单击 Selenium.WebDriver,然后单击“添加包”按钮。安装所有与 Selenium 相关的包。
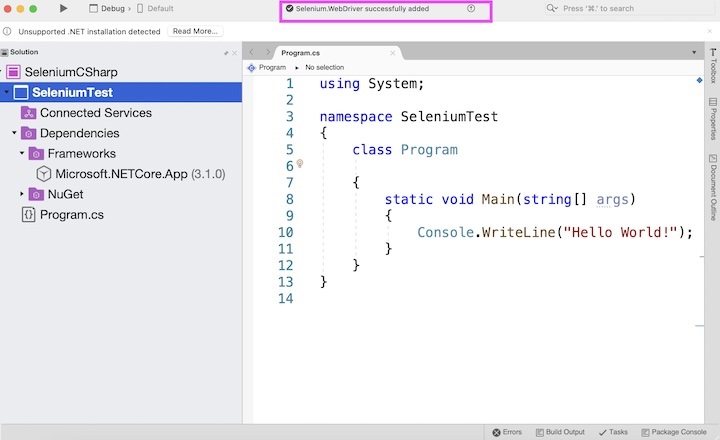
步骤 8 - 完成后,Selenium.Webdriver 成功添加消息将在 Visual Studio 的顶部显示。
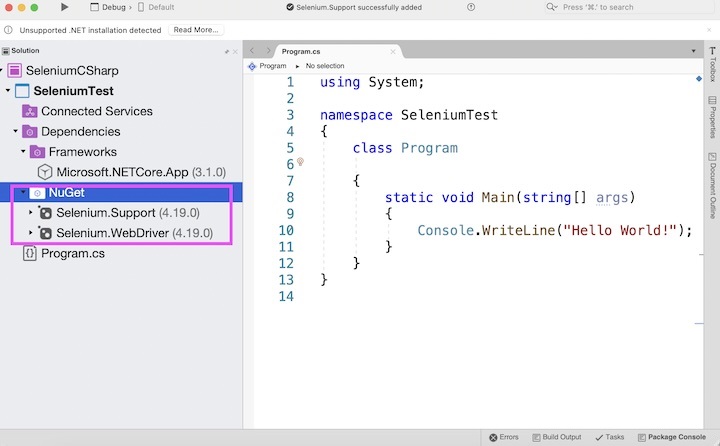
步骤 9 - 重新启动 Visual Studio。再次启动后,所有安装的包都应显示在解决方案资源管理器中的 NuGet 文件夹下。
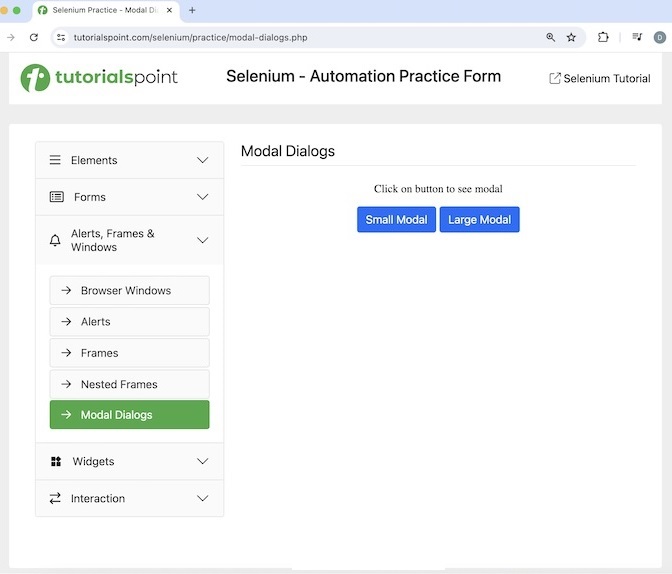
步骤 10 - 编写代码以获取以下页面的页面标题 - **Selenium Practice - Modal Dialogs**。
示例
using System;
using OpenQA.Selenium;
using OpenQA.Selenium.Chrome;

namespace SeleniumTest {
   class Program {
      static void Main(string[] args) {

         // Initiate Webdriver
         IWebDriver driver = new ChromeDriver();

         // adding an implicit wait of 20 secs
         driver.Manage().Timeouts().ImplicitWait = TimeSpan.FromSeconds(20);

         // launch the application
         driver.Navigate().GoToUrl("https://tutorialspoint.com/selenium/practice/modal-dialogs.php");

         // get the page title
         String pageTitle = driver.Title;
         Console.WriteLine("Page title is: " + pageTitle);
      }
   }
}
输出
Page title is: Selenium Practice - Modal Dialogs
在上面的示例中,我们在控制台中启动了一个应用程序并获得了其页面标题,消息为 - **页面标题是:Selenium Practice - Modal Dialogs**。
使用 Selenium C# 启动浏览器并退出驱动程序
我们可以使用 driver.Navigate().GoToUrl 方法启动浏览器并打开应用程序,最后使用 Quit() 方法退出浏览器。
using System;
using OpenQA.Selenium;
using OpenQA.Selenium.Chrome;

namespace SeleniumTest {
   class Program {
      static void Main(string[] args){

         // Initiate Webdriver
         IWebDriver driver = new ChromeDriver();

         // adding an implicit wait of 20 secs
         driver.Manage().Timeouts().ImplicitWait = TimeSpan.FromSeconds(20);

         // launch the application
         driver.Navigate().GoToUrl("https://tutorialspoint.com/selenium/practice/check-box.php");

         // quitting browser
         driver.Quit();
      }
   }
}
在上面的示例中,我们首先在 Chrome 浏览器中启动了一个应用程序,然后退出了浏览器。
使用 Selenium C# 识别元素并检查其功能
导航到网页后,我们必须与页面上可用的 Web 元素进行交互,例如单击链接/按钮、在编辑框中输入文本等等,以完成我们的自动化测试用例。
为此,我们的首要任务是识别元素。Selenium 中为此提供了一些定位器,它们是 id、class、类名、name、链接文本、部分链接文本、标签名、css 和 xpath。这些定位器需要与 FindElement() 方法一起使用。
例如,driver.FindElement(By.Id("id")) 将定位具有给定 id 属性值的第一个 Web 元素。如果找不到具有匹配 id 属性值的元素,则应抛出 NoSuchElementException。
让我们看看下面图片中突出显示的“Impressive”标签旁边的单选按钮的 html 代码 -
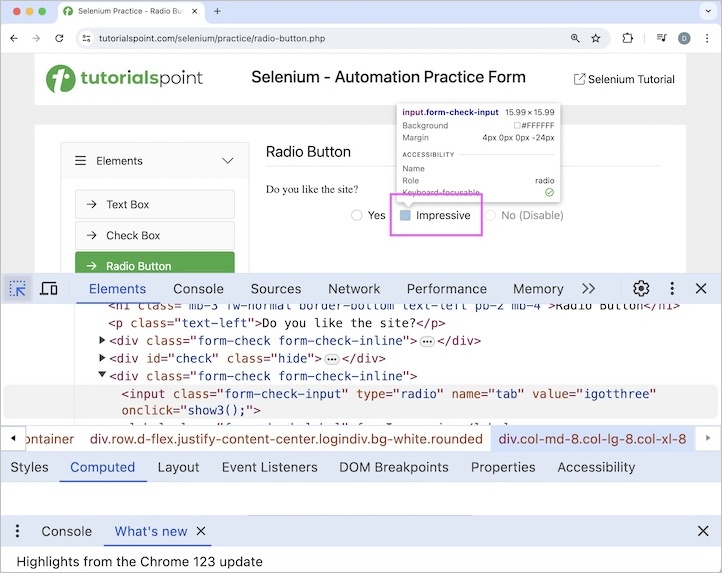
<input class="form-check-input" type="radio" name="tab"
   value="igotthree" onclick="show3();">
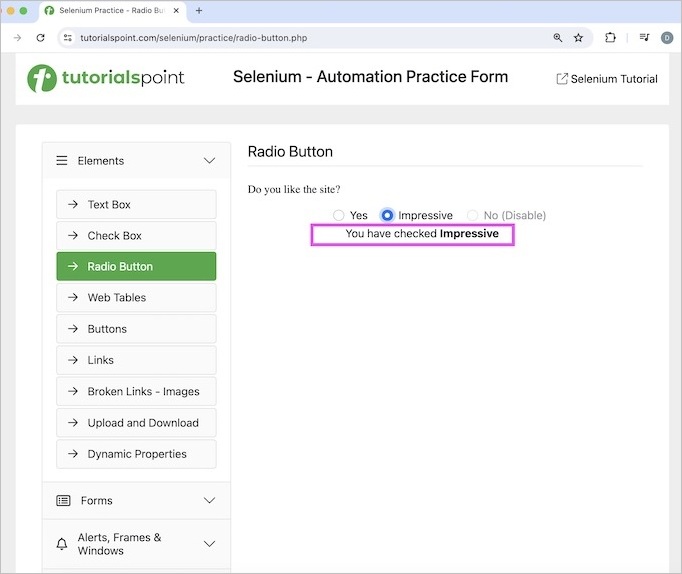
单击该单选按钮后,我们将在网页上看到文本 **You have checked Impressive**。
示例
using System;
using OpenQA.Selenium;
using OpenQA.Selenium.Chrome;

namespace SeleniumTest {
   class Program {
      static void Main(string[] args){

         // Initiate the Webdriver
         IWebDriver driver = new ChromeDriver();

         // adding an implicit wait of 20 secs
         driver.Manage().Timeouts().ImplicitWait = TimeSpan.FromSeconds(20);

         // launch an application
         driver.Navigate().GoToUrl("https://tutorialspoint.com/selenium/practice/radio-button.php");

         // identify a radio button then click on radio button
         IWebElement r = driver.FindElement
            (By.XPath("/html/body/main/div/div/div[2]/form/div[3]/input"));
         r.Click();

         // identify text after clicking radio button
         IWebElement txt = driver.FindElement(By.Id("check1"));

         // obtain text
         String text = txt.Text;
         Console.WriteLine("Text is: " + text);

         // quitting browser
         driver.Quit();
      }
   }
}
输出
Text is: You have checked Impressive
在上面的示例中,我们在控制台中获得了单击“Impressive”标签旁边的单选按钮后的文本,消息为 - **You have checked Impressive**。
本教程到此结束,我们全面介绍了 Selenium - C# 教程。我们首先介绍了如何使用 C# 设置 Selenium 并启动浏览器,以及如何使用 Selenium C# 识别元素并检查其功能。
这使您掌握了 Selenium - C# 教程的深入知识。明智的做法是不断练习您学到的知识,并探索与 Selenium 相关的其他知识,以加深您的理解并拓宽您的视野。
