
- Selenium 教程
- Selenium - 首页
- Selenium - 概述
- Selenium - 组件
- Selenium - 自动化测试
- Selenium - 环境设置
- Selenium - 远程控制
- Selenium IDE 教程
- Selenium - IDE 简介
- Selenium - 功能
- Selenium - 限制
- Selenium - 安装
- Selenium - 创建测试
- Selenium - 创建脚本
- Selenium - 控制流
- Selenium - 存储变量
- Selenium - 警报和弹出窗口
- Selenium - Selenese 命令
- Selenium - 操作命令
- Selenium - 访问器命令
- Selenium - 断言命令
- Selenium - Assert/Verify 方法
- Selenium - 定位策略
- Selenium - 脚本调试
- Selenium - 验证点
- Selenium - 模式匹配
- Selenium - JSON 数据文件
- Selenium - 浏览器执行
- Selenium - 用户扩展
- Selenium - 代码导出
- Selenium - 代码输出
- Selenium - JavaScript 函数
- Selenium - 插件
- Selenium WebDriver 教程
- Selenium - 简介
- Selenium WebDriver 与 RC
- Selenium - 安装
- Selenium - 第一个测试脚本
- Selenium - 驱动程序会话
- Selenium - 浏览器选项
- Selenium - Chrome 选项
- Selenium - Edge 选项
- Selenium - Firefox 选项
- Selenium - Safari 选项
- Selenium - 双击
- Selenium - 右键单击
- Python 中的 HTML 报告
- 处理编辑框
- Selenium - 单个元素
- Selenium - 多个元素
- Selenium Web 元素
- Selenium - 文件上传
- Selenium - 定位器策略
- Selenium - 相对定位器
- Selenium - 查找器
- Selenium - 查找所有链接
- Selenium - 用户交互
- Selenium - WebElement 命令
- Selenium - 浏览器交互
- Selenium - 浏览器命令
- Selenium - 浏览器导航
- Selenium - 警报和弹出窗口
- Selenium - 处理表单
- Selenium - 窗口和标签页
- Selenium - 处理链接
- Selenium - 输入框
- Selenium - 单选按钮
- Selenium - 复选框
- Selenium - 下拉框
- Selenium - 处理 IFrame
- Selenium - 处理 Cookie
- Selenium - 日期时间选择器
- Selenium - 动态 Web 表格
- Selenium - Actions 类
- Selenium - Action 类
- Selenium - 键盘事件
- Selenium - 向上/向下键
- Selenium - 复制和粘贴
- Selenium - 处理特殊键
- Selenium - 鼠标事件
- Selenium - 拖放
- Selenium - 手写笔事件
- Selenium - 滚动操作
- Selenium - 等待策略
- Selenium - 显式/隐式等待
- Selenium - 支持功能
- Selenium - 多选
- Selenium - 等待支持
- Selenium - 选择支持
- Selenium - 颜色支持
- Selenium - ThreadGuard
- Selenium - 错误和日志记录
- Selenium - 异常处理
- Selenium - 其他
- Selenium - 处理 Ajax 调用
- Selenium - JSON 数据文件
- Selenium - CSV 数据文件
- Selenium - Excel 数据文件
- Selenium - 跨浏览器测试
- Selenium - 多浏览器测试
- Selenium - 多窗口测试
- Selenium - JavaScript 执行器
- Selenium - 无头执行
- Selenium - 捕获屏幕截图
- Selenium - 捕获视频
- Selenium - 页面对象模型
- Selenium - 页面工厂
- Selenium - 记录和回放
- Selenium - 框架
- Selenium - 浏览上下文
- Selenium - DevTools
- Selenium Grid 教程
- Selenium - 概述
- Selenium - 架构
- Selenium - 组件
- Selenium - 配置
- Selenium - 创建测试脚本
- Selenium - 测试执行
- Selenium - 端点
- Selenium - 自定义节点
- Selenium 报告工具
- Selenium - 报告工具
- Selenium - TestNG
- Selenium - JUnit
- Selenium - Allure
- Selenium 和其他技术
- Selenium - Java 教程
- Selenium - Python 教程
- Selenium - C# 教程
- Selenium - Javascript 教程
- Selenium - Kotlin 教程
- Selenium - Ruby 教程
- Selenium - Maven 和 Jenkins
- Selenium - 数据库测试
- Selenium - LogExpert 日志记录
- Selenium - Log4j 日志记录
- Selenium - Robot Framework
- Selenium - AutoIT
- Selenium - Flash 测试
- Selenium - Apache Ant
- Selenium - Github 教程
- Selenium - SoapUI
- Selenium - Cucumber
- Selenium - IntelliJ
- Selenium - XPath
Selenium - 使用Excel进行数据驱动
在设计测试时,参数化测试是不可避免的。我们将使用 Apache POI - Excel JAR 来实现这一点。它可以帮助我们读取和写入 Excel。
下载 JAR
步骤 1 - 导航到 URL - https://poi.apache.org/download.html 并下载 ZIP 格式。
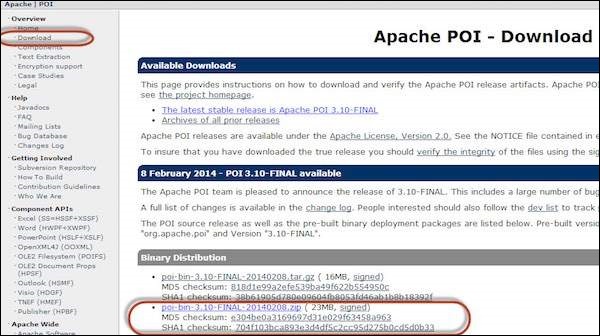
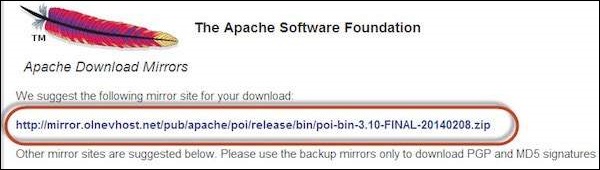
步骤 2 - 单击镜像链接下载 JAR。
步骤 3 - 将内容解压缩到文件夹中。
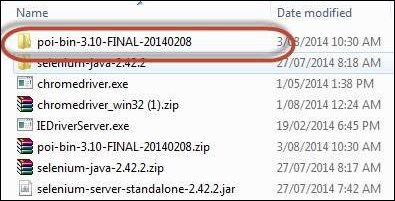
步骤 4 - 解压缩后的内容将如下所示。
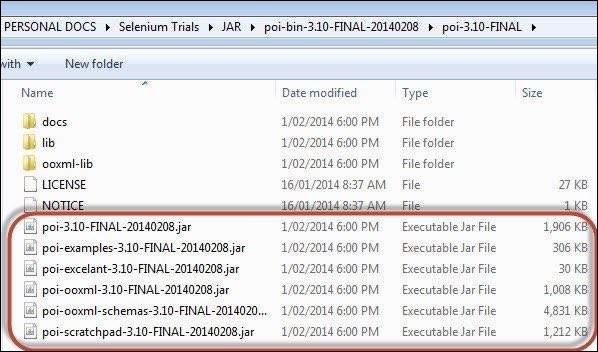
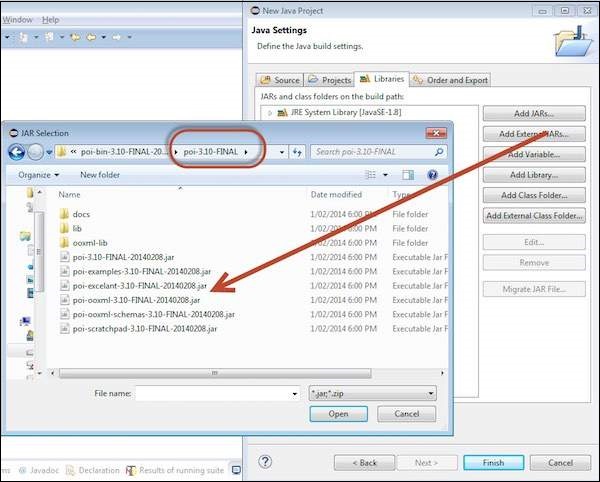
步骤 5 - 现在创建一个新项目,并在“poi-3.10.FINAL”文件夹下添加所有“外部 JAR”。
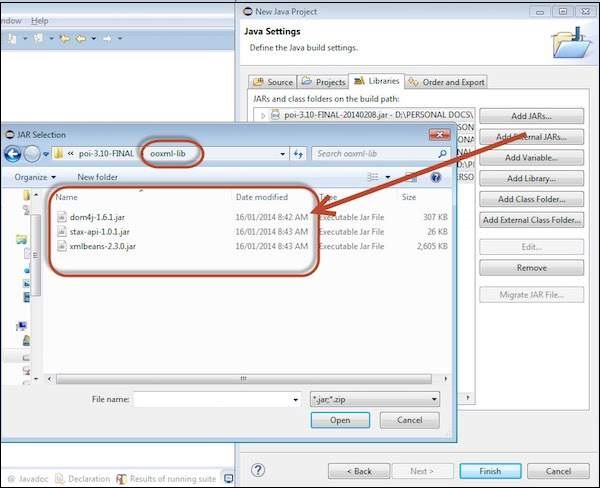
步骤 6 - 现在在“ooxml-lib”文件夹下添加所有“外部 JAR”。
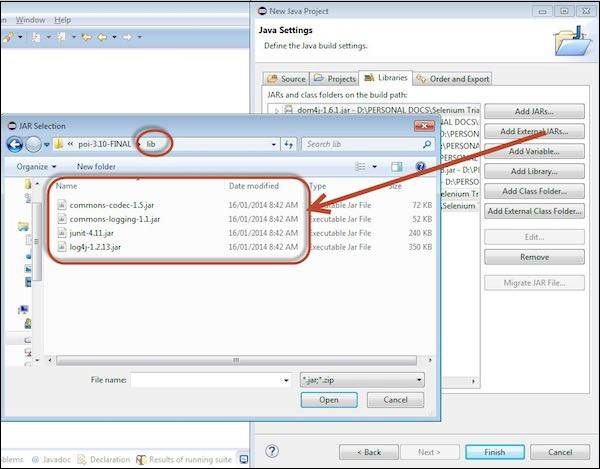
步骤 7 - 现在在“lib”文件夹下添加所有“外部 JAR”。
步骤 8 - 添加的 JAR 如下所示。
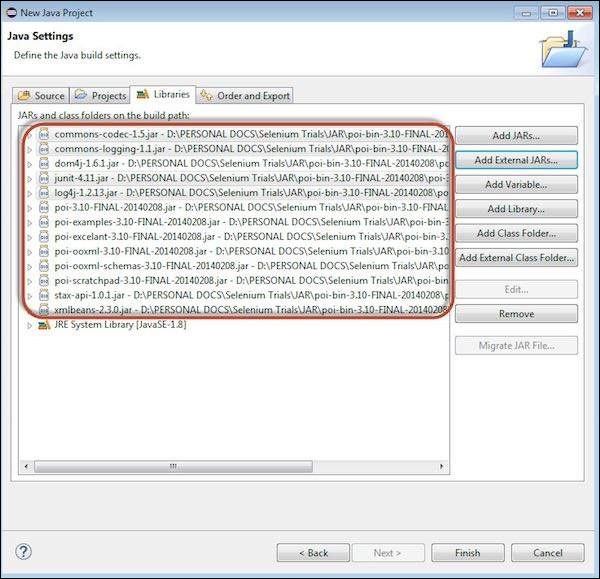
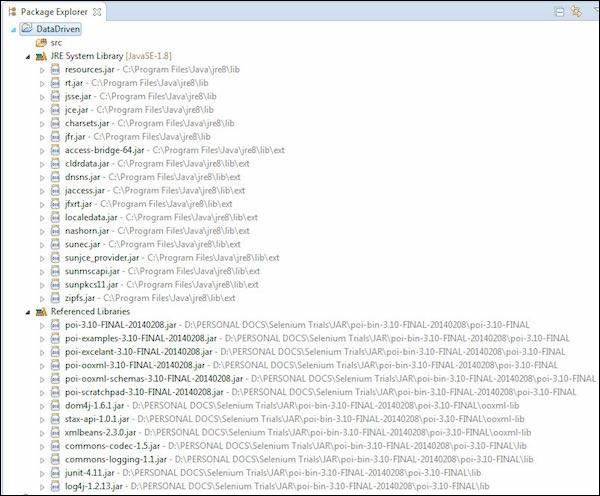
步骤 9 - 包资源管理器如下所示。除此之外,还要添加与“WebDriver”相关的 JAR。
参数化
为了演示,我们将对百分比计算器测试进行参数化。
步骤 1 - 我们将使用 Excel 参数化百分比计算器所需的所有输入。设计的 Excel 如下所示。
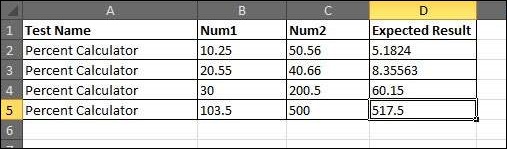
步骤 2 - 为所有指定的参数执行所有百分比计算器功能。
步骤 3 - 让我们创建通用方法以使用导入的 JAR 访问 Excel 文件。这些方法可以帮助我们获取特定单元格数据或设置特定单元格数据等。
import java.io.*;
import org.apache.poi.xssf.usermodel.*;

public class ExcelUtils {
   private XSSFSheet ExcelWSheet;
   private XSSFWorkbook ExcelWBook;

   //Constructor to connect to the Excel with sheetname and Path
   public Excelutils(String Path, String SheetName) throws Exception {

      try {
         // Open the Excel file
         FileInputStream ExcelFile = new FileInputStream(Path);

         // Access the required test data sheet
         ExcelWBook = new XSSFWorkbook(ExcelFile);
         ExcelWSheet = ExcelWBook.getSheet(SheetName);
      } catch (Exception e) {
         throw (e);
      }
   }

   //This method is to set the rowcount of the excel.
   public int excel_get_rows() throws Exception {

      try {
         return ExcelWSheet.getPhysicalNumberOfRows();
      } catch (Exception e) {
         throw (e);
      }
   }

   //This method to get the data and get the value as strings.
   public String getCellDataasstring(int RowNum, int ColNum) throws Exception {

      try {
         String CellData =
            ExcelWSheet.getRow(RowNum).getCell(ColNum).getStringCellValue();
         System.out.println("The value of CellData " + CellData);
         return CellData;
      } catch (Exception e) {
         return "Errors in Getting Cell Data";
      }
   }

   //This method to get the data and get the value as number.
   public double getCellDataasnumber(int RowNum, int ColNum) throws Exception {

      try {
         double CellData =
            ExcelWSheet.getRow(RowNum).getCell(ColNum).getNumericCellValue();
         System.out.println("The value of CellData " + CellData);
         return CellData;
      } catch (Exception e) {
         return 000.00;
      }
   }
}
步骤 4 - 现在添加一个主方法,该方法将访问我们开发的 Excel 方法。
public class xldemo {

   public static void main(String[] args) throws Exception {
      ExcelUtils  dd = new ExcelUtils ("C:\\Book1.xlsx","Sheet1");
      System.out.println("The Row count is " + dd.excel_get_rows());

      dd.getCellDataasnumber(1, 1);
      dd.getCellDataasnumber(1, 2);
      dd.getCellDataasnumber(1, 3);
      dd.getCellDataasnumber(2, 1);
      dd.getCellDataasnumber(2, 2);
      dd.getCellDataasnumber(2, 3);
      dd.getCellDataasnumber(3, 1);
      dd.getCellDataasnumber(3, 2);
      dd.getCellDataasnumber(3, 3);
   }

}
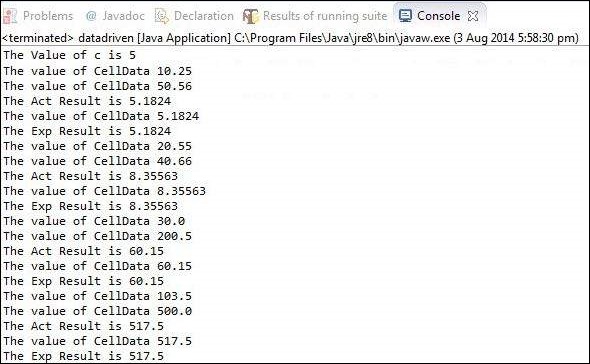
输出
执行脚本后,输出将如下所示显示在控制台中。
selenium_test_design_techniques.htm
广告